background image

Four  post  parking  lift                                                                                       Happ25  4  post  hoist


30 


Wiring of single phase power to motor control unit


10   Power   unit   –   pump   assembly       


Pump assembly 

 
Controls for operating the lift are: 
Connect the power first and push the green button the power unit for up, and press unloading handle 
on the power unit to lower the lift. 
The small allen key in the center of one side of the unit is used to adjust the lowering speed. The other 
flat head adjuster under the plastic cover on other side adjusts the pressure side of the control valve. 


The pump unit is fitted to multiple models; the outlet hose can be 
installed on either side of the control block by swapping the pipe 
joint for the plug screw on the other side. Confirm fittings are tight 
prior to operation


Summary of Contents for Happ25

Page 1: ...Four post lift Happ25 4 post hoist Happ25 four post parking lift INSTRUCTION MANUAL...

Page 2: ...delivery vehicle 14 Unpack all loose fitting items 15 Remove runways 15 Construct and attach end frames 16 Connect the cables 17 Install the pump assembly 18 Securing with anchor bolts 19 Initial Tes...

Page 3: ...eptable to remove this strap or modify it ensure the plate clears Raincoat studs There are some mushroom shaped studs on the edge of the runway we have never supplied the raincoat that is available to...

Page 4: ...r operate if it malfunctions or if it has broken or damaged parts Repairs should be made with original equipment parts 1 1 Cautions with words Pay special attention to the parts connected with product...

Page 5: ...nage carefully understand and remember them Routine maintenance and inspection is necessary for safe lift operation Read operating and instruction manuals before operating lift Remain clear of lift wh...

Page 6: ...nnel Do not operate damaged lift Do not exceed lifting capacity Avoid excessive rocking of vehicle while on lift 1 3 Usage Purpose The lift is used for parking cars whose weight is less than 4000kg Ro...

Page 7: ...debris Before lowering lift be sure tool trays stands etc are removed from under your vehicle Release locking devices before attempting to lower lift l Adequate ventilation should be provided when wo...

Page 8: ...THE LIFT MANUFACTURER S MANUAL Improper installation can cause accelerated wear resulting in catastrophic failure such as property damage and body injury Manufacturer will assume no liability for los...

Page 9: ...f a fault or defect we must supply pictures and text You must send pictures and details to us to receive warranty components Parts are sent to HAPP for verification of fault and subsequent exchange re...

Page 10: ...rocedures Ensure any maintenance and repairs have been completed and signed off Equipment Check All fittings for tightness Anchor bolts are tight Foundations are visibly sound Safety release mechanism...

Page 11: ...ed on all columns Maintenance Follow the HAPP user guides for regular planned maintenance Ensure checks by competent persons are performed at regular intervals or in the event of any accidental damage...

Page 12: ...Main Parts of the Lift The four post parking lift is the more convenient lift for parking the vehicle The following words will help you understand the working principle of the device before using Plea...

Page 13: ...estionable slope consider a survey of the site and the possibility of pouring a new level concrete slab This lift is designed to be installed on a minimum of 180mm thick 3500psi steel reinforced concr...

Page 14: ...on with pictures is provided in section 11 The first few sections are similar so don t give up review all of the sections It is recommended you read both sections which will give you two descriptions...

Page 15: ...the hose directly from the pump to the cylinder without going through the hole in the runway and fit it after you have raised the runway and located it on the safety latch Figure hose fitting which ma...

Page 16: ...he entry end and two smaller plates that are used at the entrance end as shown below Ensure that the head of the bolt is on the inside of the cross beam where the cables run Failure to do so may cause...

Page 17: ...n extended and should now be able to be routed through the pulleys and up into the cap assembly External lock The cable routes up to the top plate on the column You will put a washer then two nuts on...

Page 18: ...wires for an optional limit switch Refer to electrical system section for details these connections are to be made by a licensed electrician to a 15Amp circuit Remove the generic fitting and replace w...

Page 19: ...ust the column vertical positioning with shims under the base plate These location of the columns needs to be verified before drilling holes the column vertical alignment can be performed after this s...

Page 20: ...and double check safety mechanism is functional Make sure you have even lifting on all four cables small differences in adjustment may cause the plate connecting cables to cylinder rod to not be hori...

Page 21: ...se Test the latch operation by lifting and checking all latches release and engage at the same time If they are not engaging the cause will likely be either the lifting cable adjustment or the latch a...

Page 22: ...power unit to lower the lift Watch the runways at each end in case any of the latches have not disengaged likely due to incorrect adjustment of cables or latches Lifting higher may correct the proble...

Page 23: ...g handling transport and unpacking operations 90 of components were pre assembled and packed with blister packing in steel frame for shipment Power unit was packed together with the lift and power uni...

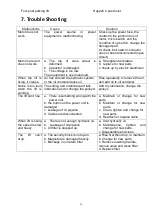
Page 24: ...to oil container Noise is too loud when the lift is working The sliding and rotational part lack lubrication and or change the pulleysl Add dry lubrication change the pulleys The lift can t rise a The...

Page 25: ...t Happ25 4 post hoist 25 8 Hydraulic diagram Item Name Item Name Item Name 1 cylinder 4 Overflow valve 7 Gear pump 2 One way overflow valve 5 Unloading valve 8 Adjustable throttling valve 3 One way va...

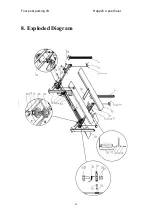
Page 26: ...Four post parking lift Happ25 4 post hoist 26 8 Exploded Diagram...

Page 27: ...al system The figure below illustrates the electrical connections for the control unit on the electric motor Figure Electrical schematic for HAPP motors Some HAPP motors are supplied with an additiona...

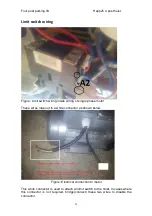
Page 28: ...ide wiring of single phase motor These wires map out to a white connector as shown below Figure Electrical connection to motor This white connector is used to attach an limit switch to the hoist In ca...

Page 29: ...The limit switch connector should be connected and either shielded with extra insulation double insulated or moved back inside the control box If the limit switch is operational a 4Amp fusible link mu...

Page 30: ...dle on the power unit to lower the lift The small allen key in the center of one side of the unit is used to adjust the lowering speed The other flat head adjuster under the plastic cover on other sid...

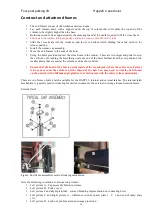
Page 31: ...ge to protect items should they fall out Unpack all loose fitting items The hoist is packed with the runways and end frames forming the package frame Carefully remove the items within the package bein...

Page 32: ...Cylinder preparation The cylinder as supplied is in the fully raised position ram tube inside the cylinder When you assemble and attach the steel cable you will need to extend the ram tube to provide...

Page 33: ...lumns then install the locking ladder The locking ladder will slot into the crossbeam nylon sliders as shown below The nylon slider will be inside the column at the base of the column at this stage Th...

Page 34: ...configure the safety release mechanism The two ends of the rod are threaded together with the threaded rod and lock nut as shown in the diagram below 7 Place the two runways onto the end frames Typic...

Page 35: ...lates are placed at the opposite end to entry location on the hoist The half size plates are placed on the entrance end of the hoist allowing runways to be fitted and overrun plate to be added when in...

Page 36: ...ct location The columns are placed in the desired location Measure the gap between the columns to confirm the spacing is correct This measurement is a guide to locating the column the columns must be...

Page 37: ...25 has extra bracing under the runway which makes this step harder than usual You will have installed some of rods earlier in readiness for this step Install the rods into the runway as shown connect...

Page 38: ...tight cables are routed correctly locks are operational and hydraulic lines are connected 11 Fill the pump assembly oil reservoir with oil the hoist should be filled with 10Litres of ISO 46 grade hydr...

Page 39: ...ift Happ25 4 post hoist 39 12 Have an electrician connect the pump motor to a 15AMP circuit of or power outlet as described in this manual 13 Install drip trays and parts tray 14 The hoist is now read...

Page 40: ...extra adjustment 5 With the runways lifting evenly the lock engagement can be adjusted After the latchs pass the latch point you will hear the four clicks lower the hoist slowly and see that all latc...

Page 41: ...replaced after the vehicle is safely on the hoist Moveable hoist configuration If the dolly wheel option has been purchased these units can be installed at any time by assembling the caster wheel to...

Page 42: ...dures for any equipment are the responsibility of the owner of the hoist Lift installation and operating conditions can significantly impact the effective operating capability of any hoist It is the o...

Reviews: