background image

Self Scan 


HandyTrac EASY GUIDE 

Installation and Operation


888-458-9994 


www.handytrac.com


[email protected]


INSTALLATION 


Parts Included………………………………………...2 
What You Need………………………………………3 

Mounting Cabinet/Door Alignment…………………4 
Mounting Control Box/Key Panels….…………..…..5 


PREPARING FOR SET UP 


       Establishing Communications ……………………..6 

       Scanning Your Tags …..……………………...…....6 

Moving Keys Into System…………………………7 


OPERATION 


HandyTrac.com….…………………………….…..8-9     

Accessing the System..………………..………….…10 
Pulling a Key..………….………………………..….10 

Returning a Key…………………………….…….....11 

Review Key Out..……………………….….…….….11 

Show Last Transaction……………………………...11 

Edit Key Tag……….………………………………..12 

Change APT/UNIT#.......………...…………………..13 

Activity Codes…..………………………………….14 


Dallas 

16990 North Dallas Parkway 
Suite 206 
Dallas, TX  75248 
Phone:  972.380.9878 
Fax:  972.380.9978 


Atlanta 

510 Staghorn Court 

Alpharetta, GA  30004 

Phone:  678.990.2305 

Fax:  678.990.2311 

Toll Free:  800.665.9994 


Summary of Contents for Key Control

Page 1: ...hing Communications 6 Scanning Your Tags 6 Moving Keys Into System 7 OPERATION HandyTrac com 8 9 Accessing the System 10 Pulling a Key 10 Returning a Key 11 Review Key Out 11 Show Last Transaction 11...

Page 2: ...ything you ll need to set up the system If you have any questions regarding this process please contact a HandyTrac technician at 888 458 9994 or email service handytrac com Here is what this kit incl...

Page 3: ...attery power 2 Mounting Fasteners capable of holding 50 lbs for masonry dry wall wood or metal studs Tools Needed 1 Drill Drill Bits 2 Level 3 Flat Head Screwdrivers 4 Phillips Head Screwdrivers 5 Pli...

Page 4: ...holes 6 When all holes are marked use screws that penetrate at least 2 inches into stud and wall anchors that are capable of holding at least 50 lbs Follow the manufacturer s directions for wall anch...

Page 5: ...net Snap the cable into the retaining clips on the inside of the cabinet to prevent contact with the Key Panels during operation Don t forget about your UPS Uninterruptable Power Supply Warranty will...

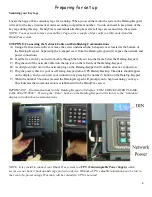
Page 6: ...C Plug the end of the network cable into the top jack on the left side of the Datalog Keypad D A solid green light next to the network plug on the Datalog Keypad will confirm an active connection E Pl...

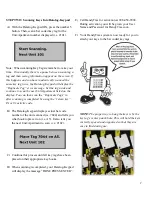
Page 7: ...completed by using the return key IN or 01 activity code B The Datalog Keypad displays actual bar code number of the unit scanned i e 7044 and tells you what hook to place it on i e A5 It also tells y...

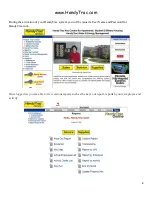
Page 8: ...ing the activation of your HandyTrac system you will be issued a User Name and Password for HandyTrac com Once logged in you are able to view various reports such as the keys out report reports by uni...

Page 9: ...s back in Master Full administrative rights to the HandyTrac system F Place a checkmark in the Active box to activate this employee G Click on Add Update Employee H Press the blue enter button on the...

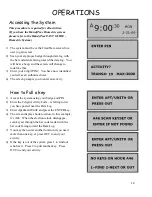
Page 10: ...as an authorized user 4 The screen prompts you to enter an activity How to Pull a key 1 Access the system using your badge and PIN 2 Enter the 2 digit Activity Code referring to list you have posted n...

Page 11: ...Review Keys Out 1 Access the system using your badge and pin 2 Enter Activity Code 06 Audit Keys Out 3 The screen will display a list of all of the keys out one at a time It will give the unit person...

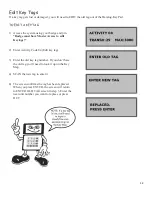
Page 12: ...e Master Access to edit Keytags 2 Enter Activity Code 04 Edit key tag 3 Enter the old key tag number If you don t have the old tag you ll need to look it up on the Key Map 4 SCAN the new tag to enter...

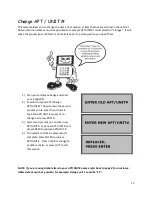
Page 13: ...ctivity Code 02 Change APT UNIT The system will beep and prompt you to enter the old unit Type the APT UNIT you want to change and press ENTER 3 System will prompt you to enter new APT UNIT Type new A...

Page 14: ...VAC Fan 55 HVAC Thermostat 56 HVAC Filter 57 HVAC No Heat 58 Vendor 1 59 Vendor 2 60 Vendor 3 61 Appliances 62 Refrigerator 63 Stove 64 Oven 65 Dishwasher 66 Vent Hood 67 Microwave 68 Trash Compactor...

Reviews: