background image

English 

_71

to set troubleshooting

1. 

Set one recorder to <

Standby

> mode and the other recorder to <

normal

> mode.

2. 

In the recorder set to <

normal

> mode, enter the viewer port IP and administrator password of the <

Standby

recorder you want to connect to and click <

connection

> under the status display.

3. 

Check the IP and status of the connected <

normal

> recorder in the <

Standby

> recorder.

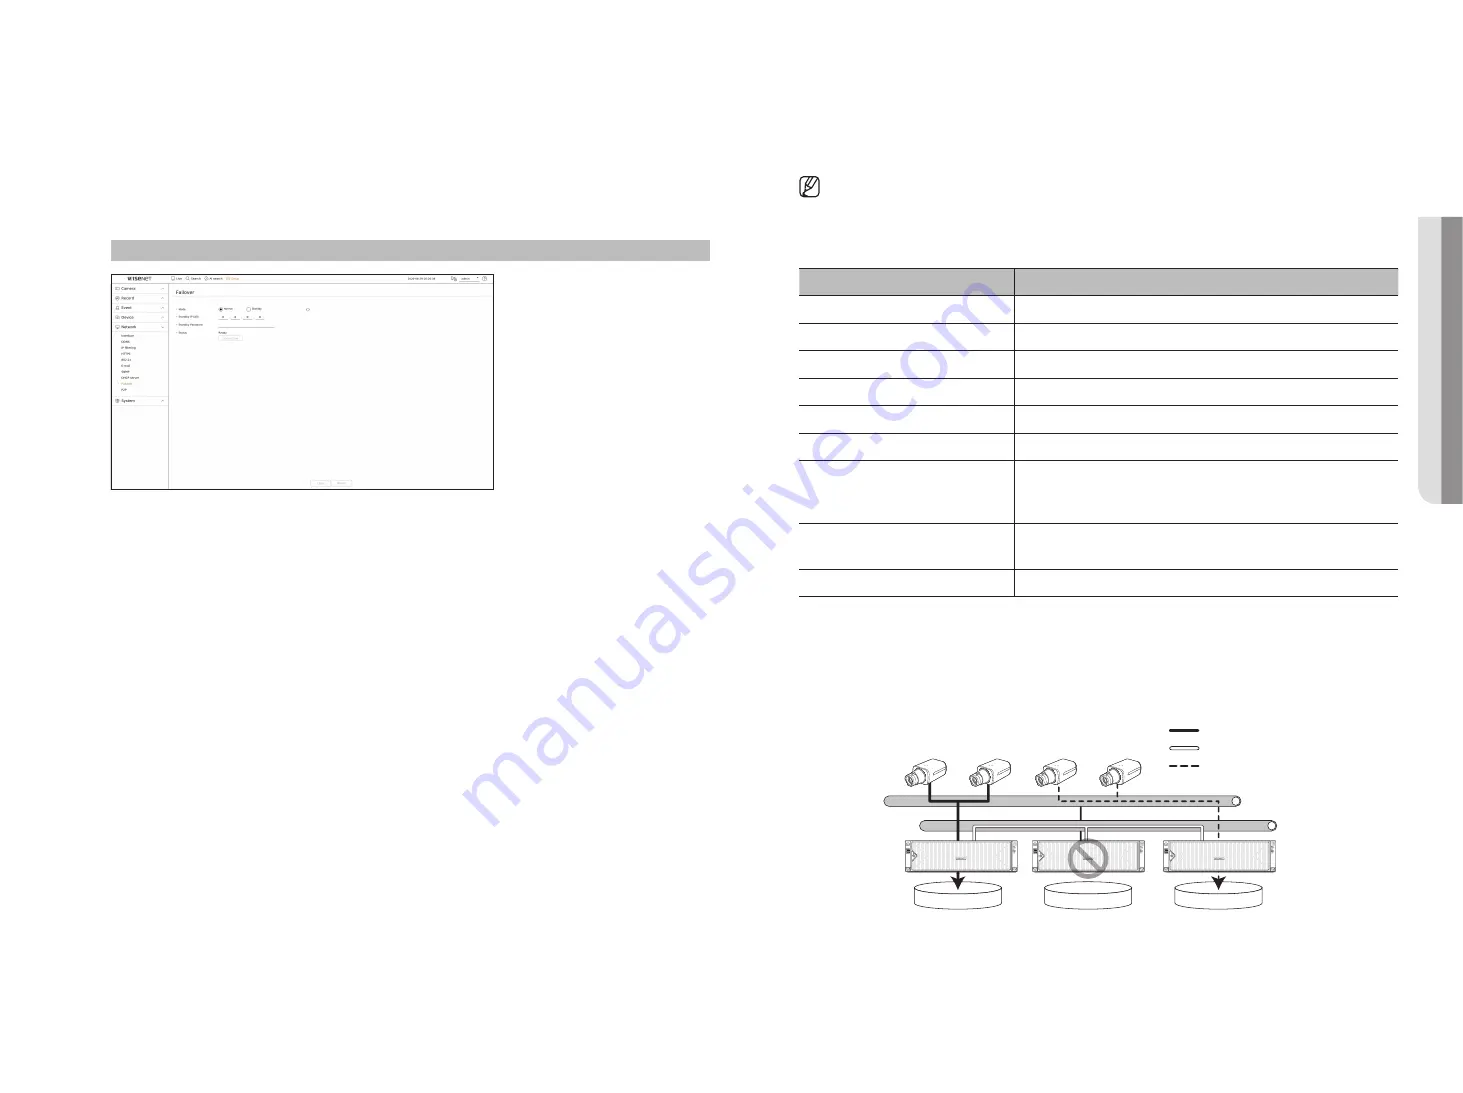
Setup > network > failover

•  Mode : Select either <

normal

> or <

Standby

> mode.

-  Normal : Recorder being recorded. Monitored by the <

Standby

> recorder.

-  Standby : Recorder being prepared without recording. It will record instead of the <

normal

> recorder if a 

problem occurs.

in the case of normal mode

•  Standby IP (All) : Enter the viewer port ID of a standby device to access.
•  Standby Password : Enter the administrator password of the standby device.
•  Status : Displays the current connection status.
•  Connection / Disconnection : Click the button to access or disconnect the access.

in the case of standby mode

•  Device List/Status : Shows the status of the general recorder currently connected to the standby recorder. To 

delete the general recorder connected, click <

delete

> on the right side of the recorder.


`

The standby recorder can only enable some functions in the <

System

>, <

Device

>, and <

Network

> menus. You can't use the 

<

Record

> and <

Event

> menus.


`

In the standby recorder, the previous operation will stop when a failover is performed during the playback or section export, and 

the screen will move to the live screen.

State name

description

Ready

Ready to be connected

Connected

General equipment and standby equipment connected (failover available)

Failover

Troubleshooting is being performed

Connected fail

Connection was attempted but failed

Authentication failure

Auth failed by entering an incorrect standby password when attempting to connect

Connected(Match Time Required)

Connected without time synchronization with the standby recorder

Connected(check camera port IP)

Even if the camera port of a general recorder is connected to the viewer port of the 

standby recorder or connected to the same viewer port, the IP port of the camera port 

is not matching.

Connected fail(check camera port IP)

The connection from the general recorder's camera port to the standby recorder's 

camera port failed.

Connected fail (It is a different model.)

Failed connection by connecting devices of different models.

example) xrn-6410db4

-  Subnet 1 

;

 Network 1 (Camera)

-  Subnet 2 

;

 Network 2 (Viewer)

-  Subnet 3 

;

 Network 3 (iSCSI)

Subnet 1

normal

normal

Standby

Subnet 2

recording Stream
failover Monitoring
fake recording Stream

●  

SetuP

Summary of Contents for Wisenet XRN-6410DB4

Page 1: ...NETWORK VIDEO RECORDER User Manual Wisenet NVR...

Page 2: ...provided Use of this document and the subsequent results shall be entirely on the user s own responsibility Hanwha Techwin reserves the right to change the contents of this document without prior noti...

Page 3: ...ch for text data from the POS device connected to Wisenet Recorder Monitor real time events that occur in Wisenet Recorder sensors and cameras or search through logs Before using this product check if...

Page 4: ...part or the body seek immediate medical attention ATTENTION IL Y A RISQUE D EXPLOSION SI LA BATTERIE EST REMPLAC E PAR UNE BATTERIE DE TYPE INCORRECT METTRE AU REBUT LES BATTERIES USAG ES CONFORM MEN...

Page 5: ...p the Live Layout 22 Check Layout List 22 Add Layout and Set Name 23 Change of Layout Channel and Name 23 Delete Layout 23 Play Layout Sequence getting started 9 live 13 32 Screen Layout of the Search...

Page 6: ...ption 52 Setting the Event 52 Event setup 54 Event Rule Setup 55 Alarm Input 55 ONVIF 56 Schedule setup 42 56 Setting the Device 56 Storage Device 60 Distributed Recording 61 S M A R T 61 Monitor 63 T...

Page 7: ...ve Screen Menu 88 Camera Video Control 88 Capture 88 PC Recording 88 Instant Viewer 88 Microphone Output 88 PTZ Mode 89 Performing Digital Zoom 89 Audio Out 89 Video Rotation 89 Channel Aspect Ratio 8...

Page 8: ...Camera Setup 100 Profile Setup 101 Camera Password 101 Setting the Recording 101 Recording Schedule 101 Record Setup 102 Record Option 102 Setting the Event 102 Event Setup 103 Event Rule Setup 103 Al...

Page 9: ...accessed at factory reset If you do not want to proceed click exit It will automatically change to the optimal monitor resolution and run the install wizard If the install wizard does not run remove...

Page 10: ...wer Can be used as a port transmitting video to the web viewer If you access the network information on your browser then you can remotely monitor video in your web viewer Network 3 iSCSI Can be used...

Page 11: ...click change iP After completing camera register click next After entering the ID and password set in the camera the connection test must be completed to successfully register 7 On the channel setup...

Page 12: ...Contents Login To use the Recorder menu you are required to login as a user that is authorized to access the applicable menu 1 Select Login at the top right of the screen 2 The Login dialog appears 3...

Page 13: ...ected channel in the designated path in a recorder or SEC format Clears the alarm in the event list and stops the alarm at the notification display of the system status Activates the manual recording...

Page 14: ...U It disappears when you modify the Delete Camera or Set Camera to reduce the data rate Displayed if the server has firmware to update It is displayed when the system is overloaded Limit the number of...

Page 15: ...reen menu appears differently depending on the recorder operation status or the type of the registered camera Each function may be restricted depending on the type of camera and the user s authority F...

Page 16: ...n the live screen but only the OSD will be displayed Item Description c Event Display Events from the recorder and camera are displayed in icons For details refer to the Setup Setting the Event Event...

Page 17: ...CH3 Single mode Horizontal 2 split screen Vertical 2 split screen Vertical 3 split screen CH1 CH2 CH3 CH4 CH2 CH1 CH3 CH4 CH5 CH6 CH2 CH3 CH1 CH4 CH5 CH6 CH7 CH8 CH1 CH2 CH3 CH4 CH5 CH6 CH7 CH8 CH9 4...

Page 18: ...CH33 CH34 CH35 CH36 CH31 CH32 CH1 CH2 CH3 CH4 CH1 CH7 CH8 CH4 CH3 CH2 CH5 CH1 CH6 CH12 CH1 CH13 CH19 CH4 CH7 CH5 CH10 CH8 CH11 CH6 CH2 CH3 CH4 CH5 CH2 CH6 CH1 CH3 CH7 CH8 CH9 CH1 CH2 CH3 CH4 CH5 CH6 C...

Page 19: ...monitored 800x448 H 264 S I D 25 24 9 24 9 XNV 6081Z S 800x448 Displays the resolution of the video H 264 Displays the video codec S I D 25 24 9 24 9 Displays the frame rate FPS of the video S Setting...

Page 20: ...figured to each channel Record Type View the record type according to general or event recording Frame rate fps Show the input record frames per second for each channel Bitrate bps Limit Input Record...

Page 21: ...CH1 CH13 CH19 CH4 CH7 CH5 CH10 CH8 CH11 CH6 CH2 CH3 CH4 CH5 CH2 CH6 CH1 CH3 CH7 CH8 CH9 CH1 CH2 CH3 CH4 CH5 CH6 CH7 CH8 CH9 CH10 CH11 CH12 CH13 CH14 CH15 CH16 CH1 CH4 CH5 CH2 CH6 CH1 CH3 CH7 CH8 CH9...

Page 22: ...room 2 Directors lounge 1 Corridor camera on the 7th floor check layout list Click list at the top left of the live screen and then click to display the layout list Create a new layout Change the chan...

Page 23: ...lly switch the layout list to a set time interval to view Sequence Setting Click at the bottom of the layout list to set the sequence Sequence switching time Set the switching time of the layout list...

Page 24: ...ime and post event time are set event recording is performed before or after the event according to the set recording method For more information about event recording settings refer to the Setup Sett...

Page 25: ...p the alarm output if necessary For details refer to the Setup Setting the Event Event rule setup page in the Table of Contents Camera Video Control By using the function icon of the video window you...

Page 26: ...ol mode Depending on the camera the PTZ control function and speed may be different The PTZ mode is closed Captures video of the current state After clicking the digital zoom icon you can use the butt...

Page 27: ...gs as appropriate The sound icon can be displayed if the sound signal fails to output from noise Only the channel where Audio is set to On in Setup Camera Channel Setup displays the audio icon in Live...

Page 28: ...ting the desired channel click on the live screen menu This is available only if a PTZ camera is connected and the icon is displayed on the screen Even if the connected network camera does not support...

Page 29: ...Some cameras may differ in the menu title and operation with regard to Swing Group Tour and Trace Even if your network camera supports the function you can use it only if the button is activated in th...

Page 30: ...recorded End You can set the end time for the export to the desired time Click end to set the export end time to the last time the video was recorded Overlapped Data Shows a list of overlapping data o...

Page 31: ...ort is in which is a progress You can switch to the menu screen during export progress but data playback will not be possible Data can be played in the web viewer during export progress but audio will...

Page 32: ...ges you can click to go to the previous next page Or you can click the current page number and enter the desired page to move Time Search You can search the recorded data by the desired date and time...

Page 33: ...ies a bookmark to the recorded video 7 If you double click an item to play in the search list the recorded video will be played Text Search You can search the data input to the POS device connected to...

Page 34: ...recorded video will be played ARB Search You can search auto recovery backup data stored on ARB storage devices 1 Select ARB search in the Search menu For more information about ARB search refer to th...

Page 35: ...n the Table of Contents 1 Click on the video window menu 2 Set the smart search area in the video window Virtual line Detects the passing of an object based on the virtual line and direction set on th...

Page 36: ...orded data you can search for a person by any condition you want such as gender top bottom color 1 Select Person search in the AI search menu 2 Select a channel to search If you select a channel to se...

Page 37: ...ed video 7 If you double click an item to play in the search list the recorded video will be played Vehicle Search You can search the vehicle by setting the vehicle type and color conditions from the...

Page 38: ...the channel in the channel list 3 Select a date and time to search 4 Select the overlapped data It will be displayed when there is overlapped data in one channel by changing the time or time zone at...

Page 39: ...me zone change at the selected time c Export You can export the video of the channel you are playing d Event filter You can filter the event items to see the time line e Channel The channel and camera...

Page 40: ...he time line of multiple channels You can click to display 1 to 4 channels in the time line The time line will be displayed as many channels as selected Click to move to the previous or next channel P...

Page 41: ...rt in your own file format that can be played directly on your PC You can play with the viewer included in the export folder Click Setup to set a password for the exported video If you check Text data...

Page 42: ...otocol Show the protocol information of a registered network camera Video ON OFF You can turn ON OFF the selected channel s camera If the camera video is turned off a blank screen is displayed Covert1...

Page 43: ...etup Camera Camera password If the camera s ID and password have already been set the registered information matches the ID and password set in the Setup Camera Camera password up to 3 sets Wisenet ca...

Page 44: ...e reason for the failure will be displayed Connection failed due to unknown error This message appears if the camera has failed to be registered due to unknown connection status Due to the camera acco...

Page 45: ...er the file may not be scanned The system may reboot if USB is disconnected from the device during an upgrade via USB Video data of the channel connected to the camera to upgrade may not be recorded D...

Page 46: ...Defog levels can be set focus You can adjust the focus of you camera s video You can set focus zoom in simple focus and focus reset flip You can set flip mirror modes and hallway view Privacy You can...

Page 47: ...is performed with the profile set for recording Profile You can set the camera profile Codec Show the codec of the selected profile Resolution Show the resolution of the selected profile Frame rate Sh...

Page 48: ...n and frame rates can be changed in the setup menu of the camera web viewer For camera web viewer refer to the Setup Viewer Setting the Camera Camera Setup page in the Table of Contents Click Camera w...

Page 49: ...there is no motion in the video Minimum GOV value can be set on the camera web page Range The range of the input value of length is displayed Any profile not supported with the dynamic GOV FPS settin...

Page 50: ...ing event recording and other recording related settings recording Schedule If you set a recording schedule for a specific date and time the recording will start at that specific time Setup record rec...

Page 51: ...data is not being transferred from the camera and that the recording is being performed temporarily using another profile on the camera Check the channel information to see the applied profile to the...

Page 52: ...are clearly distinguishable and a higher sensitivity for an environment where the background and an object are not clearly distinguishable Object size You can set the size of the object to recognize...

Page 53: ...e or if an object which exists inside the area disappears an event is created You can set the minimum observation time for each area which is needed to trigger an event after motion detection Loiterin...

Page 54: ...r On Off Alarm in camera alarm in NVR Manual recording Event action Displays the event action set in the event rule Item Description PTZ preset setting Alarm output and beep setting E mail recipient s...

Page 55: ...will run only when all set event triggers occur If only one of the multiple events set has occurred the event action will not run Set the event action only when necessary 3 Click OK at the bottom of...

Page 56: ...storage device If the state of use is in Not Defined format the HDD before use Status Displays the current working condition of a storage device Temperature You can check the temperature of the HDD mo...

Page 57: ...le channels If you select All all channels will be selected ARB bandwidth Select a bandwidth for the ARB function The ARB feature is available only when your video is saved in the SD card after regist...

Page 58: ...function is supported If you activate the LUN mapping function in the iSCSI device the LUN can only be connected to a Recorder which is mapped More than one mapped lun should be available to connect t...

Page 59: ...n the maximum number of HDDs allowed in the RAID level are malfunctioning if an additional HDD malfunctions you cannot use or restore the RAID Immediately replace the HDD and proceed with restoration...

Page 60: ...an HDD of the same capacity from the same manufacturer A HDD used to build the RAID should be one of the recommended models If it s not possible to use the same model of HDD then use the HDD with the...

Page 61: ...ode for video display Clone mode You can set the video display resolution of the primary monitor HDMI 1 and secondary monitor HDMI 2 to be the same If you set a resolution exceeding 1920 x 1080 while...

Page 62: ...the extended monitor 2 Select split mode in the layout mode 3 Select as many channels on the channel table as the number of channels selected in layout mode and you can view the applicable screens on...

Page 63: ...in the text device list 2 Enter the device information to register in the text device window Device name Enter the desired text device name Use of a device Specify whether to enable text device CH Sel...

Page 64: ...work connection route and protocol Setting a network connection Sets the protocol and environment of the network Setup network interface network Network Each product supports a different number of net...

Page 65: ...n the local PC that is connected to the Broadband Router and enter the router s address ex http 192 168 1 1 2 At this stage make the local PC s windows network configurations to the below example exam...

Page 66: ...ity com DDNS is a short form of Dynamic Domain Naming System DNS Domain Name System is a service that routes a domain name consisting of user friendly characters ex www google com to an IP address con...

Page 67: ...the screen 3 When the additional window is displayed set the details IP filtering Select whether to enable IP filtering IP address Enter the address to enable IP filtering When entering an IP address...

Page 68: ...t private key For successful implementation of the 802 1x operating environment the administrator must use the RADIUS server In addition the switch hub connected to the server must be a device that su...

Page 69: ...group and enter names and email addresses If a group is created you can add a recipient SnMP The SNMP protocol allows system or network administrators to remotely monitor and configure the network de...

Page 70: ...The recorder you want to configure for failover needs to be connected to both the camera and viewer ports to the local network Failover configurations can only be set with recorders of the same model...

Page 71: ...n only enable some functions in the System Device and Network menus You can t use the Record and Event menus In the standby recorder the previous operation will stop when a failover is performed durin...

Page 72: ...heck and setup the current Date Time and time related properties as well as the language used for the interface on the screen Setup System date time language Date Sets the date and its format that wil...

Page 73: ...s adding or deleting users and granting different authorities for each user Setting the Administrator You can set and change Administrator s ID and password The administrator can use and set all menu...

Page 74: ...n select and set the setting menu that can be accessed A group user can only access the menu selected If you select the menu the menu permission setting screen will be displayed Record Record stop PTZ...

Page 75: ...utomatically logged out if there is no operation on Recorder for over set period of time Manual Input of ID In the login window select whether to enter ID On Enter your ID manually each time you log i...

Page 76: ...are version 1 Connect a device storing the software to be updated It may take about 10 seconds to recognize the device Upgradeable devices include USB memory and network device If you want to upgrade...

Page 77: ...arm output used when the power is off check box and click Apply to clear all alarms set for alarm output 1 and then selecting alarm 1 with another alarm out will not be possible This function is provi...

Page 78: ...mat by selecting the type Select the desired type and click Apply First page Last page Move to the first last page when there are many search results Export Save all the logged information recorded in...

Page 79: ...address or URL of Recorder into the URL address box 2 A user with the admin permissions should provide the admin ID and password A registered user should provide the user ID and password 3 After you l...

Page 80: ...d click Next When the password is in factory reset it can be changed and managed in a batch Up to 3 sets of camera ID with password and password can be registered You cannot change the password for ca...

Page 81: ...the camera connected to the recorder p The ID of the connected user is displayed You are directly connected to the Hanwha Techwin homepage www hanwha security com Changes the color theme of Web Viewer...

Page 82: ...hen the amount of input data by channel exceeds the set amount of data limit Displayed when the hard disk is full during recording and the recording capacity is insufficient Displayed when the hard di...

Page 83: ...Record Status Click the button followed by the Record tab You can check the profile recording type input recording rate and setting input recorded data rate by channel Use Current Max to check the cu...

Page 84: ...es to the actual proportion of the video If you want to go back to the previous screen ratio click again Full Screen Mode You can change to full screen mode which has no top bottom left right areas of...

Page 85: ...e layout list Add Layout and Set Name 1 Click the button 2 Set the name of the layout 3 Double click a channel to display on the layout screen from the device list 4 Click to save the set layout The d...

Page 86: ...ents in the event list Common event Searches for event types that have occurred in general cameras such as motion detection and IVA AI event Searches for AI event types such as face person and vehicle...

Page 87: ...nel on the split mode roll the mouse cursor over the screen to see the live screen menu The live screen menu appears differently depending on the recorder operation status or the type of the registere...

Page 88: ...e live screen Select the desired channel and click PTZ Mode You can run PTZ control of the selected channel Select the desired channel and click Enters the PTZ control mode Depending on the camera the...

Page 89: ...Video Rotation You can rotate the live video screen Select the desired channel and click Each click of the button will rotate the video 90 degrees clockwise Channel Aspect Ratio You can change the as...

Page 90: ...at saves your preset settings with a different one you must configure the preset settings again To delete a registered preset 1 Click 2 Select the preset to delete and click Delete The selected preset...

Page 91: ...actual proportions Name Description e Turns on off the section setup f Saves the video of the selected channel in the designated path in AVI format g Calendar The date of the recorded video is display...

Page 92: ...recording data Light green Normal recording video Red Event video You can filter the event items to view the time line Overlapped You may check the timeline by setting the overlapping section caused b...

Page 93: ...ted recording However when the automatic deletion is set it will be deleted according to the set period When the bookmark is released the video will not be saved If necessary before releasing the book...

Page 94: ...esults list You can check the specified video in the bookmark search menu Person Search In the recorded data you can search for a person by any condition you want such as gender top bottom color 1 Sel...

Page 95: ...6 Click in the search list to display the instant viewer 7 Click to go to the playback screen Vehicle Search You can search the vehicle by setting the vehicle type and color conditions from the recor...

Page 96: ...name Time Displays the start time of the recorded video Play Plays the recorded video with an instant viewer Bookmark Specifies a bookmark to the recorded video 5 Click in the search list to display...

Page 97: ...m You can use the mouse wheel over the time line to zoom in or out on the time scale The time line magnification of the time line will be displayed at the top right of the time line To see the time li...

Page 98: ...xt event video f Speed Select the video playback speed Speed x1 8 x1 4 x1 2 x1 x2 x4 x8 x16 x32 x64 x128 x256 g Backward X times playback It is used for reverse playback Speed x1 8 x1 4 x1 2 x1 x2 x4...

Page 99: ...ect a desired item to set d Detailed Menu Click desired item s input field to change and enter a desired value e Ok Apply the modified settings Setting the Camera You can check a list of cameras that...

Page 100: ...are automatically set in sequence as many as the number of channels supported by Recorder If you want to change the proxy port then select the port setup menu 32 channels 10001 10032 64 channels 10001...

Page 101: ...ra password Setting the Recording For details refer to the Setup Setting the Recording page in the Table of Contents Recording Schedule If you set a recording schedule for a specific date and time the...

Page 102: ...o the Setup Setting the Event page in the Table of Contents Event Setup You can set detailed settings for each channel s event detection mode Setup Event Event setup Object detection You can change th...

Page 103: ...ou can set the event trigger and action rule to output an alarm when an event occurs Setup Event Event rule setup Alarm Input You can set the operation of the alarm sensor Setup Event Alarm input ONVI...

Page 104: ...ntents Storage Device You can check and change the settings related to the data storage device Setup Device Storage device Device Format You can check a storage device amount of use type of use and st...

Page 105: ...ck the connection status and details of the hard disk mounted in the recorder Monitor You can set the information displayed on the monitor as well as the output system Setup Device Monitor If the scre...

Page 106: ...set total amount conditions and keywords to display events of a text device Setting the Network For details refer to the Setup Setting the Network page in the Table of Contents Interface A remote user...

Page 107: ...r install public certificates Setup Network HTTPS While using HTTPS if you want to switch to HTTP then abnormal operation can take place as the browser contains the setting values You need to change t...

Page 108: ...the server that sends mails and specify if you use the authentication process Event You can set the event interval and specify which events the server sends mails for Recipient You can set groups and...

Page 109: ...server and assign an IP address to the network camera Check IP You can check the IP and MAC currently used through the DHCP server and the connected network port P2P This function is only available fo...

Page 110: ...ring the summer Daylight Saving Time DST advances clocks one hour forwards from the standard local time zone Language Select a preferred language for the Recorder Holiday A user can select specific da...

Page 111: ...orage device connected to the PC to perform an upgrade Settings Using a storage device you can apply the current configuration of Recorder to another Recorder Press the Initialization button to return...

Page 112: ...wer Event log The event log lists recorded events such as sensor events camera events or image losses Export log You can search the user who performed the export and the execution time and details tim...

Page 113: ...05 14 20 54 13 Name Description a Split screen Selects screen ratio to display The screen is changed to a split screen b Fisheye view mode IIf is pushed it is possible to change to a fisheye installa...

Page 114: ...ack screen Information such as backup date day of the week time model name and channel number will be displayed on the screen i Maintain aspect ratio Full screen Maintains the aspect ratio of the play...

Page 115: ...ble to stop the PTZ on its own This is used to change to PTZ mode from screen mode 10 It allows to exit PTZ mode in PTZ mode The Web Viewer won t be able to stop the PTZ on its own Goes back to the pr...

Page 116: ...t HDMI1 or HDMI2 Check the monitor resolution HDMI1 3840x2160 30 Hz 1080P 720P 1280x1024 HDMI2 1920x1080 1280x720 1280x1024 1024x768 Logo screen on bootup stalls in the state The HDD may have problems...

Page 117: ...ual video stream can be serviced by the camera at a lower frame rate than specified Configure your camera to use one profile for data streaming as possible For example if you set the same profile for...

Page 118: ......

Reviews: