


308
Kayenne XL Package — User Manual
Section 5 — Menu Summaries
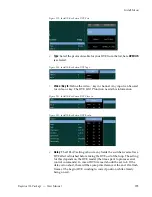
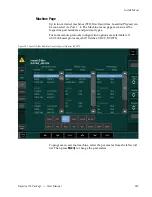
One method to determine the correct system timing phase is to select a
source on the AUX1 bus and then adjust the switcher’s phase to center the
source in the timing window. Record this phase setting. Repeat this process
for all external video sources.
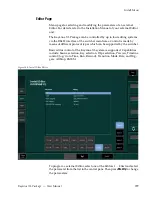
Note
Internal video sources cannot be measured and do not show up in the mea-
surement window when selected.
Find the average Phase value by adding the highest and lowest Phase
numbers together and then divide by two. Now recheck all sources with
the new average Phase number. Fine tune the
Phase
adjustment if neces-
sary.
There may be some sources that still do not fall within the legal timing
window. For these sources you will have to go back to the video source
itself and change its timing with respect to reference until it appears within
the legal timing window.
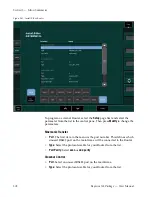
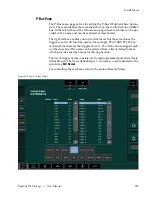
To adjust the Internal System Timing on the Kayenne XL:
1.
Observe the vertical black cursor in the timing window to see how the
source you have selected compares with the internal system timing.
2.
Now adjust the internal system timing by physically turning
Genlock
Phase
. This adjusts the switcher sync in relation to the Reference you
have selected.
3.
Turn the Genlock Phase to position the vertical black cursor as close as
possible to the middle of the green legal timing window. The vertical
black cursor must be in the green and not moving.
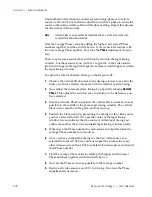
4.
Position the black cursor (representing the timing for the video source
you have selected for AUX 1) near the center of the legal timing
window. Green indicates that the source is within legal timing and
yellow means that the source is outside legal timing window limits.
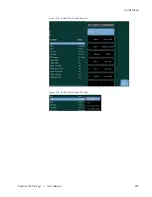
5.
Write down the Phase number for each source to help determine the
average Phase number for all sources.
6.
Once you have checked the timing for the first video source you
selected from the AUX1 bus, you must repeat the process for every
other video source on the AUX1 bus. Select all video sources and record
their Phase number.
7.
Find the average Phase value by adding the highest and the lower
Phase numbers together and then divide by two.
8.
Now set the Phase as close as possible to the average number.
9.
Recheck all video sources on AUX1 for timing. Fine tune the Phase
adjustments if necessary.
Summary of Contents for Kayenne XL Package
Page 82: ...82 Kayenne XL Package User Manual Section 2 Concepts ...
Page 264: ...264 Kayenne XL Package User Manual Section 4 Menu Overview ...
Page 275: ...Kayenne XL Package User Manual 275 Status Menu M E Mapping Submenu In Preparation ...
Page 285: ...Kayenne XL Package User Manual 285 Install Menu Figure 217 Install E Box Tally In Assign ...
Page 347: ...Kayenne XL Package User Manual 347 Config Menu Figure 282 Config Copy Simple Menu ...
Page 352: ...352 Kayenne XL Package User Manual Section 5 Menu Summaries Figure 285 Example ...
Page 434: ...434 Kayenne XL Package User Manual Section 5 Menu Summaries Figure 345 Chroma Key Main ...
Page 435: ...Kayenne XL Package User Manual 435 Key Menu Figure 346 Chroma Key Main Cursor ...
Page 437: ...Kayenne XL Package User Manual 437 Key Menu Figure 348 Chroma Key Suppression Cursor ...
Page 462: ...462 Kayenne XL Package User Manual Section 5 Menu Summaries ...
Page 487: ...Kayenne XL Package User Manual 487 RamRecorder Menu Figure 405 Export Dialog 2 ...
Page 509: ...Kayenne XL Package User Manual 509 Scaler Menu ...
Page 583: ...Kayenne XL Package User Manual 583 EMEM Menu Figure 472 EMEM Edit Insert Trigger Macro Number ...
Page 590: ...590 Kayenne XL Package User Manual Section 5 Menu Summaries ...
Page 618: ...618 Kayenne XL Package User Manual Glossary ...


