


22
Focus 70 Live Highly Affordable HD System Camera User’s Guide (v1.1)
Chapter 2 - Installation
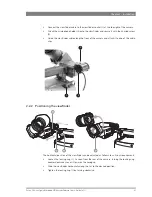
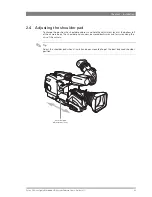
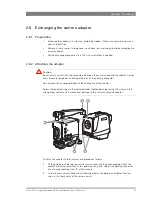
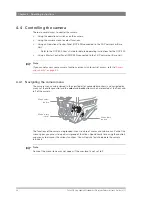
The viewfinder can be positioned backwards and forwards along the camera axis:
•
Loosen the support bracket round bar retaining lever (3).
•
Slide the round bar (2) forwards or backwards.
•
When the desired position is reached tighten the round bar retaining lever (3) again.
The viewfinder can also be viewed from a distance :
•
Press the bottom clip (4) below the eyepiece and swing it free of the associated clip.
•
The eyepiece can also be swung downwards; press the top clip to release the eyepiece
and swing it downwards.
☞
Note
☞
Note
Handle the eyepiece with care when folded back—its position is not secured.
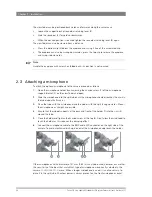
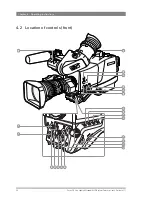
2.3 Attaching a microphone
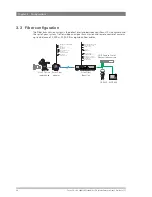
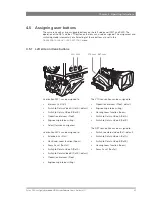
To attach the optional microphone to the camera proceed as follows:
1.
Open the microphone holder by unscrewing the knurled screw (1) of the microphone
support bracket (2) on the viewfinder and open.
2.
Slide the microphone into the split tube until the microphone shoulder reaches the mark in
the tube (about half way in).
3.
Place the tube with the microphone into the holder with the split facing upwards. Mount
the microphone as straight as possible.
4.
Ensure that the rubber supports at the back and front of the holder fit into the rims (3)
around the tube.
5.
Close the holder and tighten the knurled screw at the top (4). Don’t allow the wind hood to
touch the holder as this reduces the damping effect.
6.
Connect the microphone cable to the
MIC
audio XLR connector on the right side of the
camera. To avoid mechanical pick-up, do not let the microphone cable touch the holder.
Other microphones with a diameter of 21 mm (0.83 in) can also be used, however, ensure that
the sensitivity of the input that match that type of microphone are correctly selected in the
camera
CONFIGURATION
menu. When a longer microphone is used, it is not necessary to
place it in the split tube. Phantom power is always present on the front microphone socket.
2
1
3
3
4
Summary of Contents for Focus 70 Live
Page 1: ...3922 496 32361 July 2015 v1 1 Focus 70 Live User s Guide Highly Affordable HD System Camera ...
Page 14: ...14 Focus 70 Live Highly Affordable HD System Camera User s Guide v1 1 ...
Page 18: ...18 Focus 70 Live Highly Affordable HD System Camera User s Guide v1 1 Chapter 1 Introduction ...
Page 74: ...74 Focus 70 Live Highly Affordable HD System Camera User s Guide v1 1 Chapter 5 Video setup ...
Page 111: ...Focus 70 Live Highly Affordable HD System Camera User s Guide v1 1 111 ...


