background image

FC3100-60 Service Manual

P/N53802-031T  Rev. A

5 - 6

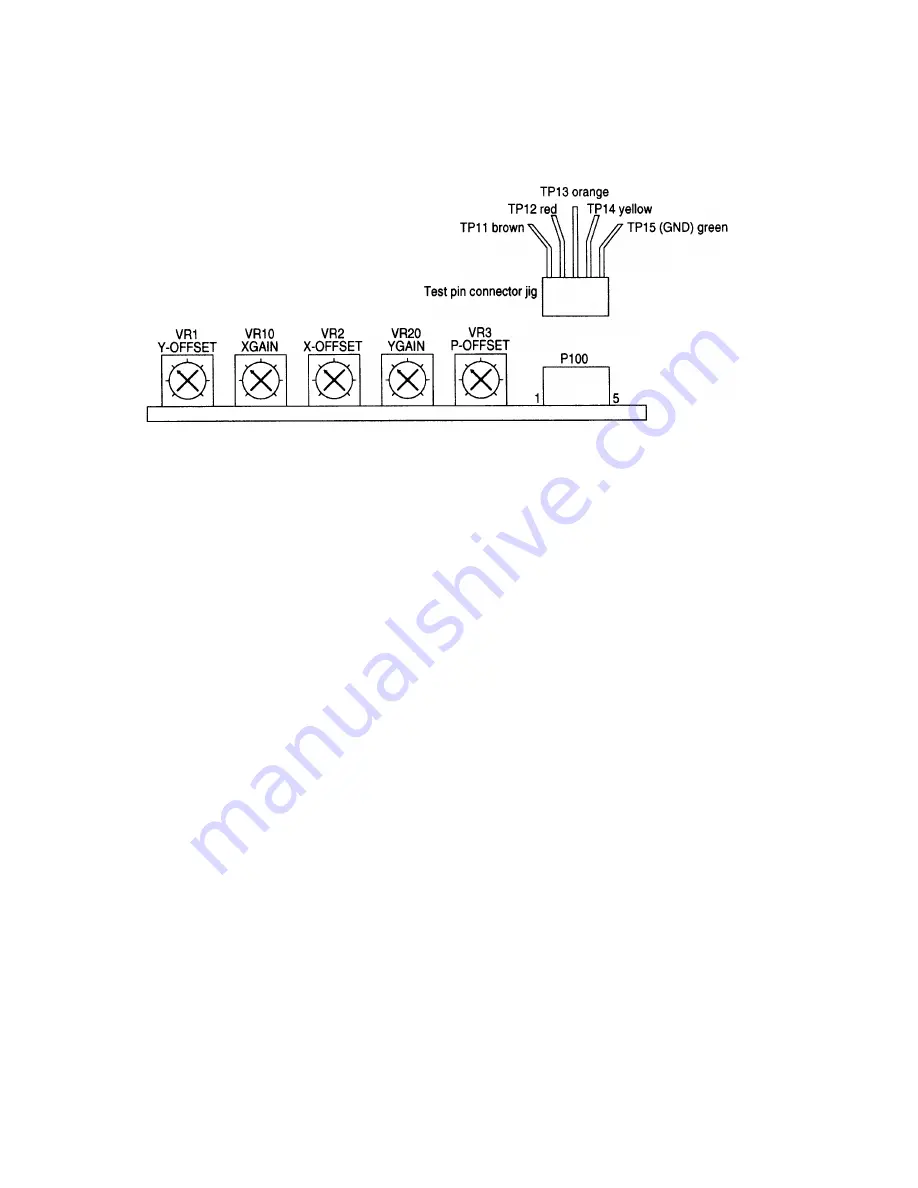
5.6  Default Trimmer Settings

Before turning the plotter back on, set each of the main board's trimmers as indicated below.

VR1 (Y-OFFSET)

:  Trimmer for adjusting the Y motor offset

VR2 (X-OFFSET)

:  Trimmer for adjusting the X motor offset

VR3 (P-OFFSET)

:  Trimmer for adjusting the pen offset

VR10 (X-GAIN)

:  Trimmer for adjusting the X motor gain

VR20 (Y-GAIN)

:  Trimmer for adjusting the Y motor gain

Brown :  TP11
Red 

:  TP12

Orange :  TP13
Yellow :  TP14
Green

:  TP15 (GND)

Summary of Contents for CUTTING PRO FC3100-60

Page 1: ...FC3100 60 Service Manual P N53802 031T Rev A 1 1 1 CUTTING PRO FC3100 60 SERVICE MANUAL The specifications etc in this manual are subject to change without notice asd asd Irvine California U S A...

Page 2: ...terface 2 18 3 USING CUTTER PENS AND SETTING CUTTING CONDITIONS 3 1 Types of Cutter Blades and Their Features 3 1 3 2 Cutter Pen Nomenclature 3 2 3 3 Replacing the Cutter Blade 3 3 3 4 Adjusting the B...

Page 3: ...nd Media Basket Option 4 49 4 5 1 Overview 4 49 4 5 2 Assembling the Stand 4 49 4 5 3 Mounting the Plotter on the Stand 4 52 4 5 4 Assembling the Media Basket 4 54 4 6 The Pounce Tool Option 4 57 4 6...

Page 4: ...ction 8 5 8 4 Push Roller Arm and Y Rail Section 8 7 8 5 Pen Block and Y Slider Section 8 9 8 6 Chassis Section 8 12 8 7 Film Stocker Section 8 14 8 8 Carton Box and Accessory 8 16 8 9 User s Manual O...

Page 5: ...itioning systems Avoid locations that are extremely dusty or humid Prior to cutting ensure that no obstacles are placed in the vicinity of the pen carriage or loaded medium Impeded movement of the pen...

Page 6: ...rd Inadequate grounding may result in severe damage to your plotter or computer and constitute misuse of the plotter Lubrication of the mechanisms will result in plotter malfunctions so avoid doing so...

Page 7: ...e of stubborn stains use a cloth that has been moistened in alcohol or in a neutral detergent diluted with water The correct functioning of the paper size sensors is obstructed by the adhesion of dust...

Page 8: ...otter pens water and oil based fiber tip water based ball point ceramic refillable ink and disposable ink pens Pouncing pen 1 2 mm diameter pin Compatible film Mono vinyl chloride film fluorescent fil...

Page 9: ...e Manual P N53802 031T Rev A 1 5 1 3 2 Options Item Model no Contents Stand ST1001 With basket Pouncing tool set PPA31 TP12 Pouncing plunger 1 Pouncing pin 1 Pouncing mats 5 1 4 External Dimensions FC...

Page 10: ...FC3100 60 Service Manual P N53802 031T Rev A 1 6 FC3100 60 with Stand Option Unit mm...

Page 11: ...ys are used to move the pen carriage when setting a function that requires the specification of a coordinate position The and keys are used to raise or lower the displayed numeric setting of a functio...

Page 12: ...GIN keys COPY Key Used to repeat the cutting operation defined by the data in the plotter s receive buffer CONDITION Key Used to set the four groups of cutting conditions retained in the plotter s int...

Page 13: ...etting the Page Length _ 3 FUNCTION ___ 1 ROTATE Rotating the Coordinate Axes _ 2 THICK __ 1 ON Cutting Thick Sheets _ 3 OFF Cutting Thick Sheets _ 2 OVERCUT _ 3 MIRROR Cutting a Reversed Image _ 4 SC...

Page 14: ...ll be based on that dummy data If the cutting plotting results are not what you expect but the received data and the transmitted program are identical check the program at the computer once more also...

Page 15: ...NTER Press the ENTER key If DUMP mode has been selected CHAR DUMP MODE appears on the display to indicate that the plotter has entered DUMP mode Transmit the data from the computer As the data is rece...

Page 16: ...cles out of the vicinity of the cutting mat and paper Procedure Replace the cutter pen at the pen carriage s pen holder with a platter pen and load paper in the plotter PAUSE Press the PAUSE key to se...

Page 17: ...of the vicinity of the cutting mat and paper Procedure Replace the cutter pen at the pen carriage s pen holder with a plotter pen and load paper in the plotter PAUSE Press the PAUSE key to select PAUS...

Page 18: ...FC3100 60 Service Manual P N53802 031T Rev A 2 8 Sample printout by the CONDITION function...

Page 19: ...is selected this function selects the plotter s response to an OI request sent from the computer When 7550 is selected the plotter s response is 7550 When 7586 is selected the plotter s response is 75...

Page 20: ...n loaded a second time after the plotter has been turned on the plotter will assume that the medium has been reloaded and will then display the menu for setting the CONTINUE mode If it has been set to...

Page 21: ...change the setting of the displayed menu press the 2 or 4 key To register the selected setting and proceed to the next menu press the ENTER key To proceed to the next menu without changing the settin...

Page 22: ...t all Be sure to set the plotter s interface conditions to match those of your computer and the target software application Note For the specifications of your plotter s serial interface see Section 2...

Page 23: ..._________________________________________ To set the number of bits per character press the 2 key Next press the or key to select 7 or 8 bits 7 8 _________ To set the parity mode press the 3 key Next...

Page 24: ...e NEXT key again 1 Press the 1 key to select INTERFACE 4 Press the 4 key to select COMMAND The sub menu below appears so select the desire command mode To select GP GL command mode press the 2 key to...

Page 25: ...lts will not be the same size that you specified Procedure PAUSE Press the PAUSE key to select PAUSE mode NEXT Press the NEXT key NEXT Press the NEXT key again 1 Press the 1 key to select INTERFACE 1...

Page 26: ...nals to begin a cutting or plotting operation When the specified operation is completed the plotter awaits the input of subsequent DATA signals Caution The interface cable should be no longer than two...

Page 27: ...signment of the Centronics compatible parallel interface connector is described below Pin No Signal Name Pin No Signal Name 1 2 3 4 5 6 7 8 9 10 11 12 13 14 15 16 17 18 STROBE DB 0 DB 1 DB 2 DB 3 DB 4...

Page 28: ...ation Asynchronous start stop Transfer rate 300 600 1200 2400 4800 9600 bits s Stop bit 2 stop bits Parity Even odd none Character length 7 or 8 bits Electrical Characteristics RD SD Negative logic RS...

Page 29: ...ade offset 0 75 PHP32 CB15 For cutting film which is too thick for the CBO9UA blade to handle Suitable for cutting film from 0 25 mm to 0 5 mm thick CB15U K30 super steel Diameter 1 5 mm Blade offset...

Page 30: ...r blades of 0 9 mm diameter The CB09UA super steel blade is shown in the figure above Structure of the PHP32 CB15 Cutter Pen for super steel cutter blades of 1 5 mm diameter The CB15U super steel blad...

Page 31: ...et values PHP32 CB09 Blue CB09UA Super steel 18 2 PHP32 CB15 Red CB15U CB15U K30 Super steel Super steel 28 2 28 2 PHP31 CB15 Red CB15 10C CB15 05S Ceramic Sapphire 18 2 9 2 Replacing the Blade The pr...

Page 32: ...turn the blade length adjustment knob in the clockwise direction until the blade tip is visible 6 Using your finger check that the cutter blade rotates smoothly inside the cutter pen be careful not to...

Page 33: ...rve the scale on the plunger cap to determine how far to move the blade When the knob is turned the distance of one scale unit the blade moves 0 1 mm When it is given one full turn the blade moves 0 5...

Page 34: ...er blade is sharp When handling the cutter pen be careful to avoid injuring yourself 1 Loosen the screw securing the pen holder While pressing the pen holder upward push the cutter pen all the way int...

Page 35: ...A 10 to 14 over 30 3 to 4 Indoor film 0 08 to 0 1 CB09UA 14 to 17 over 30 3 to 4 Transparent film translucent film 0 08 to 0 1 CB09UA 14 to 20 over 30 3 to 4 Reflective film 0 08 to 0 1 CB09UA 14 to 2...

Page 36: ...1T Rev A 3 8 The table below lists sample CUTTER OFFSET settings in case the blade type is set to OTHER Actual blade type CUTTER OFFSET value CB09UA 17 CB15 10U 18 CB15U 28 CB15U SP 28 CB15U K30 28 CB...

Page 37: ...SMS 4 1 Removing the Outer Casing 4 1 1 Removing the Left and Right Side Covers 1 Remove the left and right side covers as shown in Figs 4 1 and 4 2 Four M4 x L6 bind head screws black each Fig 4 1 Fi...

Page 38: ...e front and rear guides as shown in Figs 4 3 and 4 4 Three M3 x L6 pan head with flat washer screws black each Fig 4 3 Fig 4 4 2 As shown in Figs 4 5 and 4 6 push the guide inward and upward to releas...

Page 39: ...ol panel sheet One M3 x L8 pan head thread forming screw and flat washer 4 As shown in Fig 4 8 remove the top cover while being careful to avoid damaging the FPC cable and the other cable Four M3 x L6...

Page 40: ...ght side cover see Subsection 4 1 1 2 Remove the top cover see Subsection 4 1 3 3 As shown in Fig 4 10 remove the control panel base while making sure to avoid damaging the FPC cable and other cables...

Page 41: ...As shown in Fig 4 11 remove the relay board Three M3 x L6 pan head with flat washer screws Fig 4 11 4 To mount the relay board reverse the above procedure Run the control panel key test see Section 5...

Page 42: ...hown in Fig 4 14 disconnect the pen block FPC cable from the PR216013 pen board s J32 connector Fig 4 14 6 Remove the pen board as shown in Fig 4 15 Two M3 x L6 pan head with flat washer screws Fig 4...

Page 43: ...emove the left and right side covers see Subsection 4 1 1 2 Remove the top cover see Subsection 4 1 3 3 As shown in Fig 4 16 loosen the spring adjustment plate Tow M4 x L8 bind head screws Fig 4 16 4...

Page 44: ...7 Remove the Y slider belt as shown in Fig 4 19 Be careful not to drop the Y tension pulley as it may become damaged Fig 4 19 8 To attach the Y slider belt reverse the preceding procedure Before secur...

Page 45: ...ightening torque of 8 kg cm This is to prevent malfunction of the circuit boards at low temperatures and to ensure electrical contact between the Y slider and the Y slider belt When mounting belt stay...

Page 46: ...4 23 slide the Y slider against the right side plate Fig 4 23 3 As shown in Fig 4 24 pass a Y belt tension jig part no 462500006 or a non shrinking cord below the center of the Y slider belt Fig 4 24...

Page 47: ...or a long time the possible range of adjustment becomes smaller 5 Check the belt tension as shown in Fig 4 27 Using a 1 kgf push pull gauge check that the belt s center is displaced by 20 mm at a pull...

Page 48: ...1 1 2 Remove the top cover see Subsection 4 1 3 3 Remove the PR216012 relay board see Subsection 4 2 2 4 Remove the Y slider belt see Subsection 4 2 3 5 Remove the Y motor as shown in Fig 4 28 Four M3...

Page 49: ...e tension of the Y motor Four M3 x L8 pan head with flat washer screws Fig 4 30 3 As shown in Fig 4 31 push down on the Y motor using a 5 kgf push pull gauge Push force 1 8 0 2 kgf Fig 4 31 4 While co...

Page 50: ...emove the left side cover see Subsection 4 1 1 2 As shown in Fig 4 32 loosen the tension of the X drive belt Four M3 x L8 pan head with flat washer screws Structurally the screwdriver contacts the cha...

Page 51: ...g 4 34 push downward on the X motor pulley using a 5 kgf push pull gauge Push force 2 0 0 1 kgf Note that structurally the motor can only be pushed downward at an angle Fig 4 34 3 While continuing dow...

Page 52: ...3 2 As shown in Figs 4 35 and 4 36 disconnect the Y FPC cable and pen block FPC cable from the PR216013 pen board Take care not to damage the cables Fig 4 35 Fig 4 36 3 Remove the pen board see Subse...

Page 53: ...y be stuck to the Y slider by adhesive used to secure the screws Fig 4 38 6 As shown in Fig 4 39 secure the BB mounting plate Apply pressure to the three rollers at the rear of the Y slider Two M3 x L...

Page 54: ...and downward the black arrows When you move your left hand downward move your right hand upward the white arrows While applying pressure to the Y slider as shown in Fig 4 41 check that there is no pla...

Page 55: ...remove the two E clips Be sure not to lose them Fig 4 43 2 Remove the push roller pin as shown in Fig 4 44 Press the push roller arm using your fingers Use an L shaped hex wrench or its equivalent Fi...

Page 56: ...part no 462500002 Ensure that the push roller is above the grit roller Fig 4 45 3 As shown in Fig 4 46 push downward on the push roller arm using a 5 kgf push pull gauge Structurally pressure cannot...

Page 57: ...lower the push force Turn the upper nut so that it rises then secure the lower nut accordingly Fig 4 48 One push roller arm assembly is equipped with two springs so ensure that both of their upper nu...

Page 58: ...M2 x L8 bind head screws Fig 4 50 3 Remove the FPC cable guide as shown in Fig 5 51 Two M2 x L4 bind head screws The screw may become stuck to the MC coil Be careful not to scratch the slide shaft Fig...

Page 59: ...ten tip Visually check that the pen block s bottom surface is parallel to the cutting mat s surface Fig 4 53 When securing the pen block avoid scratching the slide shaft with the screwdriver or other...

Page 60: ...the offset pin as shown in Fig 4 56 One M2 x L6 set screw Fig 4 56 3 Turn the offset pin toward the right and then check the pressure at the point where it lightly stops Fig 4 57 4 Check the slide arm...

Page 61: ...eck results are satisfactory attach the pen block cover If the MC Coil does not move smoothly 1 If the MC coil does not move smoothly appears to stick or to be contacting its casing one or more of the...

Page 62: ...e belt Structurally the screwdriver contacts the chassis and synchro belt Be careful not to damage the X motor pulley Four M3 x L8 pan head with flat washer screws Fig 4 60 4 Remove the X motor 5 To m...

Page 63: ...section 4 2 5 3 Remove the X motor pulley as shown in Fig 4 62 Be sure not to lose the set screws Note that the motor pulley may be hard to remove Two M3 x L3 set screws Fig 4 62 4 To attach the X mot...

Page 64: ...4 2 Remove the Y motor as shown in Fig 4 64 Be careful not to damage the Y motor pulley Four M3 x L8 pan head with flat washer screws Fig 4 64 3 To mount the Y motor reverse the above procedure with...

Page 65: ...n head with flat washer screws Fig 4 66 3 Remove both the Y drive belt and Y drive pulley 4 Remove the Y motor pulley Be sure not to lose the set screws Note that the motor pulley may be hard to remov...

Page 66: ...ard to remove Two M3 x L5 set screws Fig 4 68 3 To mount the X drive pulley reverse the above procedure with special attention to the following point As shown in Fig 4 69 mount the X drive pulley so t...

Page 67: ...Tension Pulley 1 Remove the Y slider belt see Subsection 4 2 3 2 Remove the Y tension pulley Be careful that the Y tension pulley does not fall off when the Y slider belt is removed as shown in Fig 4...

Page 68: ...ver see Subsection 4 1 1 2 Remove the top cover see Subsection 4 1 3 3 Remove the FPC cable bracket Two M3 x L6 bind head screws 4 As shown in Fig 4 71 disconnect the Y FPC cable from the PR216013 pen...

Page 69: ...d it according to the dimensions shown in Fig 4 73 Fig 4 73 2 Attach double sided tape to the FPC cable bracket as shown in Fig 4 74 Fig 4 74 3 Attach the Y FPC cable to the FPC cable bracket as shown...

Page 70: ...nts for securing the Y FPC cable Tape dimensions 10 mm by 20 mm each Fig 4 78 7 As shown in Fig 4 79 slide the Y slider against the left mechanical stopper and then secure the Y FPC cable at the posit...

Page 71: ...e plotter load a single sheet of paper and then select the SHEET paper mode F3 key to detect the paper size 6 If the sensors malfunction during the preceding Step 5 b the sensors are possibly incorrec...

Page 72: ...g 4 83 2 Remove the LCD panel as shown in Fig 4 84 Four snap in rivets 0 122 dia black and four flat washer M3 paper The rivets can easily be removed using tweezers Fig 4 84 Be careful not to damage t...

Page 73: ...the control panel sheet as shown in Fig 4 86 Fig 4 86 3 Use alcohol to remove any adhesive remaining on the control panel base 4 To attach the control panel sheet reverse the above procedure Position...

Page 74: ...ched to the main board s connectors 3 As shown in Fig 4 88 remove the screws from the interface connectors Two standoffs and two M2 6 x 10 pan head screws Fig 4 88 4 Remove the main board as shown in...

Page 75: ...own in Fig 4 91 which are attached to the power unit s bottom surface Four M3 x L6 pan head with flat washer screws Fig 4 90 Fig 4 91 4 Carefully slide out the power unit disconnect the leads secured...

Page 76: ...ful not to damage the circuit board Fig 4 93 4 When mounting the ROM chips pay attention to the following points Never touch the pins of the ROM chips Check the position orientation model name specifi...

Page 77: ...ng the Drive Rollers Further tighten the drive rollers if film or other media is being fed at an angle due to loose set screws of the drive rollers As shown in Fig 4 95 use a 1 mm hex wrench to tighte...

Page 78: ...tly replaced at the factory the perpendicularity and other specifications related to precision will be adversely affected 4 3 2 Replacing the Vacuum Fan 1 Remove the front and rear guides see Subsecti...

Page 79: ...wer 1 Turn off the power supply to the cutting Plotter Remove the cutter pen from the pen holder Attach the Left Bracket Place the Film Stocker on a large flat surface 1 Temporarily attach the first 1...

Page 80: ...op flanges of the film stocker brackets 2 Align the chassis mounting brackets on the bottom of the plotter with the flanges on the film stocker brackets 3 Slide the plotter forward Fig 4 100 Assembly...

Page 81: ...4 101 Install the Film Stocker Rollers 1 Slide the second roll guide onto the Film Stocker Roller from the right side Temporarily secure it in place using the second M4 Thumb Screw 2 Place the first F...

Page 82: ...rews 5 Tighten the Right Rear screws 6 Tighten the Left Rear screws 7 Tighten the Right Side Plate screws 8 Tighten the Left Side Plate screws Fig 4 103 4 4 3 Loading Sheet Film Loading the Film 1 Low...

Page 83: ...in the appropriate range Fig 4 106 2 Be sure to position the push rollers so they are not located right at the edges of the film or grit rollers Note If necessary slowly move the pen carriage out of t...

Page 84: ...ce Fig 4 107 Turning On the Power 1 Turn on the plotter by pressing the I side of the power switch Fig 4 108 2 Select the menu sequence required for your operation 3 Plotter initializes and the film l...

Page 85: ...handling problems caused by debris adhering to media 4 5 2 Assembling the Stand Assembly Area Assemble the Stand on a secure flat surface Assembling the Stand 1 Install the Bottom Connecting Tube to...

Page 86: ...upport Fig 4 111 4 Invert Assembly 5 Invert the Right Side Base and attach to the Right Side Vertical Support using 3 M6 x 8mm screws and the Hex Key Repeat the process to attach the Left Side Vertica...

Page 87: ...per Left screws 6 Tighten the 3 Upper Right screws Fig 4 113 8 Install the 4 End Caps 9 Return the Stand Assembly to it s upright position Note The Front has a shorter base The Front must have locking...

Page 88: ...ons below 1 Remove the Roller Bars from the media bracket 2 Remove the screws holding the Film Stocker Bracket to the plotter and slide the plotter off the bracket Fig 4 116 3 If there is Media Bracke...

Page 89: ...r Bracket Install the Accuload TM Film Stocker Bracket on the Stand Assembly 1 Lock the casters on the stand The front of the machine has the locking casters Push down to lock 2 Make sure the front of...

Page 90: ...s to the Media Bracket Fig 4 122 4 5 4 Assembling the Media Basket Assembling the Media Basket 1 Place the Left Side Basket on it s side with the five wire ends facing right Fig 4 123 2 Slide one Bask...

Page 91: ...asket Tubes 6 Repeat the same process for the second Media Basket Fig 4 126 Mounting the Media Basket 1 Install one Rubber Bumper on the Left and Right Front Standoffs Locate the Standoffs at the fron...

Page 92: ...FC3100 60 Service Manual P N53802 031T Rev A 4 56 3 Install the Rear Media Basket as shown Fig 4 129...

Page 93: ...the Pounce Tool The pin of the cartridge is very sharp Do not extend further than the safety cap Fig 4 130 Disassembling the Pouncing Pin 1 Disassemble the cartridge on a clean uncluttered well lit w...

Page 94: ...tainer securely with one hand and remove the old pin with the other hand Place the old pin in a safe container and throw it away Fig 4 134 3 Locate the new pin One side of the pin s shaft is flat Fig...

Page 95: ...ter surface under the pouncing mat This will dull the pin and bend the pin shaft 4 6 2 Replacing the Mat Before using the pouncing tool you must remove the cutting mat and replace it with a pouncing m...

Page 96: ...e beginning a pouncing operation Always reinstall cutting mat before beginning a cut operation Installing the Pouncing Mat 1 Remove the backing sheet from the underside of the pouncing mat 2 Move the...

Page 97: ...FC3100 60 Service Manual P N53802 031T Rev A 5 1 5 ELECTRICAL ADJUSTMENTS 5 1 Location of the Main Board PCB No PR216001 Test Pins Trimmers DIP Switch and ROM Chips...

Page 98: ...in GND 5 pin GND 6 pin 5 V 7 pin 12 V 8 pin 32 V 9 pin 32 V 10 pin GND 3 If the measured voltage levels do not conform to the above tables the power unit is probably defective 5 2 2 The Protective Cir...

Page 99: ...s Supply Voltage 1 Check that the plotter s POWER switch is off 2 Remove the rear guide see Subsection 4 1 2 3 Connect the power unit s cable to the required connector Voltage series Corresponding are...

Page 100: ...tment Selection of Centronics compatible interface mode Distance accuracy adjustment Perform this adjustment after clearing the nonvolatile RAM or after replacing the main board Sensor test After repl...

Page 101: ...witch as shown below turn on the plotter Set only Bits 1 4 and 8 to OFF 2 The messages below consecutively appear on the LCD panel 10 seconds later 3 After the NOVRAM CLEAR END message is displayed re...

Page 102: ...immers as indicated below VR1 Y OFFSET Trimmer for adjusting the Y motor offset VR2 X OFFSET Trimmer for adjusting the X motor offset VR3 P OFFSET Trimmer for adjusting the pen offset VR10 X GAIN Trim...

Page 103: ...Pins 1 to 5 of the P100 connector Vertical axis 1 V division Horizontal axis 5 us division 3 Connect the probe of an oscilloscope to TP11 and connect either TP10 or TP15 to ground level The wave form...

Page 104: ...Bit 8 to OFF 2 Connect the probe of an oscilloscope to TP13 Pin 3 of P100 and connect either TP10 or TP15 to ground level Vertical axis 1 V division Horizontal axis 2 us division 3 The wave form show...

Page 105: ...holder is not in contact with the pen block cover 1 Set the SW1 DIP switch as shown below and then turn on the plotter Set Bits 4 5 and 6 to OFF 2 After the ROM and RAM checks a menu for electrical a...

Page 106: ...ow When the pen holder is lowered approx 5 V When the pen holder is raised approx 5 V If the voltage levels are not approx 5 V perform all of the following and then adjust the pen servo again Check th...

Page 107: ...ts equivalent to measure the actual force of the displayed FORCE value If the measured value does not match use the or POSITION key to increase or lower the numeric value at the bottom left of the LCD...

Page 108: ...the Special Functions to PROGRAM Set the programmable resolution to 0 100 mm 1 Connect the plotter to the computer via an RS 232C interface cable making sure that the cable is connected properly 2 Rev...

Page 109: ...rm adjustment if necessary While observing exploded view 2 use VR1 X OFFSET or VR2 Y OFFSET to correct any deviation of the motor wave form s origin from the ideal line s origin 6 Repeat adjustment un...

Page 110: ...direction If the above conditions are not observed an error will occur Set Bits 2 3 4 and 8 to OFF 2 After the ROM and RAM checks the following menu appears on the LCD panel 3 When the 3 SHEET key is...

Page 111: ...rsor to the desired digit then use the 2 and 4 keys to input the numeric value 5 After inputting appropriate corrective values for both the X and Y distances press the ENTER key The messages below con...

Page 112: ...justments 1 While holding down the control panel s POSITION key turn on the plotter 2 After the following messages appear on the LCD panel turn off the plotter Several moments later 3 After turning th...

Page 113: ...FC3100 60 Service Manual P N53802 031T Rev A 5 17 CONDITION 4...

Page 114: ...the paper size L X Front paper size sensor Same as the above L 3 If a sensor is not operating properly check its wiring its connector contact and the position of the sensor dog If everything checks o...

Page 115: ...ng to each bit and check that its value properly changes to 1 or 0 Normal status 0 While the key is pressed 1 The PAUSE key can be checked by observing its lamp 4 If a panel key s corresponding bit do...

Page 116: ...MANUAL 1 After turning on the plotter and selecting the paper mode consecutively press the NEXT key until the menu below appears 2 Press the 4 OPTION 2 key to display the menu below 3 Press the 4 TES...

Page 117: ...SELF TEST Pattern to display the menu below 2 When the 2 CONDITION key is pressed the plotter s currently selected conditions are printed Printing the ISO Demo Pattern 1 Perform Steps 1 to 3 of the p...

Page 118: ...e CONDITION 1 parameters as follows 2 After pressing the PAUSE key consecutively press the NEXT key until the menu below appears 3 Press the 4 OPTION2 key The menu below appears 4 Press the 4 TEST key...

Page 119: ...tern 1 Perform Steps 1 to 5 above so that the menu below appears 2 Press the 3 KAMIZURE key to print the paper deviation check pattern Printing the Aging Pattern 1 Perform Steps 1 to 5 above so that t...

Page 120: ...e 0 14 mm 2 Circular distortion a circle of 2 mm diameter Measure the inner diameter at eight points using a loupe 0 14 mm Maximum value minimum value Be sure to measure all eight points 3 Backlash pa...

Page 121: ...ice Manual P N53802 031T Rev A 5 25 4 Pen skipping over the entire plot area Check that the pen does not skip at all 5 Pattern of a dotted line and a two dot dashed line Check that each line is not mi...

Page 122: ...dial pattern Using a loupe measure the maximum difference between the widths of first time lines and second time lines Assuming that a is the line width b the maximum difference and Z is the error 0 1...

Page 123: ...OSITION key Note This function cannot be used to set certain DIP switch functions 1 While concurrently holding down the and POSITION keys turn on the plotter 2 The message below appears 3 Press the EN...

Page 124: ...k on 5 When the plotter is turned back on the pen position becomes the origin 0 0 and the menu below appears The paper selection menu disappears and the plot area menu appears instead L represents the...

Page 125: ...press the NEXT key until the menu below appears 3 Press the 2 ON key so that the flashing cursor moves to the ON position then press the ENTER key 4 Turn the plotter off then back on again 5 After th...

Page 126: ...fter displaying each MAINTENANCE menu press the 2 ON key so that the flashing cursor moves to the ON position then press the ENTER key 4 Turn the plotter off then back on again 5 After the RAM check t...

Page 127: ...a spring 3 3 With the 1 5 mm cutter pen red blade adjustment knob the blade has fallen out Grease the blade and holder B 3 3 The blade skips and does not completely cut lines that should be solid The...

Page 128: ...setting 3 4 4 5 The cutting results differ from the specified size The programmable resolution STEP SIZE has been set differently at the plotter and the software application Scaling has been specified...

Page 129: ...tting SPEED or the PEN UP SPEED setting 4 5 5 10 The distance correction requires adjustment Adjust the distance correction 5 16 Film is loaded but the LOAD PAPER prompt appears Film that is nearly tr...

Page 130: ...Assembly JPN Cover Top Cover Top JPN Plate Model Number FC3100 60 Cover Front Cover Rear Operator Panel Base Rivet Snap Dia 0 122 LCD Assembly Switch Sheet JPN Switch Sheet ENG Decal Model Number Labe...

Page 131: ...FC3100 60 Service Manual P N53802 031T Rev A 8 2 Mainframe...

Page 132: ...ion Bracket Belt Tension Base Tension Plate Bracket Spring Adjust Spring Y Belt Tension Bracket Motor Base Y Pulley Drive Motor Motor Drive UGJMEEA7MGR51 Belt Drive Motor 120TN15 10W Pulley Y Belt Dri...

Page 133: ...FC3100 60 Service Manual P N53802 031T Rev A 8 4 Y Drive Section...

Page 134: ...Stay Base Roller Drive X axis Shaft Drive X axis Cutting Mat with Base Bearing X Drive Shaft 688ZZ Rivet Snap Dia 0 161 Bearing Holder Cover Air Left Cover Air Right Cover Air Duct Collar X Drive Sha...

Page 135: ...FC3100 60 Service Manual P N53802 031T Rev A 8 6 X Drive Section...

Page 136: ...ch Roller Arm Shaft Pinch Roller Spacer 4 x 1 5 long Roller Pinch Media P Cam 2190 Plate LS Right Plate LS Left Shaft Rotary Plate Rotation Sensor Roller Shaft End Fitting Lever Lever Cover Spacer 8mm...

Page 137: ...FC3100 60 Service Manual P N53802 031T Rev A 8 8 Push Roller Arm and Y Rail Section...

Page 138: ...der Bracket Sensor Plate Slide Arm Support Shaft Adjuster Guide Roller Spring Pen Arm Lifter Shaft Guide Pen Arm Thumb Screw M4 Metric Viton O Ring 1 6mm Spacer Isolation MC Spacer Moving Coil Bearing...

Page 139: ...3 Socket Set Screw Flat head Screw E clip 2mm Flat Washer M2 Bind head Screw Flat Washer Paper M2 Bind head Screw Bind head Screw Flat Washer M2 Bind head Screw Bind head Screw Hex Nut M3 Flat head Sc...

Page 140: ...FC3100 60 Service Manual P N53802 031T Rev A 8 11 Pen Block and Y Slider Section...

Page 141: ...PB3GE Fan Cooling 12V Decal GND Spacer Power Supply Unit Plate Guide Holder Chassis Bracket Chassis Slide Tie Wire Standoff for RS232C Connector 4 40 Tap Pan head Screw with Flat Washer Pan head Screw...

Page 142: ...FC3100 60 Service Manual P N53802 031T Rev A 8 13 Chassis Section...

Page 143: ...52801 020T 01 51407 043T 52120 012T 021603021 52802 007 52120 006 Bracket Stock Media Right Bracket Stock Media Left Rod Stiffener 0 75 Rod Stiffener 0 5 Roller Stock Media Bearing Stocker Roll Guide...

Page 144: ...FC3100 60 Service Manual P N53802 031T Rev A 8 15 Film Stocker Section...

Page 145: ...Color Set 5 Blades Without Base 1 1 1 1 1 1 1 1 1 1 All All UL CE JPN JPN All All All All 8 9 User s Manual Operation Manual and Other Documentation No Part Number Description Remarks Q ty Model 1 1 2...

Page 146: ...30T 51407 035T 51407 034T 52801 023T 52801 021T 52801 022T 51404 001T 55700 001T Stanchion Right Stand Stanchion Left Stand Beam Bottom Support Beam Top Support Base Right Support Stand Base Left Supp...

Page 147: ...FC3100 60 Service Manual P N53802 031T Rev A 8 18 Stand and Media Basket Option...

Page 148: ...odel 1 2 3 4 5 6 7 a 972200620 52804 002T 52120 009T 52502 001T 52502 001T 52501 004T 53100 001T 51407 041T Cutter Cartridge Set Body and Cap Retainer Pouncing Tool O Ring Pouncing Tool Pin Pouncing S...

Page 149: ...FC3100 60 Service Manual P N53802 031T Rev A 8 20 Pouncing Tool Option...

Page 150: ...or Optical Switch Power AC Inlet Line Filter Power Supply Unit Cable FPC Y axis Cable 10con Power Supply Main Board Cable 30con Main Board Interconnection Cable 16con Main Board Interconnection Cable...

Page 151: ...FC3100 60 Service Manual P N53802 031T Rev A 9 2 Wiring Diagram...

Page 152: ...FC3100 60 Service Manual P N53802 031T Rev A 9 3 9 2 Main Board PCB PR216001A Designation Part Number Description Remarks 792160110 54000 029T PCA Main Board Firmware Set Assembly...

Page 153: ...FC3100 60 Service Manual P N53802 031T Rev A 9 4 Main Board Wiring Diagram...

Page 154: ...FC3100 60 Service Manual P N53802 031T Rev A 9 5 Main Board Interface Section...

Page 155: ...FC3100 60 Service Manual P N53802 031T Rev A 9 6 Main Board CPU Section...

Page 156: ...FC3100 60 Service Manual P N53802 031T Rev A 9 7 Main Board Memory Section...

Page 157: ...FC3100 60 Service Manual P N53802 031T Rev A 9 8 Main Board 1MB Buffer Section...

Page 158: ...FC3100 60 Service Manual P N53802 031T Rev A 9 9 Main Board GRC1504 Section...

Page 159: ...FC3100 60 Service Manual P N53802 031T Rev A 9 10 Main Board Clock Section...

Page 160: ...FC3100 60 Service Manual P N53802 031T Rev A 9 11 Main Board Reset Section...

Page 161: ...FC3100 60 Service Manual P N53802 031T Rev A 9 12 Main Board Driver Section Diagram...

Page 162: ...FC3100 60 Service Manual P N53802 031T Rev A 9 13 Main Board Motor DAC Section...

Page 163: ...FC3100 60 Service Manual P N53802 031T Rev A 9 14 Main Board Motor Drive Section...

Page 164: ...FC3100 60 Service Manual P N53802 031T Rev A 9 15 Main Board A D Section...

Page 165: ...FC3100 60 Service Manual P N53802 031T Rev A 9 16 Main Board Pen DAC Section...

Page 166: ...FC3100 60 Service Manual P N53802 031T Rev A 9 17 Main Board Pen Drive Section...

Page 167: ...FC3100 60 Service Manual P N53802 031T Rev A 9 18 Main Board Input and Output Section...

Page 168: ...FC3100 60 Service Manual P N53802 031T Rev A 9 19 Main Board Connector Section 1...

Page 169: ...FC3100 60 Service Manual P N53802 031T Rev A 9 20 Main Board Connector Section 2...

Page 170: ...ion Board PCB Joint Photo interrupter Diode High voltage Switching Diode High voltage Switching Resistor 432ohms 1 1 8W Resistor 8 25K 1 1 8W Resistor 432ohms 1 1 8W Resistor 200ohms 1 1 8W Capacitor...

Page 171: ...FC3100 60 Service Manual P N53802 031T Rev A 9 22 Interconnection Board...

Page 172: ...54701 001 51501 001 52701 001 52701 001 52101 001 52101 003 PCA Pen Control Board PCB Pen Control IC Custom Photo interrupter Resistor 200ohms 1 1 8W Capacitor Ceramic 0 22uF 50V Filter EMI Suppressi...

Page 173: ...FC3100 60 Service Manual P N53802 031T Rev A 9 24 Pen Board...

Page 174: ...00 60 Service Manual P N53802 031T Rev A 9 25 9 5 Sheet Switch Control Panel Designation Part Number Description Remarks 121606111 121606101 Switch Sheet English Switch Sheet Japanese FPC216011 FPC216...

Page 175: ...FC3100 60 Service Manual P N53802 031T Rev A 9 26 Sheet Switch Control Panel...

Reviews: