background image

PART TWO - INSTALLATION

SECTION 3 - ELECTRICAL CONNECTIONS

Rev. 0-201

PRO-series Model C3 Conductivity Transmitter

25

+

1
2
3
4
5
6
7

-

Loop Resistance

(See nomograph)

Loop Power

 14-30VDC

Jumper Required

200

0

14

16

18

R

ESIST

AN

C

E


 IN

 O

H

M

S

800

400

600

1000

1200

1400

DC VOLTAGE

20

22

24

26

28

30

50 Ohms/Volt

LOOP LOAD

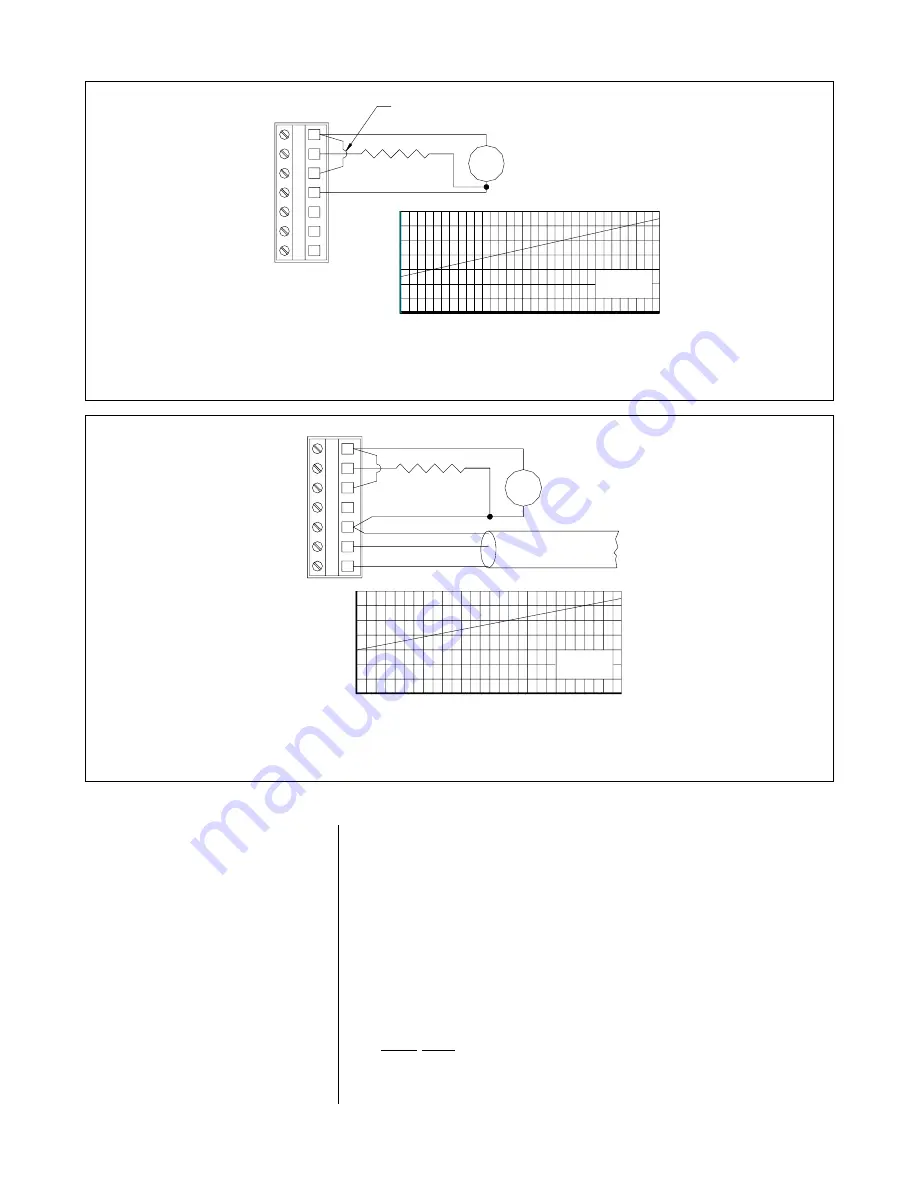
FIGURE 2-9   Three-wire Hookup -- Load Sourcing

RS-485 Serial

communications

Comms Return

"A"  +

"B"  -

+

1
2
3
4
5
6
7

-

Loop Resistance

(See nomograph)

Loop Power

 16-30VDC

DC VOLTAGE

1000

R

E

SIS

T

AN

C

E


  IN

 O

H

M

S

400

0

200

600

800

1200

1400

16

18

20

22

LOOP LOAD
50 Ohms/Volt

26

24

28

30

FIGURE 2-10   Three-wire Hookup -- Load Sourcing with RS-485 Serial Communication

3.4 Four-wire Hookups

In a four-wire hookup, the transmitter can be wired two ways
depending on whether or not RS-485 serial communication
is used. At least 12 VDC is required for operation (16 VDC
with serial communication).

Depending on how the transmitter is mounted, route the DC
power, analog output, and RS-485 serial communication
wiring into the transmitter as follows:

 Wall/Pipe-mounted Transmitter: Route cable through

right side cable entry knockout hole in the back cover.

 Panel-mounted Transmitter: Route cable behind panel to

the exposed TB1 terminal strip.

Summary of Contents for C33

Page 1: ...ment Worldwide Headquarters and Sales GLI International Inc 9020 West Dean Road Milwaukee Wisconsin 53224 U S A Represented By In the interest of improving and updating its equipment GLI reserves the right to alter specifications to equipment at any time A company Viridor Instrumentation Phone Fax E mail Web 414 355 3601 414 355 8346 info gliint com www gliint com ...

Page 2: ... 0 201 2 This operating manual and other GLI operating manuals are available on GLI s web site at gliint com when viewed using Adobe s free Acrobat reader To get this reader link to Adobe through GLI s web site or visit Adobe s web site at adobe com ...

Page 3: ...fe condition is likely when 1 The transmitter appears visibly damaged 2 The transmitter fails to operate properly or provide the intended measurements 3 The transmitter has been stored for long periods at temperatures above 158 F 70 C Installed this transmitter in accordance with relevant local codes and instructions contained in this operating manual Also note and comply with the transmitter s te...

Page 4: ... conditions GLI International s obligation under this warranty shall be limited to at its option replacement or repair of this product The product must be returned to GLI Inter national freight prepaid for examination The product must be thoroughly cleaned and any process chemicals removed before it will be accepted for re placement or repair GLI International s liability shall not exceed the cost...

Page 5: ... Section 3 2 3 3 3 4 or 3 5 to connect DC power to the transmitter C CALIBRATING THE TRANSMITTER The transmitter must be calibrated so that measured values will correspond to actual process values It can be traditionally wet calibrated However since measured conductivity is greatly affected by small changes in temperature GLI strongly recommends using its DRY CAL method for highest measuring accur...

Page 6: ...eat zeroing A Make sure that the sensor is dry before zeroing B Press MENU key to display a MAIN MENU screen If the screen is not showing use or Ø Økey to display it C Press ENTER key to display D Press ENTER key again to display E Press Ø Økey once to display F Press ENTER key to display the ZERO IN DRY AIR screen G With the dry sensor held in air press ENTER key again to start automatic zeroing ...

Page 7: ...display a T FACTOR value screen like Adjust the displayed value to exactly match the sensor s GLI certified T FACTOR Use Ö Ö and Õ Õ keys to select digit and and Ø Økeys to adjust its value Then press ENTER key to enter the value 17 After the screen re appears press MENU key once and then ESC key once to display the MEASURE screen This completes GLI s DRY CAL calibration The transmitter is now rea...

Page 8: ...PRO series Model C3 Conductivity Transmitter Rev 0 201 8 ...

Page 9: ...ECTRICAL CONNECTIONS 3 1 GLI Contacting Conductivity Sensor 21 22 3 2 Two wire Hookup 23 3 3 Three wire Hookups load sinking or load sourcing with or without RS 485 serial communication 23 25 3 4 Four wire Hookups with or without RS 485 serial communication 25 26 3 5 Monitor Mode Hookups without current loop and with or without RS 485 serial communication 27 P A R T T H R E E O P E R A T I O N SEC...

Page 10: ...3 4 Configuring Analog Output SET PARAMETER representation 44 SET 4 mA and 20 mA VALUES range expand 44 45 SET FILTER Time 45 SET FAIL LEVEL Mode off 4 mA or 20 mA 45 3 5 SET PASSCODE feature enabled or disabled 46 3 6 Configuration Setting Summary ranges choices and defaults 47 48 SECTION 4 TRANSMITTER CALIBRATION 4 1 Important Information 49 50 4 2 ZERO Procedure first time sensor calibration on...

Page 11: ...2 Keeping Transmitter Calibrated 63 2 3 Avoiding Electrical Interference 63 SECTION 3 TROUBLESHOOTING 3 1 Ground Loops Determining if Ground Loop Exists 64 Finding Source of Ground Loop 65 3 2 Isolating Measuring System Problem Checking Electrical Connections 65 Verifying Sensor Operation 65 Verifying Transmitter Operation 65 66 Verifying Sensor Interconnect Cable Integrity 66 SECTION 4 TRANSMITTE...

Page 12: ...ial Communication 24 Figure 2 9 Three wire Hookup Load Sourcing 25 Figure 2 10 Three wire Hookup Load Sourcing with RS 485 Serial Communication 25 Figure 2 11 Four wire Hookup without RS 485 Serial Communication 26 Figure 2 12 Four wire Hookup with RS 485 Serial Communication 26 Figure 2 13 Monitor Mode Hookup without Current Loop without RS 485 Serial Communication 27 Figure 2 14 Monitor Mode Hoo...

Page 13: ...feature to restrict ac cess to configuration and calibration settings to authorized personnel only See PART THREE Section 3 5 for details It is highly recommended to calibrate the transmitter using GLI s simple DRY CAL method which eliminates the need to prepare a reference solution However the transmitter can be traditionally wet calibrated For calibration details refer to PART THREE Sections 4 2...

Page 14: ...re retained indefi nitely even if power is lost or turned off The non volatile transmitter memory does not require battery backup A label with the transmitter model number serial number and build date is located on its enclosure The transmitter is designed to provide protection from most normally encountered electromagnetic interference This protection exceeds U S standards and meets European IEC ...

Page 15: ...or manually fixed at a user entered temperature NOTE The selected measurement conductivity resistivity or TDS determines which of the following temperature compensation methods are available Linear per C slope built in ammonia temp properties table built in natural water temp properties table or no compensation Sensor to Transmitter Distance 300 ft 91 m maximum Power Requirements Two wire Hookup 1...

Page 16: ...re retained indefinitely with out battery backup EMI RFI Conformance Exceeds US and meets European standards for conducted and radiated emissions and immunity certified CE compliant for applica tions as specified by EN 50081 2 for emissions and EN 50082 2 for immunity Electrical Certifications General Purpose pending UL C UL FM and CENELEC Class 1 Div 2 pending UL C UL and FM Groups A B C D F and ...

Page 17: ...is recommended to locate the transmitter as close as possible to the installed sensor The maximum allow able distance between an installed sensor and the transmitter is 300 ft 91 m WARNING ALWAYS LOCATE THE TRANSMITTER IN A SAFE NON HAZARDOUS AREA THE TRANSMITTER IS NOT INTRINSICALLY SAFE 2 Mount the transmitter in a location that is Clean and dry where there is little or no vibration Protected fr...

Page 18: ...ardware kit Determine the mounting method and attach the hardware as shown 1 Fasten the wall pipe adapter to the wall or pipe 2 Using a blunt tool open both cable entry knockout holes in the back cover 3 Insert and twist the back cover onto the installed wall pipe adapter and tighten its screw to lock back cover onto adapter 4 Attach transmitter to back cover using its four captive screws FIGURE 2...

Page 19: ...e kit 1 Cut a 3 30 inch 84 mm square cutout hole in panel 2 Position panel mount gasket over cutout in front of panel and place retainer plate behind panel with its four threaded inserts facing away from back of panel 3 Attach transmitter to retainer plate using its four captive screws NOTE If panel is too thick remove captive screws from transmitter and use longer screws pro vided in hardware kit...

Page 20: ...mount assembly onto back end of sensor using coupling provided with GLI sensor only sensors with PRO1 suffix in their part number or an appropri ately sized coupling that you provide 3 Insert and twist back cover onto installed swivel mount assembly and tighten its screw to lock back cover onto swivel mount assembly NOTE To change mounting angle loosen swivel mount assembly by lifting tab on botto...

Page 21: ...rough the specified ferrite using the required number of loops DC Power Supply Cable GLI 1W0980 two conductor plus shield Connect cable shield to earth ground at the supply end Loop cable 4 times through ferrite Fair Rite Corp 2643102002 or equivalent Sensor Cable Keep cable shield as short as possible and connect it to the SHIELD terminal Loop cable 3 1 2 times through ferrite Fair Rite Corp 2643...

Page 22: ...not route the sensor cable in any conduit con taining AC or DC power wiring electrical noise may interfere with the sensor signal Also always re calibrate the system when the cable length be tween sensor and transmitter changes Depending on how transmitter is mounted route the sensor or interconnect cable into the transmitter as follows Wall Pipe mounted Transmitter Route cable through left side c...

Page 23: ...ter Route cable through right side cable entry knockout hole in the back cover Do not open left side cable entry knockout hole in cover Wiring Tip Use high quality shielded instrumentation cable 5 7 6 1 3 4 2 Loop Power 16 30VDC Loop Resistance See nomograph Jumper Required 16 0 600 300 RESISTANCE IN OHMS 100 200 400 500 700 800 30 DC VOLTAGE 18 20 22 24 26 28 50 Ohms Volt LOOP LOAD FIGURE 2 6 Two...

Page 24: ...ality shielded instrumentation cable Refer to the three wire hookup that meets your application requirements and connect the transmitter accordingly 1 2 3 4 5 6 7 Loop Resistance See nomograph Loop Power 14 30VDC Jumper Required 200 0 14 16 18 RESISTANCE IN OHMS 800 400 600 1000 1200 1400 DC VOLTAGE 20 22 24 26 28 30 50 Ohms Volt LOOP LOAD FIGURE 2 7 Three wire Hookup Load Sinking RS 485 Serial co...

Page 25: ...00 600 800 1200 1400 16 18 20 22 LOOP LOAD 50 Ohms Volt 26 24 28 30 FIGURE 2 10 Three wire Hookup Load Sourcing with RS 485 Serial Communication 3 4 Four wire Hookups In a four wire hookup the transmitter can be wired two ways depending on whether or not RS 485 serial communication is used At least 12 VDC is required for operation 16 VDC with serial communication Depending on how the transmitter i...

Page 26: ...nd connect the transmitter accordingly 5 7 6 1 3 4 2 Loop Power 12 30VDC Loop Resistance See nomograph External Power 12 30VDC 1000 RESISTANCE IN OHMS 16 14 12 400 200 0 800 600 1400 1200 LOOP LOAD 50 Ohms Volt 26 24 22 20 18 DC VOLTAGE 30 28 FIGURE 2 11 Four wire Hookup without RS 485 Serial Communication Comms Return 5 7 6 1 3 4 2 RS 485 Serial communications B A Loop Power 12 30VDC Loop Resista...

Page 27: ...t side cable entry knockout hole in the back cover Panel mounted Transmitter Route cable behind panel to the exposed TB1 terminal strip Integral Sensor mounted Transmitter Route cable through right side cable entry knockout hole in the back cover Do not open left side cable entry knockout hole in cover Wiring Tip Use high quality shielded instrumentation cable Refer to the monitor mode hookup that...

Page 28: ...ns within the three main branches of the menu tree are used to access edit selection screens for configuration EXIT screens at the end of each menu branch enable you to move up one level in the menu tree by pressing the ENTER key This is functionally the same as pressing the ESC key Edit Selection Screens These screens enter values choices to calibrate configure and test the transmitter The keypad...

Page 29: ...re to change a value or selection 4 Õ Õ and Ö Ö keys Depending on the type of displayed screen these keys do the following MEASURE Screen Changes readout in continuous loop sequence to show different measurements Menu Screens These keys are non functional Edit Selection Screens Moves cursor left or right to select digit for adjustment with and Ø Økeys 5 and Ø Ø keys Depending on the type of displa...

Page 30: ...RE screen at any time press the MENU key once and then press the ESC key once The MEASURE screen can show four different readout ver sions To select between them in continuous loop sequence press the Õ Õ or Ö Ö key These are examples of the different versions Ö Ö Ö Ö NOTE When the transmitter returns to its normal MEASURE screen mode the appearing readout is always the version last selected Note t...

Page 31: ... Tip For operating convenience the layers within each main branch are organized with the most frequently used function screens at their beginning rather than the function screens used for initial startup 1 With the MEASURE screen displayed pressing the MENU key always shows the branch selection screen Pressing the MENU key with any other type of screen displayed always returns the display to the t...

Page 32: ... SELECT SIM EXIT SIM SENSOR RESET CONFIGURE RESET CALIBRATE EXIT Menu Structure Tip A menu screen with a horizontal bar symbol at the start of its first line indicates there is a related submenu or edit selection screen A menu screen with a symbol at the start and a È symbol at the end of its second line indicates that you can select other screens within the same layer by pressing the Ø Ø key A sy...

Page 33: ...reen Edit Selection Screens always have a first line ending with a Pressing the Ø Ø or key changes the value choice enclosed by parenthesis second line on screen Example With this submenu screen displayed pressing the Ø Økey displays this related choice Use arrow keys to edit change the value choice enclosed by parenthesis examples shown above and below A choice can be changed by simply using the ...

Page 34: ...for English To select the other language 1 Press MENU key to display a MAIN MENU screen If the screen is not showing use Ø Øor key to display it 2 Press ENTER key to display 3 Press Ø Økey until screen appears 4 Press ENTER key to display Use Ø Øor key to view the other language choice With the other language displayed press ENTER key to enter this selection NOTE After a language is selected and e...

Page 35: ...or determines its inher ent measuring range Table A lists cell constants and their respective measuring ranges When configuring the meas uring units and display resolution for your application make sure they are within the sensor s inherent listed range If they are not choose a sensor with the appropriate constant Table A SENSOR CELL CONSTANTS and MEASURING RANGES Sensor Inherent Measuring Range C...

Page 36: ...ER key to enter this selection A time constant in seconds can be set to filter or smooth out the sensor signal A minimum value of 0 seconds has no smoothing effect A maximum value of 60 seconds pro vides maximum smoothing Deciding what sensor signal filter time to use is a compromise The higher the filter time the longer the sensor signal response time will be to a change in the actual process val...

Page 37: ...00 per C slope and 25 0 C reference temperature This provides the best results for most aqueous solutions To enter different slope and reference temperature values for an uncommon solution refer to subheading CONFIG LINEAR Temperature Compensation for details 3 With the desired choice displayed press ENTER key to enter this selection Only when TDS is selected must the transmitter be further config...

Page 38: ... to the desired conductivity to TDS conversion factor and press ENTER key to enter the value C After the screen re appears press ESC key once to return to the screen Only when LINEAR is the selected temperature com pensation determine if the transmitter should be further configured by entering a specific slope per C and a reference temperature If the built in AMMONIA or NATURAL WATER properties ta...

Page 39: ...temperature and press ENTER key to enter the value 6 After the screen re appears press ESC key once to return to the screen The top line of the MEASURE screen readouts that sepa rately show the measurement temperature and analog output values are factory set to read COND This notation can be changed for example to BASIN 1 to tailor the transmitter MEASURE screen to the application The top line wou...

Page 40: ...ide cover of its optional junction box head By entering this K value calibration including zeroing is only necessary when this sensor is replaced This also sets the transmitter measuring range to match the inherent range of the sensor s cell con stant 1 With the screen displayed press Ø Økey once to display 2 Press ENTER key to display 3 Press ENTER key again to display a screen like Use Ø Ø and k...

Page 41: ...ected to the transmitter a WARNING CHECK STATUS mes sage will appear To prevent or clear the message connect the element or select MANUAL 1 With the screen displayed press Ø Økey once to display 2 Press ENTER key to display 3 Press ENTER key again to display a screen like Use Ø Ø and keys to view both choices PT1000 Configures transmitter for use with a Pt 1000 RTD temperature element used in all ...

Page 42: ... affecting temperature measurement accuracy By entering the sensor s unique T FACTOR you enable the transmitter to provide the highest possible measuring accu racy for both temperature and conductivity 1 With the screen displayed press Ø Økey once to display 2 Press ENTER key to display a screen like Use arrow keys to adjust the displayed value to exactly match the sensor s GLI certified T FACTOR ...

Page 43: ...y 3 85 ohms to get 11 55 Then increase the sensor T FACTOR by adding 11 55 to it and entering that value If due to a shortened sensor cable the transmitter was reading 3 C less than the known solution tem perature you would decrease the sensor T FACTOR by subtracting 11 55 from it Sensors with a Pt 100 temperature element provide inherently less accurate temperature readings and are not recommende...

Page 44: ...to its active state The output can be assigned to represent the SENSOR measured conductivity resistivity or TDS or measured TEMPERATURE 1 With the screen displayed press key not Ø Økey twice to display 2 Press ENTER key to display 3 Press ENTER key again to display Use Ø Ø and keys to view both choices With the de sired choice displayed press ENTER key to enter this selection Parameter values can ...

Page 45: ...lter time the longer the analog output signal response time will be to a change in the measured value 1 With the screen displayed press Ø Økey once to display 2 Press ENTER key to display a screen like Use arrow keys to adjust the displayed value to the desired filter time and press ENTER key to enter the value When a WARNING CHECK STATUS message appears indicating that a system problem may exist ...

Page 46: ...a setting in the CONFIGURE menu by pressing the ENTER key a displayed notification re quests passcode entry A valid passcode entry saves the changed setting and returns the display to the MAIN MENU branch selection screen An incorrect passcode entry causes the display to momentarily show an error notification before returning to the MAIN MENU branch selection screen There is no limit on attempts t...

Page 47: ...XXMΩ cm orXXX XKΩ cm TDS XXXX ppm or XXXX ppb CONDUCTIVITY For 0 05 cell 20 00 µS cm For 0 5 cell 200 0 µS cm For 1 0 cell 2000 µS cm For 5 0 cell 20 00 mS cm For 10 cell 200 0 mS cm RESISTIVITY XX XX MΩ cm TDS XXXX ppm SENSOR SET FILTER 0 60 seconds 0 seconds SENSOR T COMPENSATION LINEAR AMMONIA NATURAL WATER or NONE LINEAR at 2 00 per C with 25 0 C reference temperature CONFIG TDS SELECT FACTOR ...

Page 48: ...Ω cm TDS 0 ppm or 0 ppb TEMP 0 0 C or 32 0 F OUTPUT SET 20mA VALUE CONDUCTIVITY µS cm 0 2 000 0 20 00 0 200 0 or 0 2000 mS cm 0 2 000 0 20 00 or 0 200 0 RESIST 0 19 99 MΩ cm or 0 999 9 KΩ cm TDS 0 9999 ppm or 0 9999 ppb TEMP 20 0 to 200 0 C or 4 0 to 392 0 F CONDUCTIVITY µS cm 2 000 20 00 200 0 or 2000 mS cm 2 000 20 00 or 200 0 RESIST 19 99MΩ or999 9KΩ cm TDS 9999 ppm or 9999 ppb TEMP 200 0 C or ...

Page 49: ...vity refer ence solutions It also automatically sets the transmitter measuring range to match the inherent range of the sen sor s cell constant Furthermore DRY CAL eliminates the need to periodically re calibrate The only re quirement depending on the application may be periodic cleaning of the sensor Only when the sensor is replaced is a new DRY CAL calibration necessary In addition to zeroing an...

Page 50: ... if it is being calibrated for the first time If not disregard this subsection and proceed with sensor span calibration Section 4 3 or Section 4 4 Recommendation For best accuracy when using a new sensor perform a RESET CALIBRATE using the TEST MAINT menu PART THREE Section 5 8 before zeroing 1 Make sure that the sensor is dry before zeroing 2 Press MENU key to display a MAIN MENU screen If the sc...

Page 51: ...Since the inherent ohm value of the Pt 1000 RTD tem perature element built into each sensor varies slightly GLI tests each sensor to provide its specific T FACTOR If these two GLI certified values were previously entered during initial setup Section 3 2 under their respective sub headings DRY CAL calibration is complete If the certified values have not been entered use the steps in the following s...

Page 52: ...lection 8 After the screen re appears press Ø Økey once to display 9 Press ENTER key to display a cell K value screen like Use arrow keys to adjust the displayed value to exactly match the sensor s GLI certified K value and press ENTER key to enter the value After entering the K value complete DRY CAL calibration by entering the GLI certified T factor 1 With the screen displayed press ESC key once...

Page 53: ...ect cable resistance Multiply the 3 C difference by 3 85 ohms to get 11 55 Then in crease the sensor T FACTOR by adding 11 55 to it and entering that value If due to a shortened sensor cable the transmitter was reading 3 C less than the known solution temperature you would decrease the sensor T FACTOR by subtracting 11 55 from it Sensors with a Pt 100 temperature element provide inherently less ac...

Page 54: ...e water that is 25 C to obtain the listed conductivity Solution con ductivity can be decreased by dilution with de ionized water Table C CONDUCTIVITY REFERENCE SOLUTIONS Desired Solution Value Grams NaCl µS cm mS cm ppm NaCl To Be Added 100 200 500 0 10 0 20 0 50 50 100 250 0 05 0 10 0 25 1000 2000 3000 1 00 2 00 3 00 500 1010 1530 0 50 1 01 1 53 4000 5000 8000 4 00 5 00 8 00 2060 2610 4340 2 06 2...

Page 55: ...his active screen appears showing the measurement reading NOTE During calibration the analog output is auto matically held at the last measured value 6 Wait for the reading to stabilize which may take a few minutes Then press ENTER key The PLEASE WAIT screen may appear if the reading is still too unstable After the reading has stabilized this static screen appears showing the last measured value 7...

Page 56: ...NOTE When the passcode feature is enabled Section 3 5 you must successfully enter the passcode before attempting to calibrate the analog output Also the transmitter adjustment range for output values during calibration is 2 mA 1 Press MENU key to display a MAIN MENU screen If the screen is not showing use Ø Øor key to display it 2 Press ENTER key to display 3 Press Ø Økey once to display 4 Press E...

Page 57: ... the screen re appears press Ø Økey once to display 9 Press ENTER key to display a screen like Once again the displayed value is counts not mA that dynamically change when the output is adjusted 10 Now measure the actual maximum mA output in the loop with the digital multimeter 11 Use arrow keys to adjust the maximum output value to read exactly 20 00 mA on the digital multimeter not the transmitt...

Page 58: ...re is enabled Section 3 5 you must successfully enter the passcode before attempting to use the TEST MAINT menu screens The system diagnostic capabilities of the transmitter enable you to check the operating status of the transmitter and sensor The MEASURE screen will flash the WARNING CHECK STATUS message when a sensor or transmitter FAIL diagnostic condition has been detected To deter mine the c...

Page 59: ...ure to hold the analog output at the last measured value for up to 30 minutes sus pending operation of any connected device 1 With the screen displayed press Ø Økey once to display 2 Press ENTER key to immediately hold the analog output HOLD OUTPUT ENTER TO RELEASE screen appears acknowledging hold is applied NOTE If the keypad is not used within 30 minutes the analog output will automatically cha...

Page 60: ...u branch press ESC key or ENTER key You can check the firmware EPROM version used in the transmitter 1 With the screen displayed press Ø Økey until screen appears 2 Press ENTER key to view the EPROM version screen 3 To return to the previous level of the TEST MAINT menu branch press ESC key or ENTER key You can simulate a measured value to make the analog output respond accordingly First select th...

Page 61: ...on 5 5 set the desired simulation value 1 With the screen displayed press Ø Økey once to display 2 Press ENTER key to display a screen like NOTE The analog output signal is now active It has a mA value that corresponds to the measurement value shown on this screen 3 Use arrow keys to adjust the displayed simulation value to the desired value 4 To remove the simulated output and return to previous ...

Page 62: ...dging that reset has occurred 4 To return to the previous level of the TEST MAINT menu branch press ESC key or ENTER key You can conveniently reset all stored calibration settings but not configuration settings to factory set defaults 1 With the screen displayed press Ø Økey until screen appears 2 Press ENTER key to display the RESET CALIBRATE ARE YOU SURE screen asking if you really intend to per...

Page 63: ...erating manual If the DRY CAL method PART THREE Section 4 3 was used to calibrate the transmitter re calibration is only needed when replacing the GLI conductivity sensor If the transmitter was calibrated using the 1 POINT SAMPLE method you must periodically re calibrate In all cases always calibrate the transmitter when replacing the sensor NOTE If your measuring application requires utmost accu ...

Page 64: ... Common Causes of a Ground Loop Components such as recorders or computers are connected to non isolated analog outputs Not using shielded cabling or failure to properly connect all cable shields Moisture or corrosion in a junction box The following simple test can help to determine if there is a ground loop 1 With the conductivity MEASURE screen displayed put the sensor in a non conductive contain...

Page 65: ...electrically conductive the source of the ground loop may not be readily apparent When experiencing problems try to determine the primary measurement system component causing the problem sen sor transmitter or interconnect cable if used 1 Verify that adequate DC voltage exists at the appropri ate transmitter TB1 terminals 2 Check all transmitter wiring to ensure proper connec tions To verify senso...

Page 66: ... 2 Ω 32 Ω 64 Ω 320 Ω 640 Ω 0 9999 ppb 3 2 KΩ 32 KΩ 64 KΩ 320 KΩ 640 KΩ NOTE 1 When measuring ultrapure water as conductivity less than 1 00 microSiemens cm an 877 KΩ resistance will display 0 057 µS cm When measuring ultrapure water as resistivity a 910 KΩ resistance will display 18 2 MΩ z cm Verifying Interconnect Cable Integrity 3 Reconnect DC power to the transmitter 4 Verify that the transmitt...

Page 67: ...a m to 3 00 p m 6 30 a m to 2 00 p m 5 30 a m to 1 00 p m All transmitters returned for repair or replacement must be freight prepaid and include the following information 1 A clearly written description of the malfunction 2 Name of person to contact and the phone number where they can be reached 3 Proper return address for shipping transmitter s back Include preferred shipping method UPS Federal ...

Reviews: