background image

Note :

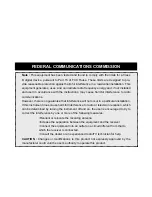
 This equipment has been tested and found to comply with the limits for a Class 

B digital device, pursuant to Part 15 of FCC Rules. These limits are designed to pro-

vide reasonable protection against harmful interference in a residential installation. This 

equipment generates, uses, and can radiate radio frequency energy and, if not installed 

and used in accordance with the instructions, may cause harmful interference to radio 

communications.

However, there is no guarantee that interference will not occur in a particular installation. 

If this instrument does cause harmful interference to radio or television reception, which 

can be determined by turning the instrument off and on, the user is encouraged to try to 

correct the interference by one or more of the following measures:


•Reorient or relocate the receiving antenna.


•Increase the separation between the equipment and the receiver.


•Connect the equipment into an outlet on a circuit different from that to  


which the receiver is connected.


•Consult the dealer or an experienced radio/TV technician for help.

CAUTION :

 Changes or modifi cations to this product not expressly approved by the 

manufacturer could void the user’s authority to operate this product.

FEDERAL COMMUNICATIONS COMMISSION

Summary of Contents for WK2000 SE

Page 1: ...D I G I T A L K E Y B O A R D S owners manual wk2000 se English ...

Page 2: ...owl kitchen sink in a wet basement or near a swimming pool or the like 5 This product should only be used by a stand or cart that is recommended by the manufacturer 6 This product either alone or in combination with an amplifier and headphones or speakers may be capable of producing sound levels that could cause permanent hearing loss Do not operate for a long period of time at a high volume level ...

Page 3: ... Song Style Mode Page 10 Song Mode Performance Real Time Performance Style Performance Single touch play settings Song Style Performance Song Performance Tracks Sounds Page 11 Connections Output Right Mono Left Input Right Mono Left Vocal Processor optional card MIC LINE GAIN MIDI Pedals Page 12 Computer Video interface Headphones Music Stand Display Data entry Page 13 Entering Alphanumeric data E...

Page 4: ...To play a USER style loaded in memory THE SAVING OPERATIONS Page 27 The saving procedure to the floppy disk The saving procedure to the hard disk optional THE COPY FUNCTION Page 28 How to copy a file from the floppy disk to the hard disk optional Unprotect the hard disk procedure How to copy an entire content of a floppy on the hard disk optional Page 29 Create a new partition on the hard disk opt...

Page 5: ...p the MIC LINE signal level Sampling procedure and Sample selection The sample edit parameters VOCAL PROCESSOR Page 46 Vocal Processor Activation Vocal Processor Preset selection Vocal Processor parameter edit Programmable PADS Page 47 The PADS assign procedure MIDI Page 48 The computer port Tracks and MIDI Channels Rules for MIDI connection Assign MIDI channel MIDI Lock Common and Chord channel M...

Page 6: ...ld the UPPER 1 selector button located to the right of the display together with the PADS buttons 2 3 and 4 The display shows the message SysRESET for a few seconds the sets ready for playing PRELIMINARY NOTES System reset The WK2000 SE is fitted with a Ni Cd rechargeable battery to retain data while the instrument is off The battery is recharged while the instrument is turned on not just plugged ...

Page 7: ...e WK2000 SE features 96 ROM Styles which provide automatic accompaniments Each Style has 4 Variations consisting of Basic Intro Fill and Ending patterns totalling 40 different patterns It is also possible to record your own Styles Programmable Styles Up to 8 User Styles can be recorded and stored to memory 96 103 Direct Style Memory and Direct Sound Memory sections The WK2000 SE allows you to sele...

Page 8: ... indicator on orstopsplaying displayindicatoroff after releasing the keys from the keyboard below the split point 11 BASS TO LOWEST The Sound assigned to the Lower key board section continues playing display indicator on or stops playing display indicator off after releasing the keys from the keyboard below the split point 18 START STOP Starts and stops a Style 12 VARIATION 1 2 3 4 These keys chan...

Page 9: ... disk drive operating functions Load Save Delete Format when transferring data to disk SAVE or from disk LOAD 33 HARD DISK Enters the Hard Disk operating functions Load Save Delete Format and Utility which allow you to organise the Hard Disk data 25 PROGRAMMABLE PADS These four buttons provide sounds or samples that can be played in real time All buttons are assignable samples or percussive sounds...

Page 10: ...ng the VOLUME pedal optional allows you to control the overall volume or section volume 4 COMPUTER The Serial port permits to connect the WK2000 SE to a com puter Apple Macintosh or IBM PC and compatibles Data interchange between WK2000 SE and PC or Mac requires appropriate setting in the MIDI General functions 5 MIDI A MIDI interface MIDI IN OUT and THRU communicate with other external devices fi...

Page 11: ... a medley 2 The Demo Song starts 3 To stop the Demo Song press the function key again or press the DEMO key to exit 4 Listen to a Song directly from Floppy disk Press the LYRICS the Song lyrics are displayed in the reading area of WK2000 SE Press PLAY STOP or START STOP to start the song direct from disk The Wait Message is shown for a few seconds then the selected song starts playing Rotate the D...

Page 12: ...ll volume of the instrument Two thirds of the maximum range of the dial is recommended 4 3 2 1 Play on the keyboard the selected Performance recalls a different com bination of sounds The keyboard setting may also change Split or Full mode Sounds and keyboard mode depend on the selected Performance The Split point is the same for all Performances 3 Select a Performance Use the Function keys F1 F9 ...

Page 13: ...ssible to regulate the general effect volumes to suit the surroundings Although each Performance recalls appropri ate effect volume and mixer settings for each track a general setting can be applied to render the General Effect Volume more or less intense with a single command Press the PAGE RIGHT buttons repeatedly to scroll through the 22 Reverb or Chorus effects 2 You can modify the pitch of th...

Page 14: ... to reach the maximum value 12 or 12 is reached If you have purchased the optonal Generalmusic pedals volume and footswitch pedals connect them to the relative Volume and Damper pedal on the rear panel Pedals will add the following controls Use the pedals Damper Damper sustain Pedal Switch Upper1 2 Start Stop Fill Fill Fill Intro Ending Volume Master Volume Transpose the instrument If you press bo...

Page 15: ...YLE from the Style selection keypad This is the default mode when WK2000 SE is started Style and Real Time modes Style accompaniments OFF Drums 1 Bass 2 Acc 1 3 Acc 2 4 Acc 3 5 Upper 1 8 Upper 2 7 Lower 6 Sounds and accompaniments can be selected in the following ways Selecting a Style by specifying the corresponding number on the Style Song selection keypad or by using the Direct Style Memory but...

Page 16: ...or a total of 960 preset settings 63 user programmable Performances are arranged in 7 PERFORMANCE GROUPS Performances recall combinations of the keyboard sounds panel settings Style Variation and Tempo Real Time Performance Press the PERFORMANCE RECALL button to quickly access the Performances select them with the F1 F9 buttons Hold down the same button to activate the STORE PERFORMANCE command wh...

Page 17: ...ear panel Stereo Right Mono Left output jacks allows the WK2000 SE to be connected to an external amplification system keyboard amplifier domestic stereo system mixing console etc The signal is delivered processed by the instrument s internal effects processor For stereo reproduction connect two jack cables to the Left and Right jacks For Mono reproduction connect to the Right Mono jack to exclude...

Page 18: ... performed on the instrument The user interface is divided into 7 areas Mac Connect to the Mcintosh Modem port via a standard serial cable DB8 DB8 Programme the sequencer to communicate with WK2000 SE PC Connect to the PC Serial port via standard DB8 DB9 DB8 DB25 cables Select the appropriate communication velocity in the WK2000 SE to communicate with the PC see EDIT GENERAL chapter 1 MENU left It...

Page 19: ...pheral Each keyboard note corresponds to a letter number or a symbol Up to 7 character names can be entered through the keyboard keys up to 8 characters when in FLOPPY DISK mode The table below illustrates the position of the characters on the keyboard ENTERING ALPHANUMERIC DATA The ENTER command confirms an operation and the values assigned to the modified parameter In some function pages Enter c...

Page 20: ...e left of the Split point will be silent The UPPER 1 and UPPER 2 sections can be activated or deactivated according to your requirements FULL MODE Enables the sound assigned to the UPPER1 section Enables the sound assigned to the UPPER2 section The SPLIT divide the keyboard into two separate sections so that two differ ent Sounds can be used at the same time one Sound will be assigned to the secti...

Page 21: ...r its content Banks 1 2 and 3 are GMX compatible GMX is an extended General Midi standard created by Generalmusic WK2000 SE Drumkits are contained in Banks 2 3 and 4 112 119 You can choose among the 17 Drumkits are available The relative drum maps are provided in the Appendix to the Owner s Manual Bank 4 offers an extra Drumkit Drum SFX To assign a Drumkit to one of the keyboard sections proceed a...

Page 22: ...et the values Select a track with the corresponding function button F1 F9 under the display 1 Recall a Sound using the procedure already described Rotate the DIAL to control the track volume 2 Press the corresponding function button repeatedly to obtain the OFF status It is not possible to change the ON OFF status of the Real Time keyboard tracks with the corresponding function buttons F7 F9 see p...

Page 23: ...formance or selecting the current one again will imply losing your data unless you save them STORE PERFORMANCE IMPORTANT using this function the factory set Performances will be restored to the original memory locations clearing the location contents Make sure that your programmed performances will be saved to a Floppy Disk before resetting with RESTORE To save Performances to disk refer to the Di...

Page 24: ... disappears for an instant then reappears again The memory button stores the memorised Style until you decided to save a different Style to the same location The configuration of the direct access buttons Style and Sound can be saved to floppy disk or Hard disk using the Save Performance operation Recall a Style using the Direct Style Memory buttons Recalling a Style from a Performance Each Perfor...

Page 25: ...re playing you can switch from a Variation to another by simply pressing the desired Variation key An appropriate INTRO a FILL and an ENDING are associated to each Variation Stops a Style accompaniment with an ending coda The corresponding display indicator turns on when ending is selected If you press ENDING before the Style start it plays as an Introduction ENDING VAR 1 VAR 2 VAR 3 VAR 4 You may...

Page 26: ...ple if a Style track is flashing the Dial will change the relative Volume The current Tempo can be stored to a Performance and be ready for new settings STYLE TEMPO To recap it is possible to A Select a Style with Single Touch Play active and recall the original Style tempo from the ROM B Recall a Performance where a user programmed Tempo was stored C Establish a Tempo that will not be subject to ...

Page 27: ...trument It will remain in WK2000 SE memory even if this is turned off Press the CURSOR button to move to the split point selection 2 HOW TO SET A NEW SPLIT POINT The display will show the default split setting with a message B3 C4 ARRANGE MODE The WK2000 SE has 4 different Chord recognition modes which trigger the automatic accompaniment in different ways FINGERED 1 FINGERED 2 ONE FINGER FREESTYLE...

Page 28: ... also allows quick access to the PERFORMANCE function If you press and hold this button for about 2 seconds the arrowhead goes directly next to the PERF menu function and sets the instrument to Performance mode without using the cursor buttons The STYLE LOCK function allows you to select Performances without changing the current Style With STYLE LOCK active corresponding display indicator on you c...

Page 29: ...ction a feature which can orchestrate your playing making simple one note melodies sound as if they are being played by a full orchestra The corresponding display indicator turns on when HARMONY is active The structure of the automatic harmony is based on the current Harmony Type setting and operates only when the keyboard is split By holding down the HARMONY button for about 2 seconds the display...

Page 30: ...hand numeric keypad or specify a partition number on the same keypad followed by ENTER When the partition is open use the Dial or buttons as navigation tools and work as if you were using a normal floppy disk The Hard Disk functions are identical to those used in the Floppy Disk LOAD SAVE DELETE FORMAT and UTILITY Access to the Hard Disk Any file handling operation concerning the transfer of data ...

Page 31: ...lso load Samples from WK2000 SE WK2 WK3 and PK7 disks LOADING SONG STYLES Disk or Partition data can be loaded into the WK2000 SE RAM using one of the following methods As single elements Load Song Load Style Load MidiFile As a set of files corresponding to Groups Load Styles Load Performance Performance Groups Load Samples As an ALL file all the data contained in the disk previously loaded with t...

Page 32: ...SONG STYLES The floppy disk may contain the following file types SONGS MIDI FILE STYLES PERFORMANCES and SAMPLES RECOGNISING FILES WITH EXTENSIONS Load all the Styles as a group Entered the Disk mode Press the PAGE button The word STYLES will appear in the display Press ENTER to start the loading procedure 3 2 1 Load all the files on disk Press PAGE again The message ALL will appear in the display...

Page 33: ...ained in the RAM memory appears in the display Note If the disk drive contains An unformatted disk pressing SAVE prompts the message UNFORMAT A protected disk pressing SAVE prompts the message PROTECTED A damaged disk pressing SAVE prompts the message CORRUPTED If you want to write a different name for the Song use the keyboard as already described for alphanumeric entry in the first chapter If yo...

Page 34: ...n is restored every time you start the instrument It is better to select the first partition of the hard disk Insert a floppy in the drive and select the file to copy Press the FLOPPY DISK button Pressing the CURSOR right button repeatedly you can select the COPY FILE page of the menu 2 1 Select from the floppy the file to copy by rotating the DIAL Once you have selected the file press ENTER to co...

Page 35: ...partition Use the keyboard to write the name Up to 8 characters can be used The display requests confirmation of the operation with the message SURE The new Hard Disk partition is created in few seconds Insert a floppy in the drive Press the FLOPPY DISK button Press the PAGE right button repeatedly to select the COPY page 2 1 Press ENTER to confirm 3 Select the partition you have created by rotati...

Page 36: ...the DISK functions If you are formatting a used disk remember that the format process cancels all data present on the disk THE DELETE FUNCTION The Delete function allows the cancellation of a single file from a floppy disk or Hard Disk partition DELETING FILE PROCEDURE IN THE FLOPPY DISK Insert a the floppy disk that contains the file to erase into the drive Press the FLOPPY DISK button then move ...

Page 37: ...mely warm or cold places Do not expose them to direct sunlight Protect them from dust or dirt Do not place objects on top of a Floppy Disk Always return a Floppy Disk in a protective case after use It is advisable to keep back up copies of all your floppy disks Back up is technical jargon for a second copy of a disk Backup copies of your data stored in a safe place are extremely important to safeg...

Page 38: ...if the memory locations are not all in use How to select a Song If you wish to playback your Song directly without loading it to WK2000 SE internal memory seek for it in the Floppy Disk and play START STOP to start it Refer to the DISK chapter for more detailed instructions SONG PLAYBACK Selecting a Song from the memory proceed as follows to play it After selecting the Song press the PLAY STOP key...

Page 39: ...F9 toggle between tracks 01 08 and 09 16 you ll find that there are no free tracks to play along with the Song during playback If one or more tracks are off this indicates that they are not engaged by the sequencer If you want to play along with your Song you can either Disengage one of the tracks used by the Song Activate one of the tracks not used by the Song B Select a Song and press PLAY STOP ...

Page 40: ...V channel Select the desired Song Press the PLAY STOP key to start the selected Song 4 4 3 2 1 SONG STYLE A Song Style is an 8 track Song created by recording a Style Rom or User with the keyboard tracks Upper 1 Upper 2 Lower Song Styles capture the chords that trigger the Style accompaniment patterns on a Chords track and you can choose to record one or more keyboard tracks according to your requ...

Page 41: ...e you can record two keyboard tracks Upper 2 Lower with accompaniments then use Upper 1 to play the melody in real time with the Song Style in playback Song Styles record all panel interventions made during the recording changes of Style use of the Intro Fills Endings Fade In Out activation deactivation of the effects Harmony On Off and more The events generated by the panel interventions are reco...

Page 42: ...ss RECORD or ESCAPE to escape the Sequencer Press PLAY STOP to start the playback 2 1 2 As an alternative you can use the Fill or Ending as an intro You can also use the Fade In to bring in the accompaniments with a gradual increase of volume Now you can proceed as you would with a normal Style Listen to the Song Style Playback If a keyboard track is not engaged by the sequencer you can use it to ...

Page 43: ...ated by the panel interventions effected during the recording changes of Var Fill etc Clear Common cancels all these type of events from the recording Clear Song Style User Song Style If the Song Style is not to your satisfaction it is possible to intervene by cancelling some parameters by means of the CLEAR function The CLEAR function is incorporated within the RECORD operations Hold down the REC...

Page 44: ...jor1 basic Major2 basic Major3 basic Major4 basic minor1 basic minor2 basic minor3 basic minor4 basic 7th1 basic 7th2 basic 7th3 basic 7th 4 basic IntroMajor1 IntroMajor2 IntroMajor3 IntroMajor4 Introminor1 Introminor2 Introminor3 Introminor4 Intro7th1 Intro7th2 Intro7th3 Intro7th4 EndMajor1 EndMajor2 EndMajor3 EndMajor4 Endminor1 Endminor2 Endminor3 Endminor4 End7th1 End7th2 End7th3 End7th4 Fill1...

Page 45: ...onal Step To change the basic parameters press the MODE function button As soon as the User Style recording mode is enables the default settings of the automatically selected RIFF are Setting the Time Signature The Tempo counter blinks in the display Press the CURSOR button to move the flashing cursor and rotate the DIAL to enter the desired value The Time Signature available values are the follow...

Page 46: ...ice to disengage the Drums sound from the keyboard In our example the next track to be recorded is the Bass track corresponding to F2 function button The Drums track will be indicated in PLAY mode in the display while the Bass track starts blinking Drums track will start playing while the Bass track is being recorded press the START STOP button to stop recording 8 Press twice the Function button r...

Page 47: ...new elements to a recorded RIFF Set the RIFF to Record mode Play the notes you wish to add to the pattern The new music parts will be added overdub the existing ones Stop the recording and repeat the procedure for each track you wish to edit 3 2 1 If you wish to further improve the pattern stop the execution by pressing the START STOP buttons Select a new quantize value and listen to the newly mod...

Page 48: ... All A recorded track is identified by the name appearing above the Program Change number Enter the Record mode and press the CLEAR button Select the Riff you wish to cancel using the buttons in the numeric keypad 2 Select the Variation by pressing the relative button Select the track you wish to cancel by pressing the corresponding Function buttons F1 F5 Select the CLEAR ALL function by rotating ...

Page 49: ... PERF STORE button for one second Press ENTER to confirm The modifications are directly stored in the User Style location Follow the recording procedure as already described Assigning a name to a User Style You can assign a name to your User Style according to the instructions described in the Performance chapter IMPORTANT Make sure that you are in Record mode when you wish to assign a name to a S...

Page 50: ...sign a different effect 2 You can scroll over the 22 different types of effect available for each DSP unit The same effect can be selected from both the DSP units To control the general effect volume move with the CURSOR button to the volume and modify it by rotating the DIAL 3 To exit the effect function use the arrow button or press ESCAPE 4 The selected effects have now been assigned to the cur...

Page 51: ...le to a keyboard track using the normal sound assignment procedure already explained 3 Once captured the Sample can be edited by means of specific editing parameters As soon as you have sampled the PAGE buttons are enabled for the change of page relating to the sample edit functions The DIAL modifies the value of the parameters shown in the 3 digit display area Applies a fine tune to the sample up...

Page 52: ...OFF status VOCAL TRACK Off This button allows to adjust the external signal MIC LINE and their parameters according to your needs Press the PAD 2 EQUAL MIC button the display show you the first PAGE parameters MIC ON VOLUME 127 LINE ON VOLUME 82 Each time you press the CURSOR button you select the various page parameters MIC ON OFF MIC VOLUME LINE ON OFF LINE VOLUME NOTE the presence of the simbol...

Page 53: ... to select the next parameters PAGE PARAMETER Description LOW GAIN Sets the microphone equalizer gain response in low frequency range value 12db HI GAIN Sets the microphone equalizer gain response in high frequency range value 12db MID GAIN Sets the microphone equalizer gainresponseinMiddlefrequency range value 12db MID FREQ Shift the equalizer middle fre quency range value from 0 to 14 The parame...

Page 54: ...ot connect the same MIDI ports both IN or both OUT between two instruments In the connections with external MIDI devices the tracks of the external device and WK2000 SE must be tuned to the same MIDI channels Rules for MIDI connection The main uses of the Common and the Chord Channel are To control the entire WK2000 SE keyboard with a Master keyboard The master keyboard must transmit on the same c...

Page 55: ...e the DIAL to assign the MIDI channel assignment Play on the WK2000 SE keyboard to send data to the external ex pander You will hear WK2000 SE sounds play together with the ex pander s sounds 6 5 4 1 NOTE Program the track as you wish setting sounds volumes pan ef fects etc The MIDI channels of the WK2000 SE sections must match those of the expander Alternatively consult the expander s owner s man...

Page 56: ...ed of 31250 baud PC1 or 38400 baud PC2 Use standard serial cables of the DB8 DB9 DB8 DB25 types connect WK2000 SE to the PC serial port Set the COMPUTER parameters to PC1 or PC2 in MIDI GENERAL IBM PC In this setup Song mode and with the correctly assigned MIDI channels the MIDI messages generated by the WK2000 SE keyboard are sent from the WK2000 SE MIDI OUT received by the MIDI IN of the compute...

Page 57: ...om 80 to 87 Styles from 81 to 88 LATIN 1 CC 0 32 CC 32 0 From 88 to 95 Styles from 82 to 96 LATIN 2 RAM Memory Locations From 96 to103 CC 0 44 CC 32 0 From 0 to 7 From 1 to 8 USER STYLES The Style controls can be simulated by sending ControlChange 80 and 81 messages to WK2000 SE with the values shown in the following table If the master keyboard features programmable keys some of the following mes...

Page 58: ...atibility with other Generalmusic instruments Selecting Sound banks via MIDI Bk 1 2 3 5 6 CC 00 vv vv bank value Prg Chng from 1 to128 CC 00 vv vv bank value Prg Chng from 1 to128 WK2000 SE offers additional MIDI parameters which add versatility to the instrument The parameters can be recalled from MIDI GENERAL mode General MIDI ON OFF Channel Lock More details are explained in the MIDI GENERAL ch...

Page 59: ...h the buttons Rotate the DIAL to assign a MIDI channel to the track or to set the Off status Another way of instantly selecting a track is to press the corresponding function button F1 F9 After the track n 16 the buttons select the Common track then the Chord track both displayed with the associated channel number Use the Dial to assign a different MIDI channel to the Common and Chord track the Ch...

Page 60: ... sequencer CLOCK EXT connected to WK2000 SE MIDI IN port in this case use the TEMPO DATA buttons to select External mode G Midi if WK2000 SE is set to General MIDI ON the instrument becomes compatible with all MIDI Files that are loaded to the memory If you wish to communicate via MIDI with instruments that are not General MIDI compatible it is advisable to set WK2000 SE to General MIDI OFF positi...

Page 61: ...owners manual wk2000 se Page55 Appendix WK2000 SE MANUAL APPENDIX ...

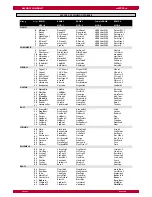
Page 62: ... 26 JazzGtr1 OctJzGtr2 Hawaiian MeloTom2 27 CleanGtr ElGuitar1 ChorusGtr2 808_Tom 28 MutedGtr Muted2 Dyn Muted GtCutNse 29 OverdrGt WhaGtr1 5thOverdr2 StrnSlap 30 DistGtr FuzzGtr HeavyGt2 Rain 2 31 HarmonxGtr SlowHarmx2 HarmGtr32 Thunder BASS 32 AcoustcBs1 AcoustcBs2 AcousticBs3 Wind 33 FingBass Dyn Fingrd Dyn Bass1 Stream 34 PickBass Dyn Bass2 PckBass22 Bubble 2 35 Fretless AcidBass1 Flanged Dog ...

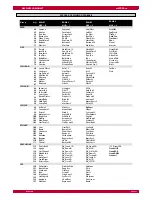
Page 63: ...ad Obx12 AnlgPad2 90 Polysynth2 Fantasy22 Fantasy32 91 SpaceVoice VocBells2 Angels2 92 BowedGlass2 Prophet12 Prophet22 93 MetalPad2 Bright22 Analogic2 94 HaloPad2 Slave2 Atmosphere2 95 SweepPad Machiner2 Decay32 SYN SFX 96 IceRain2 Noiseres BigRoom 97 Soundtrack2 MoonWind2 Slope2 98 Crystal Wind2 SynLead22 99 Atmosphere2 Arp26000 GlockAthm2 100 Brightness WithGas2 PopUp2 101 Goblin Resonance2 NoGr...

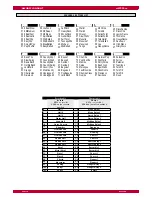
Page 64: ...ble Turk7 8 PopBeguine RhumbaClass Flamenco Turk5 8 LatinBand Guajira Sevillana Duek LATIN1 LATIN1 LATIN2 LATIN2 WORLD1 WORLD1 WORLD2 WORLD2 64 72 80 88 65 73 81 89 66 74 82 90 67 75 83 91 68 76 84 92 69 77 85 93 70 78 86 94 71 79 87 95 POP1 00 8BeatSlow LiteFunk SoftRock Waltz1 6 8Polka BasicTrio CountryPop1 01 8BtMedium 6 8Sweet HeavyRock Waltz2 Folk2 4 DiscoCha SlowSwing CountryPop2 02 8BeatFas...

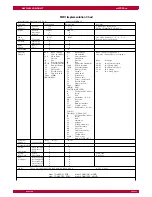
Page 65: ...ÃÌ n xäÊ À i Ì ÊV ÌÀ n xxÊ ä ÈÎ i ÊÌ iÊ iÀv ÈÇ vÌÊ i È iÀÊ i xÈ È Ê ä È Ã iÛiÀLÊ i Ì ÈÈ ÕÃÌ ÈÓÊ ä È Ê ÌÞ ià ΠÀÕÃÊ i Ì ÈÇ vÌÊ i n ÇÓ ÌÌ V ÊÌ i ää ä ÇÎ i i ÃiÊÌ i Ç ÌiÀÊ ÊVÕÌ vvÊvÀiµ iÛiÀLÊ i Ì Î ÀÕÃÊ i Ì n ää ä ÌÀ ÊxäÊ Ê äÊ Ê µÕ Õà Õà nÊ ÌÀ ÈÊ Ó ÓÇÊ 6 À Ì ÃÊ Ó Î äÊ iÞÊÃÌ ÀÌ x Ê i È Ê Ì ÀÞÊà ÜÉv ÃÌ ÈÈ ÈÇÊ i Ê V Ê iV Èn È Ê iÀv À ViÊ V Ê iV ÌÀ Êx ÊQä ÈÎRÊÊ QÈ ÓÇR äÊ Ê µÕ Õà Õà nÊ ÌÀ ÈÊ ÎÓÊ À Þ ÎÎÊ À...

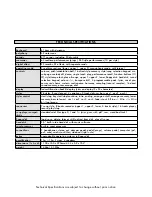
Page 66: ...yles 8 user progr 4 variations 5 tracks drums bass acc 1 acc 2 acc 3 styles control start stop key start stop continue intro ending arrange on off arrange memory lower memory bass to lowest var 1 var 2 var 3 var 4 fade in out fill in a fill in fill in b tap tempo sequencer 7 song style 8 tracks recorder upper 1 upper 2 lower 5 tracks style 16 tracks player record play stop song player compat ibili...

Page 67: ...ular installation If this instrument does cause harmful interference to radio or television reception which can be determined by turning the instrument off and on the user is encouraged to try to correct the interference by one or more of the following measures Reorient or relocate the receiving antenna Increase the separation between the equipment and the receiver Connect the equipment into an ou...

Page 68: ...eralmusic S p A Via delle Rose 12 47842 S Giovanni in Marignano RN Italy Tel 39 0541 959511Fax 39 0541 957404 www generalmusic com STOCK CODE 271477 Specifications are subject to change without prior notice ...

Reviews: