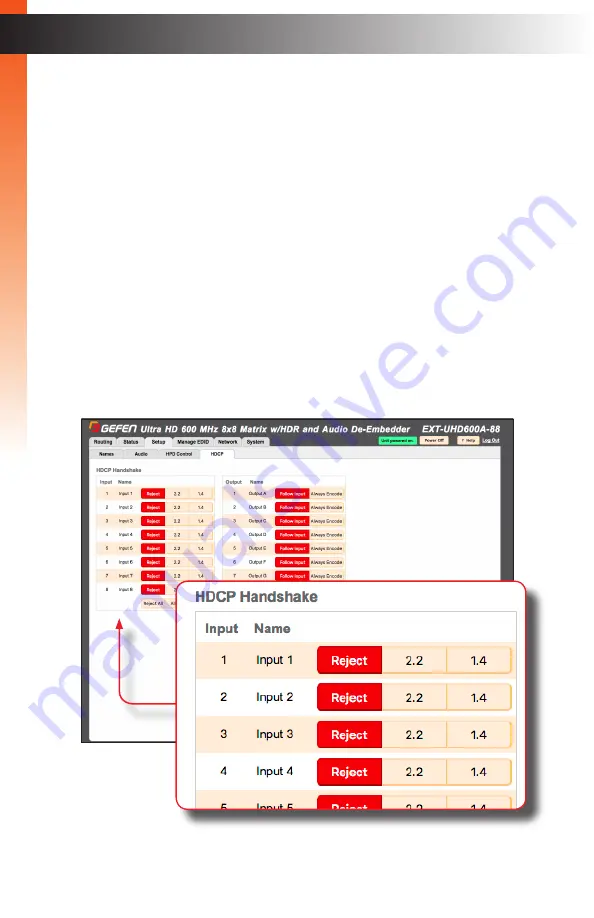
Gefen EXT-UHD600A-88 User Manual Download Page 97

page | 85

HDCP

This feature allows HDCP content to either be passed-through or rejected on each input.  

Outputs can either follow the input status or can be set to always encode HDCP.  Note that 

using the “Reject” feature, on an input, does 

not

 decrypt HDCP content.

1.  Click the 

Setup

 tab within the built-in web interface.

2.  Click the 

HDCP 

sub-tab.

3.  For inputs, select the desired button next to the input.


Reject

 - Does not allow HDCP content to be passed through.  Click the 

Reject All

 button to set all inputs to 

Reject

.


2.2

 - Click this button if the sink device supports HDCP 2.2.  Click the 

All 2.2

 button to set all inputs to 

2.2

.


1.4

 - Click this button if the sink device only supports HDCP 1.4.  Click the 

All 1.4

 button to set all inputs to 

1.4


B

asic Oper

ation

B

asic Oper

ation

The Web Interface

Summary of Contents for EXT-UHD600A-88

Page 1: ...Version A1 Preferred EXT UHD600A 88 User Manual 8x8 Matrix w HDR and Audio De Embedder 600 MHz 4K ULTRA...

Page 2: ...d from being walked on or pinched particularly at plugs convenience receptacles and the point where they exit from the apparatus 11 Only use attachments accessories specified by the manufacturer 12 To...

Page 3: ...ranty Information For the latest warranty coverage information refer to the Warranty and Return Policy under the Connect section of the Gefen Web site at http www gefen com connect warranty and return...

Page 4: ...Technical Support 707 283 5900 800 472 5555 8 00 AM to 5 00 PM Monday Friday Pacific Time Email support gefen com Web http www gefen com Mailing Address Gefen Core Brands LLC c o Customer Service 180...

Page 5: ...to change without notice 2017 Core Brands LLC All Rights Reserved All trademarks are the property of their respective owners Gefen is a registered trademark of Core Brands LLC Gefen and Core Brands LL...

Page 6: ...with or without modification are permitted provided that the following conditions are met 1 Redistributions of source code must retain the above copyright notice this list of conditions and the follow...

Page 7: ...I2 HDMI LCK DVI to HDMI cables not included Built in Audio De Embedders break out 2 channel analog 2 channel PCM and up to 5 1 channels of Bitstream digital audio from each HDMI output allowing the au...

Page 8: ...tems are not present in the box when you first open it immediately contact your reseller or Gefen Technical Support 1 x 4K Ultra HD 600 MHz 8x8 Matrix 1 x 24V DC Power Supply EXT PS24U O 6 1 x AC Powe...

Page 9: ...t Volume 21 Muting and Unmuting Audio 23 Masking Outputs 25 Turning Off Inputs 26 Locking the Matrix 27 Using the IR Remote Control 28 Routing Presets 29 Using the Front Panel 29 Using the IR Remote C...

Page 10: ...ID Data 92 Configuring Network Settings 95 System Settings 101 3 Advanced Operation Using Telnet UDP and RS 232 112 Telnet Configuration 112 UDP Configuration 112 RS 232 Configuration 113 Commands 114...

Page 11: ...This page left intentionally blank...

Page 12: ...This page left intentionally blank...

Page 13: ...1 Getting Started 8x8 Matrix w HDR and Audio De Embedder 600 MHz 4K ULTRA...

Page 14: ...o select the desired Preset 6 Lock Press this button to lock the matrix See Locking the Matrix page 73 for more information 7 IR Receives signals from the included IR remote control unit 8 Reset Press...

Page 15: ...uctions page 10 for more information 5 Audio Outputs Each HDMI output provides a three separate ports for audio de embedding 1 L R analog 2 coax digital 3 TOSLINK digital 6 In 1 8 Connect up to eight...

Page 16: ...escription 8 Cooling fan assembly Provides active cooling for the matrix by expelling warm air from the enclosure To prevent overheating make sure this vent is not blocked 9 24V DC Connect the include...

Page 17: ...tton to display the On Screen Menu 3 Press these buttons to move around within the front panel display 4 Back Press this button to return to a previous menu item OK Output RMT 88A Menu Back Down Up OF...

Page 18: ...ss this button to mask the desired output 11 Volume Adjusts the output volume on the selected output See Adjusting the Output Volume page 21 for more information 12 Mute Press this button to mute the...

Page 19: ...on Getting Started ID Name Description 15 Battery compartment shown open Press this button to toggle between locking and un Accepts two 1 5V AAA type batteries See Installing the Batteries page 8 for...

Page 20: ...attery compartment 3 Replace the back cover Getting Started Introduction Warning Risk of explosion if battery is replaced by an incorrect type Dispose of used batteries according to the instructions O...

Page 21: ...for the included IR remote control to communicate with the matrix the IR remote control must be set to the same channel as the matrix Channel 3 Channel 4 Channel 1 default DIP1 OFF DIP2 OFF DIP1 OFF D...

Page 22: ...ol 4 Connect a shielded CAT 5e or better cable from the IP Control port on the rear panel of the matrix to the Local Area Network See Network Configuration using Syner G page 12 for more information o...

Page 23: ...8x RS 232 USB OR CAT 5 LAN Web Interface Telnet or UDP EXT RMT EXTIRN IR Extender EXT UHD600A 88 IR IN 4K Ultra HD Sources 8x Power Source for Streaming Sources 2x Power Amplifier 8x Automation Contr...

Page 24: ...2 Select the matrix EXT UHD600A 88 from the list of products 3 Under the Device Settings section select either Static or DHCP from the IP Mode drop down list Select Static to manual enter the IP addr...

Page 25: ...e screen 5 The matrix will automatically reboot and use the new network settings 6 Use the IP address of the matrix to access the built in web interface or start a Telnet session See the following for...

Page 26: ...This page left intentionally blank...

Page 27: ...2 Basic Operation 8x8 Matrix w HDR and Audio De Embedder 600 MHz 4K ULTRA...

Page 28: ...is powered ext uhdA600 88 v1 0 out a output a A V In input 01 Back Enter IR Power Menu Preset Lock 4K 60 Hz 4 4 4 HDMI 2 0 HDCP 2 2 Reset Ultra HD 600 MHz 8x8 Matrix w HDR and Audio De Embedder RS 23...

Page 29: ...uttons on the front panel will momentarily glow blue when pressed as shown below OK Output RMT 88A Menu Back Down Up OFF 1 3 5 6 7 Input 8 4 2 Preset Mask Lock A B Power C D Mute E F Volume G H R03 1...

Page 30: ...t to view the source on the 4K Ultra HD display that is connected to Out G Output G The first thing we need to do is use the or buttons until Output G is displayed Currently Input 7 is routed to Outpu...

Page 31: ...ct Input 4 6 Once the desired input is selected press the Enter button The arrow cursor next to the input will disappear indicating that the input can not be changed 7 The selected input is now routed...

Page 32: ...3 1 5V R03 1 5V ON 1 2 Basic Operation Basic Operation Routing Inputs to Output 3 Select the desired input by pressing one of the Input buttons 1 8 on the lower portion of the IR remote control 4 The...

Page 33: ...essing the desired Output button A H on the upper portion of the IR remote control 4 Press the Up or Down button to adjust the volume for the selected output Press the Up button to increase the volume...

Page 34: ...e to return to the routing screen OK Output RMT 88A Menu Back Down Up OFF 1 3 5 6 7 Input 8 4 2 Preset Mask Lock A B Power C D Mute E F Volume G H R03 1 5V R03 1 5V ON 1 2 Back button Information If t...

Page 35: ...ng the desired Output button A H on the upper portion of the IR remote control If the output is not muted then the following screen will be displayed If the output is muted then the following screen w...

Page 36: ...to the Mute Select Output screen 6 Select another output using the Output buttons or press the Back button a second time to return to the routing screen OK Output RMT 88A Menu Back Down Up OFF 1 3 5...

Page 37: ...starting at the routing screen OK Output RMT 88A Menu Back Down Up OFF 1 3 5 6 7 Input 8 4 2 Preset Mask Lock A B Power C D Mute E F Volume G H R03 1 5V R03 1 5V ON 1 2 Basic Operation Basic Operatio...

Page 38: ...s the H button 5 To unblock an input press the desired Output button A H then select an input from the Input buttons located at the bottom portion of the IR remote control OK Output RMT 88A Menu Back...

Page 39: ...onger illuminated 3 The matrix is now unlocked Basic Operation Basic Operation Locking the Matrix Back Enter IR Power Menu Preset Lock 4K 60 Hz 4 4 4 HDMI 2 0 HDCP 2 2 Reset Ultra HD 600 MHz 8x8 Matri...

Page 40: ...illuminated 3 The matrix is now unlocked Basic Operation Basic Operation Locking the Matrix Back Enter IR Power Menu Preset Lock 4K 60 Hz 4 4 4 HDMI 2 0 HDCP 2 2 Reset Ultra HD 600 MHz 8x8 Matrix w H...

Page 41: ...ss the Enter button on the front panel to load the preset 6 The preset is now loaded and the routing state stored in the preset will be applied to the matrix 7 After a few moments the routing screen w...

Page 42: ...sk Lock A B Power C D Mute E F Volume G H R03 1 5V R03 1 5V ON 1 2 3 Use the set of Input buttons from the bottom portion of the IR remote control to select the desired preset Only Presets 1 8 can be...

Page 43: ...V R03 1 5V ON 1 2 2 Press and release the Menu button on the front panel or on the IR remote control The Menu button will momentarily flash blue when it is pressed 3 The Setup menu will be displayed T...

Page 44: ...k Enter IR Power Menu Preset Lock 4K 60 Hz 4 4 4 HDMI 2 0 HDCP 2 2 Reset Ultra HD 600 MHz 8x8 Matrix w HDR and Audio De Embedder RS 232 IP Control IR In Ext EXT UHD600A 88 Out A L R L R L R L R L R L...

Page 45: ...ed OK Output RMT 88A Menu Back Down Up OFF 1 3 5 6 7 Input 8 4 2 Preset Mask Lock A B Power C D Mute E F Volume G H R03 1 5V R03 1 5V ON 1 2 Back Enter IR Power Menu Preset Lock 4K 60 Hz 4 4 4 HDMI 2...

Page 46: ...emote control to select the desired setting 9 Press the Enter button on the front panel or the OK button on the IR remote control to save the setting 10 To set the volume control on a different output...

Page 47: ...OFF 1 3 5 6 7 Input 8 4 2 Preset Mask Lock A B Power C D Mute E F Volume G H R03 1 5V R03 1 5V ON 1 2 Back Enter IR Power Menu Preset Lock 4K 60 Hz 4 4 4 HDMI 2 0 HDCP 2 2 Reset Ultra HD 600 MHz 8x8...

Page 48: ...s the Enter button on the front panel If using the included IR remote control press the OK button 10 The HPD pulse will be sent to the selected input If a display is connected to the output to which t...

Page 49: ...Back Down Up OFF 1 3 5 6 7 Input 8 4 2 Preset Mask Lock A B Power C D Mute E F Volume G H R03 1 5V R03 1 5V ON 1 2 Basic Operation Basic Operation Menu System 2 The Setup menu will be displayed 3 Pres...

Page 50: ...source device 1 4 and below Only HDCP version 1 4 and below is allowed to be sent from the source device Reject Blocks HDCP content from being sent from the source device If an output A H is selected...

Page 51: ...ave the setting 13 To set the HDCP control on a different input or output press the Back button on the front panel or on the IR remote control 14 To return to the HPD Control option press the Back but...

Page 52: ...tton on the front panel or on the IR remote control The Menu button on the front panel will momentarily flash blue when it is pressed 2 The Setup menu will be displayed 3 Press and release the or butt...

Page 53: ...indicating that it can be changed 10 Press and release the or buttons on the front panel or on the IR remote control to select the desired EDID See Internal EDID Profiles page 210 for details on inte...

Page 54: ...or the OK button on the IR remote control The input selection screen will be displayed 12 To set the EDID on another input repeat steps 7 11 13 Press the Back button on the front panel or on the IR r...

Page 55: ...splayed OK Output RMT 88A Menu Back Down Up OFF 1 3 5 6 7 Input 8 4 2 Preset Mask Lock A B Power C D Mute E F Volume G H R03 1 5V R03 1 5V ON 1 2 Basic Operation Basic Operation Menu System 2 The Setu...

Page 56: ...address are automatically assigned by a DHCP server c Press the Enter button on the front panel or the OK button on the IR remote control to save the change d Reboot the matrix to affect changes Sett...

Page 57: ...g the Subnet Mask a From the IP Mode screen press and release the or buttons on the front panel or on the IR remote control to select the Subnet Mask option The current subnet mask will be displayed b...

Page 58: ...ons on the front panel or on the IR remote control to select the Gateway option The current gateway address will be displayed b Press the Enter button on the front panel or the OK button on the IR rem...

Page 59: ...P Port option The current HTTP port will be displayed b Press the Enter button on the front panel or the OK button on the IR remote control to edit the port number The cursor will appear under the fir...

Page 60: ...T 88A Menu Back Down Up OFF 1 3 5 6 7 Input 8 4 2 Preset Mask Lock A B Power C D Mute E F Volume G H R03 1 5V R03 1 5V ON 1 2 Basic Operation Basic Operation Menu System 2 The Setup menu will be displ...

Page 61: ...arrow cursor will be displayed next to the current setting indicating that it can be changed c Press and release the or buttons on the front panel or on the IR remote control to select the desired se...

Page 62: ...e port number The cursor will appear under the first digit of the port number c Press the or buttons on the front panel or on the IR remote control to move between each digit in the port number d Pres...

Page 63: ...n on the IR remote control to change the current setting The cursor will appear next to the current setting c Press and release the or buttons on the front panel or on the IR remote control to select...

Page 64: ...IR remote control to change the current setting The cursor will appear next to the current setting c Press and release the or buttons on the front panel or on the IR remote control to select the desi...

Page 65: ...port number The cursor will appear under the first digit of the port number c Press the or buttons on the front panel or on the IR remote control to move between each digit in the port number d Press...

Page 66: ...the current setting The cursor will appear next to the current setting c Press and release the or buttons on the front panel or on the IR remote control to select the desired setting Enabled Allows th...

Page 67: ...ar under the first digit of the UDP address d Press the or buttons on the front panel or on the IR remote control to change the numerical value of the digit 0 9 e Press the or buttons on the front pan...

Page 68: ...tton on the front panel or the OK button on the IR remote control to display the Discovery screen The current setting will be displayed 2 The Setup menu will be displayed 3 Press and release the or bu...

Page 69: ...the front panel or on the IR remote control to select the desired setting Enabled Allows the matrix to be discovered when connected to a network by the Syner G Software Suite Disabled Prevents the ma...

Page 70: ...G H R03 1 5V R03 1 5V ON 1 2 Basic Operation Basic Operation Menu System 3 The Setup menu will be displayed 4 Press and release the or buttons on the front panel or on the IR remote control to select...

Page 71: ...s on the front panel or on the IR remote control to select the desired setting Enabled RS 232 commands are executed and a response is sent back to the automation device Disabled RS 232 commands are ex...

Page 72: ...panel or on the IR remote control to select the System menu 5 Press the Enter button on the front panel If using the included IR remote control press the OK button 6 Press the or buttons on the front...

Page 73: ...o the current setting 8 Press and release the or buttons on the front panel or on the IR remote control to select the desired setting The range is from 0 to 100 and can be adjusted by increments of 1...

Page 74: ...mentarily flash blue when it is pressed 3 The Setup menu will be displayed 4 Press and release the or buttons on the front panel or on the IR remote control to select the System menu 5 Press the Enter...

Page 75: ...cursor will appear next to the current IR channel 8 Press and release the or buttons on the front panel or on the IR remote control to select the desired IR channel The IR channel range is 1 4 9 Press...

Page 76: ...4 Press and release the or buttons on the front panel or on the IR remote control to select the System menu 5 Press the Enter button on the front panel If using the included IR remote control press t...

Page 77: ...reset operation 8 Press and release the or buttons on the front panel or on the IR remote control to select either Yes or No 9 Press the Enter button on the front panel or the OK button on the IR rem...

Page 78: ...nt panel or on the IR remote control to select the System menu 5 Press the Enter button on the front panel If using the included IR remote control press the OK button 6 Press the or buttons on the fro...

Page 79: ...pt to confirm the factory reset operation 8 Press and release the or buttons on the front panel or on the IR remote control to select either Yes or No 9 Press the Enter button on the front panel or th...

Page 80: ...owser 2 In the address bar type the IP address of the matrix 3 The login page will be displayed 4 Select the user from the Username drop down list Operator The Operator username provides restricted ac...

Page 81: ...see Configuring Network Settings page 95 5 Enter the password for the selected username 6 Click the Login button 7 After a few moments the Routing tab will be displayed Administrator vs Operator As me...

Page 82: ...nage EDID tab have their own set of tabs which we will refer to as sub tabs as shown below Buttons Several screen contain buttons which allow the selection of a particular mode or setting Click the bu...

Page 83: ...eature For example note that both the Login Message on Connect buttons are disabled in the illustration below In order to change these particular settings TCP Access must be enabled After clicking the...

Page 84: ...s which are highlighted in gray indicate the absence of a source or sink device on that input or output Preset Available Route Squares that are light tan indicate that the input and output is availabl...

Page 85: ...ck the Lock button near the top of the screen 3 Once pressed the Lock button will read Unlock Matrix The Lock button on the front panel will also glow bright blue The matrix is now locked 4 Click the...

Page 86: ...ator red square is encountered Note the column where the red square is located Each column identifies an input and each row represents an output The output and inputs names can be changed if desired S...

Page 87: ...names as a guide when selecting the input 4 Click the square at the intersection of both the output and input A routing indicator red square will appear at the intersection of the row output and colum...

Page 88: ...rn black indicating that the input is off The OFF is an additional input that can be selected to simulate a source that is not present As with any routing operation if the operation is successful a gr...

Page 89: ...sking Outputs 1 Click the Routing tab 2 Mask the desired output by clicking the Mask button The Mask button will turn red indicating that the selected output is masked 3 To unmask the output click the...

Page 90: ...ting Presets Creating Editing a Preset 1 Click the Routing tab 2 Under the Presets section click the Preset Edit button 3 The preset buttons will begin to flash and the Preset Edit button will read Ch...

Page 91: ...each input output See Routing Inputs and Masking Outputs page 75 if necessary The preset selections for the selected preset will be indicated by a green square as shown below Note that an output can a...

Page 92: ...click the Clear All button To use the current routing state as the preset selection click the Select Current button To abort the editing of the preset click the Cancel button 9 Click the Save to Pres...

Page 93: ...top portion of the screen 3 Information on each output is listed in the bottom portion of the screen The table below outlines the information that is available for each section Input Output Color dept...

Page 94: ...input or output 1 Click the Setup tab within the built in web interface 2 Click the Names sub tab 3 Click in the field of the desired output or input to be changed 4 Once all changes have been made c...

Page 95: ...the built in web interface 2 Click the Audio sub tab 3 Click either Fixed or Variable for each output Fixed In this mode the output volume is set to 100 and variable adjustment is disabled Variable I...

Page 96: ...pulse can be sent to the selected input and reset the HDMI connection without disconnecting any cables The connected display will flash when an HPD signal is received 1 Click the Setup tab within the...

Page 97: ...built in web interface 2 Click the HDCP sub tab 3 For inputs select the desired button next to the input Reject Does not allow HDCP content to be passed through Click the Reject All button to set all...

Page 98: ...e output follow the setting used on the input Click the Follow All button to set all outputs to Follow Input Always Encode Encodes the output signal with HDCP 2 2 regardless of the input signal Click...

Page 99: ...ace 2 Click the EDID Mode sub tab 3 Select the desired EDID mode for each input using the drop down list If the EDID Mode is set to External then the name of the downstream EDID device will appear und...

Page 100: ...DID to the input that is using the Custom mode See one of the following sections for more information on copying or uploading EDID data Copying EDID Data page 89 Uploading and Downloading EDID Data pa...

Page 101: ...must be set to Custom User defined mode and then unlocked See Setting the EDID Mode page 87 for more information 1 Click the Manage EDID tab within the built in web interface 2 Click the EDID Copy sub...

Page 102: ...time 5 Click the Copy button The Copy can only be pressed when both an output or input the source and an input destination are selected 6 The EDID copy process is complete Repeat steps 3 5 as desired...

Page 103: ...nk device to be displayed 1 Click the Manage EDID tab within the built in web interface 2 Click the EDID Info sub tab 3 Select the desired input or output from the Choose EDID drop down list 4 The EDI...

Page 104: ...s to be downloaded and saved as a file on your computer An EDID file can also be uploaded to any unlocked input Downloading an EDID 1 Click the Manage EDID tab within the built in web interface 2 Clic...

Page 105: ...ck the Save File button to save the EDID file to your computer Mac OS X The file will automatically be saved under Macintosh HD Users username Downloads Windows OS The file will be saved under C Users...

Page 106: ...the Browse button under Upload EDID section 5 The File Upload dialog will be displayed 6 Select the EDID file from your computer The EDID file must be in bin format After the file is selected click th...

Page 107: ...twork setting click the Save button at the bottom of the page To revert network settings to factory default click the Set Network Defaults button IP Settings 1 Set the network mode by clicking the Sta...

Page 108: ...matrix Otherwise click the Disable button TCP Port Enter the TCP listening port in this field Login Message on Connect Click the Show button to display the welcome message at the beginning of a Telne...

Page 109: ...word Enter the old current password in this field The factory default password is admin New Password Enter the new password in this field Confirm New Password Confirm the new password by entering the...

Page 110: ...on UDP Port Enter the TCP listening port in this field Remote UDP Access Click the Enable button to set the remote UDP address and UDP listening port This feature only needs to be enabled if feedback...

Page 111: ...username above in this field Passwords are case sensitive Old Password Enter the old current password in this field Passwords are case sensitive Confirm New Password To confirm the new password re en...

Page 112: ...will flash on the front panel of the matrix Discovery Read Only When set to Read Only the IP settings for the matrix will be displayed by Syner G but they cannot be changed In order to display and ch...

Page 113: ...2 Feedback Click the Off button to disable RS 232 feedback Click the On button to enable RS 232 feedback LED Brightness Increases decreases the brightness of the front panel display Move the slider to...

Page 114: ...Current Configuration to PC Saves the current matrix configuration to a file on your computer 1 Click the Download button 2 The following dialog box will be displayed Basic Operation The Web Interface...

Page 115: ...oads Windows OS The file will be saved under C Users username Downloads Restore Upload Configuration File Uploads the selected matrix configuration from a file on your computer to the matrix 1 Click t...

Page 116: ...e the following naming convention EXT UHD600A 88 version PACK bin 4 Click the Update button 5 The following message box will be displayed WARNING Updating the firmware may overwrite some of your setti...

Page 117: ...105 Basic Operation The Web Interface 7 After a few moments the following message box will be displayed within the web interface 8 After the update process completes the matrix will automatically reb...

Page 118: ...must be set to the same IR channel as the included IR remote control in order for the IR remote control to communicate with the matrix 1 Click the desired IR channel for the matrix by clicking one of...

Page 119: ...utton to continue with the reset procedure Click the Cancel button to abort the reset procedure and return to the web interface page 107 Basic Operation The Web Interface Important Performing this fun...

Page 120: ...x Clicking this button will reboot the matrix 1 Click the Reboot button 2 The following message box will be displayed Click the OK button to continue with the reboot procedure Click the Cancel button...

Page 121: ...This page left intentionally blank...

Page 122: ...This page left intentionally blank...

Page 123: ...3 Advanced Operation 8x8 Matrix w HDR and Audio De Embedder 600 MHz 4K ULTRA...

Page 124: ...b within the web interface and do the following See Configuring Network Settings page 95 for more information a Click the Enabled button next to UDP Access b Enter the UDP listening port in the UDP Po...

Page 125: ...to the following settings Note that Only TxD RxD and GND pins are used Description Setting Baud rate 19200 Data bits 8 Parity None Stop bits 1 Hardware flow control None 3 Connect to the RS 232 port...

Page 126: ...de Returns the video mode of the specifed input gets_input_signal Returns the active signal state of the specified input Command Description get_custom_edid Download the custom EDID from the specified...

Page 127: ...t_port Returns the Telnet listening port get_udp_access Returns the UDP access state get_udp_port Returns the UDP listening port get_web_port Returns the HTTP listening port set_gateway Sets the gatew...

Page 128: ...ns the output Rsense Command Description get_preset_name Returns the name of the specified preset set_preset_name Sets the name of the specified preset p Recalls the specified preset Command Descripti...

Page 129: ...iption factory_reset Resets the matrix to factory default settings get_feedback Returns the feedback state get_firmware_version Returns the current version of matrix firmare get_ir_channel Returns the...

Page 130: ...erformed through the built in web interface or Telnet then IP settings will be preserved To reset all including IP settings this command must be issued using RS 232 Syntax factory_reset Parameters Non...

Page 131: ...d is one of the following Type Description F Fixed V Variable Syntax get_audio_output out Parameters Parameters out Type CHAR INTEGER The alphabetic identifier of the output A H Specify 0 to query all...

Page 132: ...stom_edid input Parameters Parameters input Type INTEGER The number of the HDMI input 1 8 Example get_custom_edid 1 00FFFFFFFFFFFF001CA6000000000000 Related Commands get_edid_lock get_edid_mode get_ex...

Page 133: ...anced Operation Commands get_device_desc Returns the description of the matrix Syntax get_device_desc Parameters None Example get_device_desc DEVICE DESCRIPTION IS EXT UHD600A 88 Related Commands set_...

Page 134: ...the discovery mode setting The value returned is one of the following Value Description 0 Discovery mode is disabled 1 Discovery mode is enabled Syntax get_discovery Parameters None Example get_disco...

Page 135: ...he current discovery mode The value returned is one of the following Value Description 0 Read only 1 Read Write Syntax get_discovery_mode Parameters None Example get_discovery_mode get_discovery_mode...

Page 136: ...nput The value returned is one of the following Value Description 0 EDID unlocked 1 EDID locked Syntax get_edid_lock input Parameters input Type INTEGER The number of the HDMI input 1 8 to query Examp...

Page 137: ...on 1 UHD 4K 600 MHz 2Ch 2 UHD 4K 600 MHz Multi 3 UHD 4K 300 MHz 2Ch 4 UHD 4K 600 MHz Multi 5 1080P 2Ch 6 1080 Multi 7 External 8 Custom User Syntax get_edid_mode input Parameters input Type INTEGER Th...

Page 138: ...ernal EDID Syntax get_external_edid Parameters None Example get_external_edid 00FFFFFFFFFFFF001CA6000000000000 Related Commands get_custom_edid get_edid_lock get_edid_mode get_input_edid get_internal_...

Page 139: ...back Returns the feedback status Syntax get_feedback Parameters None Example get_feedback FEEDBACK 1 Related Commands factory_reset get_firmware_version get_ir_channel get_lcd_brightness help reboot s...

Page 140: ...urrent firmware version of the matrix Syntax get_firmware_version Parameters None Example get_firmware_version FIRMWARE VERSION IS 1 0 Related Commands factory_reset get_feedback get_ir_channel get_lc...

Page 141: ...gateway address of the matrix Syntax get_gateway Parameters None Example get_gateway GATEWAY 10 5 64 1 Related Commands get_web_port get_ip_address get_ip_mode get_ipconfig get_mac_addr get_netmask se...

Page 142: ...put_edid input Parameters input Type INTEGER The number of the HDMI input 1 8 to query Example get_input_edid 00FFFFFFFFFFFF001CA6000000000000 Related Commands get_custom_edid get_external_edid get_ed...

Page 143: ...e of the specified input Syntax get_input_hdcp Parameters input Type INTEGER The number of the HDMI input 1 8 to query Set this parameter to 0 to return the HDCP handshake mode of all inputs in numeri...

Page 144: ...ternal EDID Syntax get_internal_edid edidps Parameters edidps Type INTEGER The number of the EDID preset EDID Description 1 UHD 600 4K 2CH 2 UHD 600 4K MULTICH 3 UHD 300 4K 2CH 4 UHD 300 4K MULTICH 5...

Page 145: ...io_name Returns the name given to the specified input or output Syntax get_io_name inout Parameters input Type INTEGER or CHARACTER The number of the HDMI input 1 8 to query Example get_io_name 1 IO_N...

Page 146: ...ent IP address of the matrix Syntax get_ip_address Parameters None Example get_ip_address IP_ADDRESS 10 5 64 81 Related Commands get_gateway get_web_port get_ip_mode get_ipconfig get_mac_addr get_netm...

Page 147: ...returned is one of the following Value Description 0 Static mode 1 DHCP mode Syntax get_ip_mode Parameters None Example get_ip_mode IP_MODE 0 Related Commands get_gateway get_web_port get_ip_address g...

Page 148: ...formation as executing the get_ip_address get_netmask get_gateway and get_mac_addr ommands Syntax get_ipconfig Parameters None Example get_ipconfig IP CONFIGURATION IS IP 10 5 64 81 NETMASK 255 255 25...

Page 149: ...page 137 Advanced Operation Commands get_ir_channel Returns the IR channel of the matrix Syntax get_ir_channel Parameters None Example get_ir_channel IR_CHANNEL 1 Related Commands set_ir_channel...

Page 150: ...ion Commands get_lcd_brightness Returns the brightness level of the LED indicators on the front panel Syntax get_lcd_brightness Parameters None Example get_lcd_brightness LCD_BRIGHTNESS 60 Related Com...

Page 151: ...dress of the matrix Syntax get_mac_addr Parameters None Example get_mac_addr MAC ADDRESS IS 00 1C 91 04 90 03 Related Commands get_gateway get_web_port get_ip_address get_ip_mode get_ipconfig get_netm...

Page 152: ...mask state for the specified output s Syntax get_mask output Parameters output Type CHAR INTEGER The alphabetic identifier of the output A H Specify 0 to query all outputs results are returned in outp...

Page 153: ...io muting status for the specified output s Syntax get_mute output Parameters output Type INTEGER The alphabetic identifier of the output A H Specify 0 to query all outputs results are returned in out...

Page 154: ...ent subnet mask of the matrix Syntax get_netmask Parameters None Example get_netmask NETMASK 255 255 255 0 Related Commands get_gateway get_web_port get_ip_address get_ip_mode get_ipconfig get_mac_add...

Page 155: ...utput_edid Returns the downstream EDID from the specified output Syntax get_output_edid output Parameters output Type CHAR The alphabetic identifier of the output A H Example get_output_edid a 00FFFFF...

Page 156: ...ne of the following Value Description 0 Follow input 1 Always encode Syntax get_output_hdcp output Parameters output Type CHARACTER The identifier of the HDMI output A H to query Specify 0 to query al...

Page 157: ...reset_name Returns the name of the specified preset Syntax get_preset_name preset Parameters preset Type INTEGER The identifier of the preset name 1 16 to query Example get_preset_name 5 PRESET_NAME 5...

Page 158: ...alue Description 0 Remote UDP access disabled 1 Remote UDP access enabled Syntax get_remote_udp_access Parameters None Example get_remote_udp_access REMOTE_UDP_ACCESS 0 Related Commands get_remote_udp...

Page 159: ...address Syntax get_remote_udp_ip Parameters None Example get_remote_udp_access REMOTE_UDP_IP 192 168 1 255 Related Commands get_remote_udp_access get_remote_udp_port get_udp_access get_udp_port set_re...

Page 160: ...listening port Syntax get_remote_udp_port Parameters None Example get_remote_udp_port REMOTE_UDP_PORT 50008 Related Commands get_remote_udp_access get_remote_udp_ip get_udp_access get_udp_port set_rem...

Page 161: ...149 Advanced Operation Commands get_showme Returns the showme state Value Description 0 Show me disabled 1 Shoe me enabled Syntax get_showme Parameters None Example get_showme SHOW_ME 0 Related Comma...

Page 162: ...t access state Use the set_telnet_access command to enable or disable Telnet access Syntax get_telnet_access Parameters None Example get_telnet_access TELNET_ACCESS 1 Related Commands get_telnet_port...

Page 163: ...page 151 Advanced Operation Commands get_telnet_login Returns the status of the Telnet login process Syntax get_telnet_login Parameters None Example get_telnet_login TELNET_LOGIN 0 Related Commands...

Page 164: ...ome message Use the set_telnet_message to create a custom welcome message Syntax get_telnet_message Parameters None Example get_telnet_message TELNET WELCOME SCREEN IS ENABLED Related Commands get_tel...

Page 165: ...get_telnet_port Returns the Telnet listening port Syntax get_telnet_port Parameters None Example get_telnet_port TELNET_PORT 23 Related Commands get_telnet_access get_telnet_message set_telnet_access...

Page 166: ...lue returned is one of the following Value Description 0 UDP access disabled 1 UDP access enabled Syntax get_udp_access Parameters None Example get_udp_access UDP_ACCESS 0 Related Commands get_remote_...

Page 167: ...DP listening port Syntax get_udp_port Parameters None Example get_udp_port UDP_PORT 50007 Related Commands get_remote_udp_access get_remote_udp_ip get_remote_udp_port get_udp_access set_remote_udp_acc...

Page 168: ...utput volume level for the specified output s Syntax get_vol output Parameters output Type CHAR INTEGER The alphabetic identifier of the output A H Specify 0 to query all outputs results are returned...

Page 169: ...HTTP listening port of the matrix Syntax get_web_port Parameters None Example get_web_port HTTP_PORT 80 Related Commands get_gateway get_ip_address get_ip_mode get_ipconfig get_mac_addr get_netmask se...

Page 170: ...lue Description 0 Reject 1 HDCP 2 2 and below 2 HDCP 1 4 and below Syntax gets_input_hdcp input Parameters input Type INTEGER The number of the HDMI input 1 8 to query Specify 0 to query all inputs re...

Page 171: ...lue returned is one of the following Value Description L HPD low H HPD high Syntax gets_input_hpd input Parameters input Type INTEGER The number of the HDMI input 1 8 to query Specify 0 to query all i...

Page 172: ...video mode of the specified input Syntax gets_input_mode input Parameters input Type INTEGER The number of the HDMI input 1 8 to query Specify 0 to query all inputs results are returned in input orde...

Page 173: ...he active signal status of the specified input Syntax gets_input_signal input Parameters input Type INTEGER The number of the HDMI input 1 8 to query Specify 0 to query all inputs results are returned...

Page 174: ...one of the following Value Description 1 Encrypted HDCP 1 4 2 Encrypted HDCP 2 2 U Unencrypted F Fail Syntax gets_output_hdcp output Parameters output Type CHAR INTEGER The alphabetic identifier of t...

Page 175: ...alue returned will be one of the following Value Description L HPD low H HPD high Syntax gets_output_hpd output Parameters output Type CHAR INTEGER The alphabetic identifier of the output A H Specify...

Page 176: ...rned will be one of the following Value Description D DVI signal detected H HDMI signal detected Syntax gets_output_mode output Parameters output Type CHAR INTEGER The alphabetic identifier of the out...

Page 177: ...returned will be one of the following Value Description L Rsense low H Rsense high Syntax gets_output_rsense output Parameters output Type CHAR INTEGER The alphabetic identifier of the output A H Spe...

Page 178: ...Returns a list of available commands The commands listed are specific to either the Sender or Receiver unit Syntax help Parameters None Example help HELP HELP VOLUME GET_MUTE GET_VOL SET_MUTE SET_VOL...

Page 179: ...web interface of the matrix Note that if the matrix is locked settings can still be changed using the command set Syntax lock_matrix state Parameters state Type INTEGER Accepts a number from the table...

Page 180: ...page 168 Advanced Operation Commands reboot Reboots the matrix Syntax reboot Parameters None Example reboot UNIT WILL REBOOT SHORTLY Related Commands factory_reset...

Page 181: ..._custom_edid Uploads a custom EDID to the specified input The input must first be set to CUSTOM MODE Syntax send_custom_edid input Parameters input Type INTEGER The numeric identifier of the input 1 8...

Page 182: ...D Hot Plug Detect pulse to the specified input Syntax send_hpd input Parameters input Type INTEGER The identifier of the HDMI input 1 8 where the HPD pulse will be sent Set this parameter to 0 to send...

Page 183: ...ic identifier of the output A H Set this parameter to 0 to set all outputs to the same audio mode Feedback lists all analog audio modes for outputs in order A H audtype Type CHAR The method of how the...

Page 184: ...e matrix identifier string Syntax set_device_desc name Parameters name Type STRING The device description This value cannot exceed 30 characters in length Example set_device_desc matrix8x8 DEVICE DESC...

Page 185: ...e below specifying the desired state state Description 0 Disables Discovery mode 1 Enables Discovery mode If set to disabled then the Syner G Software Suite will be unable to detect the matrix on a ne...

Page 186: ...desired state mode Description 0 Read only mode 1 Read write mode When set to read only mode the IP settings for the matrix will be displayed within the Gefen Syner G Software Suite but cannot be cha...

Page 187: ...tion Syntax set_edid_copy inout input input Parameters inout Type INTEGER or CHARACTER This parameter can accept either the identifier of an HDMI input 1 8 or an HDMI output A H Only a single input or...

Page 188: ...de command Syntax set_edid_lock input state Parameters input Type INTEGER This parameter must be the identifier of an HDMI input 1 8 state Type INTEGER Accepts a number from the table below specifying...

Page 189: ...ntifier of an HDMI input 1 8 mode Type INTEGER Accepts a number from the table below corresponding to the desired EDID mode Description 1 UHD 4K 600 MHz 2Ch 2 UHD 4K 600 MHz Multi 3 UHD 4K 300 MHz 2Ch...

Page 190: ...ables unsolicited RS 232 feedback Syntax set_feedback state Parameters state Type INTEGER Accepts a number from the table below specifying the desired state state Description 0 Disable RS 232 feedback...

Page 191: ...e DHCP server The matrix must be rebooted after executing this command Syntax set_gateway addr Parameters addr Type IP ADDRESS The desired gateway address of the matrix This address must be entered in...

Page 192: ...er to 0 to apply the HDCP setting to all inputs Feedback lists all HDCP settings for inputs in order 1 8 mode Type INTEGER Accepts a number from the table below corresponding to the desired HDCP mode...

Page 193: ...HDMI input 1 8 or the identifier or an HDMI output A H Only one input or output can be specified at one time name Type STRING The desired name of the specified input output The length of the string ca...

Page 194: ...addr Parameters addr Type IP ADDRESS The desired IP address of the matrix This address must be entered in dot decimal notation Example set_ip_address 10 5 64 81 IP_ADDRESS 10 5 64 81 REBOOT TO APPLY...

Page 195: ...Parameters mode Type INTEGER Accepts a number from the table below corresponding to the desired IP mode mode Description 0 Static 1 DHCP 2 Auto Example set_ip_mode 1 IP MODE 1 REBOOT TO APPLY SETTING...

Page 196: ...the matrix and the IR remote control must be set to the same IR channel Syntax set_ir_channel irch Parameters irch Type INTEGER Accepts a number from the table below corresponding to the desired IR c...

Page 197: ...the matrix Syntax set_lcd_brightness level Parameters level Type INTEGER Accepts a number within the range of 0 100 The value of 100 represents the brightest setting of the display Example set_lcd_br...

Page 198: ...HAR INTEGER The alphabetic identifier of the output A H Set this parameter to 0 to set all outputs to the same masking state Feedback lists all output masking states in order A H state Type INTEGER Th...

Page 199: ...ic identifier of the output A H Set this parameter to 0 to set all outputs to the same muting state Feedback lists all output muting states in order A H state Type INTEGER The muting state Accepts a v...

Page 200: ...The desired subnet mask of the matrix This address must be entered in dot decimal notation Example set_netmask 255 255 255 0 NETMASK 255 255 255 0 REBOOT TO APPLY SETTINGS Related Commands get_gatewa...

Page 201: ...is parameter to 0 to set all outputs to the same HDCP mode Feedback lists all HDCP mode for outputs in order A H mode Type INTEGER Accepts a number from table below corresponding to the desired HDCP m...

Page 202: ...INTEGER Accepts the identifier of a Preset 1 16 name Type STRING The name of the preset The name must not exceed 12 characters in length No special characters e g etc are allowed Spaces are permitted...

Page 203: ...below corresponding to the desired state state Description 0 Disable remote UDP access 1 Enable remote UDP access Example set_remote_udp_access 0 REMOTE_UDP_ACCESS 0 Related Commands get_remote_udp_a...

Page 204: ...P ADDRESS The desired remote UDP IP address of the matrix The address must be entered in dot decimal notation Example set_remote_udp_ip 192 168 1 251 REMOTE_UDP_IP 192 168 1 251 Related Commands get_r...

Page 205: ...e_udp_port port Parameters port Type INTEGER The desired remote UDP port 0 65535 of the matrix Example set_remote_udp_port 50008 REMOTE_UDP_PORT 50008 Related Commands get_remote_udp_access get_remote...

Page 206: ...ure allows the matrix to be visually identified on the network and is useful when multiple matrix units are being used The default setting is disabled Syntax set_showme state Parameters state Type INT...

Page 207: ...ss state Parameters state Type INTEGER Accepts a number from the table below corresponding to the desired state state Description 0 Disable Telnet access 1 Enable Telnet access Example set_telnet_acce...

Page 208: ...required Syntax set_telnet_login state Parameters state Type INTEGER Accepts a number from table below corresponding to the desired state state Description 0 Disable login process 1 Enable login proc...

Page 209: ...net_message state Parameters state Type INTEGER Accepts a number from table below corresponding to the desired state state Description 0 Disable welcome message 1 Enable welcome message Example set_te...

Page 210: ...on the matrix Syntax set_telnet_port port Parameters port Type INTEGER The desired remote Telnet listening port 0 65535 of the matrix Example set_telnet_port 23 TELNET_PORT 23 Related Commands get_te...

Page 211: ...ccepts a number from table below corresponding to the desired state state Description 0 Disable UDP access 1 Enable UDP access Example set_udp_access 0 UDP_ACCESS 0 Related Commands get_remote_udp_acc...

Page 212: ...rt Parameters port Type INTEGER The desired UDP listening port 0 65535 of the matrix Example set_udp_port 50007 UDP_PORT 50007 Related Commands get_remote_udp_access get_remote_udp_ip get_remote_udp_p...

Page 213: ...utput level Parameters output Type CHAR INTEGER The alphabetic identifier of the output A H Set this parameter to 0 to set all outputs to the same volume level Feedback lists all volume levels for out...

Page 214: ...et_gateway port Parameters port Type INTEGER The desired HTTP listening port for the matrix Example set_gateway 192 168 1 1 GATEWAY 192 168 1 1 Related Commands get_gateway get_web_port get_ip_address...

Page 215: ...page 203 Advanced Operation Commands p Recalls the specified routing preset Syntax p preset Parameters preset Type INTEGER The number of a preset 1 16 Example p 10 P 10 Related Commands r...

Page 216: ...gument of X The X argument is not case sensitive If X is specified then no input is selected To turn on an input that is marked as X use an HDMI input 1 8 as the argument output Type CHARACTER The ide...

Page 217: ...Operation Commands s Returns the routing state for all inputs outputs X will be displayed when the output is selected to input off Syntax s Parameters None Example s S A 1 B 2 C 3 D X E 0 F X G 1 H 0...

Page 218: ...This page left intentionally blank...

Page 219: ...page 207 4 Appendix 8x8 Matrix w HDR and Audio De Embedder 600 MHz 4K ULTRA...

Page 220: ...lor Description 1 Orange White TD Transmit Data positive differential signal 2 Orange TD Transmit Data negative differential signal 3 Green White RD Receive Data positive differential signal 4 Blue Un...

Page 221: ...assword Admin Default Operator Password Operator Gefen Syner G Discovery Enabled Gefen Syner G Discovery Mode Read Write Gefen Syner G Show Device Hide Me Description Setting Output Names Output A Out...

Page 222: ...1440x576i 50Hz 16 9 1440x576p 50Hz 4 3 1440x576p 50Hz 16 9 Audio data block Linear PCM Max channels 2 Supported sample rates kHz 48 44 1 32 Supported sample sized bits 24 20 16 720p Multichannel audi...

Page 223: ...p 50Hz 16 9 1280x720p 50Hz 16 9 1920x1080i 50Hz 16 9 1440x576i 50Hz 4 3 1440x576i 50Hz 16 9 1440x576p 50Hz 4 3 1440x576p 50Hz 16 9 1920x1080p 50Hz 16 9 1920x1080p 24Hz 16 9 1920x1080p 25Hz 16 9 1920x1...

Page 224: ...9 1920x1080p 25Hz 16 9 1920x1080p 30Hz 16 9 1920x1080i 50Hz 16 9 1280x720p 24Hz 16 9 1280x720p 25Hz 16 9 1280x720p 30Hz 16 9 1920x1080p 60Hz 16 9 Audio data block Linear PCM Max channels 2 Supported...

Page 225: ...9 1920x1080p 24Hz 16 9 1920x1080p 25Hz 16 9 1920x1080p 30Hz 16 9 3840x2160p 24Hz 16 9 3840x2160p 25Hz 16 9 3840x2160p 30Hz 16 9 3840x2160p 50Hz 16 9 3840x2160p 60Hz 16 9 4096x2160p 24Hz 256 135 4096x2...

Page 226: ...5 4096x2160p 30Hz 256 135 4096x2160p 50Hz 256 135 4096x2160p 60Hz 256 135 Audio data block Linear PCM Max channels 2 Supported sample rates kHz 48 44 1 32 Supported sample sizes bits 24 20 16 Linear P...

Page 227: ...ol 1 x RJ 45 Front panel display 1 x OLED 2x rows 20 chars row Power Button Indicator 1 x Tact type bi color blue orange backlight Control Buttons Indicators 9 x Tact type Reset Button 1 x Tact type r...

Page 228: ...ectors W x H x D 17 25 x 3 5 x 15 75 440mm x 89mm x 400mm Net Unit Weight 21 lbs 9 5 kg Shipping Weight 29 lbs 13 25 kg Specifications Features and specifications are subject to change without notice...

Page 229: ...204 reboot 168 send_hpd 170 set_device_desc 172 set_discovery 173 set_discovery_mode 174 set_edid_copy 175 set_edid_lock 176 set_edid_mode 177 set_feedback 178 set_gateway 179 set_http_port 202 set_in...

Page 230: ...ntrol 85 HPD Control 35 84 I IP Settings gateway 46 IP address 44 IP mode 44 subnet mask 45 IR Remote Control description 5 installing batteries 8 setting the IR channel 9 L Licensing vi Locking the M...

Page 231: ...the IR remote control 28 Unmuting audio outputs 23 V Volume muting unmuting 23 output adjusting 21 W Warranty Information iii Web Interface changing input and output names 82 downloading configuration...

Page 232: ...Preferred 1800 S McDowell Blvd Petaluma CA 94954 707 283 5900 800 472 5555...

Reviews: