background image

GE H

EALTHCARE

D

IRECTION

 2286865, R

EVISION

 14

LOGIQ™ 7 S

ERVICE

 M

ANUAL

9-28

Section 9-9 - Renewal Parts List For BT04 and BT06

9-9-4

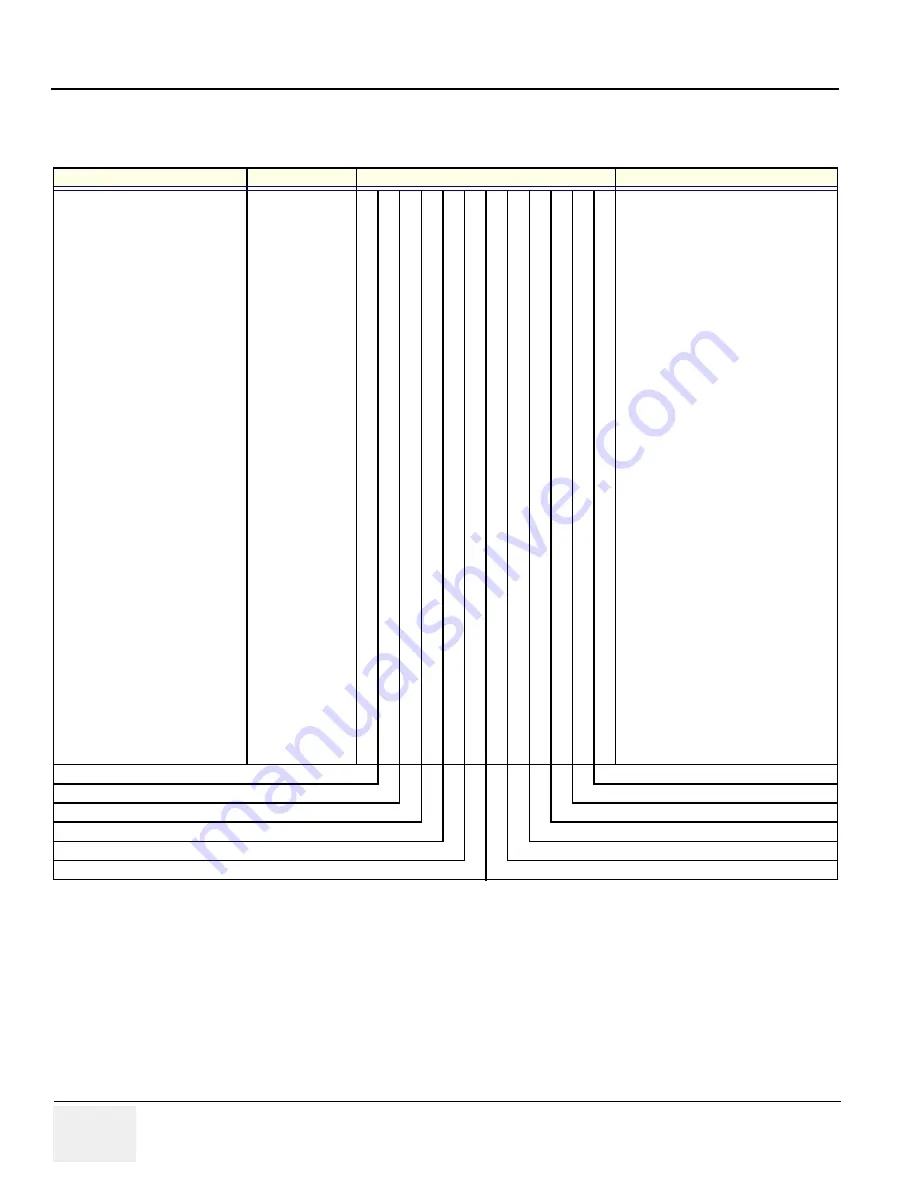
BT04: Equipment Models Covered in this Chapter (LOGIQ 7)

Table 9-23   Material List

Part Name

Part Number

Quantity

Description

OPERATOR CONSOLE ASSY

5118054

1

100V, NTSC

OPERATOR CONSOLE ASSY

5118056

1

1

120V, NTSC

OPERATOR CONSOLE ASSY

5118057

1

1

220V, PAL

OPERATOR CONSOLE ASSY

5118058

1

220V, NTSC

OPERATOR CONSOLE ASSY

5118059

1

STYLE D

TASK LAMP

2301853-4

1

1

1

1

1

1

1

LOGIQLEAN MIDDLE

2369384

1

1

GEL

2384010

1

1

GEL

U0403BD

1

1

1

1

1

PARKER AQUASONIC100

2384142

1

1

1

1

1

KEY LABEL2

2360321

1

1

1

1

1

1

WARRANTY CARD

P9889AH

1

1

HIGHLIGHT DOC

5141402

1

1

SAFETY PAMPHLET

5118349

1

SDA LABEL

2341927

1

APPLICATION CD

5118352

1

1

1

1

1

1

1

GHOST CD

5118353-3

1

1

1

1

1

1

1

DVD-R MEDIA 4.7GB

5118392

1

1

1

1

1

1

1

CD-R MEDIA 700MB

5118386

1

1

1

1

1

1

1

JAPAN (5118054)
USA (5118054-2)
EUROPE (5118054-3)
KOREA (5118054-4)
ASIA 120V(5118054-5)
ASIA 220V(5118054-6)

JAPAN STYLE D (5118054-7)

Summary of Contents for LOGIQ 7

Page 1: ...Technical Publication Direction 2286865 REVISION 14 GE Healthcare LOGIQ 7 Service Manual Copyright 2001 2008 by General Electric Company Inc All Right Reserved GE Healthcare ...

Page 2: ......

Page 3: ...NGLAIS IL INCOMBE AU CLIENT DE LE FAIRE TRADUIRE NE PAS TENTER D INTERVENTION SUR LES éQUIPEMENTS TANT QUE LE MANUEL DE MAINTENANCE N A PAS éTé CONSULTé ET COMPRIS LE NON RESPECT DE CET AVERTISSEMENT PEUT ENTRAîNER CHEZ LE TECHNICIEN L OPéRATEUR OU LE PATIENT DES BLESSURES DUES à DES DANGERS éLECTRIQUES MéCANIQUES OU AUTRES DIESES KUNDENDIENST HANDBUCH EXISTIERT NUR IN ENGLISCHER SPRACHE FALLS EIN...

Page 4: ...EM PERIGO A SEGURANç A DO TéCNICO OPERADOR OU PACIENTE DEVIDO A CHOQUES ELéTRICOS MECâ NICOS OU OUTROS IL PRESENTE MANUALE DI MANUTENZIONE è DISPONIBILE SOLTANTO IN INGLESE SE UN ADDETTO ALLA MANUTENZIONE ESTERNO ALLA GEMS RICHIEDE IL MANUALE IN UNA LINGUA DIVERSA IL CLIENTE è TENUTO A PROVVEDERE DIRETTAMENTE ALLA TRADUZIONE SI PROCEDA ALLA MANUTENZIONE DELL APPARECCHIATURA SOLO DOPO AVER CONSULTA...

Page 5: ... ΕΓΧΕΙΡΙ ΙΟ ΣΕΡΒΙΣ ΕΑΝ Ε ΛΑΒΕΤΕ ΥΠΟΨΗ ΤΗΝ ΠΡΟΕΙ ΟΠΟΙΗΣΗ ΑΥΤΗ ΕΝ ΕΧΕΤΑΙ ΝΑ ΠΡΟΚΛΗΘΕΙ ΤΡΑΥΜΑΤΙΣΜΟΣ ΣΤΟ ΑΤΟΜΟ ΠΑΡΟΧΗΣ ΣΕΡΒΙΣ ΣΤΟ ΧΕΙΡΙΣΤΗ Ή ΣΤΟΝ ΑΣΘΕΝΗ ΑΠΟ ΗΛΕΚΤΡΟΠΛΗΞΙΑ ΜΗΧΑΝΙΚΟΥΣ Ή ΑΛΛΟΥΣ ΚΙΝ ΥΝΟΥΣ EZEN KARBANTARTÁSI KÉZIKÖNYV KIZÁRÓLAG ANGOL NYELVEN ÉRHETŐ EL HA A VEVŐ SZOLGÁLTATÓJA ANGOLTÓL ELTÉRŐ NYELVRE TART IGÉNYT AKKOR A VEVŐ FELELŐSSÉGE A FORDÍTÁS ELKÉSZÍTTETÉSE NE PRÓBÁLJA ELKEZDENI HASZNÁL...

Page 6: ...DE OVERHOLDELSE AF DENNE ADVARSEL KAN MEDFØRE SKADE PÅ GRUND AF ELEKTRISK MEKANISK ELLER ANDEN FARE FOR TEKNIKEREN OPERATØREN ELLER PATIENTEN DEZE ONDERHOUDSHANDLEIDING IS ENKEL IN HET ENGELS VERKRIJGBAAR ALS HET ONDERHOUDSPERSONEEL EEN ANDERE TAAL VEREIST DAN IS DE KLANT VERANTWOORDELIJK VOOR DE VERTALING ERVAN PROBEER DE APPARATUUR NIET TE ONDERHOUDEN VOORDAT DEZE ONDERHOUDSHANDLEIDING WERD GERA...

Page 7: ... ELLER ANDRE FARER NINIEJSZY PODRĘCZNIK SERWISOWY DOSTĘPNY JEST JEDYNIE W JĘZYKU ANGIELSKIM JEśLI FIRMA śWIADCZĄCA KLIENTOWI USłUGI SERWISOWE WYMAGA UDOSTęPNIENIA PODRęCZNIKA W JęZYKU INNYM NIŻ ANGIELSKI OBOWIĄZEK ZAPEWNIENIA STOSOWNEGO TłUMACZENIA SPOCZYWA NA KLIENCIE NIE PRó BOWAć SERWISOWAć NINIEJSZEGO SPRZęTU BEZ UPRZEDNIEGO ZAPOZNANIA SIę Z PODRęCZNIKIEM SERWISOWYM NIEZASTOSOWANIE SIę DO TEGO...

Page 8: ...ANEDBANIE TOHTO UPOZORNENIA Mô ŽE VYÚSTIŤ DO ZRANENIA POSKYTOVATEĽA SLUŽIEB OBSLUHUJúCEJ OSOBY ALEBO PACIENTA ELEKTRICKýM PRúDOM PRÍPADNE DO MECHANICKéHO ALEBO INéHO NEBEZPEč ENSTVA DEN HÄR SERVICEHANDBOKEN FINNS BARA TILLGÄNGLIG PÅ ENGELSKA OM EN KUNDS SERVICETEKNIKER HAR BEHOV AV ETT ANNAT SPRÅK ÄN ENGELSKA ANSVARAR KUNDEN FÖR ATT TILLHANDAHÅLLA ÖVERSÄTTNINGSTJÄNSTER FÖRSÖK INTE UTFÖRA SERVICE P...

Page 9: ... vii GE HEALTHCARE DIRECTION 2286865 REVISION 14 LOGIQ 7 SERVICE MANUAL ...

Page 10: ... connections between pieces of electrical equipment calibrations and testing shall be performed by qualified GE Medical Systems personnel In performing all electrical work on these products GE will use its own specially trained field engineers All of GE s electrical work on these products will comply with the requirements of the applicable electrical codes The purchaser of GE equipment shall only ...

Page 11: ...r basic service software does not extend to or cover this software or related documentation If you are a GE Medical Systems employee or a customer who has entered into such a license agreement with GE Medical Systems to use this proprietary software you are authorized to use this Material according to the conditions stated in your license agreement However you do not have the permission of GE Medi...

Page 12: ...GE HEALTHCARE DIRECTION 2286865 REVISION 14 LOGIQ 7 SERVICE MANUAL x ...

Page 13: ... software loading for R2 sec8 New part number sec9 4 April 2 2003 Monitor and LCD Adjustment DDBF and Trap settings sec6 Keyboard FRU replacement sec8 Renewal Parts sec9 5 October 22 2003 Added New Printer and probe Sec 3 HDD Jumper setting sec 6 New PC box and DGVIC replacement MOD setting Service dongle notice at Ghost R3 software DVD TxCW connection notice sec 8 New spare parts Sec 9 6 Septembe...

Page 14: ...S REVISION PAGES REVISION PAGES REVISION Title Page 14 1 1 to 1 23 14 Back Cover N A Warnings i to v 14 2 1 to 2 11 14 Rev Hist LOEP vii to viii 14 3 1 to 3 25 14 Table of Contents ix to xxiv 14 4 1 to 4 31 14 5 1 to 5 45 14 6 1 to 6 41 14 7 1 to 7 2 14 8 1 to 8 60 14 9 1 to 9 91 14 10 1 to 10 33 14 ...

Page 15: ... in Book 1 5 Product Icons 1 7 Introduction 1 10 Human Safety 1 10 Mechanical Safety 1 10 Electrical Safety 1 11 Label Locations For BT07 or later including R7 5 x 1 12 Label Locations For BT04 BT06 and V65x 1 14 Lockout Tagout Requirements For USA Only 1 18 Returning Shipping Probes and Repair Parts 1 18 How to remove the Ghost CD ROM 1 19 Electromagnetic Compatibility 1 21 Electrostatic Discharg...

Page 16: ...of Chapter 3 3 1 Average Installation Time 3 1 Installation Warnings 3 2 Safety Reminders 3 5 Moving into Position 3 6 LCD Monitor Tilt Caution 3 7 LCD Monitor Swing CautionLCD Monitor Tilt Caution 3 8 LCD Monitor Removal Caution 3 9 Shipping Delivery Requirements 3 9 Preparing for Installation 3 10 Verify Customer Order 3 10 Physical Inspection 3 10 EMI Protection 3 10 Completing the Installation...

Page 17: ...ing R7 5 x 4 11 Archiving and Loading Presets for BT06 V65x or lower 4 16 Basic Controls 4 20 Performance Tests 4 20 Mode Checks 4 21 Basic Measurements 4 21 ECG Checks 4 22 Cineloop Check 4 22 Backend Processor Checks 4 22 Probe Connectors Usage QG 4 22 Peripheral Checks 4 23 Mechanical Functions 4 24 Application Turnover Check List 4 27 Software Configuration Checks 4 27 Diagnostics 4 28 Service...

Page 18: ...r BT06 2 or later 5 21 Patient I O Option 5 23 External I O Rear Panel 5 23 Peripherals 5 23 Interconnect Cabling BT09 or later 5 24 Difference points between BT07 or later and BT06 or earlier Systems for R7 5 x 17 to 19 LCD Monitor Upgrade 5 26 Common Service Platform 5 27 Introduction 5 27 Calibration 5 36 Configuration 5 36 Replacement 5 37 Remote Software Option Installation and Updates 5 38 I...

Page 19: ...tment 6 8 Reloading the Probe Data 6 9 Monitor and LCD Adjustments 6 10 CRT Monitor Contrast and Brightness Adjustment 6 10 19 inch LCD Monitor Brightness Adjustment 6 12 17 inch LCD Monitor Contrast and Brightness Adjustment 6 13 LCD Monitor Resolution 6 14 LCD Touch Panel Adjustment 6 14 BW Printer Setting Adjustment 6 27 Parameters for UP D897 6 27 Parameters for UP D895 6 29 Service Tips Print...

Page 20: ...arts Overview 9 1 Purpose of Chapter 9 9 1 List of Abbreviations 9 1 Renewal Parts List For BT09 9 2 BT09 19inch LCD Equipment Models Covered in this Chapter LOGIQ 7 9 2 BT09 Parts 9 3 Renewal Parts List For R7 5 x 9 5 R7 5 x 19inch LCD Equipment Models Covered in this Chapter LOGIQ 7 9 5 R7 5 x Parts 9 6 Renewal Parts List For BT07 9 8 BT07 CRT Equipment Models Covered in this Chapter LOGIQ 7 9 8...

Page 21: ... CONSIP Parts 9 24 Renewal Parts List For BT04 and BT06 9 25 BT06 CRT Equipment Models Covered in this Chapter LOGIQ 7 9 25 BT06 LCD Equipment Models Covered in this Chapter LOGIQ 7 9 26 BT06 Equipment Models Covered in this Chapter LOGIQ 7 PRO 9 27 BT04 Equipment Models Covered in this Chapter LOGIQ 7 9 28 BT04 Equipment Models Covered in this Chapter LOGIQ 7 PRO 9 29 Monitor 9 30 Casters and Ped...

Page 22: ...edule 10 2 How often should PMs be performed 10 2 Standard GE Tool Kit 10 4 Special Tools Supplies and Equipment 10 6 Preliminary Checks 10 7 Input Power 10 9 Cleaning 10 9 Physical Inspection 10 10 Probe Maintenance 10 11 Using a Phantom 10 11 Electrical Safety Tests 10 12 Safety Test Overview 10 12 Grounding Continuity 10 15 Isolated Patient Lead Source Leakage Lead to Ground 10 19 Isolated Pati...

Page 23: ...list 4 Chapter 4 Functional Checks Contains functional checks that must be performed as part of the installation or as required during servicing and periodic maintenance 5 Chapter 5 Theory Contains block diagrams and functional explanations of the LOGIQ 7 electronics 6 Chapter 6 Service Adjustments Contains instructions on how to make any available adjustments to the LOGIQ 7 7 Chapter 7 Diagnostic...

Page 24: ...rals Style C Ver3 BT03 2389219 LOGIQ 7 220V PAL Console and Peripherals Style C Ver3 BT03 2389218 LOGIQ 7 220V NTSC Console and Peripherals Style C Ver3 BT03 2389217 LOGIQ 7 100V NTSC Console and Peripherals Style C Ver3 BT03 5118055 LOGIQ 7 100V NTSC Console and Peripherals Style D Ver4 BT04 5118056 LOGIQ 7 120V NTSC Console and Peripherals Style D Ver4 BT04 5118057 LOGIQ 7 220V PAL Console and P...

Page 25: ...Peripherals LCD monitor BT06 2 CONSIP SOI BT06 2 PRO with LCD 5183269 LOGIQ 7 100V NTSC Console and Peripherals CRT monitor V65x CRT 5183237 LOGIQ 7 120V NTSC Console and Peripherals CRT monitor V65x CRT 5183396 LOGIQ 7 220V PAL Console and Peripherals CRT monitor V65x CRT 5183304 LOGIQ 7 220V NTSC Console and Peripherals CRT monitor V65x CRT 5183330 LOGIQ 7 100V NTSC Console and Peripherals LCD m...

Page 26: ...RO 5191436 LOGIQ 7 220V PAL Console and Peripherals Style H BT07 PRO 5191259 LOGIQ 7 220V NTSC Console and Peripherals Style H BT07 PRO 5244924 LOGIQ 7 100V NTSC Console and Peripherals LCD monitor Style I R7 5 x LCD 5244925 LOGIQ 7 120V NTSC Console and Peripherals LCD monitor Style I R7 5 x LCD 5244926 LOGIQ 7 220V PAL Console and Peripherals LCD monitor Style I R7 5 x LCD 5244927 LOGIQ 7 220V N...

Page 27: ...Known or potential hazards are labeled in one of three ways NOTE Notes are used to provide important information about an item or a procedure Be sure to read the notes the information contained in a note can often save you time or effort DANGER DANGER IS USED TO INDICATE THE PRESENCE OF A HAZARD THAT WILL CAUSE SEVERE PERSONAL INJURY OR DEATH IF THE INSTRUCTIONS ARE IGNORED WARNING WARNING WARNING...

Page 28: ... symbols may be used to make you aware of specific types of hazards that could possibly cause harm Some others make you aware of specific procedures that should be followed Some others make you aware of specific procedures that should be followed Table 1 3 Standard Hazard Icons ELECTRICAL MECHANICAL RADIATION LASER HEAT PINCH Table 1 4 Standard Icons that indicates that a special procedure is to b...

Page 29: ...ent Type CF heart in the box symbol IEC 878 02 05 indicates equipment having a floating applied part having a degree of protection suitable for direct cardiac contact ECG connector and Probes marked Type CF Device Listing Certification Labels Laboratory logo or labels denoting conformance with industry safety standards such as UL or IEC Rear of console CAUTION This unit weighs Special care must be...

Page 30: ... position of the power switch CAUTION This Power Switch DOES NOT ISOLATE Mains Supply Adjacent to On Standby Switch Protective Earth Indicates the protective earth grounding terminal Various Equipotentiality Indicates the terminal to be used for connecting equipotential conductors when interconnecting grounding with other equipment Rear of console Alternating Current symbol is in accordance with I...

Page 31: ...centration value Maximum concentration values for electronic information products as set by the People s Republic of China Electronic Industry Standard SJ T11364 2006 include the hazardous substances of lead mercury hexavalent chromium cadmium polybrominated biphenyl PBB and polybrominated diphenyl ether PBDE 20 indicates the number of years during which the hazardous substance s will not leak or ...

Page 32: ... from the MO Drive if installed WARNING WARNING WHEN THE UNIT IS RAISED FOR A REPAIR OR MOVED ALONG ANY INCLINE USE EXTREME CAUTION SINCE IT MAY BECAUSE UNSTABLE AND TIP OVER WARNING WARNING ULTRASOUND PROBES ARE HIGHLY SENSITIVE MEDICAL INSTRUMENTS THAT CAN EASILY BE DAMAGED BY IMPROPER HANDLING USE CARE WHEN HANDLING AND PROTECT FROM DAMAGE WHEN NOT IN USE DO NOT USE A DAMAGED OR DEFECTIVE PROBE...

Page 33: ...ed with a three conductor AC power cable This must be plugged into an approved electrical outlet with safety ground If an extension cord is used with the system make sure that the total current rating of the system does not exceed the extension cord rating The power outlet used for this equipment should not be shared with other types of equipment Both the system power cable and the power connector...

Page 34: ...hapter Figure 1 1 OUTSIDE MARKINGS OF LOGIQ 7 For BT07 or later including R7 5 x Back Side 100 120V Japan USA Asia Console 100V 9 10 11 8 2 1 3 4 6 7 220 240V GE Yokogawa Medical Systems ETL LISTED CONFORMS TO UL STD 2601 1 464 7 7 R ETL TESTING LABORATORIES INC CORTLAND NEW YORK 13043 L I S TE D R L I S TE D CERTIFIED TO CAN CSA C22 2 NO 601 1 C 5 12 13 14 15 16 17 18 21 Except for R7 5 x Label f...

Page 35: ... for Grounding Reliability For USA Canada and Japan 12 ETL Label 13 Identification and Rating Plate USA Asia 120V console 14 Identification and Rating Plate Europe Asia USA 220V console 15 Identification and Rating Plate Jpan 100V console 16 Identification and Rating Plate China 17 Label that indicates the presence of hazardous substance s above the maximum concentration value 18 Identification an...

Page 36: ...pages in this chapter 1 Possible Shock Hazard 2 Caution for devices near by the equipment 3 Caution for Transportation 4 Prescription Devices For USA Only 5 CE Marking of conformity and WEEE mark 6 CISPR 7 Voltage Range 8 Signal Ground Point Label 9 Power Indication Label 10 Caution for Grounding Reliability For USA Canada and Japan Figure 1 2 OUTSIDE MARKINGS OF LOGIQ 7 For BT04 or later Back Sid...

Page 37: ...UAL Section 1 2 Important Conventions 1 15 1 3 6 Label Locations For BT04 BT06 and V65x cont d 1 ETL Label 2 Identification and Rating Plate 3 SFDA or SDA Label For China ONLY Figure 1 3 OUTSIDE MARKINGS OF LOGIQ 7 For BT04 or later China 220V Con Right Side 2 1 3 ...

Page 38: ...ious pages in this chapter 1 Possible Shock Hazard 2 Caution for devices near by the equipment 3 Caution for Transportation 4 Prescription Devices For USA Only 5 CE Marking of conformity 6 CISPR 7 Voltage Range 8 Signal Ground Point Label 9 Power Indication Label 10 Caution for Grounding Reliability For USA Canada and Japan Figure 1 4 OUTSIDE MARKINGS OF LOGIQ 7 For BT03 or lower Back Side 1 3 2 4...

Page 39: ...UAL Section 1 2 Important Conventions 1 17 1 3 7 Label Locations For BT03 or lower cont d 1 ETL Label 2 Identification and Rating Plate 3 SDA Label For China ONLY Figure 1 5 OUTSIDE MARKINGS OF LOGIQ 7 For BT03 or lower Left Side China 220V Console Right Side 2 1 3 ...

Page 40: ...age NOTE The US Department of Transportation DOT has ruled that items that were saturated and or dripping with human blood that are now caked with dried blood or which were used or intended for use in patient care are regulated medical waste for transportation purposes and must be transported as a hazardous material DANGER DANGEROUS VOLTAGES CAPABLE OF CAUSING DEATH ARE PRESENT IN THIS EQUIPMENT U...

Page 41: ...side the scanner using velcro tapes The upper side of the PC BOX cover contains sharp edge causing a FE to have possibility of cutting his hand if he removes the CD ROM with the PC BOX cover closed Figure 1 6 How to Remove Ghost CD ROM Ghost CD ROM Sharp Edge PC BOX Cover NG WITH PC BOX COVER CLOSED OK WITH PC BOX COVER OPEN PC BOX Cover Do NOT remove the Ghost CD ROM when the PC Box cover is clos...

Page 42: ...r the Ghost CD ROM must be removed with the PC Box cover open according to the following steps 1 Disconnect the DVI D connector then remove the four mounting bolts three hex bolts and one phillips screw 2 Open the PC box cover and remove the Ghost CD ROM from the PC box Figure 1 7 Removing Bolts Figure 1 8 Removing Ghost CD ROM Hex bolts PC Box Cover Hex bolt Phillips screw DVI D connector PC Box ...

Page 43: ...cts from electrical fields magnetic fields electrostatic discharge and disturbances in the electrical power supply 1 4 2 Electrostatic Discharge ESD Prevention 1 4 3 CE Compliance The LOGIQ 7 unit conforms to all applicable conducted and radiated emission limits and immunity from electrostatic discharge radiated and conducted RF fields magnetic fields and power line transient requirements Applicab...

Page 44: ...Tokyo 191 8503 JAPAN Table 1 7 Phone Numbers for Customer Assistance Location Phone Number USA Canada GE Medical Systems Ultrasound Service Engineering 4855 W Electric Avenue Milwaukee WI 53219 Customer Answer Center Tel 1 800 321 7937 1 800 682 5327 1 262 524 5698 Fax 1 414 647 4125 Latin America GE Medical Systems Ultrasound Service Engineering 4855 W Electric Avenue Milwaukee WI 53219 Customer ...

Page 45: ...LOGIQ 7 SERVICE MANUAL Section 1 5 Customer Assistance 1 23 1 5 2 Contact Information cont d NOTE If this equipment does not work as indicated in the Operator Manual s contact your support center Have the system ID number available when you call ...

Page 46: ...GE HEALTHCARE DIRECTION 2286865 REVISION 14 LOGIQ 7 SERVICE MANUAL 1 24 Section 1 5 Customer Assistance This page was intentionally left blank ...

Page 47: ...allation of a LOGIQ 7 Included are descriptions of the facility and electrical needs to be met by the purchaser of the unit A checklist is also provided at the end of this section to help determine whether the proper planning and preparation is accomplished before the actual equipment installation is scheduled Table 2 1 Contents in Chapter 2 Section Description Page Number 2 1 Overview 2 1 2 2 Gen...

Page 48: ...s and diameters can be a source of EMI which could degrade image quality These controls should be selected to minimize possible interface Table 2 2 Environmental Requirements for LOGIQ 7 Scanners Operational Storage Transport Temperature 10 35 o C 50 95 oF 10 50 o C 14 122oF 10 50 o C 14 122 oF Humidity 30 80 non condensing 30 80 non condensing 30 80 non condensing Pressure 700 1060hPa 700 1060hPa...

Page 49: ... LOGIQ 7 Power Requirements The following power line parameters should be monitored for one week before installation We recommend that you use an analyzer Dranetz Model 606 3 or Dranetz Model 626 2 2 2 3 Inrush Current Inrush Current is not a factor to consider due to the inrush current limiting properties of the power supplies 2 2 2 4 Site Circuit Breaker It is recommended that the branch circuit...

Page 50: ...s medical and test equipment needed to support this unit must also be present within 1 m 3 2 ft of the unit Electrical installation must meet all current local state and national electrical codes 2 2 2 6 Unit Power Plug If the unit arrives without the power plug or with the wrong plug you must contact your GE dealer or the installation engineer must supply what is locally required 2 2 2 7 Power St...

Page 51: ... reason a unit will have noisy images Check grounding of the power cord and power outlet Replace all screws RF gaskets covers cores After you finish repairing or updating the system replace all covers and tighten all screws Any cable with an external connection requires a magnet wrap at each end Install the shield over the front of card cage Loose or missing covers or RF gaskets allow radio freque...

Page 52: ... 40 o C 50 104 oF 10 60 o C 14 140oF 40 60 o C 40 140 oF Humidity 30 85 non condensing 30 90 non condensing 30 90 non condensing Pressure 700 1060hPa 700 1060hPa 700 1060hPa Table 2 7 Operation and storage Temperatures for 4D Probes Operational Storage Transport Temperature 18 30 o C 64 86 o F 10 50 o C 14 122 o F 10 50 o C 14 122 o F Humidity Max 70 non condensing Max 90 non condensing Max 90 non...

Page 53: ...nnections between pieces of electrical equipment products involved and the accompanying electrical installations are highly sophisticated and special engineering competence is required All electrical work on these product must comply with the requirements of applicable electrical codes The purchaser of GE equipment must only utilize qualified personnel to perform electrical servicing on the equipm...

Page 54: ...utlets inside the unit One is for the monitor and three for on board peripherals Power outlets for other medical equipment and gel warmer Power outlets for test equipment and modem within 1 m 3 2 ft of unit Clean and protected space to store transducers in their cases or on a rack Material to safely clean probes done with a plastic container never metal 2 3 3 Desirable Ultrasound Room Facilities D...

Page 55: ...OGIQ 7 SERVICE MANUAL Section 2 3 Facility Needs 2 9 2 3 4 Recommended and Alternate Ultrasound Room Layout Recommended standard floor plan and a minimal floor plan for ultrasound equipment Figure 2 1 RECOMMENDED ULTRASOUND ROOM LAYOUT LOGIQ LOGIQ ...

Page 56: ...be done while scanning continues With DICOM images can be archived stored and retrieved faster easier and at a lower cost 2 3 5 2 DICOM Option Pre installation Requirements To configure the LOGIQ 7 to work with other network connections the site s network administrator must provide some necessary information Information must include A host name local port number AE Title IP address and Net Mask fo...

Page 57: ...Figure 2 2 Worksheet for DICOM Network Information LOGIQ 7 Host Name AE Title Local Port IP Address Net Mask ROUTING INFORMATION ROUTER2 ROUTER3 ROUTER1 Destination IP Addresses GATEWAY IP Addresses Default DICOM APPLICATION INFORMATION NAME Store 2 Store 3 Store 1 MAKE REVISION IP ADDRESSES PORT AE TITLE Store 5 Store 6 Store 4 Storage Commit MPPS Worklist ...

Page 58: ...GE HEALTHCARE DIRECTION 2286865 REVISION 14 LOGIQ 7 SERVICE MANUAL 2 12 Section 2 3 Facility Needs This page was intentionally left blank ...

Page 59: ...delines for transporting the unit to a new site 3 1 2 Average Installation Time The LOGIQ 7 has been designed to be installed and checked out by an experienced service technician in approximately four hours LOGIQ 7 consoles with optional equipment may take slightly longer Table 3 1 Contents in Chapter 3 Section Description Page Number 3 1 Overview 3 1 3 2 Receiving and Unpacking the Equipment 3 3 ...

Page 60: ...ay be very cold or hot If this is the case allow the unit to acclimate before you turn it on It requires one hour for each 2 5 C increment it s temperature is below 10 C or above 40 C 3 1 3 1 Brake Pedal Operation CAUTION Equipment damage possibility Turning the system on without acclimation after arriving at site may cause the system to be damaged Table 3 3 Time for Settlement C 60 55 50 45 40 35...

Page 61: ... the Cap up and off 3 Remove the six 6 Plastic Joints from the Outer Sleeves 4 Remove the Outer Sleeves 5 Remove the Monitor Sleeve 6 Remove the Box for Peripherals 7 Remove the Front and Rear Cushions 8 Slide out and set up the Slope 9 Unlock the brakes by stepping down on the brake pedal in front then carefully roll the LOGIQ 7 rear side first off the Skid Figure 3 1 Unpacking Procedures Cap Pla...

Page 62: ...tection of LCD monitor re use the packing sleeve whenever possible in case of shipment after unpacking Figure 3 2 Labels on Package Secure the LCD Sleeve with adhesive tape after placing it to the proper location Adhesive Tape Each side Turn over the LCD monitor and place the sleeve to the location above Make sure LCD arm is locked Pull over the sleeve to the LCD arm Make sure the LCD arm hinge is...

Page 63: ...than 30 V peak is present CAUTION Do not use a 20 Amp to 15 Amp adapter on the 120 Vac unit s power cord This unit requires a dedicated 20 A circuit and can have a 15 A plug if the on board peripherals do not cause the unit to draw more than 14 0 amps CAUTION Do not operate this unit unless all board covers and frame panels are securely in place System performance and cooling require this CAUTION ...

Page 64: ...d mobile machine two people should move it over rough surfaces or up and down grades CAUTION Do not lift the unit by the Keyboard Do not tilt the unit more than 5 degrees to avoid tipping it over To avoid injury by tipping over Set the monitor to the lowest position before moving CAUTION Equipment Damage Possibility Lifting the console by holding covers may damage the covers Do not lift the consol...

Page 65: ...OGIQ 7 SERVICE MANUAL Section 3 1 Overview 3 7 3 2 3 LCD Monitor Tilt Caution CAUTION Do NOT put your hand here Your fingers might be pinched when adjusting angle of the LCD monitor Figure 3 3 LCD Monitor Tilt Caution For R7 5 x 19inch LCD system ...

Page 66: ...tionLCD Monitor Tilt Caution CAUTION Arm can be swung 180 degree left and right and stick out from the side frame Pay attention to the location from the wall in the room for room layout and notice the attention to customer for Examination Table side CAUTION LCD will hit the KBD in case of moving over the right left side ...

Page 67: ... the belt as shown Always hold it at the body part of the console CAUTION Always lock the LCD monitor arm before removing the LCD monitor This prevents the monitor arm from being suddenly and fastly extended when removing the LCD monitor Failure to heed this warning may result in personal harm harm to others or death Figure 3 4 Shipping Delivery Requirements Arm Lock LCD Model ONLY CAUTION Always ...

Page 68: ...LOGIQ 7 Scanner is found on the label onto the rear lower of the scanner 3 3 3 EMI Protection This Unit has been designed to minimize the effects of Electro Magnetic Interference EMI Many of the covers shields and screws are provided primarily to protect the system from image artifacts caused by this interference For this reason it is imperative that all covers and hardware are installed and secur...

Page 69: ...transducer twist lock lever to vertical position to lock it in place Twist the lever to the horizontal position to disconnect the transducer NOTE It is not necessary to turn OFF power to connect or disconnect a transducer 2 Connect the main power cable to a hospital grade power receptacle with the proper rated voltage checked during pre installation Never use a three to two prong adapter this defe...

Page 70: ... has been installed onto the scanner before shipment If it does not select the proper location to install the peripherals following the table below Figure 3 5 Optional Peripherals Peripheral Connection Location for peripheral One peripheral Color printer ONLY One peripheral VCR or DVD recorder Two peripherals Consle Top Not used Not used VCR or DVD recorder Device Room Used Used Color Pinter Conso...

Page 71: ...belts are loosen If it is tighten the belts again to secure the peripheral s If necessary remove the peripheral from the device room to tighten the belts 3 4 2 1 Approved on board peripherals Refer to Section 5 3 Peripheral Compatibility Figure 3 6 How to Hold Peripherals Belts Belts Belts Connect the related cables between the peripheral and LOGIQ 7 if they are NOT con nected each other ...

Page 72: ...Connected to power USB Serial Bridge Cable 2304621 For converting the signal of RS232C cable to USB cable connected to VCR1 on the Rear Panel AV Cable 2119874 Connected to Video In Out on the Rear Panel The followings are the cables for BT04 ore lower system ONLY Mini Plug Cable P9509BE Shutter control signals connected to B W Printer RS232C Cable Cross 2305550 For control signals connected to Ser...

Page 73: ...79832P H40412LC 2294513 2294514 M12L PBT SMALL PARTS LINEAR H79842P H40412LD 2294510 2294511 7L NORYL ABDOMINAL SUPERFICIAL LINEAR H79862P H40412LF 2294520 2294521 10L NORYL SUPERFICIAL LINEAR H79872P H40412LG 2294522 2294523 10S ABS PEDIATRIC SECTOR H79922P H4901PC 2309478 2298589 3 5C NORYL ABDOMINAL CONVEX H79812P H4901PE 2303215 2050357 3 5CS NORYL ABDOMINAL CONVEX H78042P H40412LK 2380854 205...

Page 74: ... and later LOGIQ 7 models 4D10L PBD SUPERFICIAL LINEAR Volume H44801GB 5121651 KTZ156836 4C PBT ABDOMINAL CONVEX H4904PC 5131944 5123455 12L Noryl SUPERFICIAL LINEAR H40412LH 2295375 2295377 P2D ABS CARDIOLOGY CWD H4830JE TE100024 P6D SUPERFICIAL CWD H4830JG TQ100002 Table 3 6 List of Transducers supported by V65x and later Probe Name Material of Headshell Area of Using TYPE Catalog Number Part Nu...

Page 75: ... 21 33 Horizontal Period µs 15 625 Pixel Clock MHz 49 50 Pixel Clock MHz 108 H Blank Width µs 5 17 H Blank Width µs 3 778 408dots H Sync Width µs 1 62 H Sync Width µs 1 037 112dots H Front Porch µs 0 32 H Sync Front Porch µs 0 444 48dots Active Horizontal Period µs 16 16 Active Horizontal Period µs 11 852 1280dots Vertical Rate Hz 75 00 Vertical Rate Hz 60 0 Vertical Period ms 13 33 Vertical Perio...

Page 76: ...e kept as part of the original system documentation This will ensure that all relevant safety and user informations are available during the operation and service of the complete system 3 5 1 Peripherals Accessories Connector Panel LOGIQ 7 peripherals and accessories can be properly connected using the rear connector panel located behind the rear door front connector panel located next to the vide...

Page 77: ...rinter and service tools This section indicates the pin assignment for each connector Figure 3 7 Rear Pannel Connector BT04 or later Video In Rec Expose VGA S Video Out S Video In Cmpst Out Insite Audio In L R L R Audio Out Ethernet VCR2 VCR1 Service Camera B W Color B W Color Video Out Power AC Line Input 1200VA 220 240V Circuit Breaker Circuit Breaker 50 60Hz Power AC Line Input 1200VA 50 60Hz 1...

Page 78: ...olated except the Service port 3 All of signal lines include signal GND of the Service port are isolated The specified peripherals accessories only can be connected to the USB ports Rear Pannel Connector for BT03 or lower Figure 3 8 Rear Panel Connector BT03 or lower USB1 1 USB compatible or USB USB Serial Bridge RS232C Reserved for future use 2 1 3 4 5 6 8 7 USB1 1 USB compatible or USB USB Seria...

Page 79: ...l Description 1 SVIDEO OUT IN YG Y Luma GND 2 SVIDEO OUT IN CG C Chroma GND 3 SVIDEO OUT IN Y Y Luma SIGNAL 4 SVIDEO OUT IN C C Chroma SIGNAL Table 3 11 Pin Assignment of VGA Connector Pin No Output Signal Description 1 IO VGA OUT1 R Red 2 IO VGA OUT1 G Green 3 IO VGA OUT1 B Blue 6 IO VGA OUT1 RG Reg GND 7 IO VGA OUT1 GG Green GND 8 IO VGA OUT1 BG Blue GND 13 IO VGA OUT1 HS H Sync 14 IO VGA OUT1 V...

Page 80: ...n No Output Signal Description 1 VP 1394 Power Supply 2 VG 1394 Power Ground 3 TPB 1394 Data B 4 TPB 1394 Data B 5 TPA 1394 Data A 6 TPA 1394 Data A Table 3 14 Pin Assignment of Ethernet Connector Pin No Output Signal Description 1 ETHER TD Ethernet TD 2 ETHER TD Ethernet TD 3 ETHER RD Ethernet RD 6 ETHER RD Ethernet RD Others NC Non connection Table 3 15 Pin Assignment of Insite Connector Pin No ...

Page 81: ...rophone LED and Reset Table 3 16 Pin Assignment of Mini Jack for Controlling B W Camera Pin No Output Signal 1 PRINT 2 Signal GND Table 3 17 Pin Assignment of Mini Jack for Controlling Color Camera Pin No Output Signal 1 SHUTTER 2 Signal GND Figure 3 9 Front Connector Panel 7 8 Reset Microphone LED HD access Note USB1 1 Some systems do NOT have this port If your system has this port do NOT use thi...

Page 82: ...ctor Panel Round 5 pin connector NOTE Output level of control signals indicated in the above tables are TTL level Table 3 18 Pin Assignment of Mini Jack for Controlling B W Printer Pin No Output Signal 1 PRINT 2 Signal GND Table 3 19 Pin Assignment of Mini Jack for Footswitch Pin No Output Signal 1 SW1 WH 2 SW2 RD 3 SW3 GN 4 SW1 BK SW2 BK SW3 BK 5 Frame GND 1 2 3 4 5 ...

Page 83: ...GE HEALTHCARE DIRECTION 2286865 REVISION 14 LOGIQ 7 SERVICE MANUAL Section 3 5 Installation Paperwork 3 25 This page was intentionally left blank ...

Page 84: ...GE HEALTHCARE DIRECTION 2286865 REVISION 14 LOGIQ 7 SERVICE MANUAL 3 26 Section 3 5 Installation Paperwork ...

Page 85: ... least one transducer normally you should check all the transducers used on the system Table 4 1 Contents in chapter 4 Section Description Page Number 4 1 Overview 4 1 4 2 General Procedure 4 2 4 3 Functional Checks 4 20 4 4 Application Turnover Check List 4 27 4 5 Diagnostics 4 28 4 6 Power Supply 4 29 4 7 Site Log 4 30 NOTICE Most of the information pertaining to this Functional Checks chapter i...

Page 86: ...in Circuit Breaker at the rear of the System When power is applied to the Scanner and the Rear Circuit breaker is turned ON Power is distributed to the Fans Control panel Monitor Internal and External I O s Cage Boards Peripherals and the Backend Processor When the Power ON OFF key is pressed once the Backend Processor starts and its software code is distributed to initiate the scanner CAUTION SYS...

Page 87: ...r Up Sequence NOTE For consoles with BEP4 BT09 power switch lamp is darker compared to existing BT04 BT07 consoles with BEP3 This is NOT abnormality and system will function normally regardless of the brightness of the power button 1 The Start Up Screen will be shown on the Monitor display when the system is turned ON Figure 4 2 Power On Off Standby Switch Location Figure 4 3 Start Up Screen ...

Page 88: ...t B Mode screen or Patient screen no probes are connected is displayed on the monitor display 4 2 2 3 Entering Maintenance Mode 4 2 2 3 1 R6 2 x or later 1 Insert the service dongle into any USB port 2 Wait for scanner boot up 3 Tap ON OFF the power switch 4 Click on Exit 5 Enter the proper password to enter the maintenance mode 6 Click on OK Figure 4 4 Clicking on Exit Figure 4 5 Clicking on OK ...

Page 89: ...EVISION 14 LOGIQ 7 SERVICE MANUAL Section 4 2 General Procedure 4 5 4 2 2 3 Entering Maintenance Mode cont d 7 Click on maintenance 8 Click on Exit to window Figure 4 6 Clicking on Maintetance Figure 4 7 Clicking on Exit to Window 7 7 ...

Page 90: ...y Click on Maintenance 4 Click on Exit to Windows in maintenace diaglog window Then the scanner is booted up automatically 4 2 2 3 3 R2 x x to R4 x x 1 Insert the service dongle in the Service port located at the rear panel 2 The Start Up Screen will be shown on the Monitor display when the system is turned ON 3 Then Start Loader display will be shown on the Monitor display Then the scanner is boo...

Page 91: ... must follow the procedures in order to use the option NOTE Do not use more than 20 Stand by mode continuously without shutting down the system The scanner must be powered off daily 1 Press the POWER switch once 2 Select Standby At this point both the touch panel and the main monitor will go blank Keyboard lights also turns dark Power switch button will be illuminated 3 Wait more than 20seconds 4 ...

Page 92: ...ure 4 11 Stand by Sequence Press POWER button Select Standby Check Monitor OFF Wait Check Touch Panel OFF Check POWER button illuminated Wait more than 20 seconds Disconnect Power Cord Connect to electrical outlet Power Cord Press POWER button Wait 5 seconds Scanner Start up completion in 45 seconds Standby may be failed Stand by Sequence ON ON OFF OFF or Blinking Note 1 Note1 BT09 Release with BE...

Page 93: ...our CD R or DVD disc in an original CD R or DVD case or caddy all the time will prevent it from becoming dirty or damaged NOTE Media Requirement Please be aware of the following regarding saving data to DVD R on R6 0 x Use x8 or x16 speed compatible DVD R When it is the upgraded R6 0 x system from R4 x x or prior version some systems have a number 4 or 5 printed on the disc tray of the media drive...

Page 94: ... cases Manual ejection methods listed in preferred order of use are a Press EJECT button on the MOD while system is ON b Press and hold EJECT button while the system is booting c Mechanical eject Insert the end of a paper clip into the hole while system power is OFF NOTICE Never move the unit with a disk in the MOD because the drive actuator will not be locked and the MOD could break NOTICE Avoid ...

Page 95: ...NOT be saved on the same CD R MO DVD R disk as images The Archive Menu lists the images but does NOT list the presets stored on a CD R MO DVD R disk NOTICE Do not attempt to change use Regional Preset buttons for Upgraded BT07 For Upgrade BT07 always use Factory Default in order to avoid preset conflict Contact application specialist for details Table 4 2 Presets Unique to Regions Presets NOT uniq...

Page 96: ...nstalling R7 x x Application Software for details Current Regional Preset is displayed under Utility System About Factory Default Regional Preset can be re loaded from Utility Systme About Additional About Figure 4 14 Current Regional Preset NOTICE For Upgraded BT07 this field always shows None as Region Preset is feature available for pure BT07 and onward Figure 4 15 Factory Default Regional Pres...

Page 97: ...y blank CD R DVD R disk into the CD R DVD R device 2 Access to the Utility Menu on the Touch Panel and select Connectivity Removable Media 3 Select the removable media from media list 4 Type a name for the removable media in Label field 5 Select Format button CAUTION When software is upgraded from BT07 and on re loaded or upgraded from BT07and on make sure to select the factory default Because the...

Page 98: ...D R DVD R device 2 Access to the Utility Menu on the Touch Panel and select System Backup Restore The Backup screen will be shown on the monitor 3 Select the item to back up either from Resource Files 4 Select the media to locate the items 5 Click on Backup The backup status for each item is displayed on the Result column 6 Make sure Finished OK is displayed on the Result column Figure 4 17 Clicki...

Page 99: ...ke sure the restore process is displayed on the monitor Click OK The restore status for each item is displayed on the Result column 5 Make sure Finished OK is displayed on the Result column 4 2 6 7 Regional Preset Files Service Tip The system shall have each region preset files into Americas C Pegasus target resources Pegasus Americas userdefs Europe C Pegasus target resources Pegasus Europe userd...

Page 100: ...anges to Summary Anatomy and Biometry pages can be saved on an CD R MO DVD R disk for reloading on the system 4 2 7 1 Formatting CD R MO DVD R Disk 1 Insert an empty blank CD R MO DVD R disk into the CD R MO DVD R device 2 Access to the Utility Menu on the Touch Panel and select Connectivity Removable Media or Tools NOTICE Presets should NOT be saved on the same CD R MO DVD R disk as images The Ar...

Page 101: ... SERVICE MANUAL Section 4 2 General Procedure 4 17 4 2 6 4 Formatting CD R DVD R Disk cont d 3 Select the removable media from media list 4 Type a name for the removable media in Label field 5 Select Format button Figure 4 20 Formatting Removable Media2 ...

Page 102: ...he CD R MO DVD R device 2 Access to the Utility Menu on the Touch Panel and select System Backup Restore The Backup screen will be shown on the monitor 3 Select the item to back up either from Resource Files 4 Select the media to locate the items 5 Click on Backup The backup status for each item is displayed on the Result column 6 Make sure Finished OK is displayed on the Result column Figure 4 21...

Page 103: ... 2 Access to the Utility Menu on the Touch Panel and select System Backup Restore The Restore sheet will be shown on the monitor 3 Select the item to restore either from resource Files 4 Click on Restore A message to make sure the restore process is displayed on the monitor Click OK The restore status for each item is displayed on the Result column 5 Make sure Finished OK is displayed on the Resul...

Page 104: ...mance Tests 4 3 2 1 Recommended Test Phantoms GE Healthcare recommends the RMI 430GS phantom but it is not required It is the most current phantom recommended to our field service personnel and provides the necessary targets and extended life necessary for consistent system testing Figure 4 23 Performance Test 2 4 3 2 1 4 6 8 10 12 14 16 RMI 403GS Lateral Distance Measurement Functional Resolution...

Page 105: ...nd in the LOGIQ 7 Quick Guide Table 4 3 System Functional Checks Step Item Description 1 B Mode Verify basic B Mode 2D operation Check the basic system controls that affect this mode of operation 2 CF Mode Verify basic CF Mode Color Flow Mode operation Check the basic system controls that affect this mode of operation 3 Doppler Modes Verify basic Doppler operation PW and CW if available Check the ...

Page 106: ...all the previous tests have been passed successfully the backend processor is most likely OK See Service Platform If the system seems to be operating erratically please refer to Chapter 7 Diagnostic Troubleshooting 4 3 8 Probe Connectors Usage QG The LOGIQ 7 Quick Guide provides information on connecting activating deactivating and disconnecting probes Table 4 4 ECG Control Step Task Expected Resu...

Page 107: ...roved Peripheral Hardware Option Functional Checks Step Item Description 1 VCR Verify record playback capabilities of the VCR Clean heads and covers if necessary 2 B W Printer Verify hardcopy output of the B W video page printer Clean heads and covers if necessary 3 Color Printer Verify hardcopy output of the Color video page printer Clean heads and covers if necessary 4 DICOM Verify that DICOM is...

Page 108: ...hanical Functions 4 3 10 1 Keyboard and Display Platform Console Check Table 4 7 Display platform Maneuverability check Step Task to do Expected Result s 1 Pull release lever under the OP Panel to release the lock The height of the Monitor and OP Panel will be maneuverable Figure 4 24 Keyboard Lever Keyboad Lever ...

Page 109: ...d below Refer to Figure 4 25 for the locations of brake and swivel Table 4 8 Brakes and Direction Lock Check Step Task to do Expected Result s 1 Press on pedal no 2 To engage the pedal in full lock 2 Press on pedal no 3 To release the brake 3 Press on pedal no 1 To engage swivel lock 4 Press on pedal no 3 To release swivel lock Figure 4 25 Brake and Swivel Location 1 2 3 1 2 3 1 2 3 1 2 3 Swivel B...

Page 110: ...Procedure 4 3 10 3 Caster and Caster Link Checks Check if For Caster No loose caster with it jacked up Smooth operation when moving the scanner For Caster Link Assy Effective brake and direction lock function See section 4 3 10 2 The pedals can be smoothly returned The lock pin must be removed ...

Page 111: ...before returning the scanner to customer for use 4 4 1 Software Configuration Checks Table 4 9 Software Configuration Checks Step Task to do Expected Result s 1 Check Date and Time setting Date and Time are correct 2 Check that Location Hospital Name and Department is correct Location Name is correct 3 Check Language setting Language is proper 4 Check Units setting Units are proper ...

Page 112: ...ERVICE MANUAL 4 28 Section 4 5 Diagnostics Section 4 5 Diagnostics 4 5 1 Service Software Menu Refer to Section 5 5 Common Service Platform 4 5 2 Diagnostics Test Menu Refer to Section 5 5 5 Diagnostics 4 5 3 Utility Menu Refer to Section 5 5 9 Utilities ...

Page 113: ...roblem that may be related to the Power Supplies Refer to Section 6 2 LV Unit Adjustments For BT03 or lower if you appear to have a problem that may be related to the Power Supplies 4 6 2 Power Supply Adjustment There are no adjustments on the power supplies The DC Power is self regulated If a voltage is outside the specified range it means that something is wrong either with the power supply itse...

Page 114: ...GE HEALTHCARE DIRECTION 2286865 REVISION 14 LOGIQ 7 SERVICE MANUAL 4 30 Section 4 7 Site Log Section 4 7 Site Log Table 4 10 Site Log DATE SERVICE PERSON PROBLEM COMMENTS ...

Page 115: ...GE HEALTHCARE DIRECTION 2286865 REVISION 14 LOGIQ 7 SERVICE MANUAL Section 4 7 Site Log 4 31 Table 4 10 Site Log DATE SERVICE PERSON PROBLEM COMMENTS ...

Page 116: ...GE HEALTHCARE DIRECTION 2286865 REVISION 14 LOGIQ 7 SERVICE MANUAL 4 32 Section 4 7 Site Log ...

Page 117: ...ystem concepts component arrangement and subsystem function It also describes the Power Distribution System PDS and probes Table 5 1 Contents in Chapter 5 Section Description Page Number 5 1 Overview 5 1 5 2 Hardware Compatibility Matrix 5 2 5 4 Block Diagrams and Theory 5 12 5 5 Common Service Platform 5 27 5 6 Password 5 40 5 7 Air Flow Control 5 42 5 8 Monitor Video Specification 5 44 ...

Page 118: ...125391 5189828 DVI_CABLE_TOP_LCD_L7 N Y Y N Y if LCD monitor Two piece BEP LCD cbl 5137743 MIC_SPK CBL CSL_LCD L7 N Y N N Y if LCD monitor 5132394 AC CABLE LCD ASSY LOGIQ7 N Y N N Y if LCD monitor 5139307 2 LCD CABLE DUCT ASSY CSL L7 N N N N Y if LCD monitor replaced by 5139307 3 5139307 3 FRU_Parts_LCD_CABLE_DUCT_ASSY N Y N N Y if LCD monitor This part replaces 5139307 2 5309932 FRU_Parts_LCD_CAB...

Page 119: ...6 Y Y Y Y FA200801 PAT I O Y Y Y Y 2324098 P9534XE FRONT IF ASSY N N N N 5111715 2 LOGIQ7 FRONT CONN2 ASSY N Y Y Y Backward compatible among BT04 system 2355070 P9534ZH 1 3GMOD OPTION Y N N N 1 3G SCSI 5113449 MOD DRIVE LOGIQ7 N Y N N 1 3G IDE 2302393 P9534XD FRONT CONTROL ASSY Y N N N 5111714 LOGIQ7 REAR CONN2 ASSY N Y N N For Console BT04 BT06 5174604 LOGIQ7 REAR CONN3 ASSY N N Y Y For Console B...

Page 120: ...632 2344632 2 5138507 5138507 2 2369816 P9536BR KEY ACCESSORY Depends Y Y Y Replaceable only on KBD 2344632 2344632 2 5138507 5138507 2 Contains A N Key Tops Clear Caps Labels for clear caps Knobs for rotally encoders TGS Slid Caps 2369816 2 P9536BR KEY ACCESSORY Depends Y Y Y Replaceable only on KBD 2344632 2344632 2 5138507 5138507 2 Contains A N Key Tops Clear Caps Labels for clear caps incl 4D...

Page 121: ...FRU 2271702 2 P9535BA EBUS ASSY N N N N 2399317 P9535FA EBUS2 ASSY Y N N N Only for Upgraded BT04 from BT01 02 03 5111348 EBUS3T ASSY CSL LOGIQ7 N Y Y N Upper 5112465 EBUS3B ASSY CSL LOGIQ7 N Y Y N Bottom 5182215 EBUS4T ASSY CSL L7 N N N Y 5182757 EBUS4B ASSY CSL L7 N N N Y 2273295 P9535BC MDCON ASSY N N N N No need in BT04system 2264608 3 P9535AY MOTHER ASSY N N N N 5111345 2 MOTHER2 ASSY CSL LOG...

Page 122: ...2304809 2 P9536RH BATTERY PACK Y Y Y Y 5118511 Extended MEMORY3 LOGIQ7 Y Y Y N Never be used on BEP2 BEP4 5306528 DDR2 MEMORY4 1GB N N N Y 5118510 HD LOGIQ7 Y Y Y N 80GB PATA 5306526 SATA HDD 160GB N N N Y 160GB SATA type To be used with BEP4 5179643 HDD For Consip L7 Console N N N N 160GB PATA type FC200656 PC2IP II B Y Y N N Only supported by BECOMPSW3 Y if BT04 BT06 N if BT06 2 V65x BT07 FC2007...

Page 123: ...PG L7 Y N N N Only for Upgraded BT04 from BT01 02 03 2372387 P9534XH L7HV SVC Y Y Y Y 2334197 P9534WU LV 2 SERVICE UNIT Y N N N Compatible with 2283531 LV 2292209 P9534WF SSR PANEL Y N N N 2315585 P9534WR FUSE FOR SSR PANEL Y N N N 2283530 P9534WB MAIN TRANS Y N N N 2373331 2 MAIN TRANS2 ASSY CSL L7 Y Y Y Y 5117721 LV 04 UNIT MAIN PS L7 N Y Y Y 5118824 2 LV 04 UNIT with Cables N Y Y Y Noise Improv...

Page 124: ... 8 Section 5 2 Hardware Compatibility Matrix 5 2 2 Hardware Identification Tip 5 2 2 1 LCD Monitor Differences The flowchart below describes how to differentiate LCD monitor type Figure 5 32 LCD monitor How to Differentiate GPN Identification Mark Bottom of LCD monitor ...

Page 125: ...E MANUAL Section 5 2 Hardware Compatibility Matrix 5 9 5 2 2 1 LCD Monitor Differences cont d LCD Variation Tips Bezel Shape Curvy for 17 inch Straight for 19 inch GE Logo Silver for 17 inch Silver on black background for 19 inch Figure 5 33 LCD Variation Tips ...

Page 126: ...el RS232C Not Available on back Utility Menu shows Ghost Part Number NO Rear Panel markings Utility Menu shows Ghost Part Number REAR Panel have GPN printed 5304518 REAR CONN4 ASSY L7 N A R8 x x R8 x x Software Note Console Config N A BT04 BT06 BT07 base BT04 BT06 B T07 BT09 base MD 3000 USB Upgraded to BT09 BEP3 BT09 Original BEP4 Label RS232C Not Available on back Utility Menu shows Ghost Part N...

Page 127: ...nter ONLY The D21MD or D23MD printer contains the L sized ribbon cassette and paper as a standard However the S sized paper is recommended for LOGIQ 7 system If the S sized paper is used with the L sized ribbon cassette Incorrect paper size setting error occurs with no print So when using the S sized paper change the ribbon cassette to the S sized Figure 5 35 Peripheral Compatibility ...

Page 128: ...Link Port EMIF MID BUS PCI D opple r Audio PC I P C I B r i d ge Int e l 21152 PC I C abl e t o BE P SDRAM SH 4 PC I Br i dge SH BUS RO M SH4 EUSC I F Safe t y 6T P r obe HV C TL 4D Box PS Observat i on SDRAM SDRA M SDRAM SDRA M EUSC Sound Mixer SSR SSR AC Outlet B W Printer ATX PS SW comtrol Mic PC2IP3 DGVIC A DGPCIO RS232C Sound Braster IIC 5V 12V Patient I O VGA VGA UPS BAT HDD DVD 5V Standby D...

Page 129: ...system can be used for 2D Black and White imaging 2D Color Flow M Mode Black and White imaging Color M Mode Doppler a number of combinations of the above LOGIQ 7 is a digital beam forming system that can handle up to 192 element linear probes through multiplexing Signal flow from the Probe Connector Panel to the Front End to the Mid Processors and Back End Processor and finally to the monitor and ...

Page 130: ...I Express slot Graphics Card PCI Slot PCIDGVIC2 PCI Express slot Not Used PCI Slot FALCON PCI Slot PC2IP3 PCI Slot Not Used FDD IDE Not Used USB 4 USB5 USB6 USB3 CPU Fan Fan2 Not Used Fan 6 Fan 4 Not Used SATA LAN one of three is used PW1 Memory DIMM1 DIMM2 DIMM3 DIMM4 Not Used Not Used SATA HDD Bulk Head Extended USB Ports 2 ports Pin Header Power SW Reset SW HDD LED Power LED Connector Panel ECG...

Page 131: ...mm Board PCI Slot 2 Falcon Video Capture PCI Slot 3 PCI DGVIC2 PCI Slot 4 P690 Graphics Board PCI E1 USB Ext 4Ch USB5 6 USB Ext 2Ch Top USB4 USB Ext 2Ch Bottom USB3 Connects to ATX Power PW2 Connects to 160GB HDD SATA 1GB DDR2 at DIMM1 slot Memory 4 pin CPU Power Conn PW1 Description Device Connector Connects to CPU Fan CPU Fan PC2IP3 Comm Board PCI Slot 2 Falcon Video Capture PCI Slot 3 PCI DGVIC...

Page 132: ...ector 4 4x1 pin connector 2pin connector Not Used 4 4x1 pin connector small 4 4x1 pin connector small 2pin connector AC100V SW 4 4x1 pin connector Connector Panel 24V 5V 12V 5V 12V 12V 3 3V 5V 12V 5V 12V 5VSTB 5VSTB 6 6x1 pin connector A02 4FAN A02 4FAN A03 8FAN A03 8FAN A01 HDD A01 HDD 5V 12V A06 UPS A06 UPS A05 BULK A05 BULK A04 CNPNL A04 CNPNL 6 3x2 pin connector UPS Ctrl FAN To DVD only 12V on...

Page 133: ...imary Slave Memory Cache Cache System BIOS area Write Protect Cache Video BIOS area Write Protect Cache Base 0 512k Write Back Cache Base 512k 640k Write Back Cache Extended Memory Area Write Back Cache A000 AFFF Disabled Cache B000 BFFF Disabled Cache C800 CBFF Disabled Cache CC00 CFFF Disabled Cache D000 D3FF Disabled Cache D400 D7FF Disabled Cache D800 DBFF Disabled Cache DC00 DFFF Disabled Cac...

Page 134: ...ice 2 Function 1 Auto DVMT 4 0 Mode Auto Azalia Audio Auto Enable Multimedia Timer No Serial ATA Enabled Native Mode Operation Auto SATA RAID Enable Disabled SATA AHCI Enable Disabled Advanced Processor Options Core Multi Processing Enabled Machine Checking Enabled Compatible FPU Code Disabled Thermal Management 2 Enabled Set Max Ext CPUID 3 Disabled C1 Enhanced Mode Disabled PECI Interface Enable...

Page 135: ...Fail LED Indicator Disabled Auto Fan Control Enabled Console Redirection Com Port Address Disabled Baud Rate 19 2K Console Type PC ANSI Flow Control CTS RTS Console Donnection Direct Continue C R after POST Off Security Set Supervisor Password Set Set User Password Clear Diskette access Supervisor Fixed disk boot sector Normal Password on boot Disable Power Blank S1 Resume On Time Off Resume Time ...

Page 136: ...N 14 LOGIQ 7 SERVICE MANUAL 5 20 Section 5 4 Block Diagrams and Theory Exit Exit Saving Changes Exit Discarding Changes Load Setup Defaults Discard Changes Save Changes TAB Top Menu Sub Menu1 Sub Menu2 Sub Menu3 GEYMS Custom Setting Ver 7008 ...

Page 137: ...or CPU Back End Processor HD DVD MO drive Patient I O PC2IP Power Supply UPS AGP Graphic Board DGVIC DGPCIO Video signals to External I O Control signals to from External I O To Keyboard Touch Panel DVI Data from to MDBRG Mid Processors PC Box USB IDE USB Modem USB InSite Ethernet Ethernet Sound Brastter Communication and Audio signals to from MDBRG PCI Bus VGA CRT Model Video Capture Board Video ...

Page 138: ... front of scanner Optional Magneto Optical Drive MO Drive Available from front of scanner Figure 5 42 CPU Backend Processor BT06 2 or later LCD Main Monitor CPU Back End Processor HD DVD MO drive Patient I O PC2IP Power Supply UPS AGP Graphic Board DGVIC DGPCIO Video signals to External I O Control signals to from External I O To Keyboard Touch Panel DVI Data from to MDBRG Mid Processors PC Box US...

Page 139: ...t controls for manipulating the picture quality controls for use in Measure Analyze M A and loudspeakers for stereo sound output used during Doppler scanning inside the CRT monitor cover 5 4 7 External I O Rear Panel The External I O is the interface between the scanner and all external items located at the rear side of the scanner Examples InSite TCP IP network Printer etc 5 4 8 Peripherals A VCR...

Page 140: ...B21 CN 21B CB21 CN 22A CB22 CN 14B CB14 CN 24B CB24 CN 27A CB27 CN 28A CB28 CN 24A CB24 CN 31A CB31 CN 32A CB32 CB33 CN 33A CN 35A CB35 CN 17A CB17 CB1 CN 1A CB4 CN 4A CN 9A CB9 CN 10A CB10 CN 5A CB5 CN 6A CB6 CN 11A CB11 CN 12A CB12 CN 13A CB13 CN 14A CB14 CN 35B CB35 CN 33B CB33 CN 22B CB22 CN 12B CB12 CN 6B CB6 CN 13B CB13 CN 62A CN 64B CB64 CN 10B CB10 CN 1B CB1 CN 28B CB28 CN 41A B CB41 CN 40...

Page 141: ...ction BT09 or later A A B B USB type A Ver 2 0 USB type B Ver 2 0 A A A A A A A A A A A A A A A A A A A A 1 2 3 4 5 6 7 8 9 10 11 12 OP Panel DVD Drive Color Printer Front Panel Voice Command Mic USB Memory or Service Rear Panel Out VCR1 VCR2 Service BW Printer 4D Box B B USB Option Dongle B B reserve B B B B A A reserve A A A B B B B BECOMP4 ATX MOTHER Pin Header on motherboard ...

Page 142: ...ween BT07 or later and BT06 or earlier Systems for R7 5 x 17 to 19 LCD Monitor Upgrade For BT06 or earlier system the DVI cable is connected directly to the monitor from the BECOMP3 via the DVI HDMI adapter Figure 5 45 R7 5 x 17 to 19 LCD Monitor Upgrade For BT07 or later Figure 5 46 R7 5 x 17 to 19 LCD Monitor Upgrade For BT06 or earlier ...

Page 143: ...look and feel for service software across all GEMS products 5 5 2 1 Internationalization The user interfaces provided by the service platform are designed for GE personnel and as such are in English only At this time there is no multi lingual capability built into the Common Service Interface 5 5 2 2 Service Login 5 5 2 2 1 For BT04 or later 1 Touch Utility Service It will take about ten 10 second...

Page 144: ...ey are authorized to use NOTE For a GE Field Engineer the password changes at specific intervals Except for iLinq all access to the service interface is via the Network port A modem on the scanner is specifically intended for iLinq use Every access request whether successful or not will be logged into a service access log that is viewable to authorized users Figure 5 48 User Level Table 5 2 User L...

Page 145: ... Health Information The navigation bar at the top of the screen allows the user to select from several tools and applications NOTE When using the Common Service Desktop do NOT iconify any of the Common Service Desktop windows If you iconify them they end up in the lower left hand corner of the screen behind the Service Desktop Manager window and cannot be restored Resize the windows with the mouse...

Page 146: ...ol driven by the following high level requirements Simple filtering of the scanner log s with filtering capabilities being a function of login access permissions Logs are viewable by all service modes Allow for multiple instances of the log viewer Color coded log entries for severity levels Severity 1 Color coded Green Severity 2 Color coded Yellow Severity 3 Color coded Red Support the transfer o...

Page 147: ...f the Logs category are System Power Temperature Probe Board and DICOM Figure 5 51 Log Sub Menus System Logs Descriptions System Software bug information for software engineering to debug the software Power Not used for LOGIQ 7 Infomatics Exam informations Whenever the New patient or End Current Patient is pressed they are reported as a log ...

Page 148: ...erature which the warning occurs 70 degrees or higher for Rack Temperature 1 60 degrees or higher for Rack Temperature 2 60 degrees or higher for HV Temperature Info The information occurred in the temperature with mark to call attention In the time when the information occurred the message Approaching the overheat limit Check air filter appears in the status bar The temperature which the informat...

Page 149: ... entries for severity levels Severity 1 Color coded Green Severity 2 Color coded Blue Severity 3 Color coded Red Support the transfer of logs to local and or remote destinations 5 5 4 1 2 Informatics Informatics is the ability to collect and upload usage information logged on the scanner The Service Platform is used to report the logged data via the log viewing feature 5 5 4 2 Utilities The two su...

Page 150: ...ystem Logs to enter Filter menu Filtering is used to extract select data from the Error Logs There are four different error levels and 11 packages that can be filtered 5 5 4 5 Exit The sub menu Exit Log Viewer returns the user to the Common Service Desktop home page Figure 5 54 Filter Category Figure 5 55 Exit Category BT04 BT06 BT06 2 or later ...

Page 151: ...ic tests return a report to the Service Platform The platform retains the report and allows for future viewing of the diagnostic logs 5 5 5 2 Proactive Diagnostics A system of self monitoring is largely supported with the integration of iLinq The scheduler executive user interfaces and some of the proactive diagnostic functions are provided by iLinq Other tasks will need to be provided by the prod...

Page 152: ...5 5 7 Calibration Field is not yet populated The Calibration page is used to calibrate the system 5 5 8 Configuration Field is not yet populated The Configuration page is used to setup various configuration files on the system The Service Platform is used as the access and authorization control for remote access to the configuration subsystem Figure 5 57 Image Quality Page Figure 5 58 Calibration ...

Page 153: ...ommon Service Platform 5 37 5 5 9 Utilities The Utilities page contains several miscellaneous tools These includes access to the problem solution database at the Online center 5 5 10 Replacement Field is not yet populated Figure 5 60 Utilities Page Figure 5 61 Part Replacement Page ...

Page 154: ...where applicable Supports software upload via remote transmission Supports software upload via Service Platform Supports partial upgrades Supports de installs of the latest partial upgrade Supports remote activation installation of software options Options can be activated permanently Options can be activated for a timed period Options can be limited to a number of uses Options that expire must gi...

Page 155: ...iguration Questra Agent Configuraion Then enter the followings NOTE Refer to Section 8 14 InSite II Installation for details Figure 5 63 Table 5 3 InSite II Entry Item Descriptions Modifiable Device Name Should be set to Dongle ID DO NOT MODIFY CRM No FE OLC Field to enter device identifier Modifiable Display Name FE OLC Field to enter descriptive name Modifiable Address Proxy Contact OLC for cont...

Page 156: ...ith a different user level this window is open You can modify the user level and password without restraint using one of the Utility function Utility Admin Users 5 6 2 For Service Login Window When you access the Common Service Desktop this window is open The user level and password are preset They can NOT be modified Figure 5 64 Operator Login window Table 5 4 Password to enter common service des...

Page 157: ...ndows desktop for maintenance access this window is open The user name and password are preset They can NOT be modified Figure 5 65 Service Login window Table 5 5 Password to enter windows desktop Username Password No entry Access is protected with the Service Dongle and a password The password must change at specific intervals every six month Figure 5 66 Windows desktop Login Window ...

Page 158: ...PC Box cooling Path B Front lower left Filter LV unit Rear lower left for LV unit cooling Path C Bottom right Filter NEST Assy Rear upper right for NEST Assy cooling Path D Rear bottom right Filter HV unit Rear upper right for HV unit cooling 5 7 2 Filters The scanner contains the three filters located at Front lower left for air flow of the LV unit and PC box Bottom right for air flow of the NEST...

Page 159: ... following positions for producing an air flow Two fans Inside the LV unit for air flow path A and B One fan On the PC Box for air flow path A Four fans At the bottom of the NEST Assy for air flow path C One fan On the HV unit for air flow path D Figure 5 68 Fans Fan for HV unit Fan for PC Box Fans for LV unit Fans for NEST Assy Example For BT03 or lower ...

Page 160: ...ync DDC Termination SVGA 800 x 600 75 Hz RGB 0 700 mV H TTL V TTL VESA DDC2 signals 75 ohms Type Standards Termination SVHS NTSC EIA and PAL BDGHI 75 ohms Composite Video NTSC EIA and PAL BDGHI 75 ohms RGB NTSC EIA and PAL BDGHI 75 ohms B W NTSC EIA and PAL BDGHI 75 ohms General SVHS luma SVHS croma Composite RGB B W Line field 625 50 FH 15625 Hz FV 50 Hz Bandwidth 6MHz luma Signal 100 IRE 100 amp...

Page 161: ... 15734 Hz FV 59 94 Hz Bandwidth Min 4 2MHz luma Signal 92 5 IRE fromblacklevel 100 amplitude Blanking setup 7 5 IRE Sync 40 IRE Burst amplitude 20 IRE 9 cycles Fsc 3 579545 MHz 100 saturation Summed luma and croma Signal 0 700 mV Comp sync H sync V sync 0 3 4 Vpp SVHS luma Parameters NTSC PAL White relative to blank 714 7 mV 700 7 mV Black relative to blank 54 7 mV 0 Sync relative to blank 286 7 m...

Page 162: ...GE HEALTHCARE DIRECTION 2286865 REVISION 14 LOGIQ 7 SERVICE MANUAL 5 46 Section 5 8 Monitor Video Specification This page was intentionally left blank ...

Page 163: ...ner These tests are optional You may use them to check the system for errors Table 6 1 Contents in chapter Section Description Page Number 6 1 Overview 6 1 6 2 LV Unit Adjustments For BT03 or lower 6 2 6 3 Caster Brake Swivel Function Adjustments 6 4 6 4 Reloading the Probe Data 6 9 6 5 Monitor and LCD Adjustments 6 10 6 6 BW Printer Setting Adjustment 6 27 6 7 Cleaning the Trackball 6 33 6 8 Jump...

Page 164: ...ments For BT03 or lower This system contains three power supply modules LV unit The LV unit for BT04 or later can not be adjusted 6 2 1 Access to Adjustments 1 Remove the LV unit a Remove the left side cover b Remove the LV unit cover c Remove the bracket then pull out the LV unit Assy with the cables connected Figure 6 1 LV Unit Assy LV Unit Assy ...

Page 165: ... Procedures 1 Using the following VRs DC output can be adjusted Table 6 2 DC Output Specification for LV Unit VR Specifications VR1 3 4V 34mV VR2 5V 50mV VR3 6V 60mV VR4 6 V 60mV VR5 12V 120mV VR6 12V 120mV Figure 6 2 VRs for Adjusting DC Output VR4 for 6V VR2 for 5V VR3 for 6V VR6 for 12V VR1 for 3 4V VR5 for 12V OR 6V 12V 5V 12V 3 3V 6V ...

Page 166: ...tion Adjustments Section 6 3 Caster Brake Swivel Function Adjustments 6 3 1 Brake Function Adjustment The LOGIQ 7 contains front and rear brake lock adjusters They are separately adjusted using the similar method Figure 6 3 Locations of Brake Lock Adjusters Front Brake Lock Adjuster Rear Brake Lock Adjuster ...

Page 167: ...e Swivel Function Adjustments 6 5 6 3 1 Brake Function Adjustment cont d 1 Locate the adjuster nut on the caster linkage joint 2 Rotate the adjuster until the caster lock lever comes center as shown Figure 6 4 Adjuster Nut Location Figure 6 5 Rotating Adjuster Adjuster Nut Center lock lever ...

Page 168: ...n Adjustment cont d 3 After completion of adjustment press on the brake and check its function and location of the boss connected to the caster lock arm Figure 6 6 Brake Function Check Example GOOD Boss of the front caster in place and brake properly adjusted Example NO GOOD Boss of the front caster NOT in place and brake NOT properly adjusted ...

Page 169: ...ke Function Adjustment cont d 4 Adjuster of the rear caster is also located on the caster linkage joint as shown 5 Turn the adjuster so that the caster lock lever is in the ceter position as same as the front caster and the link is securely in place Figure 6 7 Rear Caster Adjuster Location Adjuster Nut Link Rear Caster Lock Arm Boss ...

Page 170: ... 6 3 Caster Brake Swivel Function Adjustments 6 3 2 Swivel Function Adjustment The LOGIQ 7 contains one swivel lock adjuster It can be adjusted using the similar method as brake function adjustment described above Figure 6 8 Locations of Swivel Lock Adjuster Swivel Lock Adjuster ...

Page 171: ...lash memories of DDBF and TRAP boards 1 Insert the Service Dongle into the USB port located at the rear panel of the scanner 2 Power ON the scanner 3 Refer to 4 2 2 3 Entering Maintenance Mode to enter the windows desktop 4 Windows Desktop screen is displayed 5 Erase the file D Pegasus target resources Pegasus ProbeInfo res 6 Erase the above file completely from Recycle bin then restart the scanne...

Page 172: ...Monitor check your PCVIC or DGVIC Part Number on the Utility Screen The typical setting value changes with its Part Number To enter this screen select Utility System About Additional About Information To adjust the contrast and brightness 1 Select Calibration from the Test Pattern Utility Touch Panel The test pattern consists of a small box inside a larger box Figure 6 10 PCVIC DGVIC Part Number C...

Page 173: ...sponse to this adjustment logs behind the button push Record the final brightness and contrast settings and leave this information withe the system Generally speaking do not change the controls once they have been set the display becomes the reference for the hard copy device s NOTE After readjusting the monitor s Contrast and Brightness readjust all preset and peripheral settings Figure 6 12 Moni...

Page 174: ...ress the Toggle button 2 or 3 Once for brightness adjustment a Verify that Brightness is 80 If it is not increase brightness to press the adjustment button 3 If it is not decrease brightness to press the adjustment button 2 b Press the button 1 Once The brightness display disappears NOTE 19 inch LCD is ONLY a brightness adjustment Figure 6 13 19 inch LCD Monitor Adjustment buttons 1 2 3 ...

Page 175: ... that Temperature is 15000 If it is not increase or decrease temperature to press the adjustment button 3 or 2 d Press the button 1 again for confirmation e Press the button 3 Once The second item changes in pink f Press the button 1 Once to select the gamma menu g Verify that Gamma is 2 6 If it is not increase or decrease gamma to press the adjustment button 3 or 2 h Press the button 1 again for ...

Page 176: ...bout Info 3 Select High Resolution 6 5 5 LCD Touch Panel Adjustment There are two types of the touch panel LCD in LOGIQ 7 manufactured by Gaudi or Technart Depending on the LCD type on the system adjustment procedure is slightly different Some models of LOGIQ 7 have the LCD with the cover plate Open the key board and remove those plate to identify the content This adjustment must be performed when...

Page 177: ...ve sideways NOTE If the location of the LCD screen is appropriately set in center do not proceed this adjustment procedures 4 Open the OP Panel and hold the OP Panel using maintenance service rod Refer to Replacement Procedure in chapter 8 for the procedures Figure 6 16 Start up Screen Figure 6 17 Example of LCD Bad balance NOTICE Only when the windows desktop appears in the 17 inch CRT monitor or...

Page 178: ...e install the OP Panel temporarily to use the LCD touch panel Refer to Replacement Procedure in chapter 8 for the procedures 8 Using SELECT button select AUTO ADJUST The letters will be blue when it is selected 9 Make sure that the AUTO ADJUST is selected then touch ENTER 10 LCD display Auto Adjustment procedures will be started automatically Figure 6 18 Switch Location NOTICE Never select AUTO CO...

Page 179: ...d shown at the center location 13 If it is fixed appropriately select OK then touch ENTER to go on to the next step If the display is not adjusted yet select CANCEL then touch ENTER to repeat the adjustment procedures form step 6 14 The first screen is shown on the display Touch SELECT three times to select EXIT Refer to Figure 6 19 15 Touch ENTER button OSD menu will be finished and go back to re...

Page 180: ...ents 6 5 5 2 For Technart 6 5 5 2 1 Auto Adjustment 1 Refer to 4 2 2 3 Entering Maintenance Mode to enter the windows desktop 2 The following screen should appear when exiting to Windows 3 Press the AUTO button once on the LCD touch panel board Figure 6 21 Start up Screen Figure 6 22 Auto Button Auto Button ...

Page 181: ...OGIQ 7 SERVICE MANUAL Section 6 5 Monitor and LCD Adjustments 6 19 6 5 5 2 For Technart cont d 4 AutoAdjust OK message will appear If it does not appear press AUTO button again Figure 6 23 AutoAdjust OK message Figure 6 24 Auto Button Auto Button ...

Page 182: ...r menu and visually check if auto adjustment succeeds If no character blurring exits auto adjustment succeeds Go to 6 5 5 2 3 Completing adjustment If character blurring exits auto adjustment fails Perform 6 5 5 2 2 Manual Deblurring For Technart ONLY Figure 6 25 Blurring No Blurring Blurring at the right side of the character Example Blurring Example No blurring ...

Page 183: ...ly when auto adjustment fails 1 Refer to 4 2 2 3 Entering Maintenance Mode to enter the windows desktop 2 Select Program Accessories Paint to run the paint software 3 Phase Check a Drag and drop the paint screen on the touch panel screen b Click on square symbol at the top right corner of the paint screen to maximize the screen Figure 6 26 Paint Software Figure 6 27 Moving Paint Screen ...

Page 184: ...ents 6 5 5 2 For Technart cont d c Click on the line icon and select the thinest line d Draw a vertical line at the right side of the screen below and check if it has no deblurring If deblurring exists go to next step If no deblurring exists go to step 4 HTotal Check Figure 6 28 Line Figure 6 29 Drawing Line ...

Page 185: ...utton to find the value with no character blurring For example this value is X h Set the value X 14 to Phase i Press the AUTO button once to save the setting j Repeat to press the MENU button until the Exit blinks k Press the AUTO button once to exit from the menu Figure 6 30 Menu Screen NOTICE You can select the number from 0 62 Values with deblurring cause are continuous seven or eight values So...

Page 186: ...is 16 go to step5 Hposition VPosition check If it is NOT 16 go to next step c Repeat to press the MENU button until the HTotal blinks d Repeat to press the PLUS or MINUS button to set 16 e Press the AUTO button once to save the setting f Repeat to press the MENU button until the Exit blinks g Press the AUTO button once to exit from the menu 5 Hposition VPosition Check a Close the paint software an...

Page 187: ...ut of alignment adjust HPosition c Display the LCD monitor menu and press the MENU button once The following menu appears d Repeat to press the MENU button until the HPosition or VPosition blinks e Repeat to press the PLUS or MINUS button until the screen should be centered evenly in the monitor f Press the AUTO button once to save the setting g Repeat to press the MENU button until the Exit blink...

Page 188: ...tor menu and press the left button MENU The following menu appears 2 Verify that Contrast 210 ContrastRed 145 ContrastGrn 130 ContrastBlu 160 3 Verify that The display does not move up down or sideways All menu are shown in the LCD display Turning the brightness knob clockwise fades in and turning it counterclockwise fades out Figure 6 34 Contrast 210 37 145 130 160 ...

Page 189: ...ted Go to Utility System Peripherals then hit Printers button in the Setup group 2 Click SONY UP D897 in the Printer List then right click and select Properties 3 Select General tab then hit Printing Preferences 4 Select Layout tab then Set 1920x1280 into Paper Check off into Enlarge to Paper Set Bilinear into Interpolation Method Set Landscape into Orientation Figure 6 35 Printing Preferences Bil...

Page 190: ...865 REVISION 14 LOGIQ 7 SERVICE MANUAL 6 28 Section 6 6 BW Printer Setting Adjustment 6 6 1 Parameters for UP D897 cont d 5 Select Density Adjust tab then Set TONE1 into GAMMA Set 7 into Sharpness Figure 6 36 Printing Preferences ...

Page 191: ...en system started Go to Utility System Peripherals then hit Printers button in the Setup group 2 Click SONY UP D895 in the Printer List then right click and select Properties 3 Select General tab then hit Printing Preferences 4 Set Landscape into Orientation then click on Advanced 5 Set 1920x1280 into Paper Figure 6 37 Landscape Figure 6 38 Paper ...

Page 192: ...ge to Paper and set Bilinear into Interpolation Method 7 Click on Density Adjust set TONE1 into GAMMA and set 7 into Sharpness 6 6 3 Service Tips Print Quality When printer is set to Nearest Neighbor interepolation method comments and body pattern may become hard to read Re adjust interpolation method to Bi Linear to avoid this situation Figure 6 39 Scaling Figure 6 40 Density Adjust Bilinear ...

Page 193: ...e UP D895 it takes a few seconds longer for the UP D897 to receive data from L7 system All that time an user cannot operate the L7 system and must wait until the UP D897 finished receiving data from the L7 Cause This is due to driver software difference between UP D895 and UP D897 It seems the UP D897 driver software has been modified from the UP D895 Solution The following actions must be require...

Page 194: ... D897 completes to be set to the UP D895 mode Notice With setting the UP D897 COMD to UP D895 the following items cannot be selected or operated from the jog dial Item No Items Descriptions 1 GAMMA TONE4 VERY SOFT cannot be selected 2 GAMMA Cannot be selected from jog dial It can change only from Properties of UP D895 menu Corresponding type of GAMMA between UP D895 and UP D897 is as follows UP D8...

Page 195: ...the scanner 2 Place your fingers onto the notches of the trackball retainer ring 3 Rotate the retainer ring counterclockwise until it can be removed from the keyboard 4 Lift off the inner retainer and trackball from the keyboard Figure 6 41 Rotating the Retainer Ring Figure 6 42 Removing Inner Retainer and Trackball Retainer Ring Inner Retainer Trackball ...

Page 196: ... or dust from the trackball housing rollers and small ball using a cleaner or cotton bud NOTICE When cleaning the trackball housing make sure not to spill or spray any liquid into the trackball housing Keyboard or system Avoid organic solvents that may damage the mechanical parts of the trackball assembly Do not apply much force to the small ball Figure 6 43 Cleaning TrackBall and Housing Trackbal...

Page 197: ...e two rollers using a cleaner or cotton bud NOTICE When cleaning the roller make sure not to spill or spray any liquid into the trackball housing Keyboard or system Use either ethanol isopropyl alcohol or VCR head cleaner to clean the trackball assembly Avoid other solvents that may damage the mechanical parts of the trackball assembly Figure 6 44 Cleaning Rollers Rollers Cotton Bud ...

Page 198: ...iner into the housing with its stopper facing down Lift off the inner retainer and trackball from the keyboard 10 Install the trackball retainer ring onto the inner retainer then rotate it clockwise until its notches are set in the horizontal position Figure 6 45 Removing Inner Retainer and Trackball Figure 6 46 Rotating the Retainer Ring Inner Retainer Trackball Inner Retainer Stopper Retainer Ri...

Page 199: ... Dip Switch setting represents the bit location as shown Figure 6 47 Dip Switch Setting Figure 6 48 Bit Setting 1 to 4 4 lower 4 bits E Upper 4 bits Example E4 h is set as shown O N 1 2 3 4 5 6 7 8 O N 1 2 3 4 5 6 7 8 O N 1 2 3 4 5 6 7 8 O N 1 2 3 4 5 6 7 8 O N 1 2 3 4 5 6 7 8 O N 1 2 3 4 5 6 7 8 O N 1 2 3 4 5 6 7 8 O N 1 2 3 4 5 6 7 8 O N 1 2 3 4 5 6 7 8 0 h 1 h 2 h 3 h 4 h 5 h 6 h 7 h O N 1 2 3 ...

Page 200: ... h 7 h O N 1 2 3 4 5 6 7 8 O N 1 2 3 4 5 6 7 8 O N 1 2 3 4 5 6 7 8 O N 1 2 3 4 5 6 7 8 O N 1 2 3 4 5 6 7 8 O N 1 2 3 4 5 6 7 8 O N 1 2 3 4 5 6 7 8 O N 1 2 3 4 5 6 7 8 O N 1 2 3 4 5 6 7 8 O N 1 2 3 4 5 6 7 8 O N 1 2 3 4 5 6 7 8 O N 1 2 3 4 5 6 7 8 O N 1 2 3 4 5 6 7 8 O N 1 2 3 4 5 6 7 8 O N 1 2 3 4 5 6 7 8 O N 1 2 3 4 5 6 7 8 8 h 9 h A h B h C h D h E h F h Bit Setting for DIP Switch 5 to 8 Upper 4...

Page 201: ...g 6 8 3 1 Mitsubishi MD 3000 VCR Dip Switch Setting This section describes Mitsubishi MD 3000 VCR communication setting Field Service Engineer FSE is not allowed to modify dip switch setting Following setting is documented for purpose of troubleshooting by FSE Figure 6 50 HDD Jumper Figure 6 51 MD 3000 Dip Switch Master 1 2 3 4 5 6 7 8 ON OFF SW5001 1 2 3 4 5 6 7 8 ON OFF SW5001 Serial Communicati...

Page 202: ...and Dip Switch Setting 6 8 3 2 Accessing Dip Switch Module for inspection 1 Remove the two screws of RS232C board plate 2 Remove the RS232C board from the VCR to access the dip switch Figure 6 52 Opening Board Plate Figure 6 53 Removing Board Screws RS232C board plate Dip Switch RS232C Board ...

Page 203: ...3 3 CP30D Dip Switch Setting This section describes CP30D Dip Switch setting Field Service Engineer FSE is not allowed to modify dip switch setting Following setting is documented for purpose of troubleshooting by FSE NOTICE D Do NOT change the DIP SW setting Figure 6 54 CP30D Dip Switch All OFF 1 2 3 4 5 6 7 8 ON OFF ...

Page 204: ...GE HEALTHCARE DIRECTION 2286865 REVISION 14 LOGIQ 7 SERVICE MANUAL 6 42 Section 6 8 Jumper and Dip Switch Setting ...

Page 205: ...his section describes how to setup and run the tools and software that help maintain image quality and system operation Very basic host system and board level diagnostics are run whenever power is applied Some Service Tools may be run at the application level However most software tests are required Table 7 1 Contents in Chapter 7 Section Description Page Number 7 1 Overview 7 1 ...

Page 206: ...step approach to system check out and fault isolation There are two levels of diagnostic board level and system level Board level diagnostics are intended to test functionality of a single circuit board System level diagnostics are intended to test functionary on more than one circuit board Unused system components board or signals for each diagnostic test are drawn in gray ghosted NOTE In this do...

Page 207: ...roperly decontaminated prior to shipment Under no circumstance should a part or equipment with visible body fluids be taken or shipped from a clinic or site for example body coils or an ultrasound probe The purpose of the regulation is to protect employees in the transportation industry as well as the people who will receive or open this package NOTE The US Department of Transportation DOT has rul...

Page 208: ...GE HEALTHCARE DIRECTION 2286865 REVISION 14 LOGIQ 7 SERVICE MANUAL 8 2 Section 8 1 Overview This page was intentionally left blank ...

Page 209: ...ms before loading base image software NOTE Before loading base image software if you are troubleshooting loss of image or patient data review troubleshooting to collect information for future analysis 8 2 2 Parts Required LOGIQ 7 R8 x x Application CD LOGIQ7 Ghost DVD for BECOMP4 5305206 x 8 2 3 Time Required Approximately 1 hour CAUTION This software can be installed for the system with software ...

Page 210: ...SB Devices Check if all USB printers are OFF Check if SCSI UP D50 is ON Should be OFF OK N A 8 2 6 2 Save Cus tomer Data Setting Save Customer Setting User and Password OK N A Save Customer Setting Connectivity Parameter OK N A Save Customer Setting Option Key String OK N A Regional Preset OK N A 8 2 7 Install Base System Install Base System Select fullghost or C ghost Full C only 8 2 8 Modify Sys...

Page 211: ...s OK NG Software Options Check OK NG Set VCR parameters Set parameters OK N A Set Language Set Language options OK N A Printer Registration Set printer OK N A Report Template Set user template OK N A Regional Preset Set Regional Preset OK N A Analog Peripheral Set analog peripheral parameters OK N A UP D897 Set UP D897 parameter OK N A 8 2 11 Functional Check Service Platform Be able to enter SV p...

Page 212: ...is section and the following pages should provide detailed guide of the system and application installation procedures Figure 8 55 BT07 Software Loading Procedures 8 2 6 PRE INSTALLATION PROCEDURES 8 2 7 INSTALL BASE SYSTEM OS Application Installing 8 2 10 SYSTEM SETTINGS 8 2 11 FUNCTIONAL CHECK 8 2 9 INSTALLING R8 X X APPLICATION SOFTWARE 8 2 8 MODIFY SYSTEM WINDOWS SETTINGS ...

Page 213: ...In case of Full Ghost customer data setting must be saved for restoration after the process Figure 8 57 Software Loading Procedures NOTICE 1 Do not power ON the peripherals when installing base system image Disconnecting LAN is also recommended procedure to ensure stable process 2 Press the N key at start of process should FE wish to abort installation process Pop up window may appear to notify pr...

Page 214: ...ault value is no password just press enter key 3 If FE cannot see login window for Service Platform then installation of the platform have failed FE must double check the installation setting and repeat ghost appli load procedure For entering password make sure CAPS lock is OFF 4 Each computer name is unique Check the scanner serial number printed on the label located at the rear lower side of the...

Page 215: ...should finalize the Media before R8 x x Upgrade Because once the system is upgraded to R8 x x The system never recognizes the no finalized media CD DVD R 8 2 6 3 Operator Login Password The Operator Login Password will be deleted even if the BECOMP is not replaced So write down the password if necessary CAUTION Loading R8 x x application software procedures requires basically C drives to be ghoste...

Page 216: ...onnectivity on the touch panel and click the TCP IP tab 2 Write down the following parameters Figure 8 60 TCP IP Parameters Descriptions Entry for Stand Alone System Computer Name Enable DHCP This parameter must NOT be selected IP Address 192 168 1 2 Subnet Mask 255 255 255 0 Default Gateway 192 168 1 1 Note For a stand alone system preset values of IP adress subnet mask and default gateway shown ...

Page 217: ...Software Loading Procedures for BT09 R8 x x or later 8 11 8 2 6 5 Software Option 1 Touch Utility Admin 2 Click on System Admin tab and write down HW Number and Installed Option Keys Figure 8 61 System Admin Items Descriptions HW Number Installed Option Key Table 8 4 System Admin ...

Page 218: ...86865 REVISION 14 LOGIQ 7 SERVICE MANUAL 8 12 Section 8 2 Software Loading Procedures for BT09 R8 x x or later 8 2 6 6 Regional Preset 1 Go to Utility System About 2 Write down the current Preset Region Figure 8 62 Preset Region ...

Page 219: ...7 Printer Registration 1 Select Utility Connectivity Button 2 Write down the printer names which are registered to Print1 through Print4 3 Click on to add Printflow View Figure 8 63 Printer Registration Button Active Image Printer Print1 Print2 Print3 Print4 Table 8 5 Printer Registration Select Print x button to display the printer name here ...

Page 220: ...Power OFF the scanner wait more than 5 seconds then power ON the scanner 2 Open the DVD drive and set the Ghost DVD DVD drive reads Ghost DVD automatically and go to next step 3 After loading software when the following screen appears press the Enter key NOTICE Before starting to install base system all printer must be disconnected from the system Figure 8 64 Enter ...

Page 221: ...ing screen appears Press B then Enter to initialize the C drive 5 Check if the message appears as reloading C partition only then press Enter key If the message appears as reloading the entire disk press CTRL ALT DEL to reboot the sysytem and retry from procedures described in previous page Figure 8 65 Select B CAUTION If you select A all the archive would be lost Figure 8 66 Enter ...

Page 222: ...on is selected then press Enter key If it is not selected select OK button using the arrow keys then press Enter key 7 Approx fifteen minutes later the following screen appears Eject the Base System Software Load Image DVD from the drive 8 To restart the system press Ctrl Alt DEL key at the same time Figure 8 67 OK Figure 8 68 Ejecting DVD NOTICE The Base System Software Load Image DVD must be sto...

Page 223: ... choose OK Table 8 6 System Windows Settings Item Method Proper Value UPS Setting Automatic Setting n a just load Restart System Avance AC97 Audio Load from c windows system32 drivers n a just load Restart System Drive Letter Automatic Setting but check desktop icon if not DVD Drive G HW Device My Computer Properties Various LAN Desktop My Network Places Properties Local Area Connection Double Cli...

Page 224: ...nd boot up Please choose OK You should check the Drive Letter manually by Windows Explorer for double check DVD Drive should be assigned to G If Drive letter is wrong please double click Remap Drive Letter icon on the desktop 8 2 8 3 Hardware Device Check 1 On the windows desktop left click on My Computer then right click on Properties Figure 8 70 OK CAUTION Drive F Swap Letter is removed on R7 0 ...

Page 225: ...or later 8 19 2 The System Properties window appears Select Hardware Divice Manager 3 Verify that X or is not displayed Figure 8 72 Divice Manager NOTICE The Eusc Mlultifunction adapters Eusc might contain mark but it is no problem Skip any of device driver installation procedures described below mark on Eusc is no problem ...

Page 226: ...isplayed Left click on the device with x mark then rigtht click on Enable Left click on the device with mark then rigtht click on Properties to perform the device driver reconfiguration When some files are required designate the file in the directories of C WINDOWS SYSTEM32 or C WINDOWS SYSTEM32 DRIVERS If they are not found search them using a windows search function 5 Close the window ...

Page 227: ... on Properties 2 Verify that two network icons appears If Local Area Connection icon does not appear the hardware failure might occur 3 Using the right trackball button double click on Local Area Connection 4 When the following window appears it will be automatically closed later 5 When the following window appears right click on Cancel 6 Close all windows Figure 8 73 Properties Figure 8 74 Local ...

Page 228: ...8 5 TCP IP Filter Setup 1 On the desktop left click on My Network Places then right click on Properties 2 Double click Local Area Connection or Local Area Connection 2 if you do NOT find Local Area Connection 3 Select Internet Protocol TCP IP then click Properties button Figure 8 76 Local Area Connection Figure 8 77 Internet Protocol TCP IP ...

Page 229: ...6865 REVISION 14 LOGIQ 7 SERVICE MANUAL Section 8 2 Software Loading Procedures for BT09 R8 x x or later 8 23 8 2 8 5 TCP IP Filter Setup cont d 4 Click Advanced button 5 Click Options tab Figure 8 78 Advanced Figure 8 79 Options ...

Page 230: ...6865 REVISION 14 LOGIQ 7 SERVICE MANUAL 8 24 Section 8 2 Software Loading Procedures for BT09 R8 x x or later 8 2 8 5 TCP IP Filter Setup cont d 6 Select TCP IP Filtering then click Properties button Figure 8 80 TCP IP Filtering ...

Page 231: ...pends on the network card installed in the PC box At first check mark Enable TCP IP Filtering All adapters Check mark Permit Only in TCP ports box Click Add button Enter 21 port number as the TCP Port then click OK button to apply it Repeat these procedures to register 21 23 80 104 512 3003 5800 5801 5900 and 5901 for TCP ports Figure 8 81 TCP port number NOTICE UDP Ports and IP Protocols must be ...

Page 232: ...box then click OK buttons for all opened window to complete the TCP IP Filter Setup 9 The following dialog box appears Click No to proceed the other settings After completion of all system checks the system is shut down Figure 8 82 TCP IP Filter Setup Figure 8 83 No NOTICE In case the last dialog box to restart the computer does NOT appear check the TCP IP Filter setup again Connectivity check wil...

Page 233: ...Loading Procedures for BT09 R8 x x or later 8 27 8 2 8 6 Date and Time Setting 1 Select Start Settings Control Panel Date and Time I 2 Click on Time Zone tab 3 Select the appropriate time zone Then click on Apply 4 Then click on Date Time tab Figure 8 84 Date and Time Figure 8 85 Time Zone ...

Page 234: ... Software Loading Procedures for BT09 R8 x x or later 8 2 8 6 Date and Time Setting cont d 5 Set the current date and time 6 Click on Apply 7 Click on OK to close the Date and Time window 8 Select Start Shutdown OK to power OFF the scanner Figure 8 86 Date Time Month and Year Day Time ...

Page 235: ...9 Base image before Application Software installation If not Application shows the error message Service platform is out of date You must reghost the C drive and reinstall the software NOTICE If you are attempting to install only application software you MUST first check current Regional Preset Value Press Utility System About Details in 4 2 6 Archiving and Loading Presets for BT07 Including R7 5 ...

Page 236: ...adSoftware bat 4 The Installation program will start and the command prompt screen will be shown on the monitor as shown 5 Select TYPE A BT09 with BEP4 does not have PRO version available Figure 8 88 LoadSoftware bat NOTICE 1 If wrong application software installed the system will not work properly 2 You will ask confirmation twice as below If you select wrong system A or B please select N at the ...

Page 237: ...er OFF the system NOTE When the Information Window appears asking you to select OK do nothing This window will disappear automatically 7 The installation procedures will start automatically It will take 10 minutes 8 After the installation procedures are completed the system will power OFF automatically Figure 8 89 Y NOTICE Do not operate with using mouse or keyboard during installation procedures ...

Page 238: ...ng MUST be required Computer Name Utility Connectivity TCP IP Computer Name Enable DHCP IP Address Subnet Mask Default Gateway Same as Serial Number OFF restore customer setting restore customer setting restore customer setting Patient Database Check Utility Connectivity DataFlow Default Data Flow Press Patient Keyboard or Touch Panel Local Archive Int HD n a Automatic LCD Monitor Setting Press To...

Page 239: ...ttings tab Installed Service Default Input Language Advanced tab Language JPN Japanese Japan Japanese Keyboard Japanese Japanese Language For Russian Greek Only Utility System General Language Regional Option Regional Option tab Standard and formats Location Language tab Details Settings tab Installed Service Default Input Language Advanced tab Language RUS GRK Russian Greek Russia Greece Rus Grk ...

Page 240: ...th no error It will take a few minutes 4 Set up customer data saved at 8 2 6 Pre installation Procedures 8 2 10 2 Confirmation of the software version 1 Touch the Utility button on the Touch Panel NOTE The Operator Login window appears Select adm Administrator for the Operator field Adm Administrator will be shown in the Operator field as default Enter the password which is configured already or t...

Page 241: ...Click on About tab The software version will be shown on the monitor as shown Confirm the following Software Version R8 x x Preset Resion Americas Europe Asia Japan or None Image Part Number described on the Base System Software Image DVD Figure 8 92 System Figure 8 93 About Tab Press System button Click on the About tab Software Version R 8 x x Base System Software CD ROM Part Number xxxxxxx Pres...

Page 242: ...5 Check if Computer name IP Address Subnet Mask and Default Gateway are proper ones which you wrote down in section 8 2 6 4 Saving Connectivity 6 Click on OK for confirmation dialog box NOTICE The computer name is unique Check the scanner serial Number printed on the label located at the rear lower side of the scanner When 123456YM1 for example is printed L7 123456YM1 must be entered as a computer...

Page 243: ...ing Procedures for BT09 R8 x x or later 8 37 8 2 10 3 Computer Name and Connection Settings cont d 7 Touch Scan on the Touch Panel to return to the scan screen 8 Shut down the scanner 9 Power ON the scanner then press Patient key and verify that the following screen appears Figure 8 96 Patient ...

Page 244: ...rightness is 80 Dark Room or 100 Bright Room If it is not increase brightness to press the adjustment button 3 If it is not decrease brightness to press the adjustment button 2 b Press the button 1 Once The brightness display disappears NOTE 19 inch LCD is ONLY a brightness adjustment 8 2 10 5 Software Option Check 1 Touch Utility Admin 2 Click on System Admin tab and verify that HW Number is the ...

Page 245: ...art the scanner 5 Verify that the VCR can be properly operated with no error remote play 8 2 10 7 Regional Setup For the system with language other than English ONLY For Japanese Languages You can set up the keyboard for Japanese If you select Japanese the following items display or enter by Japanese Patient name Exam comment in Patient screen and Worksheet Report Direct Report free text Insert Te...

Page 246: ...ther than English ONLY cont d 1 Select Utility System General Regional Option Menu 2 Click on Languages tab 3 Check Install files for East Asian languages 4 Click on Apply 5 The system requires the re boot automatically shut down the system Figure 8 100 Regional Option NOTICE You do not need to change Language used in menus and dialogs option It should be English Check Do not Change English ...

Page 247: ...10 7 Regional Setup For the system with language other than English ONLY cont d 6 In Utility System General set the Language as JPN Save this setting but do not reboot the system yet 7 Press Regional Options under Standards and Formats select Japanese under Location select Japan Press Apply Figure 8 101 General Figure 8 102 Regional Options ...

Page 248: ...he Advanced tab then select Japanese in the Language for non Unicode programs pull down menu Press Apply Answer Yes to use files already loaded on the hard disk then answer No to not reboot the system yet press OK Press Save and Exit the Utility screen 10 Reboot the system 11 In Utility System General press Regional Options Select Language Tab and press Details Remove English under Installed Servi...

Page 249: ...figuration shall setup the keyboard assignment remove 半角かな etc in IME 14 Reboot the system 15 To type Japanese press Alt right side of the Escape key to start IME Input Method Editor You can use the following short cut keys F6 key Hiragana F7 key Katakana F9 key alphameric two byte character F10 key alphameric one byte character Figure 8 104 Automatic Setup for Japanese Language NOTICE When pressi...

Page 250: ...stem General set the Language as Russian or Greek Save this setting but do not reboot the system yet 2 Press Regional Options under Standards and Formats select Russian or Greek under Location select Russia or Greece Press Apply 3 Select the Language tab press Details under Installed Services select the Russian or Greek keyboard under Default input language select Russian Russian or Greek Greek pr...

Page 251: ...ly Answer Yes to use files already loaded on the hard disk then answer No to not reboot the system yet press OK Press Save and Exit the Utility screen 5 Reboot the system When your system restarts the system appears in the selected language 6 To switch between the English and Russian or Greek keyboard press Alt Shift to change the keyboard to the Russian or Greek keyboard 7 Apply the changes by pr...

Page 252: ...h language other than English ONLY cont d For non Russian Greek Languages 1 Press Regional Options select the Language tab press Details and comfirm default input Languarge to English United States International NOTICE If the system is used at U S press Regional Options Language tab press details change default input Languarge to US Figure 8 108 Text Services and Input Languages ...

Page 253: ...anguage for non Unicode programs pull down menu Press Apply Answer Yes to use files already loaded on the hard disk then answer No to not reboot the system yet press OK Press Save and Exit the Utility screen 3 Reboot the system When your system restarts the system appears in the selected language 4 To type foreign characters press Alt Shift to change the keyboard to the international keyboard then...

Page 254: ...ower switches of the printer and scanner are turned ON 2 Select Utility Connectivity Button 3 Select the Printer1 button and select the user defined printer which has been recorded in 8 2 6 7 Printer Registration 4 Click on to add Printflow View Figure 8 110 Printer Registration 1 Select the button the SONY UP D21 or 23 MD should be assigned 2 Select the user defined printer 3 Click on ...

Page 255: ...r UP D50 ONLY When performing 4 divided frame print in the active image screen select D50 for Active Image Printer 7 For UP D21 or UP D23 When upgrading to BT07 updated printer driver may be loaded and assigned Before assigning Print Button to Printer check DEVICE Tab for multiple UP D21 23 Printer and check for active printer 8 Right click on Save Figure 8 111 Save 1 Verify that the user defined ...

Page 256: ...286865 REVISION 14 LOGIQ 7 SERVICE MANUAL 8 50 Section 8 2 Software Loading Procedures for BT09 R8 x x or later 8 2 10 9 Report Template only for BT04 system Please setup the user template as it is Figure 8 112 Report Template ...

Page 257: ... Click Additional About Information 12 Check the region name of Preset Region Rquires reboot If it is None skip this section 13 Click Reload Factory Default button 14 Click OK on confirmation dialog box This changes Preset Region Requires reboot to None NOTICE For the system other than NONE selected as Regional Preset resetting MUST be required Figure 8 113 Preset Region Figure 8 114 Reload Factor...

Page 258: ...RVICE MANUAL 8 52 Section 8 2 Software Loading Procedures for BT09 R8 x x or later 8 2 10 10 Regional Preset cont d 15 Click the button Reload Preset corresponding you noted 16 Click OK on confirmation dialog box Figure 8 115 Reload buttons Figure 8 116 OK ...

Page 259: ...oading Procedures for BT09 R8 x x or later 8 53 8 2 10 10 Regional Preset cont d 17 Check Preset Region Requires reboot is right region you selected 8 2 10 11 Analog Peripheral After you update software version to R8 x x you may need to adjust peripheral settings Figure 8 117 Preset Region ...

Page 260: ...tility System Peripherals then hit Printers button in the Setup group 2 Click SONY UP D897 in the Printer List then right click and select Properties 3 Select General tab then hit Printing Preferences 4 Select Layout tab then Set 1920x1280 into Paper Check off into Enlarge to Paper Set Bilinear into Interpolation Method Set Landscape into Orientation Figure 8 118 Printing Preferences Bilinear ...

Page 261: ...N 14 LOGIQ 7 SERVICE MANUAL Section 8 2 Software Loading Procedures for BT09 R8 x x or later 8 55 8 2 10 12 UP D897 Parameter cont d 5 Select Density Adjust tab then Set TONE1 into GAMMA Set 7 into Sharpness Figure 8 119 Printing Preferences ...

Page 262: ...re Loading Procedures for BT09 R8 x x or later 8 2 10 13 Setting Report Printer 1 Press UTILITY SYSTEM in Touch Panel 2 Click PERIPHERAL Printers 3 Find Printer to be used for REPORT right click and select Set as Default Printer Figure 8 120 Printer Setup Figure 8 121 Setting Default Printer ...

Page 263: ...14 LOGIQ 7 SERVICE MANUAL Section 8 2 Software Loading Procedures for BT09 R8 x x or later 8 57 8 2 11 Functional Check 8 2 11 1 Service Platform 1 Click on Utility Service It will take about ten 10 seconds for activating Figure 8 122 Service ...

Page 264: ...or Service Platform will be shown on the monitor display 4 Select GE Service at the Select User Level field 5 Enter the password for the Service Platform 6 Click on Okay Figure 8 123 Service Login CAUTION If the Login window for Service Platform is not displayed on the monitor the installation of the Service Platform has failed Reload the application software or Base System Software OS application...

Page 265: ...nel 8 2 11 2 Functional Checks for Probe Recognition 1 Touch Scan button on the Touch Panel to return to the scan screen 2 Connect each probe to ensure that they are recognized 3 Check every probe in the following modes and ensure that no artifacts or no problems are found in B mode Color FLow Pulsed Doppler M mode CW option 4 Install the removed parts in the reverse order of removal 8 2 11 3 Cali...

Page 266: ...ional tests to confirm the system is operational before returning the system to the customer If all are successful include the following debrief script Table 8 8 Functional Tests See Section Functional Test Debrief Script 4 2 2 1 Power Up LOGIQ 7 Proprietary Service Manual Direction 2286865 Rev 14 Section 8 2 Equipment passed all required tests and is ready for use 4 2 2 2 Power Up Sequence ...

Page 267: ...time involved Int Internal I O Input Output KB Keyboard LCD Liquid Crystal Display MON Monitor PAT Patient PC Personal Computer Back End Processor Table 9 1 Contents in Chapter 9 Section Description Page Number 9 1 Overview 9 1 9 2 List of Abbreviations 9 1 9 3 Renewal Parts List For BT09 9 2 9 4 Renewal Parts List For R7 5 x 9 5 9 5 Renewal Parts List For BT07 9 8 9 6 Renewal Parts List For V65x ...

Page 268: ...1 1 1 LOGIQ 7 WEEE instruction 5143413 1 1 1 1 1 1 WARRANTY CARD P9889AH 1 L7 Tempu Bunsho for R6 5 X 5182547 1 AIUM Safety Pamphlet 5118349 1 AIUM Safety Pamphlet License 5123992 1 AC CORD 100V JPN 2371416 1 AC CORD 100V USA 2371417 1 1 AC CORD 200V EU 2371418 1 1 AC CORD 200V CHIN 2371415 2 1 P9538UA POWER CABLE TAG 2304574 1 1 SFDA LABEL L7 5149899 1 CAUTION TEL LABEL L7 2290996 3 1 1 1 1 1 CAU...

Page 269: ...Part Number Description Qty FRU 1 SVP BECOMP4 L7 5308149 Device cards and UPS batteries not included 1 1 2 DDR2 MEMORY4 1GB 5306528 DDR 2 667 1GBx1 1 1 3 SATA HDD 160GB 5306526 Serial ATA interface both Signal and Power connectors are SATA 1 1 4 PCI Express Graphic board 5306525 Matrox P690 PCI Express Slot 1 1 SVP BECOMP4 PARTS 5316350 Small parts collection for BEP4 1 1 5 PCI DGVIC2 Assembly 530...

Page 270: ...2 EBUS4T ASSY CSL L7 5182215 1 1 13 EBUS4B ASSY CSL L7 5182757 1 1 14 Mitsubishi CP30DW COLOR PRINTER 5310492 For market globally 1 1 15 Mitsubishi CP30D COLOR PRINTER for Japan 5310491 For use in Japan only 1 1 16 VCR MD 3000 JPN NTSC USB Control 5212446 For use in Japan only 1 1 17 VCR MD 3000 EURO PAL USB Control 5199397 For use in EU or other areas with PAL system 1 1 18 VCR MD 3000 USA NTSC U...

Page 271: ...21 1 1 1 1 1 1 LOGIQ 7 WEEE instruction 5143413 1 1 1 1 1 1 WARRANTY CARD P9889AH 1 L7 Tempu Bunsho for R6 5 X 5182547 1 AIUM Safety Pamphlet 5118349 1 AIUM Safety Pamphlet License 5123992 1 AC CORD 100V JPN 2371416 1 AC CORD 100V USA 2371417 1 1 AC CORD 200V EU 2371418 1 1 AC CORD 200V CHIN 2371415 2 1 P9538UA POWER CABLE TAG 2304574 1 1 SFDA LABEL L7 5149899 1 CAUTION TEL LABEL L7 2290996 3 1 1 ...

Page 272: ...em Part Name Part Number Description Qty FRU LOGIQ7 R7 5 0 Application Software CD 5252012 3 Application software in CD This part never went to circulation 1 LOGIQ7 R7 5 1 Application Software CD 5252012 4 Application software in CD 1 1 2 19Inch LCD Monitor for LOGIQ 5212808 19inch LCD Monitor Front Rear Panel 1 1 3 L9 19 In LCD Speaker Assembly 5199460 L R Speakers and Bracket 1 1 4 COVER VESA AS...

Page 273: ... used 1 1 8 19 LCD DVI HDMI CABLE 5224943 Display Cable 1 1 9 19 LCD MIC SPK CABLE ASSY 5224944 Mic Spk Cable 1 1 10 19 LCD POWER CABLE 5224942 48V Power Cable 1 1 11 ARM COVER LCD L7 5136256 Arm plastic cover top 1 1 12 ARM JOINT COVER LCD L7 5136257 Arm plastic cover joint Common part between 17 and 19 LCD Monitor arm 1 1 12 b FRU ARM JOINT COVER LCD L7 FOR KOREA 5271234 Physically the same as 5...

Page 274: ...O R7 0 0 eDoc CD 5181486 200 1 1 1 1 1 1 LOGIQLEAN MIDDLE 2369384 1 MSDS FOR KAO ACOUSTIC GEL 2384010 1 GEL AQUASONIC GEL U0403BD 1 1 1 1 1 PARKER AQUASONIC100 2384142 1 1 1 1 1 CD R Media 700MB 5118386 1 1 1 1 1 1 DVD R 4 7GB 8 x Speed media 5160800 2 1 1 1 1 1 1 KEY LABEL2 2360321 1 1 1 1 1 1 LOGIQ 7 WEEE instruction 5143413 1 1 1 1 1 1 WARRANTY CARD P9889AH 1 HIGHLIGHT DOC 5141402 1 SAFETY PAMP...

Page 275: ...OGIQLEAN MIDDLE 2369384 1 MSDS FOR KAO ACOUSTIC GEL 2384010 1 GEL AQUASONIC GEL U0403BD 1 1 1 1 1 PARKER AQUASONIC100 2384142 1 1 1 1 1 CD R Media 700MB 5118386 1 1 1 1 1 1 DVD R 4 7GB 8 x Speed media 5160800 2 1 1 1 1 1 1 KEY LABEL2 2360321 1 1 1 1 1 1 LOGIQ 7 WEEE instruction 5143413 1 1 1 1 1 1 WARRANTY CARD P9889AH 1 HIGHLIGHT DOC 5141402 1 SAFETY PAMPHLET 5118349 1 SAFETY PAMPHLET License 512...

Page 276: ... 1 LOGIQLEAN MIDDLE 2369384 1 MSDS FOR KAO ACOUSTIC GEL 2384010 1 GEL AQUASONIC GEL U0403BD 1 1 1 1 1 PARKER AQUASONIC100 2384142 1 1 1 1 1 CD R Media 700MB 5118386 1 1 1 1 1 1 DVD R 4 7GB 8 x Speed media 5160800 2 1 1 1 1 1 1 KEY LABEL2 2360321 1 1 1 1 1 1 LOGIQ 7 WEEE instruction 5143413 1 1 1 1 1 1 WARRANTY CARD P9889AH 1 HIGHLIGHT DOC 5141402 1 SAFETY PAMPHLET 5118349 1 SAFETY PAMPHLET License...

Page 277: ...gure 9 2 BT07 Parts Table 9 9 V65x Parts Item Part Name Part Number Description Qty FRU 1 LOGIQ7 Base System Software Load Image for R7 0 0 5191839 2 Ghost image in DVD 1 1 2 LOGIQ7 Application Software R7 0 0 5191939 4 Application software in CD 1 1 3 FRU_Parts_LCD_CABLE_DUCT_ASSY 5139307 3 LCDPart Compatible to BT04 1 1 4 FRU_Parts LCD_TOP_BOTTOM_DSUB _CABLE_ASSY 5198733 LCDPart Compatible to BT...

Page 278: ...GE HEALTHCARE DIRECTION 2286865 REVISION 14 LOGIQ 7 SERVICE MANUAL 9 12 Section 9 5 Renewal Parts List For BT07 This page was intentionally left blank ...

Page 279: ...x eDoc CD 5183312 200 1 1 1 1 1 1 LOGIQLEAN MIDDLE 2369384 1 MSDS FOR KAO ACOUSTIC GEL 2384010 1 GEL AQUASONIC GEL U0403BD 1 1 1 1 1 PARKER AQUASONIC100 2384142 1 1 1 1 1 CD R Media 700MB 5118386 1 1 1 1 1 1 DVD R 4 7GB 8 x Speed media 5160800 2 1 1 1 1 1 1 KEY LABEL2 2360321 1 1 1 1 1 1 LOGIQ 7 WEEE instruction 5143413 1 1 1 1 1 1 WARRANTY CARD P9889AH 1 HIGHLIGHT DOC 5141402 1 SAFETY PAMPHLET 51...

Page 280: ...N MIDDLE 2369384 1 MSDS FOR KAO ACOUSTIC GEL 2384010 1 GEL AQUASONIC GEL U0403BD 1 1 1 1 1 PARKER AQUASONIC100 2384142 1 1 1 1 1 CD R Media 700MB 5118386 1 1 1 1 1 1 DVD R 4 7GB 8 x Speed media 5160800 2 1 1 1 1 1 1 KEY LABEL2 2360321 1 1 1 1 1 1 LOGIQ 7 WEEE instruction 5143413 1 1 1 1 1 1 WARRANTY CARD P9889AH 1 HIGHLIGHT DOC 5141402 1 SAFETY PAMPHLET 5118349 1 SAFETY PAMPHLET License 5123992 1 ...

Page 281: ...QLEAN MIDDLE 2369384 1 MSDS FOR KAO ACOUSTIC GEL 2384010 1 GEL AQUASONIC GEL U0403BD 1 1 1 1 1 PARKER AQUASONIC100 2384142 1 1 1 1 1 CD R Media 700MB 5118386 1 1 1 1 1 1 DVD R 4 7GB 8 x Speed media 5160800 2 1 1 1 1 1 1 KEY LABEL2 2360321 1 1 1 1 1 1 LOGIQ 7 WEEE instruction 5143413 1 1 1 1 1 1 WARRANTY CARD P9889AH 1 HIGHLIGHT DOC 5141402 1 SAFETY PAMPHLET 5118349 1 SAFETY PAMPHLET License 512399...

Page 282: ...h BT06 For Common Parts not listed here refer to Section 9 9 Renewal Parts List For BT04 and BT06 NOTE For BECOMP3 replacement the following parts must be reused Extended Memory PC2IP3 UPS DGVIC Video Card G550 for CRT G450 for LCD SONO64 for LCD Video Capture Board Table 9 13 V65x Parts Item Part Name Part Number Description Qty FRU 1 PRINTER BRACKET T B D Short type BW printer bay bracket 1 2 ...

Page 283: ...ost3 CD for BEP3 R6 2 0 5174668 2 1 1 1 1 1 1 L7 BT06 2 eDoc CD 5177295 200 1 1 1 1 1 1 LOGIQLEAN MIDDLE 2369384 1 MSDS FOR KAO ACOUSTIC GEL 2384010 1 GEL AQUASONIC GEL U0403BD 1 1 1 1 1 PARKER AQUASONIC100 2384142 1 1 1 1 1 CD R Media 700MB 5118386 1 1 1 1 1 1 DVD R 4 7GB 8 x Speed media 5160800 2 1 1 1 1 1 1 KEY LABEL2 2360321 1 1 1 1 1 1 LOGIQ 7 WEEE instruction 5143413 1 1 1 1 1 1 WARRANTY CAR...

Page 284: ...6 2 eDoc CD 5177295 200 1 1 1 1 1 1 LOGIQLEAN MIDDLE 2369384 1 MSDS FOR KAO ACOUSTIC GEL 2384010 1 GEL AQUASONIC GEL U0403BD 1 1 1 1 1 PARKER AQUASONIC100 2384142 1 1 1 1 1 CD R Media 700MB 5118386 1 1 1 1 1 1 DVD R 4 7GB 8 x Speed media 5160800 2 1 1 1 1 1 1 KEY LABEL2 2360321 1 1 1 1 1 1 LOGIQ 7 WEEE instruction 5143413 1 1 1 1 1 1 WARRANTY CARD P9889AH 1 HIGHLIGHT DOC 5141402 1 SAFETY PAMPHLET ...

Page 285: ...BT06 2 eDoc CD 5177295 200 1 1 1 1 1 1 LOGIQLEAN MIDDLE 2369384 1 MSDS FOR KAO ACOUSTIC GEL 2384010 1 GEL AQUASONIC GEL U0403BD 1 1 1 1 1 PARKER AQUASONIC100 2384142 1 1 1 1 1 CD R Media 700MB 5118386 1 1 1 1 1 1 DVD R 4 7GB 8 x Speed media 5160800 2 1 1 1 1 1 1 KEY LABEL2 2360321 1 1 1 1 1 1 LOGIQ 7 WEEE instruction 5143413 1 1 1 1 1 1 WARRANTY CARD P9889AH 1 HIGHLIGHT DOC 5141402 1 SAFETY PAMPHL...

Page 286: ... to support the hardware listed above NOTE For BECOMP3 replacement the following parts must be reused Extended Memory PC2IP3 UPS DGVIC Figure 9 3 BT06 2 Parts Table 9 17 Monitor Item Part Name Part Number Description Qty FRU 1 MDBRG2S 5145999 1 1 2 Capture Board 5147460 1 1 3 Rear Panel 5174604 1 1 4 YC Cable S Video 5169391 1 1 5 BECOMP3 5119906 3 or 5119906 4 Refer to 9 9 13 HDD and Battery 1 1 ...

Page 287: ...CARE DIRECTION 2286865 REVISION 14 LOGIQ 7 SERVICE MANUAL Section 9 7 Renewal Parts List For BT06 2 or later 9 21 9 7 4 BT06 2 Parts cont d Video Card G550 for CRT G450 for LCD SONO64 for LCD Video Capture Board ...

Page 288: ...GE HEALTHCARE DIRECTION 2286865 REVISION 14 LOGIQ 7 SERVICE MANUAL 9 22 Section 9 7 Renewal Parts List For BT06 2 or later This page was intentionally left blank ...

Page 289: ...ide the PC box 9 8 1 BT06 2 CONSIP Equipment Models Covered in this Chapter LOGIQ 7 Table 9 18 Material List Part Name Part Number Quantity Description OPERATOR CONSOLE ASSY 5179605 1 220V PAL PRO with LCD LOGIQ7 Application Software CD R6 3 0 for Italy 5177651 1 LOGIQ7 Ghost3 CD for BEP3 R6 2 0 5174668 2 1 GEL AQUASONIC GEL U0403BD 1 PARKER AQUASONIC100 2384142 1 CD R Media 700MB 5118386 1 DVD R ...

Page 290: ...rts List For BT04 and BT06 NOTE Software R6 3 x application with base image is required to support this CONSIP Console NOTE For BECOMP3 replacement the following parts must be reused Extended Memory PC2IP3 UPS DGVIC Video Card G550 for CRT G450 for LCD SONO64 for LCD Video Capture Board HDD Figure 9 4 BT06 2 CONSIP Parts Table 9 19 Monitor Item Part Name Part Number Description Qty FRU 1 HDD for L...

Page 291: ...146099 1 1 1 1 1 1 LOGIQ7 Ghost3 CD for BEP3 R5 0 0 5146100 1 1 1 1 1 1 L7 BT06 eDoc CD 5120980 200 1 1 1 1 1 1 LOGIQLEAN MIDDLE 2369384 1 MSDS FOR KAO ACOUSTIC GEL 2384010 1 GEL AQUASONIC GEL U0403BD 1 1 1 1 1 PARKER AQUASONIC100 2384142 1 1 1 1 1 CD R Media 700MB 5118386 1 1 1 1 1 1 DVD R Media 4 7GB 5118392 1 1 1 1 1 1 KEY LABEL2 2360321 1 1 1 1 1 1 LOGIQ 7 WEEE instruction 5143413 1 1 1 1 1 1 ...

Page 292: ... 5146100 1 1 1 1 1 1 L7 BT06 eDoc CD 5120980 200 1 1 1 1 1 1 LOGIQLEAN MIDDLE 2369384 1 MSDS FOR KAO ACOUSTIC GEL 2384010 1 GEL AQUASONIC GEL U0403BD 1 1 1 1 1 PARKER AQUASONIC100 2384142 1 1 1 1 1 CD R Media 700MB 5118386 1 1 1 1 1 1 DVD R Media 4 7GB 5118392 1 1 1 1 1 1 KEY LABEL2 2360321 1 1 1 1 1 1 LOGIQ 7 WEEE instruction 5143413 1 1 1 1 1 1 WARRANTY CARD P9889AH 1 HIGHLIGHT DOC 5141402 1 SAF...

Page 293: ... 0 5146100 1 1 1 1 1 1 L7 BT06 eDoc CD 5120980 200 1 1 1 1 1 1 LOGIQLEAN MIDDLE 2369384 1 MSDS FOR KAO ACOUSTIC GEL 2384010 1 GEL AQUASONIC GEL U0403BD 1 1 1 1 1 PARKER AQUASONIC100 2384142 1 1 1 1 1 CD R Media 700MB 5118386 1 1 1 1 1 1 DVD R Media 4 7GB 5118392 1 1 1 1 1 1 KEY LABEL2 2360321 1 1 1 1 1 1 LOGIQ 7 WEEE instruction 5143413 1 1 1 1 1 1 WARRANTY CARD P9889AH 1 HIGHLIGHT DOC 5141402 1 S...

Page 294: ...5118058 1 220V NTSC OPERATOR CONSOLE ASSY 5118059 1 STYLE D TASK LAMP 2301853 4 1 1 1 1 1 1 1 LOGIQLEAN MIDDLE 2369384 1 1 GEL 2384010 1 1 GEL U0403BD 1 1 1 1 1 PARKER AQUASONIC100 2384142 1 1 1 1 1 KEY LABEL2 2360321 1 1 1 1 1 1 WARRANTY CARD P9889AH 1 1 HIGHLIGHT DOC 5141402 1 1 SAFETY PAMPHLET 5118349 1 SDA LABEL 2341927 1 APPLICATION CD 5118352 1 1 1 1 1 1 1 GHOST CD 5118353 3 1 1 1 1 1 1 1 DV...

Page 295: ...NSOLE ASSY 5132217 1 1 220V PAL OPERATOR CONSOLE ASSY 5132218 1 220V NTSC LOGIQLEAN MIDDLE 2369384 1 GEL 2384010 1 GEL U0403BD 1 1 1 1 1 PARKER AQUASONIC100 2384142 1 1 1 1 1 KEY LABEL2 2360321 1 1 1 1 1 1 WARRANTY CARD P9889AH 1 HIGHLIGHT DOC 5141402 1 SAFETY PAMPHLET 5118349 1 SDA LABEL 2341927 1 APPLICATION CD 5132139 1 1 1 1 1 1 R4 2 0 Pro GHOST CD 5118353 3 1 1 1 1 1 1 DVD R MEDIA 4 7GB 51183...

Page 296: ...2 b FRU MON REAR WSP ASSY FOR CHINA 5264592 Physically the same as 2303930 but with Chinese caution Label 1 2 102 c FRU MON REAR WSP ASSY FOR KOREA 5271314 Physically the same as 2303930 but with Korean caution Label 1 2 103 MON CAP ASSY 2303932 cap to cover screws 1 2 104 MON FRONT ASSY 2303929 3 front cover of monitor 1 2 105 NECK ASSY 2347387 1 2 106 SPEAKER BRACKET ASSY 23866616 2 2 107 USER S...

Page 297: ...st For BT04 and BT06 9 31 110 GAS SPRING ASSY 5117495 Gas spring including release cable and mechanical Not used for LCD monitor system 1 2 111 Grill Left 2279675 1 2 112 Grill Right 2279676 1 2 113 MON Cable Assy 2304171 cable 1 2 Table 9 25 Monitor Item Part Name Part Number Description Qty FRU ...

Page 298: ...ber type anti stain 1 2 CASTER LOCK 2379695 Obsolete Do not use these parts 203 CASTER LOCK 5233774 lock front right and rear left Improved rubber type anti stain 2 2 CASTER FREE 2379693 2 Obsolete Do not use these parts 204 CASTER FREE 5233772 free front left Improved rubber type anti stain 1 2 205 FRONT BUMPER ASSY 2315419 front bumper left and right 1 2 207 PEDAL R 2291870 rubber pedal for brak...

Page 299: ... rear pedal 1 2 CASTER SET 2381035 Obsolete Do not use these parts CASTER SET 2381035 2 Obsolete Do not use these parts CASTER SET 2381035 3 This part contains one free caster one swivel lock caster and two total lock caster with bolts Improved rubber type anti stain 1 2 Table 9 26 Casters and Pedals Item Part Name Part Number Description Qty FRU ...

Page 300: ...86865 REVISION 14 LOGIQ 7 SERVICE MANUAL 9 34 Section 9 9 Renewal Parts List For BT04 and BT06 9 9 8 Plastic Covers Figure 9 7 OP Panel and Keys 251 252 253 254 255 256 257 258 259 260 261 262 263 264 265 266 267 268 269 271 270 ...

Page 301: ...SSY 2304770 plastic cover including bracket 1 2 261 SIDE POCKET 2291872 cover of peripheral room with pocket 1 2 262 SIDE FRINGE 2303896 cover of peripheral room without pocket 1 2 REAR COVER ASSY 2304767 2 Obsolete This plastic cover is acceptable to use if stock remains 263 REAR COVER ASSY 5150568 3 Plastic cover Physically the same as 2 but caution marks are of updated color scheme Exclamation ...

Page 302: ...nt connector for peripherals FCON 1 1 304 QCON ASSY 2304617 5 PCON PSEL bracket 1 2 305 PAT I O FA200801 for ecg 1 1 DVD unit 2388429 5 Obsolete Acceptable to use the part if remained in stock 307 DVD unit 6 2388429 6 1 1 308 Front Device bay Assy 5115606 Without DVD unit 1 2 309 B W printer bracket 5115690 1 2 310 B W printer bumper 2301001 1 2 311 Foot SW bracket Assy 5117795 1 2 312 DUMMY CONN ...

Page 303: ...r Figure 9 9 Probe Holder Table 9 29 Probe Holder Item Part Name Part Number Description Qty FRU 350 PROBE HOLDER R ASSY 2296738 rubber holder with bracket 1 2 351 PROBE HOLDER L1 ASSY 2296736 rubber holder with bracket 1 2 352 TV HOLDER ASSY 2296740 rubber holder for TV 1 2 353 GEL HOLDER R ASSY 2296741 includes bottom 1 2 350 351 352 353 ...

Page 304: ... 38 Section 9 9 Renewal Parts List For BT04 and BT06 9 9 11 OP Panel and Keys Figure 9 10 OP Panel and Keys Note The task lamp is wrapped by heat shrinkable tape around its lamp portion Do NOT remove it 401 403 404 405 406 407 408 409 410 411 412 413 414 For L7 ONLY 403 ...

Page 305: ... FRU This version contains two types of LCD brightness adjustment knob and instruction 1 1 404 TRACKBALL ASSY 2369823 trackball two cables w o bracket 1 1 405 TGC ASSY 2369822 TGC PCB Assy bracket cable w o TGC knobs 1 1 406 A N KBD ASSY 2369818 board of a n key switch 1 1 407 I F BOARD ASSY 2369817 I F PCB ASSY Mic cable USB cable 1 1 408 SW BOARD ASSY 2369815 Three SW PCB Assy rubber sheets two ...

Page 306: ... board 1 2 504 PREA2F ASSY 5119039 board in nest slot 1 for BT04 BT06 1 1 504 PREA2H ASSY 2393853 for Upgrade BT04 Upgrade BT06 1 1 505 BTRAPHV Assy 5118342 3 board in nest slot 3 4 for BT04 1 1 505 BTRAPP5AHV Assy 5154321 board in nest slot 3 4 for BT06 1 1 506 BTxCW ASSY 5111346 Installed on the BTRAP Option 1 1 507 DDBF64 ASSY 2399312 board in nest slot 5 6 1 1 508 SINANO ASSY 2374744 board in ...

Page 307: ...al Parts List For BT04 and BT06 9 41 511 STCW ASSY 2277244 5 Compatible with 4 Minor change due to delay line EOL and resistor change 1 1 NEST Board JIG Assy 2315492 Tools to remove a board in the NEST Assy 1 2 Table 9 31 OP Panel and Keys Item Part Name Part Number Description Qty FRU ...

Page 308: ...9906 3 Obsolete Replaced by 5119906 4 Do NOT use this parts 1 1 550 BECOMPSW3 SVC 5119906 4 See Reuse Parts List below 1 1 CPU Battery Included on the CPU Board Type CR2032 Lifetime Approx 10 years 1 N 551 USB MODEM 5120503 USB modem Option 1 1 552 UPS BATTERY PACK 2304809 2 battery of ATX power supply 1 1 553 DGPCIO VIC2 SVC 5133526 1 1 554 EXTENDED MEMORY3 L7 5118511 Option 2 555 HD L7 5118510 8...

Page 309: ...S DGVIC Video Card G550 for CRT G450 for LCD SONO64 for LCD 556 1 BASE SYSTEM SOFTWARE Ghost CD Contact your Online center Part Number depends on application version 1 1 556 2 APPLICATION SOFTWARE Ghost CD Contact your Online center 1 1 557 PC2IP2B FC200656 Only support BECOMP3 1 1 G550 Video ard AGP 2362887 For CRT Monitor System 1 1 BECOMP3 Rear Fan 5142743 1 1 Table 9 32 HDD and Battery Item Pa...

Page 310: ...286865 REVISION 14 LOGIQ 7 SERVICE MANUAL 9 44 Section 9 9 Renewal Parts List For BT04 and BT06 9 9 14 Power Units Figure 9 13 Power Units RIGHT REAR 701 702 708 703 704 706 702 1 706 2 706 3 706 4 707 705 1 705 2 705 3 711 709 ...

Page 311: ... 1 706 2 AC CORD 100V JPN 2371416 For JAPAN power cable of 100V with clamp 1 1 706 3 AC CORD 200V EU 2371418 power cable of 200V with clamp 1 1 706 4 AC CORD 200V China CCC 2371415 2 applied to Chaina CCC specifications 1 1 708 MAIN Transformer 2373331 2 power transformer 1 1 707 NF INLET Assy 5117723 Noise Filter Inlet PCB 1 1 705 1 AC IN OUT 100V 5117724 1 1 705 2 AC IN OUT 200V 5117725 1 1 705 ...

Page 312: ... 46 Section 9 9 Renewal Parts List For BT04 and BT06 AC Cord India Africa 5151450 1 2 AC Cord Australian 5151453 1 1 AC Cord Argentina 5151454 1 1 AC Cord Israel 5151451 1 1 AC Cord Swiss 5151448 1 1 Table 9 33 Power Units Item Part Name Part Number Description Qty FRU ...

Page 313: ...IRECTION 2286865 REVISION 14 LOGIQ 7 SERVICE MANUAL Section 9 9 Renewal Parts List For BT04 and BT06 9 47 9 9 15 Options Peripherals and Cables Figure 9 14 Options Peripherals and Cables 1 750 760 761 765 770 771 772 ...

Page 314: ...EALTHCARE DIRECTION 2286865 REVISION 14 LOGIQ 7 SERVICE MANUAL 9 48 Section 9 9 Renewal Parts List For BT04 and BT06 9 9 15 Options Peripherals and Cables cont d Figure 9 15 Options Peripherals and Cables 2 ...

Page 315: ...les Item Part Name Part Number Description Qty FRU CABLE DUCT ASSY 5117797 Obsolete Cannot use this part any longer and the parts in stock have been purged 750 CABLE DUCT ASSY CSL L7 5117797 2 Including USB LAN CABLE ASSY CB1 CB2 CB3 CB4 CB6 CB9 DSUB CABLE ASSY CB10 CB13 CB16 CB17 CB22 DEVIDE CABLE ASSY CB5 CB15 CB19 CB32 BW CABLE ASSY CB7 CB18 CB20 CB31 AC CABLE ASSY CB12 CB28 CB33 CB35 Felite co...

Page 316: ... Ext Peripheral L7 1 2 RS232C CABLE ASSY CROSS 2305550 2 Ext Peripheral L7 1 2 ECG CBL SHORT 2304616 Ext Patient L7 1 2 ECG CBL LONG 2304615 Ext Patient L7 1 2 US CABLE FOR PERIPHERAL DEVICE 2324360 Ext Peripheral L7 1 2 Keyboard Knob Repair kit 2363861 1 2 Strap with Buckle 5115855 1 2 Foot for Printer 2318441 1 2 USB Conversion Adapter 5129258 B Type to A Type in Device room 1 2 PAT I O FA200801...

Page 317: ...LOGIQ7 R6 5 0 Application Software CD Release 5181894 Initial Release M3 Related Ghost CD is 5182424 1 1 24 LOGIQ7 R6 5 1 Application Software CD 5181894 2 Apr 07 Release M4 compatible to 5181894 Related Ghost CD is 5182424 1 1 25 BW PRINTER SHORT BOX FRU L7 5194980 For consoles V65x and afterward Printer Box is Short type Consoles with Standard type printer box if not equipped with BW printer can...

Page 318: ... 1 807 10L PROBE EXP 2294523 1 808 M12LMIH PROBE EXP 2294511 1 809 3S PROBE EXP 2323337 1 810 10S PROBE EXP 2298589 1 811 I12L PROBE EXP 2264883 1 812 P2D PROBE EXP TE100024 PPA adapter is separately required 1 813 P6D PROBE EXP TQ100002 PPA adapter is separately required 1 814 8C PROBE EXP 2348094 1 815 3 5CS PROBE EXP 2051858 1 816 6T TEE PROBE EXP KN100068 1 817 M3S PROBE EXP 2295649 1 818 7S P...

Page 319: ...PROBE JPN 2294640 1 856 7L PROBE JPN 2294520 1 857 10L PROBE JPN 2294522 1 858 M12LMIH PROBE JPN 2294510 1 859 3S PROBE JPN 2348878 1 860 10S PROBE JPN 2309478 1 861 I12L PROBE JPN 2270556 1 862 8C PROBE 2348093 1 863 3 5CS PROBE 2380854 1 864 6T TEE PROBE 2294534 1 865 M3S PROBE 2293726 1 866 7S PROBE JPN 2355698 1 867 BE9C PROBE JPN 2389381 1 868 T739 PROBE JPN 2259245 1 869 PPA ADAPTER 2331934 ...

Page 320: ...EALTHCARE DIRECTION 2286865 REVISION 14 LOGIQ 7 SERVICE MANUAL 9 54 Section 9 9 Renewal Parts List For BT04 and BT06 9 9 17 LCD Option Figure 9 17 LCD Option 901 902 903 904 905 906 907 908 909 910 911 912 ...

Page 321: ...C Ccable from FrontConn2 to LCD 1 1 LCD ARM LCD L7 5132571 Arm assy includes covers 911 and 912 Obsolete Replaced by 5132571 2 Do NOT use this parts LCD ARM LCD L7 5132571 2 Arm assy includes covers 911 and 912 Obsolete Use FRU 5264730 to upgrade this part to 4 if stock remains LCD ARM LCD L7 5132571 3 Arm assy includes covers 911 and 912 Obsolete Use FRU 5264730 to upgrade this part to 4 if stock...

Page 322: ...GE HEALTHCARE DIRECTION 2286865 REVISION 14 LOGIQ 7 SERVICE MANUAL 9 56 Section 9 9 Renewal Parts List For BT04 and BT06 This page was intentionally left blank ...

Page 323: ...V NTSC OPERATOR CONSOLE ASSY 2304806 1 1 120V NTSC OPERATOR CONSOLE ASSY 2304807 1 1 220V PAL OPERATOR CONSOLE ASSY 2304808 1 220V NTSC OPERATION MANUAL 2286866 140 1 OPERATION MANUAL 2286866 100 1 1 1 ADV REFERENCE MANUAL 2291860 140 1 ADV REFERENCE MANUAL 2291860 100 1 1 1 SERVICE MANUAL 2286865 1 1 1 QUICK GUIDE 2291859 140 1 QUICK GUIDE 2291859 100 1 1 WARRANTY CARD P9889AH 1 TASK LAMP 2301853...

Page 324: ...NSOLE ASSY 2355589 1 100V NTSC OPERATION MANUAL 2286866 140 1 1 OPERATION MANUAL 2286866 100 1 1 1 1 ADV REFERENCE MANUAL 2291860 140 1 1 ADV REFERENCE MANUAL 2291860 100 1 1 1 1 SERVICE MANUAL 2286865 1 1 1 1 QUICK GUIDE 2291859 140 1 1 QUICK GUIDE 2291859 100 1 1 1 1 WARRANTY CARD P9889AH 1 1 TASK LAMP 2301853 4 1 1 1 1 Gel U0403BD 1 1 1 1 1 1 B Flow 2297481 1 1 Application Software CD R2 1 0 or...

Page 325: ...ON MANUAL 2286866 100 1 1 1 1 ADV REFERENCE MANUAL 2291860 140 1 1 ADV REFERENCE MANUAL 2291860 100 1 1 1 1 SERVICE MANUAL 2286865 1 1 1 1 1 QUICK GUIDE 2291859 140 1 1 QUICK GUIDE 2291859 100 1 1 1 1 WARRANTY CARD P9889AH 1 1 RELEASE NOTE 2382150 140 1 1 RELEASE NOTE 2382150 100 1 1 1 1 QUICK CARD 2318541 140 1 1 QUICK CARD 2318541 100 1 1 1 1 L7 HILIGHT DOCUMENT 2363423 140 1 1 Application Softw...

Page 326: ...th Chinese caution Label 1 2 102 c FRU MON REAR WSP ASSY FOR KOREA 5271314 Physically the same as 2303930 but with Korean caution Label 1 2 103 MON CAP ASSY 2303932 cap to cover screws 1 2 104 MON FRONT ASSY 2303929 3 front cover of monitor 1 2 105 NECK ASSY 2347387 1 2 106 SPEAKER BRACKET ASSY 2386616 or 2297882 2386616 for R3 xx or later software 2297882 for R2 xx or lower software 2 2 107 USER ...

Page 327: ...N 14 LOGIQ 7 SERVICE MANUAL Section 9 10 Renewal Parts List for BT03 or lower 9 61 111 Grill Left 2279675 1 2 112 Grill Right 2279676 1 2 113 MON Cable Assy 2304171 cable 1 2 Table 9 41 Monitor Item Part Name Part Number Description Qty FRU ...

Page 328: ...ight Improved rubber type anti stain 1 2 CASTER LOCK 2379695 or 2307312 Obsolete Do not use these parts 203 CASTER LOCK 5233774 lock front right and rear left Improved rubber type anti stain 2 2 CASTER FREE 2379693 2 or 2307301 Obsolete Do not use these parts 204 CASTER FREE 5233772 free front left Improved rubber type anti stain 1 2 205 FRONT BUMPER ASSY 2315419 front bumper left and right 1 2 20...

Page 329: ... PEDAL REAR REL 2304908 rear pedal 1 2 211 PEDAL REAR SWL 2304909 rear pedal 1 2 CASTER SET 2381035 Obsolete Do not use these parts CASTER SET 2381035 2 Obsolete Do not use these parts CASTER SET 2381035 3 See Note Improved rubber type anti stain 1 2 Table 9 42 Casters and Pedals Item Part Name Part Number Description Qty FRU ...

Page 330: ...lace a caster from the old type to the new one Order Caster FRU Assy 2381035 x FRU2 This contains 4 casters One Free Caster One Swivel Lock Caster and Two Total Lock Caster and 16 attaching bolts This mean that you must replace ALL of the four casters as an assembly when replacing a caster If you replace a caster for the system with a new type of the caster installed Order Caster 5233772 Free 5233...

Page 331: ...865 REVISION 14 LOGIQ 7 SERVICE MANUAL Section 9 10 Renewal Parts List for BT03 or lower 9 65 9 10 4 Plastic Covers Figure 9 20 OP Panel and Keys 251 252 253 254 255 256 257 258 259 260 261 262 263 264 265 266 267 268 269 271 270 ...

Page 332: ...cover around probe connector 1 2 258 FRONT COVER UNDER 2304766 2 lower cover around probe connector 1 2 259 SIDE COVER L ASSY 2304769 plastic cover including bracket 1 2 260 SIDE COVER R ASSY 2304770 plastic cover including bracket 1 2 261 SIDE POCKET 2291872 cover of peripheral room with pocket 1 2 262 SIDE FRINGE 2303896 cover of peripheral room without pocket 1 2 263 REAR COVER ASSY 2304767 2 p...

Page 333: ...GB drive or 2307450 230MB drive are available 1 1 302 CD RW SVC 2375462 or 2304918 cd r w drive 2375462 includes CD RW Ghost CD and manual 1 1 303 FRONT IF ASSY 2324098 front connector for peripherals 1 1 303 2 FRONT CONTROL ASSY 2302393 front connector for peripherals 1 2 304 QCON ASSY 2304617 5 PCON PSEL bracket 1 2 305 PAT I O FA200801 for ecg 1 1 306 MOD Fixture Kit 2308066 1 2 DVD unit 238842...

Page 334: ...Y If the system is upgraded from CD RW to DVD order DVD installation kit 2389332 1 1 308 5 inch bay Assy 2389204 For installation of the DVD unit ONLY 1 2 309 B W PRINTER TRAY ASSY 2324611 Including Printer Tray Inner box and bumper 1 2 310 B W PRINTER TRAY 2283002 1 2 311 B W PRINTER BUMPER 2301001 1 2 Table 9 44 Recording Devices Item Part Name Part Number Description Qty FRU ...

Page 335: ...r Figure 9 22 Probe Holder Table 9 45 Probe Holder Item Part Name Part Number Description Qty FRU 350 PROBE HOLDER R ASSY 2296738 rubber holder with bracket 1 2 351 PROBE HOLDER L1 ASSY 2296736 rubber holder with bracket 1 2 352 TV HOLDER ASSY 2296740 rubber holder for TV 1 2 353 GEL HOLDER R ASSY 2296741 includes bottom 1 2 350 351 352 353 ...

Page 336: ... 9 10 Renewal Parts List for BT03 or lower 9 10 7 OP Panel and Keys Figure 9 23 OP Panel and Keys Note The task lamp is wrapped by heat shrinkable tape around its lamp portion Do NOT remove it 401 403 404 405 406 407 408 409 418 419 420 421 422 403 410 402 411 412 413 414 415 416 ...

Page 337: ...TGC knobs 1 1 406 A N KBD ASSY 2369818 a board of a n key switch 1 1 407 I F BOARD ASSY 2369817 a I F PCB ASSY Mic cable USB cable 1 1 408 SW BOARD ASSY 2369815 a Three SW PCB Assy rubber sheets two cables 1 1 409 KEY ACCESSORY SET 2369816 2 a A N keytops all encoder knobs all clear key caps labels For knob repair order 2363861 repair kit 1 2 410 ROTARY ENCODER ASSY 2299448 b Three rotary encoders...

Page 338: ...AMP ASSY 2301857 Lampstay and cable inside the L7 1 2 420 TASK LAMP KNOB 2304620 knob 1 2 421 LIGHT BULB 2357676 BULB ONLY 1 2 422 CAP 2239428 CAP FOR SCREW HOLE 1 2 AN KEY RUSSIA 2375159 Only for KBD 5138507 3 1 2 AN KEY GREEK 2371160 Only for KBD 5138507 3 1 2 Table 9 46 OP Panel and Keys Item Part Name Part Number Description Qty FRU Keyboard 2344632 xx Keyboard 2267259 2 The keyboard 2344632 x...

Page 339: ...st slot 4 7 When 2264598 TRAP is discontinued order this TRAP2 Assy However for the board inserted into Slot 5 only the TRAP2 Assy MUST be installed If it is not the STCW option can not be installed later 1 1 506 TRAPCW ASSY 2323450 4 board in nest slot 4 7 1 1 507 DDBF ASSY 2357804 board in nest slot 8 11 Including DDBF Assy 2264600 4 and 3 conversion kit ROM 3 label instructions 1 1 508 SINANO A...

Page 340: ...2277244 4 board in nest slot 2 option Obsolete but acceptable to use if in stock 512 STCW ASSY 2277244 5 Compatible with 4 Minor change due to delay line EOL and resistor change 1 1 513 NEST Board JIG Assy 2315492 Tools to remove a board in the NEST Assy 1 2 Table 9 47 OP Panel and Keys Item Part Name Part Number Description Qty FRU ...

Page 341: ... 1 1 BECOMP3 SV Kit for Replacing BEP1 BEP2 5136903 Refer to the table below for contents 1 1 CPU Battery Included on the CPU Board Type CR2032 Lifetime Approx 10 years 1 N 551 GLOBAL MODEM KIT 2245794 global modem Option 1 1 552 UPS BATTERY PACK 2304809 2 battery of ATX power supply 1 1 553 DGPCIO VIC2 SVC 2384944 Refer to the table below for proper selection 1 1 554 EXTENDED MEMORY2 2373707 Incl...

Page 342: ...MPSW2 Assy PC Box 2351328 2 Ghost CD 2351329 4 or later 1 Used Used 2 SV PCVIC Bracket U 2379774 1 Used Not used 3 SV PCVIC Bracket L 2379773 1 Used Not used 4 Screw N9408HR 8 Used 4 screws Used 5 DGVIC connector label 2354667 1 Used Not used 6 Velcro tape U0032BA 30 cm Used Not used 7 Heat shrinkable tube 2357134 40 cm Used Not used 8 Tie wrap U0212AC 2 Used Not used DGPCIO VIC2 SVC 2384944 inclu...

Page 343: ...OMP3 UPR BRKT 1 N9510ZX CAP SCREW 3 N9408HR SCREW for spare 6 5122012 HDD Extension Cable1 1 5134920 GHOST CD W2K FOR BEP3 1 5136802 installation instruction This manual 1 2367977 DGVIC TRAY2 1 N9306ZX SCREW HEX SOCKET 3MM 6MM CAP SCREW 2 U0082AG SPACER MALE FEMALE 3MM 10 STUD 2 N9306HR SCREW TP 3X6 2 U0055AG SPACER 2 U0032BA MAGIC TAPE HOOK FOR MODEM 1 set U0033BA MAGIC TAPE LOOP FOR MODEM 1 set ...

Page 344: ...REVISION 14 LOGIQ 7 SERVICE MANUAL 9 78 Section 9 10 Renewal Parts List for BT03 or lower 9 10 10 Power Units Figure 9 26 Power Units RIGHT LEFT REAR 701 702 703 703 2 704 705 705 2 705 3 706 706 2 706 3 708 709 710 711 712 713 706 4 ...

Page 345: ...0V Including cable 1 1 705 3 AC POWER BOX 200V 2304538 4 Inlet unit for 200V 1 1 706 AC CORD 100V US 2371417 power cable of 100V with clamp 1 1 706 2 AC CORD 100V JPN 2371416 For JAPAN power cable of 100V with clamp 1 1 706 3 AC CORD 200V EU 2371418 power cable of 200V with clamp 1 1 706 4 AC CORD 200V CHINA with Clamp 2379693 2 For China ONLY 1 1 708 MAIN TRANS 2373331 2 power trans 1 1 709 CONSO...

Page 346: ...CB025AA USB1 CB025AA USB1 CB026B Reset CB026A Reset P076 J014 CB027B Mic_O1 CB027B Mic_O2 J017 P017 CB027A Mic_O1 CB027A Mic_O2 J018 J021 P021 CB029B VGA2 CB029A VGA2 J025 J024 CB030 Patient I O PC2IO J030 CB031 2 VGA1 CB031 2 VGA1 CB035 PC2IO REAN J037 J039 CB042B C Video CB042B Shutter CB042A C Video CB042A Shutter P039 P041 CN41 DG2IO J028 CB034 RGB Sync CN44 CB047B P_SW CB047A P_SW J042 P042 C...

Page 347: ...J10 J15 J14 J11 J10 J8 J9 J19 Modem_PS 6 J406 CB305 Modem_AC CB306 DEV_ROOM_AC J407 P407 J409 P409 CB307B BW_AC CB205 1 CB205 2 CB206 CB207 CB208 1 CB208 2 CB209 CB210 P3 P4 P5 P6 P7 P8 P10 P11 P13 FAN CB201 P16 P17 P15 CB205 1 CB205 2 CB206 CB207 5 CB208 1 3 3_1 CB208 2 3 3_2 CB209 12 CB210 12 CB201 CB201 CB201 HV LV CB202 P1 J1 J2 P2 3 HV_AC 12 1 LV_AC 12 2 LV_AC 24 1 CRT_AC 30 1 OP_PWR J300 NF ...

Page 348: ...xx 230xxxx Ver1 BW Printer Conn Plate BNC AC AC CB307B P405 BW PNL Connector P408 200mm GND400mm BNC Shutter CB042B P041 BW PNL Rear PNL P039 300mm 1 2 758 PW SW ASSY 2301858 3 Power Switch SW Bracket SW Cable CB47B SW MDCON P042 290mm 1 2 759 1 DEV ROOM ASSY 2354669 2 AC shutter panel in device room for OC 235xxxx 238xxxx Ver2 Ver3 Panel AC USB MiniJack AC CB306 P404 DEVroom Rear PNL J407 900mm G...

Page 349: ... DEVroom R G B Sync 2500mm GND CB311 GND Monitor MainFrame GND 770mm AC CB244 1 SSR2 Monitor AC 1850mm 1 2 761 4 MONITOR VGA CABLE ASSY 2298144 2333352 2333877 for OC 22xxxxx 230xxxx Ver1 CB031 2333352 3 Speaker CB033 J7 MDCON Int housing Lock under monitor P032 2360mm Video CB034 J5 DGVIC Color Printer DEVroom R G B Sync 2500mm GND CB311 GND Monitor MainFrame GND 800mm AC CB244 1 SSR2 Monitor AC ...

Page 350: ...sing lock under KBD J014 1500mm CB027A J018 MiniJack BECOMP Int housing lock under KBD J017 1700mm CB027C J020 MDCON Int housing lock under KBD J017 2000mm VGA for LCD CB029A J022 BECOMP D Sub Int housing lock under KBD P021 1850mm Video CB042A J040 RearPNL Int housing lock under KBD P039 2100mm Shutter CB042A J040 RearPNL Int housing lock under KBD J417 1600mm 1 2 763 TX CABLE ASSY 2305111 3 QCON...

Page 351: ...em CB040 J14 REAN Modem Line 950mm CB044 J12 MDCON REST J10 270mm CB047A J8 MDCON Int housing lock J042 1100mm 100mm 1 2 764 3 PC CABLE ASSY 2298147 for OC 22xxxxx 230xxxx Ver1 CB012 J10 MDCON Int housing lock in BECOMP J006 575mm CB012 J10 MDCON PC2IO D Sub J2 710mm CB014 J11 MDCON BECOMP Audio mini Jack1 640mm CB015 RS232 BECOMP Modem RS232 1000mm CB016 Ethernet BECOMP REAN J10 340mm USB CB018 U...

Page 352: ... CB210 12V 0V LV Mother P12 700mm CB230 1 Int housing lock in KBD Mother P1 P2 520mm 540mm CB231 Cooling FAN Mother P14 800mm 1 2 765 2 POWER CABLE ASSY 2359541 for OC 235xxxx 238xxxx Ver2 Ver3 CB201 P2 HV Mother P15 P16 P17 950mm 790mm 720mm CB202 P1 HV MDCON J18 750mm CB205 1 6V 0V LV Mother P3 P4 810mm 810mm CB205 2 6V 0V LV Mother P5 P6 810mm 810mm CB206 6V 0V LV Mother P7 700mm CB207 5V 0V LV...

Page 353: ...022A P001 BECOMP MOD J002 1500mm 1 2 767 1 OP2 CABLE2 ASSY 2383141 for OC 238xxxx Ver3 CB027B CN31 OP PNL Int housing lock under KBD P017 1090mm CB029B CN18 LCD Int housing lock under KBD D Sub P021 950mm CB230 2 CN21 OP PNL Int housing lock under KBD Power Cable KBD1 1000mm USB CB025A CN18 OP PNL Int housing lock in KB support Assy P011 CB026B P014 Int housing lock in KB support assy Int housing ...

Page 354: ... CB203 TB3 SSR HV AC in 1050mm CB212 TB3 SSR LV AC in 1700mm CB225 TB2 SSR ATX AC in 970mm 1 2 771 2 PWR AC CABLE ASSY 2304613 for OC 22xxxxx 230xxxx 235xxxx 238xxxx Ver1 Ver2 Ver3 CB203 TB3 SSR HV AC in 1050mm CB212 TB3 SSR LV AC in 1700mm CB225 TB2 SSR ATX AC in 970mm CB305 TB3 SSR Modem AC in 1150mm 1 2 772 PC BOX INTERNALCABLE ASSY 2304797 for OC 235xxxx 238xxxx Ver2 Ver3 CB101 J005 BECOMP Mot...

Page 355: ... Patient L7 1 2 777 ECG CBL LONG 2304615 Ext Patient L7 1 2 US CABLE FOR PERIPHERAL DEVICE 2324360 Ext Peripheral L7 1 2 Keyboard Knob Repair kit 2363861 1 2 Strap with Buckle 5115855 1 2 Foot for peripheral 2318441 1 2 MON CABLE ASSY 2304171 1 2 Loopback Connector 2116343 Loopback Connector for Diagnostics 46 330081P3 1 2 Table 9 50 Options Peripherals and Cables Item Part Name Part Number Descri...

Page 356: ... 1 803 5C PROBE EXP 2294516 1 804 M7CMIH PROBE EXP 2294514 1 805 E8C PROBE EXP 2294641 1 806 7L PROBE EXP 2294521 1 807 10L PROBE EXP 2294523 1 808 M12LMIH PROBE EXP 2294511 1 809 3S PROBE EXP 2323337 1 810 10S PROBE EXP 2298589 1 811 I12L PROBE EXP 2264883 1 812 P2D PROBE EXP TE100024 PPA adapter is separately required 1 813 P6D PROBE EXP TQ100002 PPA adapter is separately required 1 814 8C PROBE...

Page 357: ...PROBE JPN 2286353 1 852 3 5C PROBE JPN 2348877 1 853 5C PROBE JPN 2294515 1 854 M7CMIH PROBE JPN 2294513 1 855 E8C PROBE JPN 2294640 1 856 7L PROBE JPN 2294520 1 857 10L PROBE JPN 2294522 1 858 M12LMIH PROBE JPN 2294510 1 859 3S PROBE JPN 2348878 1 860 10S PROBE JPN 2309478 1 861 I12L PROBE JPN 2270556 1 862 8C PROBE 2348093 1 863 3 5CS PROBE 2380854 1 864 6T TEE PROBE 5131947 1 865 M3S PROBE 2293...

Page 358: ...GE HEALTHCARE DIRECTION 2286865 REVISION 14 LOGIQ 7 SERVICE MANUAL 9 92 Section 9 10 Renewal Parts List for BT03 or lower This page was intentionally left blank ...

Page 359: ...10 4 Tools Required 10 4 10 5 System Periodic Maintenance 10 7 10 6 Using a Phantom 10 11 10 7 Electrical Safety Tests 10 12 10 1 When There s Too Much Leakage Current 10 31 PM Inspection Certificate 10 29 CAUTION Practice good ESD prevention Wear an anti static strap when handling electronic parts and even when disconnecting connecting cables DANGER THERE ARE SEVERAL PLACES ON THE BACKPLANE THE A...

Page 360: ...ting must occur regularly The same tests are performed during each period so that changes can be monitored over time and effective corrective action can be taken Testing results corrective action and the effects of corrective action must be documented and maintained on the site Your GE service representative can help you with establishing performing and maintaining records for a quality assurance ...

Page 361: ... also after corrective maintenance or as required by your facilities QA program Peripheral Leakage Current Checks also after corrective maintenance or as required by your facilities QA program Surface Probe Leakage Current Checks also after corrective maintenance or as required by your facilities QA program Endocavity Probe Leakage Current Checks also after corrective maintenance or as required by...

Page 362: ... 9 4151 Screwdriver Blade Stubby 9 41322 Pickup Tool Claw type 9 41421 Screwdriver Blade Pocket clip 9 6757 6 pc Needle File Set 9 41594 Screwdriver Blade 1 8 in x 4 in 9 9487 Utility Knife 9 41581 Screwdriver Blade 3 16 in x 4 in 9 45341 Pliers Vice Grip 10 inch 9 39451 20 Steel Tape locking Spring load 9 3001 Xacto Pen Knife 9 GH807 Ratchet Offset Slotted 9 HT62002 Solder Aid Fork and Hook 68 41...

Page 363: ...n 9 45381 Pliers Arc Joint 9 1 2 inch 9 44067 Socket 1 1 16 in for 1 2 in drive 9 45092 Pliers Linesman 8 1 2 inch 9 42679 Socket 10MM Hex for 1 2 in drive 2273333 9 42882 Punch Pin 3 32 inch 9 44262 Extension 10 inch for 1 2 in drive 2273405 9 42884 Punch Pin 5 32 inch 9 4258 3 8 inch to 1 2 inch Adapter 9 42886 Punch Pin 1 4 inch 9 34374 3 8 inch Metric Socket Set 12 PT 9 42973 Cold Chisel 1 2 i...

Page 364: ...e adjustable wrist strap 3M 2214 Small adjustable wrist strap 3M 3051 conductive ground cord Anti Static Vacuum Cleaner 46 194427P278 46 194427P279 120V 230V Air Filter air intake Safety Analyzer 46 285652G1 DALE 600 KIT or equivalent for electrical tests SVHS VCR Cassette E7010GG E7010GF 60 minute 120 minute SVHS VCR Head Cleaner See VCR user manual for requirements 3 5 MOD MEDIA E8381AA E8381AB ...

Page 365: ... Ask Listen Ask the customer if they have any problems or questions about the equipment 2 Paperwork Fill in the top of the Periodic Maintenance PM Inspection Certificate Note all probes and system options 3 Power up Turn the system power on and verify that all fans and peripherals turn on Watch the displays during power up to verify that no warning or error messages are displayed 4 Probes Verify t...

Page 366: ...em controls that affect this mode of operation Applicable Software Options Verify the basic operation of all optional modes such as Multi Image 3D Contrast Harmonics Cine Stress Echo etc Check the basic system controls that affect each options operation Probe Elements Perform an Element Test on each probe to verify that all probe elements and system channels are functional System Diagnostic Perfor...

Page 367: ...OM device 5 InSite iLinq Verify that InSite is functioning properly Ensure two way remote communications Warranty Contract Customers only 6 Camera Verify hardcopy output of the film camera Clean as necessary 7 Footswitch Verify that the footswitch is functioning as programed Clean as necessary 8 ECG Verify basic operation with customer 9 3D Probe Table 10 9 Mains Cable Inspection Step Item Descrip...

Page 368: ...rol Panel Inspect keyboard and control panel Note any damaged or missing items 4 Control Panel Movement Verify ease of control panel Operator I O Panel movement in all acceptable directions Ensure that it latches in position as required 5 Wheels Brakes Check all wheels and casters for wear and verify operation of foot brake to stop the unit from moving and release mechanism Check all wheel locks a...

Page 369: ... system sockets before plugging in a probe TEE and Interoperative probes often have special considerations and individual probe user manuals For TEE and Interoperative probes also refer to their separate user manuals 10 5 7 3 Basic Probe Cleaning Refer to the User s Manual for details on probe cleaning NOTE To help protect yourself from blood borne diseases wear approved disposable gloves These ar...

Page 370: ...essive leakage current To minimize the risk that a probe may shock someone the customer should Not use a probe that is cracked or damaged in any way Check probe leakage current once a year on surface probes twice a year on endocavitary probes whenever probe damage is suspected WARNING WARNING THE USER MUST ENSURE THAT THE SAFETY INSPECTIONS ARE PERFORMED AT LEAST EVERY 12 MONTHS ACCORDING TO THE R...

Page 371: ...obe leakage current and ECG leakage current All measurements are made with an electrical safety analyzer Model 600 600E built by Dale Technology Corporation or equivalent device Table 10 14 Chassis Leakage Current Limits Accessible Metal Surfaces Country Normal Condition Open Ground Reverse Polarity Open Neutral USA N A 0 3 mA 0 3 mA N A Other 0 1 mA 0 5 mA 0 5 mA 0 5 mA Table 10 15 Type BF Applie...

Page 372: ...he Dale 600 has self contained lamps designed for testing the outlet wiring arrangement Plug the Dale 600 into each outlet to be tested comparing the lamp status NOTE No outlet tester can detect the condition where the Neutral grounded supply conductor and the Grounding protective earth conductor are reversed If later tests indicate high leakage currents this should be suspected as a possible caus...

Page 373: ...test the ground wire resistance 1 Turn the LOGIQ 7 unit OFF 2 Plug the unit into the meter and the meter into the tested AC wall outlet 3 Plug the black chassis cable into the meter s CHASSIS connector and attach the black chassis cable clamp to an exposed metal part of the LOGIQ 7 unit 4 Set the meter s FUNCTION switch to the RESISTANCE position 5 Set the meter s POLARITY switch to the OFF center...

Page 374: ...chment plug to the meter s Chassis Cable clamp Test the grounding continuity of the system to all exposed metal parts in accordance with the IEC 601 1 1 procedure as above Refer to the Dale 600 Instruction Manual for meter self tests and operation Record measured resistance of the grounding continuity The ground wire resistance should be less than 0 2 Use any safety analyzer Figure 10 4 Dale 600 G...

Page 375: ...he unit ON and OFF with the power line polarity Normal and Reversed Record the highest reading of current When using the Microguard or a similar test instrument its power plug may be inserted into the wall outlet and the equipment under test is plugged into the receptacle on the panel of the meter This places the meter in the grounding conductor and the current flowing from the case to ground will...

Page 376: ...GIQ 7 unit OFF 2 Plug the unit into the meter and the meter into the tested AC wall outlet 3 Plug the black chassis cable into the meter s CHASSIS connector and attach the black chassis cable clamp to an exposed metal part of the LOGIQ 7 4 Set the tester s FUNCTION switch to CHASSIS position 5 Follow the test conditions described for respective test points shown in Table 10 17 6 Keep a record of t...

Page 377: ...e made with the ground open and closed with power line polarity normal and reversed and with the ultrasound console Off and On For each combination the operating controls such as the lead switch should be operated to find the worst case condition Table 10 18 Typical Data Sheet for Chassis Source Leakage Current Unit Power Tester Polarity Switch Tester Neutral or Ground Switch Test 1 Probe Connecto...

Page 378: ...the meter into the tested AC wall outlet 3 Plug the black chassis cable into the meter s CHASSIS connector and attach the black chassis cable clamp to an exposed metal part of the LOGIQ 7 unit 4 Connect the patient leads to the corresponding snaps located at the upper front of the Dale 600 600E Lead nomenclature for this test is not important Figure 10 7 Test Circuit for Measuring Non Isolated Pat...

Page 379: ...nt lead to ground leakage current 6 Select and test each ECG lead positions except ALL of the LEAD selector testing each to the power condition combinations Figure 10 1 ECG Leakage Current Test Table 10 19 Testing Power Conditions ECG Power Meter s Polarity Switch Meter s Neutral Switch ON NORM CLOSED ON NORM OPEN ON REVERSE CLOSED ON REVERSE OPEN OFF NORM CLOSED OFF NORM OPEN OFF REVERSE CLOSED O...

Page 380: ...ad isolation current measured on the data sheet 10 7 7 Isolated Patient Lead Source Leakage Lead to Lead Reference the procedure in the IEC 60601 1 When using the Dale 600 switch the meter s function selector to the LEAD LEAD position Select and test each of the five ECG lead positions except ALL on the LEAD selector testing each to the power condition combinations found in the table Record the hi...

Page 381: ...imit GROUND OPEN GROUND CLOSED Patient Lead to Ground Leakage Current Test and Patient Lead to Lead Leakage Current Test 115V 10uA 10uA 220 240V 500uA 10uA Table 10 21 Maximum Allowance Limit for ECG Leakage Current AC Power Source Maximum Allowance Limit Patient Lead Isolation Current Test 115V 20uA 220 240V 5mA Table 10 22 Typical Data Sheet for ECG Leakage Current ECG Power Tester Polarity Swit...

Page 382: ...ription Contents 46 285652G1 Dale 601 ULTRASOUND SAFETY ANALYZER FIELD KIT for 120V unit ELECTRICAL SAFETY ANALYZER DALE MODEL 601 for 120V unit Vendor MODEL 600 100 8FT CHASSIS GROUND CABLE Vendor MODEL 600 102 6FT SALINE BATH GROUND CABLE Vendor MODEL 600 202 ULTRASOUND PROBE ADAPTER Vendor MODEL 600 600 SOFT CARRYING CASE Vendor MODEL 600 900 OPERATORS MANUAL Vendor MODEL 600 901 LMINATED OPERA...

Page 383: ...or Saline Bath Ground Cable Measures earth resistance and enclosure leakage current Also used for grounding saline baths for isolation testing of probes Used on DALE601 601E This probe may be substituted for the 600 100 Chassis Cable and used as a probe instead of a clamp Vendor MODEL 600 200 46 285647P6 ISO EXTERNAL LEAKAGE CABLE Black coiled cord with red grips Standard auxiliary cable for exter...

Page 384: ...the test meter and plug the test meter into the tested AC wall outlet 3 Plug the Chassis Ground Probe saline probe into the test meter s CHASSIS connector 4 Set the test meter s FUNCTION switch to CHASSIS Dale 600 or ENCLOSURE LEAKAGE Dale 601 5 Connect the probe to be tested to the LOGIQ 7 unit 6 Put the saline probe and the probe s probe face imaging area of the probe into the saline bath 7 Powe...

Page 385: ...ster NEUTRAL Switch Tester GROUND Switch Measurement Start with System Powered OFF OFF NORMAL OPEN CLOSED OFF NORMAL OPEN OPEN OFF NORMAL CLOSED CLOSED OFF NORMAL CLOSED OPEN Open Neutral first then attempt Power ON ON NORMAL OPEN CLOSED ON NORMAL OPEN OPEN Close Neutral Power System ON and wait until Probe under test is active before continuing ON NORMAL CLOSED CLOSED ON NORMAL CLOSED OPEN Power ...

Page 386: ...each probe for leakage current 1 Plug the test meter into the tested AC wall outlet 2 Plug the Chassis Ground Probe saline probe in diagram into the test meter s CHASSIS connector 3 Connect the probe to be tested to the LOGIQ Family Probe Adapter 4 Plug the LOGIQ Family Probe Adapter into the test meter s connector marked EXTERNAL 5 Set the meter s FUNCTION switch to EXTERNAL position 6 Put the Ch...

Page 387: ...sure Probe Isolation Sink Current cont d 8 Test every probe and record in Table 10 26 the test results for every probe The test passes when all readings measure less than the values in Table 10 30 9 Keep a record of the results with other hard copies of Planned Maintenance data Table 10 26 Probes Tested for Isolation Sink Current Probe Tested ISO Mains Applied ...

Page 388: ...t will pass or sink to ground if a patient contacted mains voltage Table 10 27 Chassis Leakage Current Limits Accessible Metal Surfaces Country Normal Condition Open Ground Reverse Polarity Open Neutral USA 0 1 mA 0 3 mA 0 1 mA 0 3 mA Other 0 1 mA 0 5 mA 0 1 mA 0 5 mA Table 10 28 Type BF Applied Part Leakage Current Limits Non Conductive Floating Surface and Cavity Probes All Countries Normal Cond...

Page 389: ... the probe or the scanner NOTE Each probe will have some amount of leakage dependent on its design Small variations in probe leakage currents are normal from probe to probe Other variations will result from differences in line voltage and test lead placement The maximum allowable leakage current for body surface contact probe differs from inter cavity probe Be sure to enter the correct probe type ...

Page 390: ... Model Number Serial Number Probe 2 Frequency Scan Format Model Number Serial Number Probe 3 Frequency Scan Format Model Number Serial Number Probe 4 Frequency Scan Format Model Number Serial Number Probe 5 Frequency Scan Format Model Number Serial Number Probe 6 Frequency Scan Format Model Number Serial Number Probe 7 Frequency Scan Format Model Number Serial Number Probe 8 Frequency Scan Format ...

Page 391: ...onfig System Ground Continuity Chassis Source Leakage Current Probe Chassis Source Leakage Current Wheel Chassis Source Leakage Current CRT Patient Lead Source Leakage Lead to Ground Patient Lead Source Leakage Lead to Lead Patient Lead Source Leakage Isolation Peripheral 1 Leakage Current Peripheral 1Ground Continuity Peripheral 2 Leakage Current Peripheral 2Ground Continuity Peripheral 3 Leakage...

Page 392: ...GE HEALTHCARE DIRECTION 2286865 REVISION 14 LOGIQ 7 SERVICE MANUAL 10 34 Section 10 7 Electrical Safety Tests ...

Page 393: ......

Page 394: ...stems Telex 3797371 P O Box 414 Milwaukee Wisconsin 53201 U S A Asia Pacific Latin America North America GE Ultraschall Tel 49 0 212 28 02 208 Deutschland GmbH Co KG Beethovenstrabe 239 Postfach 11 05 60 D 42655 Solingen Germany ...

Reviews: