DVSR xU User Manual
9
Using the IR remote control
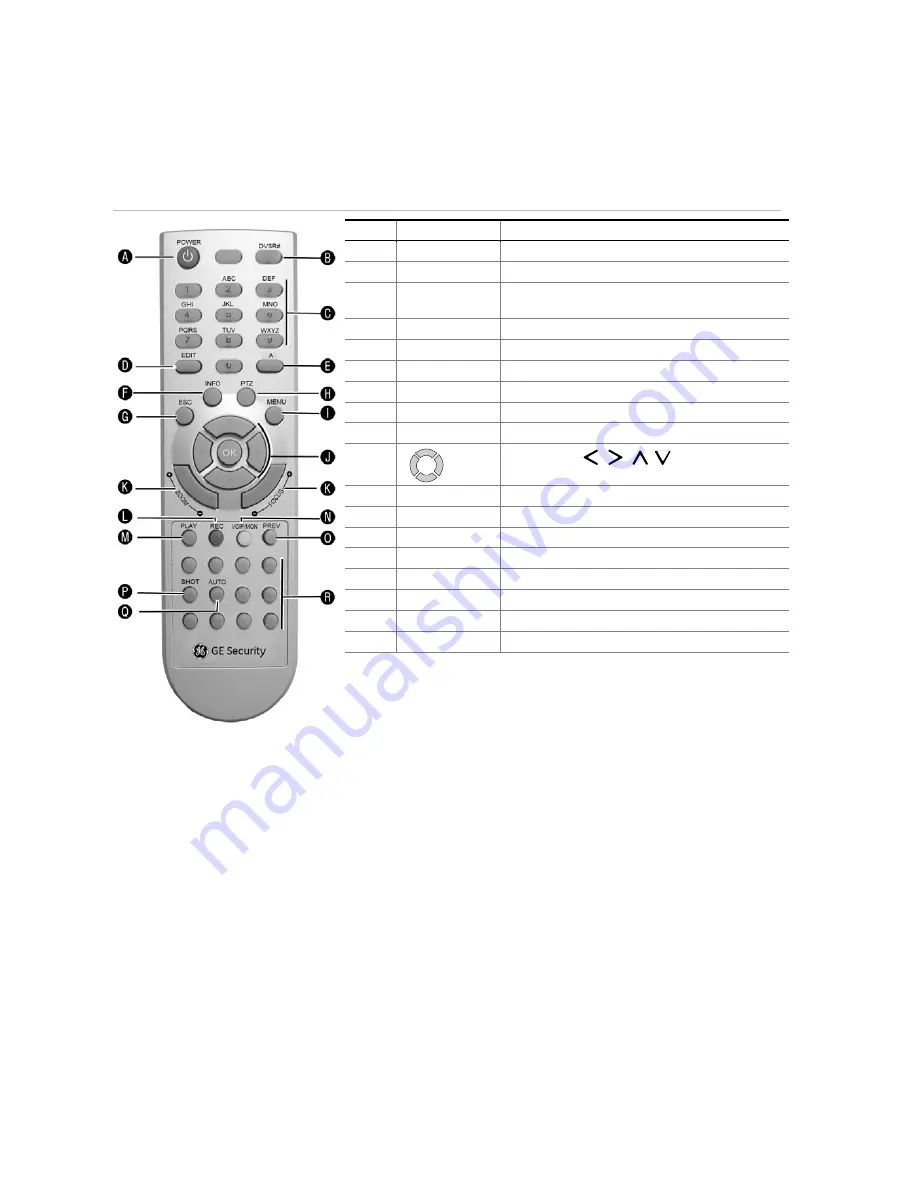
The IR remote control operation is similar to front panel operation.
Figure 6: Description of the IR remote control
No.
Name
Description
A.
POWER
Turn the DVSR on/off.
B.
DVSR#
Enable/Disable the IR remote control
C.
Alphanumeric
buttons
Same as the alphanumeric button on the front
panel
D.
EDIT
Same as the
EDIT
button on the front panel
E.
A
Same as the
A
button on the front panel
F.
INFO
Same as the
INFO
button on the front panel
G.
ESC
Same as the
ESC
button on the front panel
H.
PTZ
Same as the
PTZ
button on the front panel
I. MENU
Same
as
the
MENU
button on the front panel
J.
OK
Same as the
,
,
,
buttons and the
Enter
button on the front panel
K.
Lens control
IRIS, FOCUS ZOOM for lens control
L.
REC
Same as the
REC
button on the front panel
M.
PLAY
Same as the
PLAY
button on the front panel
N.
VOIP/MON
Same as the
VOIP
button on the front panel
O.
PREV
Same as the
PREV
button on the front panel
P.
SHOT
Same as the
REC-SHOT
button on the front panel
Q.
AUTO
Same as the
PLAY-AUTO
button on the front panel
R.
Reserved
To insert batteries into the IR remote control
1. Remove the battery cover on the remote control.
2. Insert the batteries. Observe the correct battery polarity (+ and -).
3. Replace the battery cover.
To connect the remote control to the DVSR xU:
1. Press the DVSR# button on the remote control.
2. Enter the device ID. The DVSR xU default ID is 1.
Note:
See page 31 on how to change the device ID.
3. Press OK. The Status LED will light up on the DVSR xU front panel.
To switch off the IR remote control
1. When IR remote control STATUS LED on the DVSR front panel is lit, press the
DVSR#
button. The
STATUS LED switches off and the IR control cannot be used to operate the DVSR.
Summary of Contents for DVSR xU
Page 1: ...GE Security P N DVSR xU_EN REV2 23 ISS 04MAR09 DVSR xU User manual ...
Page 101: ...DVSR xU User Manual 97 ...
Page 102: ......
Page 103: ...DVSR xU User Manual 99 ...


