background image

85


232001240G(08)


Chapter VII - Optional Items 

When purchasing the LaserPro X252RX & X380RX from your local authorized GCC distributor, you will be 
provided a chance to purchase optional items to enhance your experience with your system. If anytime after the 
purchase of your X252RX & X380RX, would you like to purchase any optional item, please contact your local 
authorized GCC distributor. 


7.1 Fume Extraction System Option 

To properly remove dust, vaporized materials and chemical smoke from the working area and machine, it is 
necessary to install a suitable Fume Extraction system.  The Fume Extraction system and other components 
are readily available from your local authorized GCC distributor or you can elect to purchase and install one 
yourself with components found at your local industrial supply store.  
 
LaserPro's Fume Extraction Systems are specifically designed to prevent personnel from inhaling hazardous 
fumes and dust generated by the laser process. Available for all LaserPro engravers, the LaserPro Fume 
Extraction System represents the latest in fume extraction and odor reduction technology for all types of 
applications. Quiet operation, high vacuum capacity, compact design and long life expectancy are but a few 
outstanding features. Each LaserPro Fume Extraction System is powered by a maintenance-free, continuous-
running turbine. In order to ensure personnel safety and legal compliance, the LaserPro Fume Extraction 
System is CE-compliant for Europe.To purchase a LaserPro Fume Extraction System, contact your local 
authorized GCC distributor 


INSTALLATION (Self-Assembled Unit): 


1)  Purchase an exhaust system at your local industrial supply store, we recommend you have a 

contractor install the exhaust system. We highly recommend you install the exhaust system outside of 
the building for both noise considerations and if it does not possess filtering capabilities. 

2)  Mount the exhaust system in an obvious and accessible location, not too far from the X252RX & 

X380RX, so it can be routinely switched on prior to laser engraving. The maximal distance you should 
mount the exhaust system away from the X252RX & X380RX depends on the blower’s vacuum 
capacity. We recommend you consult with the vendor regarding the unit’s vacuum force, maximal 
distances, based on the available models. 

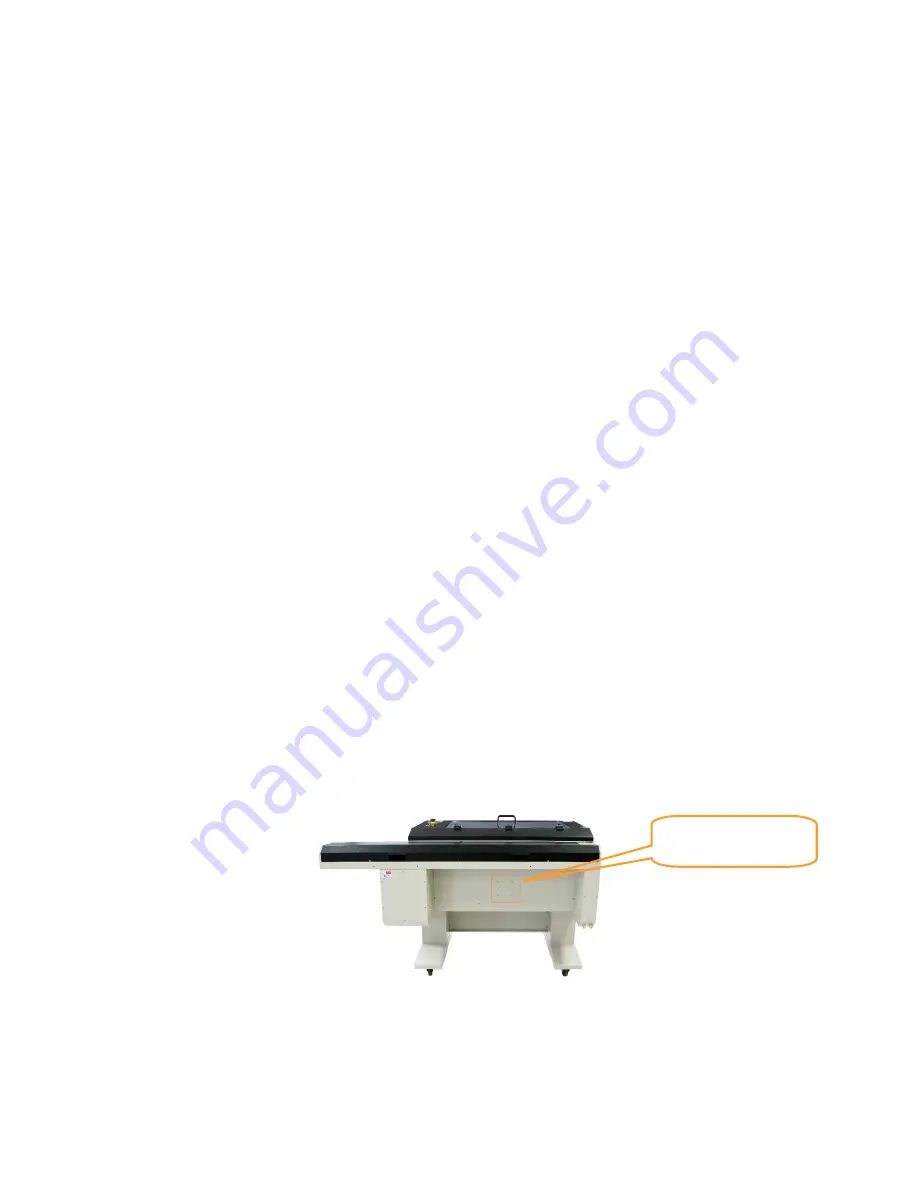
3)  Connect rigid and smooth walled tubing such as PVC or sheet metal with an 8” diameter to the 

ventilation opening located on the rear side of the X252RX & X380RX. (As shown in the picture 
below). Try to keep this tubing as straight as possible as bends reduce the exhaust efficiency.  Use 
the appropriate sized tube clamps and sealants to ensure a tight and secure attachment. 


Exhaust outlet 

Summary of Contents for LaserPro X252RX

Page 1: ......

Page 2: ...he LaserPro X252RX X380RX is clearly on the cutting edge of all laser systems GCC understands that a creative technical background is the key to successful growth in the ever changing information econ...

Page 3: ...guration 23 4 2 2 Installation of the LaserPro Print Driver 23 4 2 3 Parallels Desktops for MAC OS Users 24 4 2 5 Using eCut Plug in with GCC Laser Machine 33 Chapter V Operating the LaserPro X252RX X...

Page 4: ...Rotary Attachment Option 91 Chapter VIII Basic Maintenance 95 8 1 Suggested Cleaning and Maintenance Supplies 95 8 2 Maintaining the Worktable and Motion System 96 8 2 1 Accessing the Worktable and M...

Page 5: ...ds make it an extremely safe machine When the front door and back door are open machine becomes a Class 4 equipment and users must wear goggles to operate the machine 1 3 The Safety Interlock System T...

Page 6: ...propriate locations These labels are not to be modified in any way or removed for any reason Please familiarize yourself with the specific labels and their locations on the machine Below is a list of...

Page 7: ...6 232001240G 08 CDRH Label This label indicates the class level of CDRH...

Page 8: ...t Laser Path Warning Label will be stick on the possible laser path When operators close to these paths should be careful of the possible injury while machine working Laser Path Danger label This labe...

Page 9: ...Normally you can find this label inside of machine or laser exit Please take extra caution of this area when you conduct maintenance or operate machine Protection Window Label This label indicates th...

Page 10: ...your local GCC authorized distributor for more details for having this safety option installed onto your system Always wear safety goggles when the laser system is in operation Reflective materials su...

Page 11: ...d environments where the machine is exposed to high levels of dust temperature temperatures exceeding 30 C or 85 F o r humidity humidity exceeding 70 or where the ambient temperature is near the dew p...

Page 12: ...11 232001240G 08 1 7 EC Declaration of conformity...

Page 13: ...ine please obtain assistance when loading and unloading the shipping crate NOTE Please save the original shipping crate If the machine must be returned for product servicing it will need to be packed...

Page 14: ...240G 08 5 Unscrew the screws holding the spacers left and right side of the machine and the step board front and rear of the machine Remove the two spacers and the step board Spacer Step Board Safety...

Page 15: ...lace one against the left or right side of the shipping crate to form an incline Place the step board against the inclined sideboard to form a complete ramp 7 Carefully roll the machine off the shippi...

Page 16: ...f the following items are missing immediately contact your local GCC distributor ITEM QUANTITY Cleaning Kit Cotton swab Lens Cleaner Solution Lens Tissue 1 1 1 1 Hex Screw Wrench 1 Manual Focus Gauge...

Page 17: ...section regarding the mechanical overview of the LaserPro X252RX X380RX References will be made back to the different parts of the LaserPro X252RX X380RX in later sections 3 1 Front View 3 2 Top View...

Page 18: ...17 232001240G 08 3 3 Right Profile View 3 4 Left Profile View Power ON OFF Switch USB Port Error Indicators Power Cable Inlet Print Port Access Panel Mirror 1...

Page 19: ...18 232001240G 08 3 5 Rear View Laser Compartment Handles Laser Compartment Handles Water Inlet and outlet SmartEXT Pass Through Rear Ventilation Opening...

Page 20: ...achine Setup 4 1 1 Water Chiller Installation Always turn on the water chiller before turning on the machine Connect the water hoses between the machine and the water chiller Make sure the hoses are c...

Page 21: ...ening and the Water In openings 3 Connect the tubes to the water chiller system It is recommended to change the cooling water once every month Remove water from the water chiller if machine will not b...

Page 22: ...detailed instructions in section 7 1 and 7 2 NOTE De ionized water is recommended as the coolant Propylene glycol can be used as an anti freeze agent The coolant used with the water chiller should hav...

Page 23: ...arallel Printer Port connection Regardless of the connectivity method chosen you will need to connect the respective connection cable from the LaserPro X252RX X380RX to your computer USB Connectivity...

Page 24: ...ect the manufacturer and model of your printer From this menu click Have Disk Another menu will now pop up for you to indicate the location of the print driver With the LaserPro CD still in your drive...

Page 25: ...ons If you are using the X252RX X380RX s USB connection interface then you will need to go to your Windows Control Panel Printer and Faxes Right click on the X252RX X380RX listing and select propertie...

Page 26: ...25 232001240G 08 4 Enter your Mac OS X User Name and Password then press OK 5 Press Active...

Page 27: ...26 232001240G 08 6 Press OK when activation is complete...

Page 28: ...27 232001240G 08 7 Register Parallels Desktop 8 Press Register and OK to complete the installation of Parallels Desktop 9 Open Parallels Desktop in the Applications folder then choose File New...

Page 29: ...28 232001240G 08 10 Press Install Windows from DVD or image file then press continue to install windows OS 11 Select CD ROM drive with the Windows installation CD 12 Enter the Windows OS product key...

Page 30: ...is complete the windows OS installation procedure will start automatically 15 Windows OS installation is complete then you can refer to 4 2 5 Installation of the LaserPro Print Driver to install GCC L...

Page 31: ...Autodesk Inventor with GCC LaserPro machine 1 Start drawing 2 Delete border and title block by right clicking on sheet1 and selecting delete 3 Set sheet size to match working area of engraver Engrave...

Page 32: ...e windows driver 4 Start sketch 5 Engraving a Finish sketch b Right click on sketch and select properties c Line Type By Layer d Line Weight By Layer e Set color to match one of the 16 colors availabl...

Page 33: ...0G 08 6 Cutting a Finish sketch b Right click on sketch and select properties c Line Type Continuous d Line Weight 001 in e Set color to match one of the 16 colors available in the pen tab of the wind...

Page 34: ...Cut is an inexpensive and powerful plugin work under CorelDRAW or Illustrator software with GCC laser systems It increases the functions Corel Draw or Illustrators doesn t have or simplifies the opera...

Page 35: ...sting the LCD Display Screen s Contrast Setting Depending on the lighting of your immediate work area you may need to adjust the LCD display screen s contrast You may increase or decrease the display...

Page 36: ...operly The top lid the pass through doors the rear laser access panel and the water flow sensors that ensures the flow of cooling water POWER The power light will illuminate when the LaserPro X252RX X...

Page 37: ...directional buttons cycle through the various selections while the directional buttons adjust the value of that particular selection Enter Confirms the current selection Start Stop Allows you to star...

Page 38: ...k Page Machine Setting Page Link DLink Page Set Lens Page Tune Auto Focus Page Set Red Beam Page Carriage Free Page Command Mode Page File Save Mode Page Save Position Page Reset Page Other Page Funct...

Page 39: ...arious functions of the control panel This will be the page that is displayed when you are processing your jobs This page contains specific job information such as the current job s name Speed Power P...

Page 40: ...Back to previous page F3 Down Manually decrease the height of the work table Z axis F4 Up Manually increase the height of the work table Z axis Directional Manually adjust the Y axis position of the...

Page 41: ...Command Mode Save Position Flash Memory Set File Save Mode Set Vector Mode Tune Image Power Set Laser Wattage Set Fine Mode Other Reset Machine Information Page this page allows you to view informati...

Page 42: ...elevant Buttons Function F1 Back Back to previous page F2 Link Go to the Link DLink Page F3 D All Delete all loaded jobs F4 Del Delete the selected job Directional Scroll through your loaded jobs Ente...

Page 43: ...ueue sequence The second column after the file name displays that job s next file in the job queue sequence First and last jobs in the job sequence you set will have a in the first and second columns...

Page 44: ...elected job File Information Page Relevant Buttons Function F1 Back Back to previous page F4 Edit Go to the File Management Edit Page for the selected job Start Stop Back to Main Work Page Auto Focus...

Page 45: ...to previous page Directional Scroll through the menu selections Directional Cycle through the available selections Enter Perform the selection Start Stop Back to Main Work Page Auto Focus Initiate the...

Page 46: ...ower 0 0 100 Vector Speed 0 0 100 Vector PPI 30 1524 Power Ramp YES NO File Edit Vector Page Relevant Buttons Function F1 Back Back to previous page F4 Save Save your current settings Directional Scro...

Page 47: ...Tune Image Power Set Laser Wattage Set Fine Mode Other Reset Machine Setting Page Relevant Buttons Function F1 Back Back to previous page Directional Scroll through the menu selections Enter Perform...

Page 48: ...The LaserPro X252RX X380RX s default setting is 2 0 Lens 2 0 4 0 Set Lens Page Relevant Buttons Function F1 Back Back to previous page F4 Save Save your current settings Directional Cycle through sel...

Page 49: ...ack Back to previous page F4 Save Save your current settings Directional Manually adjust the height of the work table Z axis Start Stop Back to Main Work Page Auto Focus Initiate the auto focus functi...

Page 50: ...then the LaserPro X252RX X380RX will not display this warning prompt at system startup Table Down YES NO Distance 0 165 mm Set Table Down Page Relevant Buttons Function F1 Back Back to previous page...

Page 51: ...levant Buttons Function F1 Back Back to previous page F4 Save Save your current settings Directional Cycle Red Beam between YES NO Start Stop Back to Main Work Page Auto Focus Initiate the auto focus...

Page 52: ...t or positioning can only be done by the control panel Carriage Free YES NO Carriage Lock Page Relevant Buttons Function F1 Back Back to previous page F4 Save Save your current settings Directional Cy...

Page 53: ...tput formats are supported Mode Default HPGL Vector Pen 1 16 Vector Speed 0 0 100 Vector PPI 0 0 100 Power Ramp YES NO Set Command Mode Page Relevant Buttons Function F1 Back Back to previous page F4...

Page 54: ...he origin for subsequent jobs TIP This is an excellent function to use when you are processing identical items or cutting relatively smaller objects positioned away from the default start position top...

Page 55: ...the LaserPro X252RX X380RX even after each job has been processed File Save YES NO File Save Mode Page Relevant Buttons Function F1 Back Back to previous page F4 Save Save your current settings Direc...

Page 56: ...tically shuts down the system For example if the sensor delay switch is set to the 3 second position the SmartGUARD will start an alarm and automatically shutdown the laser system after detecting a fi...

Page 57: ...LaserPro X252 X380RX User Manual Other Page Main Work Page Press F4 Navigating to this page Functions Page Select Machine Setting from the menu Machine Setting Page Select Other from the menu Other P...

Page 58: ...seconds of the SmartAIR air assist after the point of laser firing Language ENGLISH others dependent on Firmware Unit METRIC ENGLISH EOF Alarm YES NO Air Delay 1 100 seconds TIP Depending on the mater...

Page 59: ...r Reset will pop up a confirmation press Enter to confirm and continue System Reset will pop up a confirmation press Enter to confirm and continue Reset Page Relevant Buttons Function F1 Back Back to...

Page 60: ...Machine Information Page Relevant Buttons Function F1 Back Back to previous page Directional Scroll through pages Start Stop Back to Main Work Page Auto Focus Initiate the auto focus function Manual...

Page 61: ...RX Print Driver will be to make sure the page and layout settings are properly configured within your graphics software You will need to access and edit the Page Setup or Layout page of your graphics...

Page 62: ...l laser cutting parameters In addition to having your Page Setup and Orientation properly set in your graphics software you will also need to make sure Color Management is DISABLED prior to working wi...

Page 63: ...Driver Now after you have properly set the Page and Layout and Color Management of your graphics software you are ready to configure the details of your actual job through the LaserPro X252RX X380RX...

Page 64: ...of the settings found in the LaserPro X252RX X380RX Print Driver If you are new to laser cutting it is recommended that you first familiarize yourself with the general principals of the laser process...

Page 65: ...aphics software prior to engraving in the Black White mode NOTE Selecting the Black White mode will enable the Raster page on the LaserPro X252RX X380RX Print Driver allowing you to adjust advanced st...

Page 66: ...your output results Set DPI 125 250 300 380 500 600 760 1000 Actual DPI 127 254 381 381 508 762 762 1016 NOTE Outputting a full table job using 300 or 600 DPI will result in a truncation error this i...

Page 67: ...laser engraving process when you select Print from your graphic software program If Print Immediately is not checked then selecting Print will transfer the job file to the LaserPro X252RX X380RX Serie...

Page 68: ...57 232001240G 08 User will be prompted to enter a filename After entering the filename and pressing ok the Preview screen will be shown...

Page 69: ...e Spi extension LOAD This function allows you to load those previously saved print driver parameters ORIGINAL This function will load the print driver s original factory parameter settings SAVE TO DEF...

Page 70: ...signated laser setting rather than as a color As an example a black and white image will use only one power and speed laser setting Black An image that is made up of black red and blue colors will be...

Page 71: ...image is composed of colors that are not part of the pen menu s default color selection and instead of modifying your image you simply would like to assign the laser settings based on the existing col...

Page 72: ...wing out This also disables the power ramp functionality which automatically controls the PPI depending on the speed of the lens carriage such as vector cutting around the corner of a square TIP Cutti...

Page 73: ...o do this you would simply need to select the pen color that you have assigned to the sections to be cut and select the Air checkbox for those particular pen colors NOTE In order to use the Air Delay...

Page 74: ...T SETTING Home These selections allow you to control the positioning of the laser head after each job completion and before the next subsequent job Home Resets the positioning of the laser head to the...

Page 75: ...sses an engraved image Top To Bottom Selecting this will force the system to process the current task by moving the lens carriage from the top to the bottom of the image rear end to front end of the w...

Page 76: ...ted This setting allows you to change how the Spirit interprets and processes individual independent areas of an image in order to minimize job processing times The Cluster function is only applicable...

Page 77: ...e processing extremely fine and detailed designs requiring near microscopic edge to edge precision you will need to adjust the image tuning setting To adjust this setting we recommend that you engrave...

Page 78: ...with the optional rotary attachment system to engrave on round or cylindrical objects When you have your material and rotary attachment properly set up 1 Check the Rotary Fixture function and notice t...

Page 79: ...nt Driver Current language options allow for English Spanish French And Chinese Simplified Traditional Japanese and German 5 2 3 6 X252RX X380RX Print Driver Raster Page NOTE The Raster Page is only a...

Page 80: ...ions yielding different output effects style and quality Dithering Interprets and outputs the raster engraving via the dithering method This mode will allow you to select the Pattern Type and Ditherin...

Page 81: ...the fun in engraving is experimentation 5 2 3 7 X252RX X380RX Print Driver Stamp Page Producing stamps require different operational steps than your standard engraving or cutting jobs The Stamp page o...

Page 82: ...r the shoulder sections of your stamp By sliding the sliders or directly input of power levels you will be able to change the slope of the shoulder NOTE The visual representations of the Pitch and Sho...

Page 83: ...composed of lines through continuous firing of the laser to cut out various shapes When performing vector cutting operations imagine the laser head as a pair of scissors cutting out the lines specifie...

Page 84: ...want to process both raster engraving and vector cutting tasks within a single project For example if you wanted to engrave a design onto a particular material and then cut a particular shape around...

Page 85: ...h any 3D software some editing software specific for laser in the market also have 3D mode functionality which could be a handy tool for you to produce 3D objects Of course you may also use Photoshop...

Page 86: ...and combination Then you may let the laser proceed with 3D mode Both Photoshop and CorelDRAW may produce 3D graphics in the manner of combination A way to produce 3D graphics For the production of 3D...

Page 87: ...76 232001240G 08...

Page 88: ...ts your attention If you need to produce circular 3D graphics you only need to select Radial as the gray level type in the pull down menu of Type Then a circular 3D graphic may be produced Step 2 Prod...

Page 89: ...78 232001240G 08...

Page 90: ...production for each of the objects you may proceed with the combination of the objects The combined graphic may be output with the laser engraver Output the 3D graphic After selecting the graphic to...

Page 91: ...raving would be deeper Set Air assist inside the driver by checking the box Polish Dust will accumulate during the engraving when acrylic is engraved The acrylic may be polished with Polish after the...

Page 92: ...the computer by USB cable 2 Download the picture from the digital camera to the computer 3 Select the picture that you want to engrave 4 Import the image from the folder where the picture is located...

Page 93: ...82 232001240G 08 6 Change the Bitmap settings by setting Color to Grayscale 8 bit and Resolution to 300 dpi and click OK 7 Finally Invert the image by selecting Effects Transform Invert...

Page 94: ...83 232001240G 08 8 Now you are ready to output the modified image by clicking File Print...

Page 95: ...general use There are many tips and tricks to achieve a good engraving quality It takes a lot of practice and experience to achieve a good engraving quality Different picture may need different modif...

Page 96: ...g features Each LaserPro Fume Extraction System is powered by a maintenance free continuous running turbine In order to ensure personnel safety and legal compliance the LaserPro Fume Extraction System...

Page 97: ...ucts generated from the laser process INSTALLATION 1 Remove the plugs on the air compressor to expose the air inlets 2 Fasten the included air tube fastener valve to the outgoing air inlet indicated b...

Page 98: ...hment as indicated in the diagram below 6 Plug the air compressor to the power outlet on laser machine to control the air assist function through laser driver and firmware X252 Air Compressor Connecti...

Page 99: ...anel Please refer to the LaserPro X252RX X380RX PEN page on print driver section of this manual for details on how to enable and configure air assist functionalities 7 3 SmartBOX Option The SmartBOX i...

Page 100: ...le 4 OPTIONAL If you have an Fume Extraction system option installed then you will need to attach the Fume Extraction system s pipe connector to the SmartBOX s Fume Extraction opening from the X252RX...

Page 101: ...will be lasered especially during laser cutting 7 4 SmartAIR Fine Ultra Nozzles Option The SmartAIR Fine and Ultra Nozzles minimize flaming suppress working temperatures and blow away dust and particl...

Page 102: ...bility to engrave on cylindrical or spherical objects In addition to the standard X Y Z axis the rotary attachment allows for a fourth axis which rotates your object 360 to allow for engraving on cups...

Page 103: ...Fixtures A Remove the 2 screws shown in the picture below B Detach the circular cylindrical cone by moving it in the direction of the arrow as shown below C Assemble the smaller conical fixture onto...

Page 104: ...nt aligned to the center position on the engraver s vertical axis 3 With the rotary attachment properly positioned tighten the mounting screws to secure the rotary attachment 4 Open the front panel of...

Page 105: ...proper input based on your rotary attachment 5 Under Paper Size the X value represents the length of your working piece Enter the length of your work piece in this field 6 Un nd de er r P Pa ap pe er...

Page 106: ...Special notes Soap Solution or All Purpose Cleaner Paper Towels Cotton Cloth Denatured Alcohol DO NOT use alcohol on any painted surface plastic or the laser system Acetone ONLY to be used on the wor...

Page 107: ...bris from the worktable and motion system 3 Apply small amounts of all purpose cleaner alcohol or acetone to a paper or cotton towel to clean the working table 4 Apply a soap solution all purpose clea...

Page 108: ...ly recommended you remove clean and replace each mirror one at a time Refer to section 8 2 2 on how to clean the mirrors The following section will detail how to access and remove each of the four mir...

Page 109: ...Re install the mirror after cleaning 5 Tighten the thumbscrew 6 Replace and secure the outer access panel Mirror 2 3 4 These mirrors are located in the worktable area of the LaserPro X252RX X380RX Mir...

Page 110: ...nel to reveal mirror 4 and the focal lens 2 Loosen the top thumbscrew to remove mirror 4 as shown in the picture below 3 Clean the lens in the proper manner 4 Re install mirror 4 after cleaning 5 Tigh...

Page 111: ...cratched contact your LaserPro X252RX X380RX dealer for a replacement 8 2 3 Removing and Cleaning the Focal Lens 1 Unscrew the three thumbscrews front face of the laser head securing the laser carriag...

Page 112: ...laser beam will not be generated when the top or front door is opened unless you short the connector of the magnetic switches 5 Check water level or temperature of water cooler for the machine If over...

Page 113: ...can only be changed by replacing the chips or in the case of EEROM by special procedure PPI Pulses Per Inch PPI determines the gross amount of laser pulses there will be per linear inch PPI is exclusi...

Page 114: ...72 9 x 44 3 x 50 0 in 1850 x 1125 x 1270mm Drive Closed loop DC servo control Maximum Motor Speed 40 IPS Speed Control Adjustable from 0 1 100 Up to 16 color linked speed settings per job Power Contr...

Page 115: ...ings per job Power Control Adjustable from 0 100 Up to 16 color linked power settings per job Z axis movement Automatic Computer Interface Full speed USB 2 0 Safety Class I Laser Product Compliant wit...

Reviews: