background image


20


System Setting 


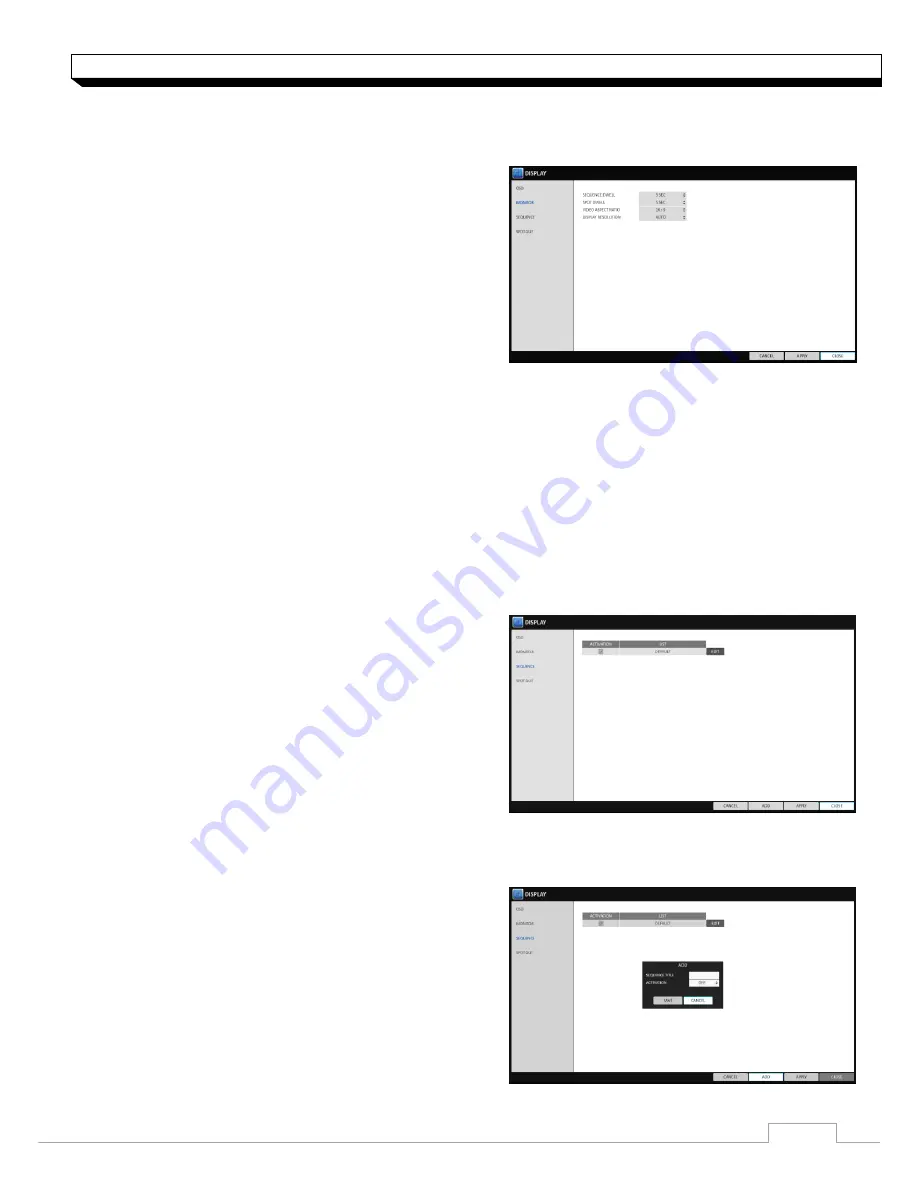
Monitor


If you change from monitoring mode to sequence, you will have to set the interval of the sequence. 

1. From 

<SYSTEM SETUP> - <DISPLAY>

, select 

<MONITOR>

2. Use the 

[▲▼

◀▶

/ENTER]

 buttons on the remote 

control or use the mouse to set dwell  for  sequence 
mode  and  SPOT  Out  dwell. 

> SEQUENCE DWELL : Sets the time interval to 

the next screen mode for Live monitoring, which 
defines individual screen mode

�s dwell time in the 

Sequence. (Can set to 1 sec ~ 60 sec) 

> SPOT DWELL : Sets the time interval to the next 

view type, which defines individual view type

’s dwell time for SPOT OUT. (Can set to 1 ~ 60sec) 

> VIDEO ASPECT RATIO : Set aspect ratio for Live View image ( 16:9 / 4:3 ). 
> DISPLAY RESOLUTION: Set monitor output resolution.   

(Auto / 1920x1080 /1280x720 / 1280x1024)   

3. To apply the change, click 

<APPLY>

  button. 

4. When done, press the

 [EXIT]

 button on the remote  control or click 

<CLOSE>

 button.   

The confirmation message appears and you will  return to the previous menu. 

Sequence 

Select a split mode for the sequence, and also select a list of active items when the sequence is 
performed.


1. From 

<SYSTEM SETUP> - <DISPLAY>

, select 

<SEQUENCE>

2. Use the 

[▲▼

◀▶

/ENTER] 

buttons on the remote 

control or use the mouse to add a sequence or 
change the settings of the existing sequence. 

>ACTIVATION : Select a list that you want to   

activate  the sequence for. 
Only one list will become active. 

>ADD : add a sequence. 

3. To apply the change, click 

<APPLY>

  button. 

4. When done, press the 

[EXIT]

 button on the remote control or click 

<CLOSE>

button. 

  The confirmation  message appears and you will return to the previous menu. 

 
To add a sequence 

1. Click 

<ADD>

 in the bottom of the screen. 

2. When the "ADD" dialog appears, enter a title using 

the


virtual keyboard. 

3. Enter the name of the sequence and click 

<ADD>

4. When the 

<ADD VIEW TYPE>

 dialog appears, 

click 

<ADD>


Summary of Contents for digimaster DR-4FX1

Page 1: ...1 FW Version 1015xx...

Page 2: ...rch 24 Audio Setup 70 Setup 25 User Setting 27 Network Setup 30 System Setting 34 Storage 37 Event Setup RECORD SETTING MOBILE VIEWER 46 To start the Record Setup menu 82 GanzView 47 Record Setup SEAR...

Page 3: ...d have logged in 1 When the system starts the login screen appears 2 Select a user and provide the password The default password of the ADMIN account is 1234 3 Click OK If the login information is cor...

Page 4: ...ttom left corner of the screen to SHUTDOWN the system or press the POWER button on the remote control 2 Use the virtual keyboard to enter the password 3 Be sure to disconnect the power in the rear pan...

Page 5: ...ode Icons Displayed if an event recording is reserved Display the status of the continuous recording Display the recording status when an alarm occurs Display the recording status when a motion event...

Page 6: ...st of the recent recording events Audio Channel Selection Button You can use the camera supporting the audio input to listen to the audio Panic Record Start the panic recording Alarm Indicator Turns o...

Page 7: ...e Navigation through Timeline Navigate through the timeline You can also use the mouse wheel to do the navigation Timeline Bar Display the recording data with time The color of each bar indicates the...

Page 8: ...bar or press the SEQ button on the remote control to perform the specified sequence mode You can configure the sequence settings in SEQUENCE For details refer to Sequence page 35 Controlling PTZ You c...

Page 9: ...image step by step Enlarge the current image step by step Zoom Box Use the yellow box to move to or select a desired zooming area Exit the zooming screen and return to the live screen To check the ev...

Page 10: ...rk devices Click to display detailed information on current users and network connection Click OK to close the window For more information refer to Network Status page 40 To check the disk status You...

Page 11: ...torage device and click EXPORT button To save the captured image onto the built in HDD press the RESERVE button Saved image can be found in the Archive Reserved data management and can be backed up 3...

Page 12: ...System Setting To move to the System Setup menu How to use the mouse How to use the remote control 1 How to use the remote control 2...

Page 13: ...ange click APPLY in the bottom of the screen 5 When done press the EXIT button on the remote control or click CLOSE button The confirmation message appears and you will return to the previous menu Cam...

Page 14: ...u want to hide from a specific user or user group 1 From SYSTEM SETUP CAMERA select COVERT SETUP 2 Use the ENTER buttons on the remote control or use the mouse to select a covert channel s from a spec...

Page 15: ...The confirmation message appears and you will return to the previous menu The motion detection sensitivity may differ depending on the characteristics of the connected camera or installation environm...

Page 16: ...en If unwanted events occur frequently at night you may want to reduce the motion sensitivity for the night duty PTZ Setup You can configure PTZ cameras connected to each channel Set the camera ID pro...

Page 17: ...nges click APPLY button 4 When done press the EXIT button on the remote control or click CLOSE button Privacy Mask Area Setup You can specify privacy masking area 1 From AREA SETUP tab on the right si...

Page 18: ...set the day night sensitivity 4 Set the activation of each channel and set whether to display indicator on the screen SENSITIVITY LEVEL The detection sensor s sensitivity for each detection block Can...

Page 19: ...1 MIN If no mouse movement is detected for from 5 seconds to 1 minute the status bar will disappear TIMELINE ON FULL SCREEN MODE select to show or hide the timeline in full screen mode AUTO HIDE place...

Page 20: ...hen done press the EXIT button on the remote control or click CLOSE button The confirmation message appears and you will return to the previous menu Sequence Select a split mode for the sequence and a...

Page 21: ...or press the ENTER button on the remote control to edit or delete it To edit a sequence 1 Select a sequence that you want to edit in the list 2 The EDIT dialog appears 3 Use the ENTER buttons on the...

Page 22: ...confirmation dialog appears and returns to the previous menu To add a View Type to a SPOT OUT 1 Select an item from the SPOT OUT list to be changed 2 The EDIT window appears click EDIT button 3 When t...

Page 23: ...wo types of SPOT output port AUX Programmable Support 1 4 9 16 display mode SPOT 1 4 Programmable Supports 1 4 display mode 1 From SYSTEM SETUP DISPLAY select SPOT 16DIVISION or SPOT 4DIVISION 2 Setti...

Page 24: ...C Remote client DVR 3 To apply the change click APPLY button 4 When done press the EXIT button on the remote control or click CLOSE button The confirmation message appears and you will return to the p...

Page 25: ...Click ADD in the bottom of the screen 2 Use the buttons on the remote control and move to a desired item Then press ENTER to select the item USER ID enter the user ID using the virtual keyboard PASSWO...

Page 26: ...he permissions for the Backup menu SYSTEM SETUP Set the permissions for the System Setup menu RECORD SETUP Set the Access Permissions for the Record Setup menu EVENT ACTION CONTROL Set the permissions...

Page 27: ...ary DNS server 2ST DNS SERVER Enter the address of the primary DNS server RTSP SERVICE PORT port number that the remote client receives the DVR video from WEB SERVER PORT port number used for connecti...

Page 28: ...e DVR NAME and press the DDNS REGISTRATION TEST button The name will be added automatically DDNS CONNECTION TEST Perform the connection test to check if DDNS is normally registered 3 To apply the chan...

Page 29: ...es the internal IP address of the DVR MAC ADDRESS Indicates the internal MAC address of the DVR DDNS ADDRESS Indicates the internal DDNS address of the DVR RTSP SERVICE PORT Indicates the network port...

Page 30: ...ME SERVER obtain the current time from the time server Click to get the current time AUTO TIME SYNC automatically synchronize the time with the time server at a specific time SYNC AT Set the time to s...

Page 31: ...formation from other device SAVE Store the DVR settings to a storage device Connect the storage device to the USB port of DVR LOAD Apply the settings of the storage device to the DVR Connect the stora...

Page 32: ...RADE 5 When the confirmation message appears click OK 6 The progress bar displays the progress of the firmware upgrade process 7 When the upgrade is complete reboot the system During the updating neve...

Page 33: ...CONTROL DEVICE 2 Use the ENTER buttons on the remote control or use the mouse to set the connection options for the control device SYSTEM ID Set the ID of the DVR so that the keyboard controller can...

Page 34: ...nection to the disk and mark it as Not In Use CAPACITY show the capacity of the disk MODEL indicate the disk model S M A R T STATUS Read the S M A R T information of the disk and check to display if t...

Page 35: ...data size exceeds the free space of the HDD If the option is set to ONCE and the HDD is full the DVR will stop recording and output the beep or alarm that is pre defined at EVENT RECORDING TIME LIMIT...

Page 36: ...rent disk is in normal operation Click DETAIL INFO to view the details NORMAL The disk is in a normal state CHECK The disk has an error so that you need to check the disk or the connection cables of t...

Page 37: ...larm OPERATION Set the alarm output mode N O Normal Open It normally stays Open If an event occurs it will switch to Close N C Normal Close It normally stays Close If an event occurs it will switch to...

Page 38: ...the settings 6 To apply the change click APPLY button 7 When done press the EXIT button on the remote control or click CLOSE button The confirmation message appears and you will return to the previous...

Page 39: ...TRANSPARENT Keep the video popup displayed for as much time as the event lasts UNTIL KEY Keep the video popup displayed until a mouse or remote control button is pressed 5 300 SEC Keep the video popup...

Page 40: ...um delivery cycle so that the server does not classify the email as spam FTP Upon events uploads event notification onto the added FTP server FTP SERVER Enter the FTP server address For event transfer...

Page 41: ...alarm sensor if it is triggered If you have set the alarm recording and the sensor detects the recording all synchronized cameras will start alarm recording ALARM OUTPUT Specify the alarm output chan...

Page 42: ...tion is detected by the motion sensor EMAIL Select to send an email if a motion is detected by the motion sensor FTP Select whether to upload event notification onto the FTP upon detected motion event...

Page 43: ...nu Disk OVERWRITE START EVENT if you set the disk write mode to OVERWRITE this event occurs when the disk is full and the overwriting begins accordingly DISK FULL EVENT if you set the disk write mode...

Page 44: ...e to an invalid ID or password You can specify the times of clicking to trigger the event FAIL IN DDNS UPDATE This event occurs if the DVR tried to update the DDNS address but failed If the DDNS addre...

Page 45: ...event action upon a tampering detection ALARM OUT Set the alarm out channel for detected tampering event BUZZER Sets whether to sound beeper upon a tampering detection VIDEO POPUP Sets whether to disp...

Page 46: ...ecord Setting You can configure the record settings for the DVR Only authorized users can access the Record Setup menu To start the Record Setup menu How to use the mouse How to use the remote control...

Page 47: ...D Recording will proceed only if an alarm event occurs MOTION ALARM RECORD Recording will proceed only if a motion is detected or an alarm event occurs INTENSIVE MOTION RECORD Normally recording will...

Page 48: ...ust set the SCHENDULE MODE of the MANUAL RECORD to WEEKLY before you can specify the DAY 2 Click a time cell from which you want to edit the SIZE FPS Quality and drag it to a desired cell Or use the b...

Page 49: ...ol or click CLOSE in the lower screen The confirmation message appears and you will return to the previous menu Motion Recording Specify the recording size of the motion event if it occurs and make sc...

Page 50: ...5 When done press the EXIT button on the remote control or click CLOSE in the lower screen The confirmation message appears and you will return to the previous menu Panic Recording In panic recording...

Page 51: ...u want to edit 3 Set the MAX RESOLUTION and MAX FPS for each channel 4 When done click OK 5 To apply the change click APPLY in the bottom of the screen 6 When done press the EXIT button on the remote...

Page 52: ...users can access the Record Setup menu To move to the Search menu while in monitoring How to use the mouse How to use the remote control 1 How to use the remote control 2 To move to the Search menu wh...

Page 53: ...anual recording is performed on the recording data 4 Click to move to a desired start time in the time bar or use the buttons at the bottom of the status bar to make search Recall the recording data E...

Page 54: ...is automatically selected CHANNEL Select a channel to search for DATE TIME Specify the search date and time The menus available differ depending on the selected interval mode INTERVAL Select a time in...

Page 55: ...NT list 5 Press the SEARCH button The search results will be listed as shown TYPE displays the event type TIME displays the recording start time CONTENTS shows the details of the event found ORDER BY...

Page 56: ...isplay the current video Timeline Display the type of recording data The vertical bar in the timeline indicates the current point of playback Double click a desired point in the timeline to start play...

Page 57: ...ause Stop playing forward or playback temporarily Play Play the video forward Fast Forward The video will be played forward at the speed of x2 4 8 16 32 64 in this order Zoom In Move to the zoom in ou...

Page 58: ...stop the bookmarking click BOOKMARK 5 To quit the bookmarking click STOP To continue with bookmarking just click CONTINUE 6 Click RESERVE You can export the reserved data to a connected storage device...

Page 59: ...st date of recording is automatically selected LAST The last date of recording is automatically selected 3 Check the START and END times Drag the timeline to specify the start and end time 4 Mark the...

Page 60: ...t to import to a storage device connect it to the DVR and click EXPORT 5 If you want to delete the reserved data click next to the list Click CANCEL ALL to cancel reserving the whole page at once 6 To...

Page 61: ...er PORT enter the port number to which you can access the server USER NAME enter the user ID with which you can access the server PASSWORD enter the connection password DIRECTORY specify the archiving...

Page 62: ...S and WEB SERVICE PORT of the DVR page 40 Enter the IP address and web service port in the address bar of the browser Ex http 192 168 1 116 8080 To connect to the DVR from outside Using the IP address...

Page 63: ...ning bar to install the ActiveX If you fail to download the ActiveX control move to Tools Internet Options Security Custom Level Download unsigned ActiveX control and change its setting from Disable r...

Page 64: ...era or select the full screen mode 5 Status Log Refresh Time Reload Show the connection status of each channel Show the log Set the interval at which the DVR Status is refreshed Load the DVR Status im...

Page 65: ...Web Viewer Switching the split mode Click the Switch button to switch the mode as follows 1 split Mode 4 split Mode 8 split Mode 9 split Mode 16 split Mode...

Page 66: ...well as the video streaming Render DirectDraw is recommended in order to enable the hardware acceleration 3 If you want to change the saving path click Save Folder and specify a new path The Windows V...

Page 67: ...lick PTZ at the bottom of the screen You can control the operations of a PTZ camera Adjust the focus zooming and iris of the camera You can use the arrow buttons to control the operations of the camer...

Page 68: ...ect the full screen mode You can turn on off the voice signal 5 Play button bar You can control the playback screen 6 Time Selection Specify the start time of playback 7 Time Line Indicates the status...

Page 69: ...t screen reload the changes PLAY Play the searched video Backup Archive the recorded video Search by event You can sort the recording data items by event to facilitate your search 1 Mark the checkbox...

Page 70: ...not recommended at all Setup Viewer at a Glance Camera Camera Title You can name the camera title that is displayed on each channel screen Select a channel to name and provide a new title Then click...

Page 71: ...hen done click APPLY to apply the changes Motion Setting Specify the use of motion detection and reaction for each channel and set also the daytime nighttime options Select a channel Set the Motion de...

Page 72: ...refer to TAMPER DETECTION page 30 Display OSD Setting Configure the settings for the time title boundary icon and language that will be displayed on the screen Make changes to each item of the OSD men...

Page 73: ...ormation If you want to delete the user click DEL next to it When done click APPLY to apply the change Group Authority Setting You can grant different user groups different permissions to a specific m...

Page 74: ...NS Setting You can configure the DDNS settings so that remote users who are connected to the network can access remotely Change the DDNS settings and click APPLY to apply the changes Email Setting You...

Page 75: ...ngs of log in log out and auto logout System Information You can check information of system firmware version disk space and network settings as well as the status information of network connection an...

Page 76: ...ormation are displayed Check Disk operation mode You can check disk operation mode setting S M A R T Status The detailed S M A R T information of each internal storage device is displayed What is S M...

Page 77: ...T DISPLAY E MAIL against an event alarm that occurs Specify the buzzer output time display time and email notification and click APPLY to apply the changes For more information about the event notific...

Page 78: ...and determine what to do on the alarm output port if no video is received from the camera When done click APPLY to apply the changes System Event You can set which action to perform if an event relate...

Page 79: ...Mode page 58 Continuous Recording You can configure the settings of continuous recording time recording size frame rate per second and quality Click next to each item to display the list of values ava...

Page 80: ...changes For more information about the motion recording size and schedule refer to Motion Recording page 60 Alarm Recording Set the SIZE FPS QUALITY AUDIO and the SCHEDULE to apply if a motion event o...

Page 81: ...al record settings refer to Panic Recording page 61 Network Streaming You can specify the maximum size of network streaming and video resolution form remote users and changes the FPS can set Click nex...

Page 82: ...ication OS Minimum specification Recommended specification Android Phone Processor 800 MHz or higher Flash 512 MB or higher RAM 512 MB or higher SD Card 4 GB or higher OS 2 0 or higher Processor 1 GHz...

Page 83: ...it before downloading Install the application on your iPhone The GanzView supports the 1 4 split screen mode To connect to DVR with GanzView 1 Select and run the GanzView 2 Click in the top right cor...

Page 84: ...e access ID of the DVR as well as the password 6 Specify the use of the Auto Login 7 Click Save 8 Select the site that you added in the DVR List 9 Try to access the DVR If connected successfully you w...

Page 85: ...or right to move to the next camera video screen To use PTZ control 1 Click in the top right corner 2 Use buttons on the screen for PTZ control available only for cameras supporting PTZ functions Adj...

Page 86: ...two fingers and pinch open to zoom in or pinch close to zoom out To View HQ High Quality Video 1 Click in the right corner 2 It switch to HQ video Using the Log View 1 From the main menu click You can...

Page 87: ...story of the data stored 2 Select a desired time and date You can use the vertical time bar to specify the start time 3 Click to play the video recorded at the specified time 4 Click any area to displ...

Page 88: ...Mobile Viewer Using the Setup function From the main menu click You will be connected to the web viewer site For details about each displayed item refer to Setup page 81...

Page 89: ...ication on your Smart Phone The GanzView supports the multi split screen mode To connect to DVR with GanzView 1 Select and run the GanzView 2 Use the Add button to select and add a site to the list 3...

Page 90: ...DVR List Press and hold the mouse button to display the pop up window 9 Select Connect and try to access If connected successfully you will see the screen as shown Split Mode 1 Click any area on the s...

Page 91: ...porting PTZ functions Adjust Focus Zoom In Out Select one from the listed presets to run the selected preset action stored in the camera Activates Pan Tilt toward the selected direction Captures the r...

Page 92: ...of related items Using the Search function 1 From the main menu click You can view the history of the data stored 2 Select a desired time and date You can use the vertical time bar to specify the star...

Page 93: ...Mobile Viewer Using the Setup function From the main menu click You will be connected to the web viewer site For details about each displayed item refer to Setup page 81...

Page 94: ...Connect the backup USB storage to your PC 2 Open the folder saving the archived images 3 Run the Backup Player 4 Click in the bottom left corner to display the file browser Select the archived file to...

Page 95: ...pen the file that you backed up Capture the current screen Print out the current screen 6 Playback Control Control the playback direction and speed of the current video For more information about how...

Page 96: ...al frame of the current video Screen Capture the visible portion of the current video Format Select a saving format BMP JPG PNG Path Specify the saving path Default location My Documents My Pictures P...

Page 97: ...ngs You can check the version of the Backup Player Maintain image aspect ratio Preserve the aspect ratio of the image If you do not mark this option the image will be adjusted to fit the screen About...

Page 98: ...LAY 5V 35mA 4CH pulled up to 5V via 10KOhm 1CH RELAY 5V 35mA 4CH pulled up to 5V via 10KOhm 1CH RELAY 5V 35mA STORAGE INTERNAL HDD SATA EXTERNAL STORAGE ODD 1 NO NO 2 NO NO 2 NO NO INTERFACES USB USB2...

Page 99: ...h pulled up to 5V via 10KOhm 4CH RELAY 5V 35mA 4CH TTL 18CH 16ch 2ch pulled up to 5V via 10KOhm 8CH RELAY 5V 35mA 8CH TTL STORAGE INTERNAL HDD SATA EXTERNAL STORAGE ODD 5 eSATA NAS FTP server for back...

Page 100: ......

Page 101: ......

Page 102: ......

Reviews: