▶
Check the settings on the new system board, see
.
▶
Hold the system board on the two touch points and insert it at a slight angle.
Slide the connectors into the I/O panel.
▶
Lower the system board carefully into the chassis.
▶
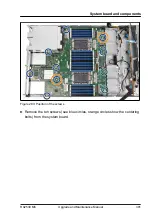
Adjust the system board. If necessary adjust the position of the system
board with a gentle twisting motion (orange circles in
centering bolts).
▶
Fasten the system board with the ten screws, see
Figure 287: Connecting the OOB cable
▶
If applicable, connect the OOB cable to the system board (see circle).
Figure 288: Installing the FBU carrier
System board and components
394
Upgrade and Maintenance Manual
RX2530 M6
Summary of Contents for PRIMERGY RX2530 M5
Page 18: ...Content Upgrade and Maintenance Manual RX2530 M6 ...
Page 194: ...Fans 194 Upgrade and Maintenance Manual RX2530 M6 ...
Page 262: ...Expansion cards and backup units 262 Upgrade and Maintenance Manual RX2530 M6 ...
Page 278: ...Main memory 278 Upgrade and Maintenance Manual RX2530 M6 ...
Page 324: ...Accessible drives 324 Upgrade and Maintenance Manual RX2530 M6 ...
Page 336: ...Front panel 336 Upgrade and Maintenance Manual RX2530 M6 ...
Page 344: ...Serial interface 344 Upgrade and Maintenance Manual RX2530 M6 ...
Page 480: ...List of all used screws for PRIMERGY Servers Assembled in Germany and Japan February 2019 ...

