Installing the heat sink
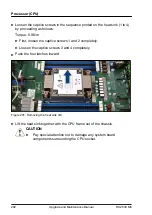
Figure 194: Marks on heat sink and CPU frame
▶
If applicable, remove the protective cover from the heat sink.
▶
If using a heat sink again, clean residual thermal paste from the heat sink
surface using a lint-free cloth.
▶
Ensure that the triangle marks on the heat sink and on CPU frame are on
the same edge (see circles).
Processor (CPU)
RX2530 M6
Upgrade and Maintenance Manual
285
Summary of Contents for PRIMERGY RX2530 M5
Page 18: ...Content Upgrade and Maintenance Manual RX2530 M6 ...
Page 194: ...Fans 194 Upgrade and Maintenance Manual RX2530 M6 ...
Page 262: ...Expansion cards and backup units 262 Upgrade and Maintenance Manual RX2530 M6 ...
Page 278: ...Main memory 278 Upgrade and Maintenance Manual RX2530 M6 ...
Page 324: ...Accessible drives 324 Upgrade and Maintenance Manual RX2530 M6 ...
Page 336: ...Front panel 336 Upgrade and Maintenance Manual RX2530 M6 ...
Page 344: ...Serial interface 344 Upgrade and Maintenance Manual RX2530 M6 ...
Page 480: ...List of all used screws for PRIMERGY Servers Assembled in Germany and Japan February 2019 ...


