▶
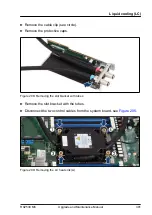
Remove the cable clip (see circle).
▶
Remove the protective caps.
Figure 208: Removing the slot bracket with tubes
▶
Remove the slot bracket with the tubes.
▶
Disconnect the two control cables from the system board, see
.
Figure 209: Removing the LC heat sink (A)
Liquid cooling (LC)
RX2530 M6
Upgrade and Maintenance Manual
301
Summary of Contents for PRIMERGY RX2530 M5
Page 18: ...Content Upgrade and Maintenance Manual RX2530 M6 ...
Page 194: ...Fans 194 Upgrade and Maintenance Manual RX2530 M6 ...
Page 262: ...Expansion cards and backup units 262 Upgrade and Maintenance Manual RX2530 M6 ...
Page 278: ...Main memory 278 Upgrade and Maintenance Manual RX2530 M6 ...
Page 324: ...Accessible drives 324 Upgrade and Maintenance Manual RX2530 M6 ...
Page 336: ...Front panel 336 Upgrade and Maintenance Manual RX2530 M6 ...
Page 344: ...Serial interface 344 Upgrade and Maintenance Manual RX2530 M6 ...
Page 480: ...List of all used screws for PRIMERGY Servers Assembled in Germany and Japan February 2019 ...


