background image

Standard Control Panel

15

Co
nt

ro

l Pa
n

e

l

2

9

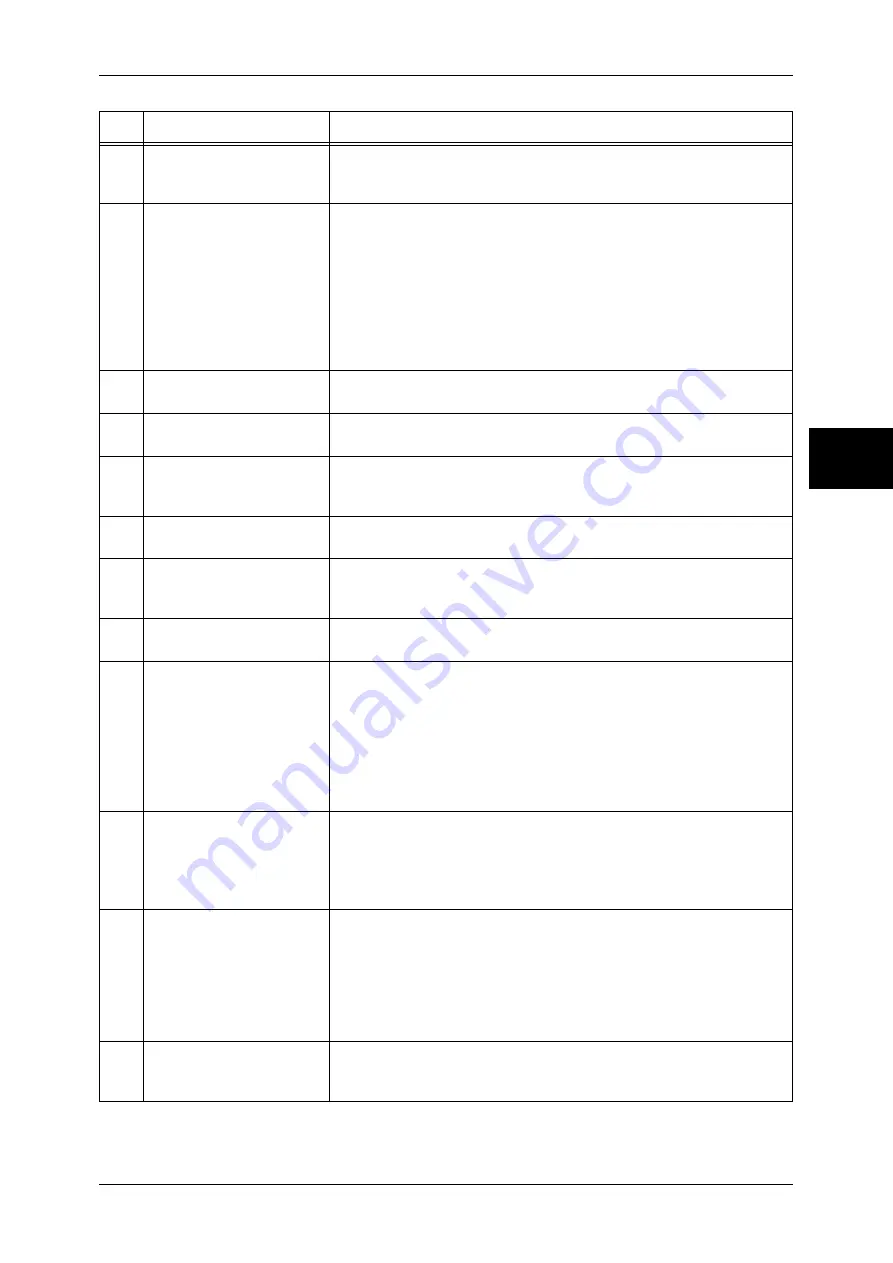
<Clear All> button

Returns the statuses of all displayed services to their default values. 
The machine will be reset to this state after it is turned on.
In this manual, this button is indicated as the <Clear All> button.

10

<Interrupt> button

Press this button to temporarily stop a continuous copy job or printing to 
give another job higher priority. During an interrupt, the interrupt button 
lights up. Pressing the <Interrupt> button again cancels the interrupt 
and the previous operation is resumed.
In this manual, this button is indicated as the <Interrupt> button.

Some jobs such as print jobs designated from client computers cannot be 
executed during the interruption. For detail information, refer to “Notes and 
Restrictions on the Interrupt Mode” under “Chapter 16 Appendix” in the User 
Guide.

11

<Stop> button

Press this button to stop the current copy job or communications.
In this manual, this button is indicated as the <Stop> button.

12

<Start> button

Press this button to start copying or scanning.
In this manual, this button is indicated as the <Start> button.

13

Numeric keypad

Press these buttons to enter the number of copies, passwords and other 
numerical values.
In this manual, these buttons are indicated as the numeric keypad.

14

<Speed Dial> button

Used to specify a destination phone number for fax or e-mail.
In this manual, this button is indicated as the <Speed Dial> button.

15

<C (Clear)> button

Press this button if you have entered a wrong numerical value with the 
numeric keypad.
In this manual, this button is indicated as the <C> button.

16

<Dial Pause> button

Used to insert a pause into a destination number.
In this manual, this button is indicated as the <Dial Pause> button.

17

<Custom> buttons 
(<Copy>, <Custom 2>, 
<Custom 3> buttons)

Used to call a custom feature.
The features assigned to the buttons are selected from the features 
displayed on the [All Services] screen and [Language].
In this manual, these buttons are indicated as the <Copy>, <Custom 2>, 
and <Custom 3> buttons.

For information on registering a feature with a button, refer to “Screen/Button 
Settings” of “Common Settings” under “Chapter 10 System Settings” in the 
User Guide.

18

<All Services> button

Used to display the [All Services] screen.
In this manual, this button is indicated as the <All Services> button.

You can change the features that appear in the All Services screen. For detail 
information, refer to “Screen/Button Settings” of “Common Settings” under 
“Chapter 10 System Settings” in the User Guide.

19

One touch button panels

Panels for one touch buttons.
You can leaf through panels to display 001 to 030, 031 to 060, and 061 
to 070.
M01 to M20 are reserved for the stored programming feature. These 
buttons correspond to jobs registered in 01 to 20.

Note •

This feature is not available for some models. An optional package is
necessary. For details, contact our Customer Support Center.

20

One touch buttons

Specify a recipient with one button. These buttons are available for fax 
and iFax.
Registered preset recipient numbers 001 to 070 are supported.

No.

Component

Function

Summary of Contents for ApeosPort-II C2200

Page 1: ...ApeosPort II C4300 C3300 C2200 ApeosPort Function Guide...

Page 2: ...en shots Xerox The Document Company Ethernet CentreWare and the digital X are trademarks of Xerox Corporation All Xerox and Fuji Xerox product names are either registered trademarks or trademarks of X...

Page 3: ...erences in the Copy Feature 25 Layout Adjustment Tab 25 Output Format Tab 26 4 Fax 33 Fax Feature List 34 Differences in the Fax Feature 37 Transmission Options Tab 37 5 Scan 39 Scan Feature List 40 D...

Page 4: ...Settings Procedure 84 Step 1 Entering the System Administration Mode 84 Step 2 Entering the Administrator ID and Password 84 Step 3 Selecting the Operation Mode on the System Administrator Menu 85 Ste...

Page 5: ...Table of Contents 3 11 Job Status 129 Job Status Screens 130 Job Status Overview 132...

Page 6: ......

Page 7: ...1 Before Using the Machine This chapter describes how to use this guide and the features available on the ApeosPort series z Preface 6 z Using This Guide 7 z Features Overview 10...

Page 8: ...o use the machine for the first time and describes features unique to the ApeosPort series For features common to both the ApeosPort and DocuCentre series refer to the User Guide Please read this guid...

Page 9: ...copy print scan fax features of the ApeosPort series that differ from functions described in the User Guide For common features refer to the User Guide Network Administrator Guide Aimed toward networ...

Page 10: ...touch screen 3 Copy Describes differences from the copy feature written in the User Guide 4 Fax Describes differences from the fax feature written in the User Guide 5 Scan Describes differences from...

Page 11: ...nventions are used in this guide A cross reference included in this guide Refers to names of CD ROM features and touch screen messages and input text Refers to folders files applications button or men...

Page 12: ...a DocuShare server You can store scanned documents in the DocuShare server Note The Remote Access Kit optional and DocuShare optional are required to use this feature Signature and Encrypted Communic...

Page 13: ...n operation You can create advanced job flow sheets with ApeosWare Flow Service Note ApeosWare Flow Service optional is required to use this feature Network Scanning Documents can be automatically sca...

Page 14: ...lbox Various methods are available to store or import documents in or from mailboxes You can use mailboxes to reduce the amount of paper used or maintain confidentiality of documents iFAX Server E mai...

Page 15: ...2 Control Panel This chapter describes how to use the touch screen z Standard Control Panel 14 z Customizing the Control Panel 16 z Differences in the Screen Operations 18...

Page 16: ...en you can check a list of the status of copy fax and scan features whose settings have changed from the defaults You can also check the destination information for sending faxes and e mail In this ma...

Page 17: ...r button Press this button if you have entered a wrong numerical value with the numeric keypad In this manual this button is indicated as the C button 16 Dial Pause button Used to insert a pause into...

Page 18: ...to Clear Allows you to customize items displayed on the screen after Auto Clear You can select from Last Selection Screen and All Services Customizing the All Services Screen Allows you to customize t...

Page 19: ...rvices screen and Language Attach the labels included in the machine when you have changed the assignment If you have used a feature for which no label is provided use a blank label and write down the...

Page 20: ...on describes differences on the screens that are common among features Screen Changes List screen The buttons to jump to the first screen and the last screen are added Keyboard screen The Clear All bu...

Page 21: ...3 Copy This chapter describes differences from the copy feature written in the User Guide z Copy Feature List 20 z Differences in the Copy Feature 25...

Page 22: ...3 Copy 20 Copy 3 Copy Feature List This section describes items in the copy feature...

Page 23: ...tem Settings the paper colors specified under Paper Tray Attributes are displayed Size Detection When Size Detection is selected for Other Attributes under Customize Paper Supply Screen in the System...

Page 24: ...ows in the Document P 25 Image Shift Variable Shift Original Orientation is added User Guide and Original Orientation Specify the Orientation of Loaded Documents P 26 Image Rotation Invert Image Origi...

Page 25: ...to Style Page Number Print On Screen Allows you to select Include Covers Separators when specifying All Pages Watermark Original Orientation is added User Guide and Original Orientation Specify the O...

Page 26: ...99 z Printed Separator Side 1 Copies on Side 1 when inserting separators z Printed Separator Side 2 Copies on Side 2 when inserting separators z Printed Separator 2 Sided Copies on the both sides when...

Page 27: ...e User Guide Normal The edge erase amount is set to 2 mm for the top and bottom and left and right Select one of Margin Erase Edge Erase and Border Erase to change the edge erase amount Margin Erase E...

Page 28: ...t is placed facing the left side horizontal text Output Format Tab Booklet Creation Creating a Booklet You can make copies to create a booklet The machine automatically lays out the pages appropriatel...

Page 29: ...y be inserted before the last page Binding Shift Displays the Booklet Creation Binding Shift screen You can set the width of Binding Shift within the range from 0 to 50 mm in 1mm increments Divide Out...

Page 30: ...ide of the front cover When a back cover is to be attached the second page is copied on the back cover z Printed Cover 2 Sided The first and second pages of the document are copied on the front and ba...

Page 31: ...rlap before making copies If Multiple Up is set the annotation is added to the combined image If Repeat Image or Booklet Creation is set the annotation is added to each individual image Stamp Displays...

Page 32: ...and Opposite to Side 1 can be selected for Side 2 z Size Displays the Date Size screen Three sizes for Date are available The size can be specified from 6 to 24 points in increments of 1 point Page Nu...

Page 33: ...e page s to add a page number All Pages A page number is added to all pages Enter First Page Number Specify the start page for adding page numbers within the range from 1 to 999 Enter End Page Number...

Page 34: ...3 Copy 32 Copy 3...

Page 35: ...4 Fax This section describes differences from the fax feature written in the User Guide z Fax Feature List 34 z Differences in the Fax Feature 37...

Page 36: ...hanged location Changes Refer to iFax Fax User Guide Address Book Keyboard The procedures described in Speed Dialing entering numbers using address number Specifying Destination Using the Keyboard Scr...

Page 37: ...ature changed location Changes Refer to Report Read Receipts User Guide Communication Mode Priority Send Delayed Start Send Header Cover Note iFax Subject iFax Comment Mail Contents Recipient Print Se...

Page 38: ...4 Fax 36 Fax 4 Advanced Fax Features Tab Item Feature changed location Changes Refer to Polling User Guide Store for Polling On hook Manual Send Receive...

Page 39: ...without encryption On Sends encrypted iFax Digital Signature Sending iFax with a Digital Signature by S MIME When using the iFax feature you can send iFax with a digital signature by S MIME Digital Si...

Page 40: ...4 Fax 38 Fax 4...

Page 41: ...5 Scan This chapter describes differences from the scan feature written in the User Guide z Scan Feature List 40 z Differences in the Scan Feature 44...

Page 42: ...ure List This section describes items in the scan feature Note Items displayed vary depending on the selected feature General Settings Tab E mail Item Feature changed location Changes Refer to The tab...

Page 43: ...essage Up to 512 characters are allowed Scanning Color 2 Sided Originals Original Type File Format More Items relating to encryption and digital signature with certificates are added File Format Scree...

Page 44: ...h certificates are added File Format Screen P 45 Item Feature changed location Changes Refer to Photographs User Guide Image Options Image Enhancement Shadow Suppression Color Space Item Feature chang...

Page 45: ...aken from the template and cannot be changed File Name When specifying a job template the file name is taken from the template and cannot be changed User Guide File Name Conflict Reply To Encryption T...

Page 46: ...or will be garbled on the screen For information on characters that can be used in names or description of job templates refer to Notes and Restrictions on the Use of the Machine of Notes and Restrict...

Page 47: ...nt name select Change Settings to display the keyboard and enter the new name The recipient name appears when registered in Address Book S MIME Certificate To confirm whether there is a linked certifi...

Page 48: ...by E mail DocuWorks 5 0 x and earlier versions including trial version do not support high compressed DocuWorks files Note To browse or print an output DocuWorks file on a computer one of the followin...

Page 49: ...ure is added z Visible Signature Adds a digital signature using the certificate of the machine z Invisible Signature Adds an invisible digital signature using the certificate of the machine z Signatur...

Page 50: ...od using password Files encrypted by this method can be opened with DocuWorks Ver 4 0 or later Select Open Password and set a password Password V4 Incompatible Encrypts the file by the 128 bit AES met...

Page 51: ...P 49 DocuWorks Security Certificate Screen Select a certificate added to the file Remove Deletes the selected certificates from the list Edit Displays the Change Settings screen You can change the acc...

Page 52: ...r to allow to modify the file contents such as inserting pages or adding notes Allow Contents Copying and Extraction The Allow Contents Copying and Extraction screen appears Configure whether to allow...

Page 53: ...er to LDAP Server Directory Service P 115 Output Format Tab Encryption Sending E mail Encrypted by S MIME When using the E mail feature you can send e mail encrypted by S MIME When sending encrypted e...

Page 54: ...5 Scan 52 Scan 5...

Page 55: ...x This chapter describes the basic operations and features of the mailbox z Selecting a Mailbox 54 z Checking Operating Documents in a Mailbox 55 z Printing Documents in a Mailbox 58 z Configuring Sta...

Page 56: ...3 Authentication and Auditron Administration in the User Guide 1 Press the All Services button 2 Select Send from Mailbox 3 Select a mailbox Note Select to return to the previous screen or to move to...

Page 57: ...he documents stored in the mailbox with their stored dates and pages Thumbnail Displays the images and names of the documents stored in the mailbox Important If power supply is cut off immediately aft...

Page 58: ...omer Support Center Job Flow Settings Displays the Job Flow Settings screen This screen allows you to create and execute job flows Refer to Configuring Starting Job Flow P 60 Note Print documents are...

Page 59: ...Center 1 Select a document on the Mailbox Document List screen 2 Click Document Details 3 Select any item View Size Select whether to display the whole page or to enlarge the image by 200 Important A...

Page 60: ...ent Details P 57 Note Some models require an optional package to use this feature For more information contact our Customer Support Center Batch Print Configure the Batch Print settings Batch Print al...

Page 61: ...fer to Mailbox Print Settings Screen of Printing Deleting Documents in the Mailbox under Chapter 6 Send from Mailbox in the User Guide Document Details Displays the Document Details screen Select a do...

Page 62: ...heets screen Features that can be registered are listed below Forward Multiple forwarding recipients can be configured for each forwarding method z FTP Forwards via FTP Up to 2 recipients can be speci...

Page 63: ...Pressing Save without selecting a job flow does not set a link If the selected job flow is already linked then the link is cancelled Note The settings for linking delinking and Auto Start can also be...

Page 64: ...z Search by Keyword Searches for job flows that fully match the entry The machine searches through keywords that were registered upon each job flow creation The entry can be up to 12 characters long z...

Page 65: ...b Flow Restrictions Job flow sheets can be assigned to an individual shared by many users or only accessible from the specified mailbox to which they are linked Job flow restrictions may vary dependin...

Page 66: ...6 Send from Mailbox 64 Send from Mailbox 6...

Page 67: ...g This chapter describes the Stored Programming feature for recording procedures provided by the machine z Stored Programming Overview 66 z Registering Deleting Renaming Stored Programs 67 z Calling a...

Page 68: ...ot only remembers feature settings but also can record a series of operations This enables you to record the hierarchy of displayed screens for each step For example Stored Programming can be used whe...

Page 69: ...ngs are changed after registering a stored program in which Watermark is registered When features registered in a stored program become unavailable after the default settings are changed in System Set...

Page 70: ...stored programs can be registered in the machine The one touch buttons M01 to M20 are provided for Stored Programming 1 to 20 The following is the procedure for registering actions with stored program...

Page 71: ...creen or to move to the next screen 3 Set the feature you want to register Note The machine produces an audible tone while a stored program is registered You can change the volume of the sound that no...

Page 72: ...nt to use Note You can only select registered numbers Select to return to the previous screen or to move to the next screen 4 After the stored program is called select other features if necessary 5 Pr...

Page 73: ...s the scanning operation using a job flow sheet created on a network computer and registered in the machine Job Flow is a feature for executing a series of registered actions z Job Flow Procedure 72 z...

Page 74: ...pening the Job Flow Sheets Screen 72 Step 2 Selecting a Job Flow Sheet 72 Step 3 Confirming Changing the Job Flow Sheet 73 Step 4 Starting the Job Flow Sheet 73 Step 1 Opening the Job Flow Sheets Scre...

Page 75: ...refer to Selecting Changing a Job Flow Sheet P 74 Step 4 Starting the Job Flow Sheet 1 Load the originals Note A job flow sheet with application linkage does not require loading documents 2 Press the...

Page 76: ...on how to enable the port refer to Port Settings of Network Settings under Chapter 10 System Settings in the User Guide 1 Select a job flow sheet Displayed job flow sheets may vary depending on the u...

Page 77: ...75 Sheet Filtering Screen Filters the job flow sheets displayed Job flow sheets displayed on the screen depends on the settings of the Authentication feature Displayed job flow sheets may vary dependi...

Page 78: ...Note A triangle icon appears at the left of each mandatory item 4 Select any item Items The items set for the job flow sheet Current Settings The values set for the job flow sheet Delete E mail Recip...

Page 79: ...9 Web Applications This chapter describes the operations when the Remote Access Kit optional is installed z Web Applications 78 z Setting an Access Destination 78 z Accessing Web Applications 81...

Page 80: ...settings to access web applications 1 Press Log In Out button 2 Enter the Administrator ID with the numeric keypad or a keyboard displayed by selecting Keyboard and select Confirm Note The default Ad...

Page 81: ...and select Change Settings Server Name Enter the access destination name with up to 32 characters URL Enter the URL of the access destination with up to 256 characters The URL must include the type o...

Page 82: ...ry Machine Authentication Notification Set whether to notify the remote server of machine information and user authentication information every time the machine is connected to the remote service Note...

Page 83: ...2 Select Web Applications Note If Auto Jump Destination has been set the machine access the remote service 3 Select an access destination 4 Select open on the pop up menu displayed Open Accesses the...

Page 84: ...9 Web Applications 82 Web Applications 9...

Page 85: ...m the features whose settings can be changed written in the User Guide and the procedures to change the settings for system administrators z System Settings Procedure 84 z System Settings Menu List 87...

Page 86: ...tering the System Administration mode If you are using the authentication feature a password may be required It is recommended to change the Administrator ID and password immediately after installing...

Page 87: ...4 Selecting an Item on the System Settings Screen In the System Settings screen select an item to be set For the items that can be set in the System Settings screen refer to System Settings Menu List...

Page 88: ...ob flow sheets are stored Stored Document Settings Allows you to configure the settings relating to stored documents Web Applications Allows you to configure an access destination server Setup Menu Yo...

Page 89: ...Connection Interval The location is changed from Connection Interval under NTP Time Synchronization Auto Clear Auto Job Release Auto Print Printer Lockout Duration Auto Power Saver Energy Saver Time Z...

Page 90: ...djust the screen contrast within the range from 16 to 16 Paper Tray Settings Custom Paper Name User Guide Paper Tray Attributes z The name is changed from Paper Size Type z The paper color can be set...

Page 91: ...Report Scan File Transfer Report 2 Sided Report Recipient on Activity Report Job Flow Error Report Maintenance Initialize Hard Disk User Guide Delete All Data Software Options Watermark Date Format Us...

Page 92: ...ition Print Position Adjustment Print Position Side 2 Other Settings Auto Job Promotion User Guide Offset Stacking Center Output Tray Offset Stacking Finisher Tray Default Print Paper Size Odd Page 2...

Page 93: ...ns Paper Supply Button 2 5 Allows you to assign frequently used trays to the 2nd to 5th Paper Tray buttons User Guide Reduce Enlarge Button 3 5 Allows you to assign frequently used magnifications to t...

Page 94: ...Balance Cyan Color Balance Black Color Shift 2 Sided Copying Mixed Sized Originals Edge Erase Top Edge Bottom Edge Left Edge Right Edge Center Erase Binding Erase Side 2 Allows to set edge erase value...

Page 95: ...Side 2 z Same as Side 1 z Opposite to Side 1 Date Size Page Number Style N M and Page N M are added Page Number Position Side 1 Side 2 Allows to specify Side 1 and Side 2 Side 1 Six positions are avai...

Page 96: ...Procedure User Guide Maximum Stored Pages Auto Paper Off Mixed Sized Originals 2 Sided Copy Fine tune 100 Background Suppress Photo Text Background Suppression Level Text Photo Text Printed Original...

Page 97: ...p Right Date Position Bottom Left Date Position Bottom Center Date Position Bottom Right The name is changed from Data Position on Side 2 Advanced settings are available Page Number Position Top Left...

Page 98: ...mps User Guide Item Subitem Changes Refer to Port Settings Network Administrator Guide Protocol Settings Ethernet Settings Network Administrator Guide TCP IP Get IP Address TCP IP IP Address TCP IP Su...

Page 99: ...ming E mail Settings POP3 Server Settings Network Administrator Guide SMTP Server Settings Domain Filter Remote Authentication Server Directory Service Authentication System Remote Authentication Serv...

Page 100: ...eceiving Buffer LPD Spool Receiving Buffer NetWare Receiving Buffer SMB Spool Receiving Buffer IPP Spool Receiving Buffer EtherTalk Receiving Buffer Port 9100 Delete Form ESC P User Guide Form Number...

Page 101: ...C Lighten Darken Contrast Sharpness Background Suppression Shadow Suppression Color Space Original Orientation Scan Resolution Mixed Sized Originals Edge Erase Edge Erase Top Bottom Edges Edge Erase L...

Page 102: ...e Transfer Screen Item Subitem Changes Refer to Screen Defaults Fax Screen Default User Guide General Settings 2nd Column Address Book Default Transmission Screen Fax Defaults Resolution User Guide Or...

Page 103: ...livered Faxes Save Cancelled Faxes Saved Faxes Auto Delete Transmission Interval Batch Send Auto Switch Attempts Fax Receiving Mode Border Limit Auto Reduce On Receipt Receiving Paper Size 2 Pages Up...

Page 104: ...ion Output Destination Box Selector Service Setup User Guide Box Selector Line Setup Output Destination Line Setup Reduce Enlarge Presets Reduce Enlarge Presets 1 to 12 The number of buttons is 12 Use...

Page 105: ...Fax Transfer Maximum Data Size Item Subitem Changes Refer to E mail Control Maximum E mail Size User Guide Maximum Address Entries Incoming E mail Print Options Auto Print Error Mail Response to Read...

Page 106: ...trieved By Client User Guide Print Detele Confirmation Screen Convert Custom Size to Standard Size Standard Size Threshold Value iFax to iFax iFax to E mail Item Subitem Changes Refer to Pool Server D...

Page 107: ...rint Documents Print Job Confirmation Screen Item Subitem Changes Refer to Server Setup Available when the Remote Access Kit is installed You can register servers and user IDs Web Applications P 78 It...

Page 108: ...Name Job Flow Sheets P 121 Description Keyword Send as Fax Send as iFax Send as E mail Transfer via FTP 1 Transfer via FTP 2 Transfer via SMB 1 Transfer via SMB 2 Print User Guide Edit Delete Job Flo...

Page 109: ...x F Code Relay Broadcast Billing Day Time Billing Night Time Billing Midnight iFax Profile Last Name First Name Custom Item 1 Custom Item 1 P 127 Custom Item 2 Custom Item 2 P 127 Custom Item 3 Custom...

Page 110: ...r Guide System Administrator s Passcode Maximum Login Attempts Item Subitem Changes Refer to Create Check User Accounts User ID User Guide User Name Password E mail Address Account Limit Card Number R...

Page 111: ...ngs Charge Private Print Settings The name is changed from Charge Print Settings Receive Control User Guide Fax Billing Data Charge Rate per Unit User Guide Password Entry from Control Panel User Guid...

Page 112: ...anded the print position for a UUID is 6 mm default from the paper edge Therefore a UUID will not completely printed if you use SPA3 paper 320 mm in width Note that this problem may also occur for oth...

Page 113: ...tem Settings 10 When making 2 sided copies set the position where the UUID is printed on Side 2 Same as Side 1 Prints in the same position as the front side Opposite to Side 1 Prints in a position sym...

Page 114: ...to allocate a feature 5 Features When you select 5 Features no feature can be allocated 7 Features Allows you to set the features appearing in the fourth column from the left of the General Settings...

Page 115: ...ying the addresses HTTP Proxy Server Name Enter the HTTP server name Up to 255 characters are allowed HTTP Proxy Server Port Number Set the HTTP server port number in the range from 1 to 65535 HTTP Pr...

Page 116: ...imary Server Setup Select the primary server specification method from By IP Address and By Server Name Primary Server IP Address Enter the primary server IP address using values from 0 to 255 Note Yo...

Page 117: ...the name of the primary server Up to 64 characters are allowed Note You can set this item when Primary Server Setup is By IP Address Primary Server Port Number Set the Primary server port number in t...

Page 118: ...o User Name You can use up to 64 characters Search Login Name Set a login name for address book search and access to the directory server by Authentication of User Attributes of LDAP authentication Ho...

Page 119: ...bute type Up to 32 characters are allowed Maximum Number of Search Results Set the upper limit on the number of searched address results from 5 to 100 If there are more search results than the upper l...

Page 120: ...P SSL TLS communication or S MIME the device certificate must be set For information on the certificate refer to the Network Administrator Guide SSL TLS Settings Configure the settings of SSL TLS Devi...

Page 121: ...a digital signature to the E mail whenever you send Digital Signature Outgoing iFax Select whether or not to always add a digital signature to iFax You can also select the setting in which the machin...

Page 122: ...server the machine must be registered in the pool server in advance Pool Server Select whether to use a pool server Pool Server Login Method Select a pool server login method Show Login Screen A scree...

Page 123: ...Forwarding specification FTP SMB e mail fax transmission iFax transmission z Multiple forwarding specifications multiple processing execution z Print Depending on the method of storing in the mailbox...

Page 124: ...work computer can be deleted but cannot be changed or copied A job flow sheet stored on the pool server cannot be changed copied or deleted However editable items can be temporarily edited for use For...

Page 125: ...ify an address by address number Enter the address number with the numeric keypad and select Save The specified address appears in Recipient Name Fax Number in the Send as Fax screen New Recipient Spe...

Page 126: ...to enable or disable the digital signature feature iFax Profile Select an iFax profile format An iFax profile is an agreement between transmitting and receiving iFax machines that limit image resolut...

Page 127: ...FTP 1 Transfer via FTP 2 Note Transfer via FTP 2 will appear when Transfer via FTP 1 is configured Specify where FTP forwarding is to be stored Address Book When the server address is registered in Ad...

Page 128: ...input are as follows z Recipient Name Up to 18 characters z Server Up to 64 characters z Shared Name Up to 128 characters z Save in Up to 128 characters z User Name For domain users Up to 97 character...

Page 129: ...te refer to the Network Administrator Guide Custom Item 1 The attribute name set as Custom Item 1 attribute name is shown as the item name You can input any information as an auxiliary item Up to 20 c...

Page 130: ...ing to or from the remote access mode the following information is lost All user information Personal mailboxes and personal job flow sheets When a Kerberos server is used as a remote authentication s...

Page 131: ...11 Job Status This section describes differences from the Job Status screen written in the User Guide z Job Status Screens 130 z Job Status Overview 132...

Page 132: ...Jobs Tab Completed Jobs Tab Item Feature changed location Changes Refer to Print Waiting Jobs User Guide Document Job Type User Guide Remote Terminal Contents Status Progress Item Feature changed loca...

Page 133: ...r Guide Document No Job Type Remote Terminal Contents Status Pages Item Feature changed location Changes Refer to Secure Print User Guide Sample Print Delayed Print Charge Print Private Charge Print P...

Page 134: ...r Guide Checking Current Pending Jobs Lists the current and pending jobs and displays their details Also allows you to cancel the current or pending jobs Checking Completed Jobs Displays the status of...

Page 135: ...tored program 70 calling a stored program for Build Job 70 canceling the auto jump destination 80 Clear All button 15 configuring the auto jump destination 80 control panel standard 14 covers 28 creat...

Page 136: ...n Name System Settings 116 Search Password System Settings 116 Search Root Entry DN System Settings 116 Search Time Out System Settings 117 Secondary Server Name System Settings 114 Secondary Server P...

Page 137: ...ApeosPort II C4300 C3300 C2200 ApeosPort Function Guide Manual Group Human Interface Design Development Fuji Xerox Co Ltd DE3500E2 1 Edition 1 May 2006 Copyright 2006 by Fuji Xerox Co Ltd...

Reviews: