


- 17 -
2) Sample Scan Manual Slicing
If a sample has already been recorded, slices can still be created by just playing the sample back and tapping
the SLICE button, but for precise loops to be captured and turned into slices, really good reflexes with the finger
on the button would be an asset! Fortunately, the Reflex has it's own reflexes, which are quite a bit more accurate.
At this point it'd be great if you have tried creating a MiniLoop before this, as it will be used to "scan" the
sample (hopefully you have one playing!) for that perfect slice of musical pie:
1
-Ensure SLICE SEL is off or hold >4 seconds to erase previous slices (Slice P Green LED should be off)
2
-Start a POS MiniLoop Playing (P.SEL to POS, Play LOOP on, tap PLAY) and set the SIZE fairly quick.
3
-Use POS to scan across the RP Sample (or echo/layer) to find the start for the Slice
4
-Use SIZE to set the end of the slice. (If the slice won't be looping, then this won't matter)
5
-Tap the PlayFX repeatedly to get an idea of how the Slice will sound
6
-Tap the SLICE button to create a Slice.
-Do steps 3 - 7 again until you have enough slices
-Switch to SLICE SEL (Green P LED on) and use the RATE knob to select a slice.
-Tap SLICE button to play slices.
Options:
You can play a Slice, then apply PlayFX to it (ST or POS) and create more slices from that!
* This method isolates slices so they don't have to be created sequentially.
* If this is done with G-Move instead of MiniLoop, the slice should play a "snapshot" from when
the slice was created, not the whole G-Move slide. Slice Play won't recall Sample Rate at the time.
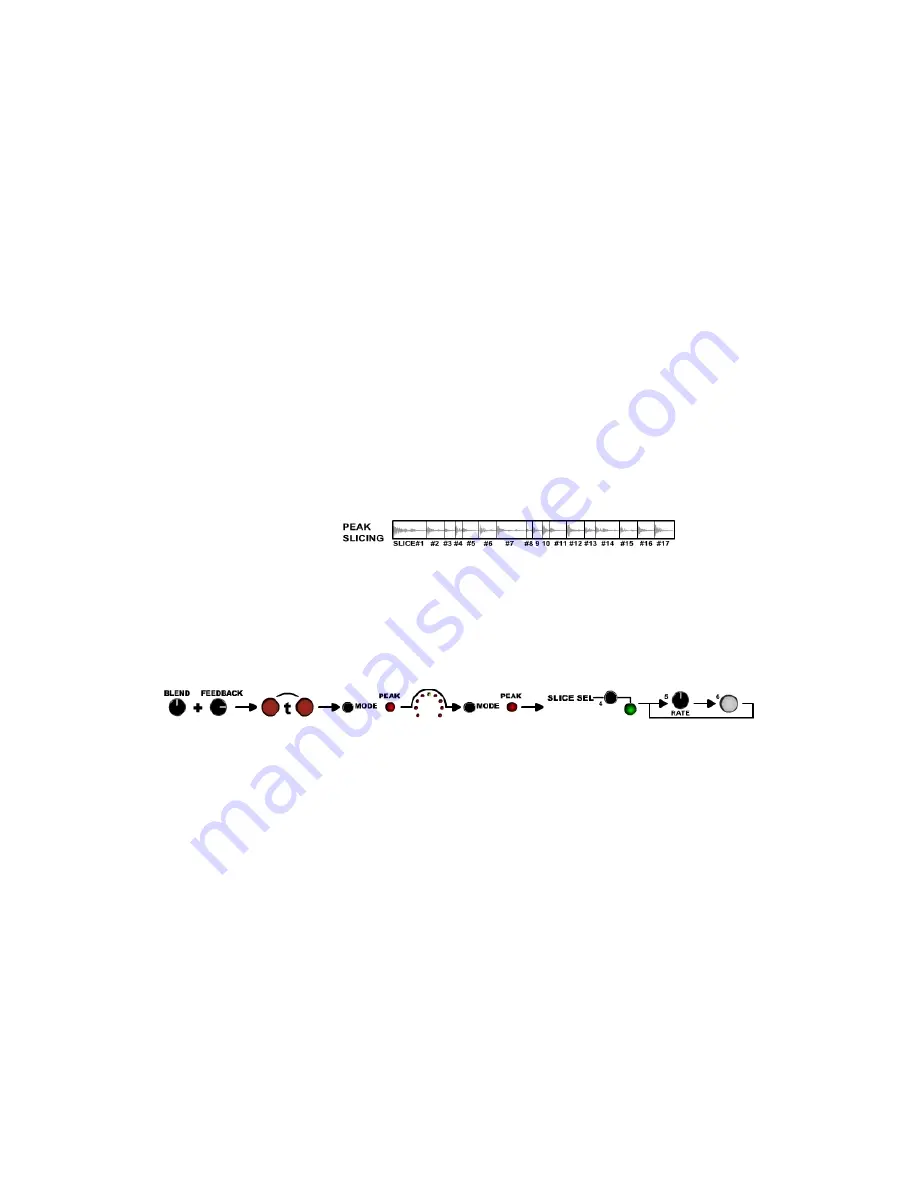
3) Peak Slicing Mode
Peak Slicing in a modular sampler is very rare (Reflex may be the first) like a jewel in the LiveLoop crown!
It is what it sounds like; a sample slicer that creates slices from audio peaks. It's not as simple as that, but the
results are usually ideal, and can be used to turn canned music into a frenzy of breakdowns, grooves, or chaos.
The best part is that once set, Peak Slicer takes over until the sample or recording is done, or it's stopped by you.
Because peak slicing is sensed at the Output of Both Channels, you can have audio at either, but no audio, no slices.
Also as the sensor is at the output, Live Slicing, or Slicing from a sample can be accomplished.
This example dives right into Peak Slicing an echo. The slices will be from various points in the echo, and all have
echo length. This will result in many slices, the first 16 of which you will be able to access from the panel:
-Select Echo Mode with P.SEL button
-Make sure you have some audio feeding into the Right and/or Left channel AC inputs (Left =mono)
-Hold the Slice button for over 4 seconds to erase any previous Slices
1
-Set BLEND to center, and FEEDBACK to a bit down from maximum, so echo fades.
2
-When ready, Tap the REC button, then tap again to set echo size, relatively short.
3
-Turn on PEAK Slicing by selecting it with the MODE button.
(The Mode LED will flip back to R/P, ECHO, or LAY after a moment)
*By this time a slice or two may have already been created. Watch the LED circle increment. Once it has
passed the 8th LED twice you have over 16 slices.
4
-Tap MODE button to Stop Peak Slicing.
-Tap the MODE button again to exit Peak Slicing Mode.
-Switch to SLICE SEL (Slice P Green LED on) to play back slices as usual.
Options:
-Try turning Blend over to the left, maybe 10 o'clock (toward input side) which will slice more with input.
-Try moving the RATE control while Peak Slicing an echo. Rate will be recalled when slices are played!
*Record can be Armed by the Peak slicer to Start Recording once there's audio, whether slicing or not!
Refer to Section VI. for more on the Peak Slicer algorithm and "Back Slice" timing


