background image

4.

5.

6.

8.

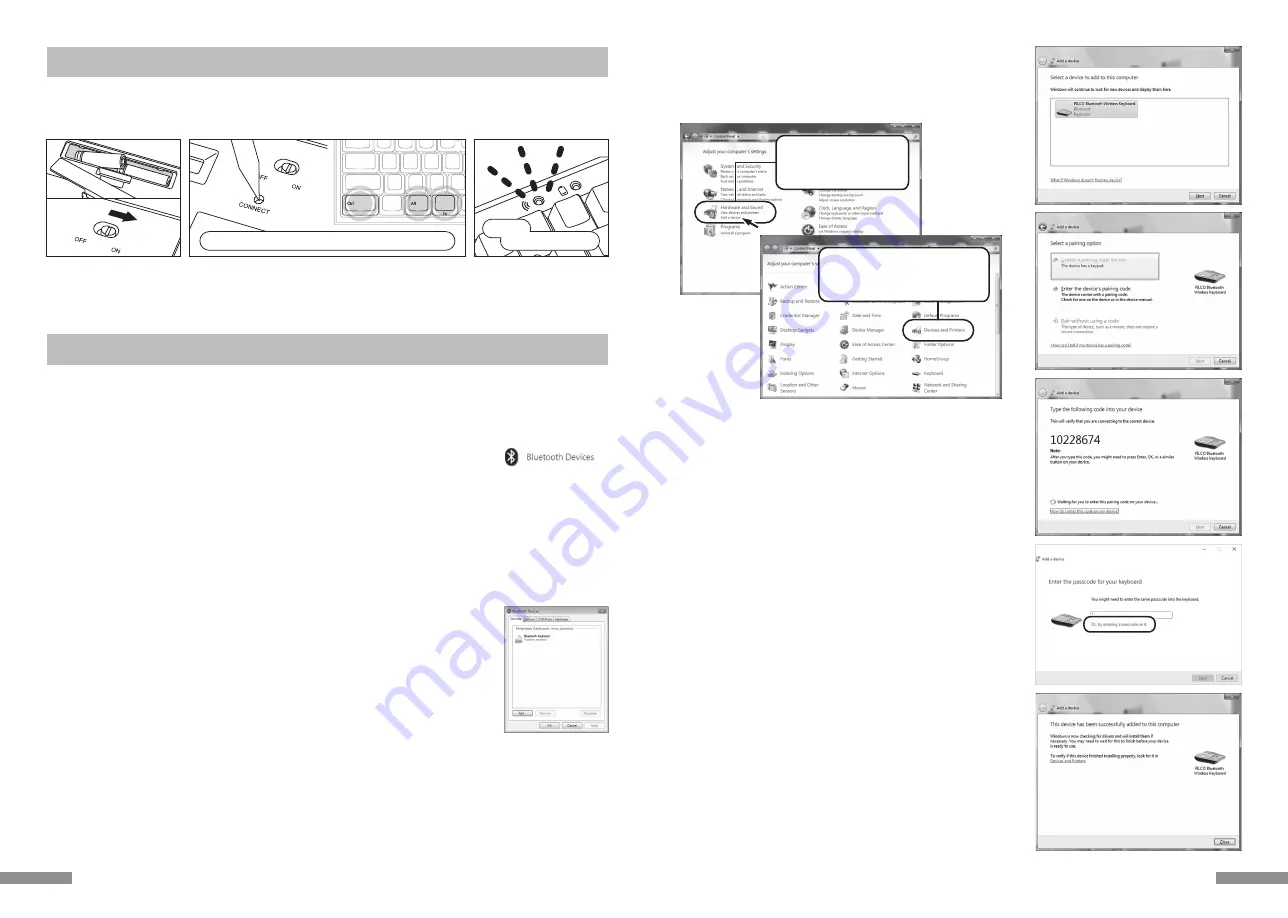
Windows 7 / 8 / 8.1 / 10

1. Open the Control Panel.
2. On category view, click [Hardware and Sound], then click [Add a 

device].
On icon view, click [Devices and Printers]

then click [Add a device

]

.

3. Open the 

 [

Add Bluetooth Device Wizard].

  Add a device window displays [Select a device to add to this comput-

er.]

4. Bluetooth devices found.

Select [FILCO Bluetooth Keyboard], then click [Next].

5. Add device passcode.

When the passcode dialog box appears, select [Create a pairing code 
for me

then click [Next]. (Windows 7)

6. Please input the passcode using the numeric keys on the keyboard, 

and then press Enter. Ensure to complete the pairing code input 
within 30 seconds.

  [Reference] When inputting a pairing code, the status will not be 

displayed on the screen.

7.  When the passcode has been entered successfully, installation for the 

Bluetooth keyboard will start within a short while. If the entered pass-
code is incorrect, please re-execute the previous step by re-entering 
the passcode.
In the case of failing to input the passcode by time-out and re-pairing 
under Windows 8/8.1/10, the passcode may not be displayed on the 
screen of [Enter the passcode for your keyboard]. Click on the [or, try 
entering a passcode on it.] to get a new passcode displayed.

8. The dialog box of Add a device will display [This  device has been 

successfully added to this computer.] indicating that the installation is 
complete. Please close the dialog box.

9. Paired device information will automatically be stored within the 

keyboard. After pairing, turn on the keyboard power, press any key 
and it will enter into [Search mode]. The pairing LED lamp will flash, 
and then reconnect automatically.

10. To confirm the connection status settings, please go to Control Panel 

> Devices and Printers > Devices.

7.

• By Category

Click “Add  a device” of 
“Hardware and Sound”.

• By Icon

Click “Devices and Printers”, and 
click “Add a device”.

21

1. Insert the batteries into the keyboard. Follow the battery holder instruction, and note the direction of poles.
2. Start keyboard switch.
3. Push Connect button on the back of the main body or Ctrl+Alt+Fn simultaneously.
4. Pairing LED on the keyboard blinks while in Pairing Mode (attempting to recognize PCs).

3.

3.

1.

2.

4.

the Pairing LED is blinking

Check that

[Procedure 1]  Switching to Pairing Mode from Keyboard

[Procedure 2]  Installing Bluetooth Device (Pairing Mode)

Windows XP / Vista 

* Pairing mode procedure is the same, but the displayed graphics are based on the OS, therefore, there will be minor discrep-

ancies.

1. Control Panel > double-click the [Bluetooth Devices] icon
2. Bluetooth Devices > Devices tab > click [Add]
3. Open the Add Bluetooth Device Wizard dialog box.

Tick [My device is set up and ready to be found.], and then click [Next].

4. Bluetooth device found.

Select [FILCO Bluetooth Keyboard], and then click [Next].

5. Add passkey for the device.

Select [Choose a passkey for me], and then click [Next] .

6. Passkey exchange between computer and keyboard.

Please input the passkey using the numeric keys on the keyboard. Then press Enter. Ensure to complete the passkey input 
within 30 seconds.

[

Reference

When inputting passkey, the status will not be displayed on the screen.

7.  When the passkey has been entered successfully, the Bluetooth keyboard installation will 

start within a short while.
If the entered passkey is incorrect, please re-execute the previous step, by re-entering the 
passkey again.

8. When [Completing the Add Bluetooth Device Wizard] dialog box is displayed on the screen, 

indicating that the installation has completed.
Close the wizard by clicking Finish.

9. Paired device information will automatically be stored within the keyboard. After pairing, 

turn on the keyboard power, press any key and it will enter into [Search mode]. The pairing 
LED lamp will flash, and then reconnect automatically.

10. To confirm the connection status settings, please go to ControlPanel >  Bluetooth Devices > 

Devices tab.

10.

1.

* Press the pairing button or long press the Ctrl+Alt+Fn keys at the same time for more than 3 seconds; and the pairing login 

content will be cleared completely and the factory state will be restored. Please note that the long press shall not exceed 3 
seconds during pairing.

* The following is the operating method of genuine OS software or drive program setting. Please refer to the Bluetooth receiver 

instruction manual when setting with the special software attached to the Bluetooth receiver.

Push Connect button or Ctrl+Alt+Fn simultaneously

*

*

20

Summary of Contents for FILCFF02

Page 1: ...101 0021 6 5 4 4F Kairaku Bldg Sotokanda 4F 6 5 4 Sotokanda Chiyoda ku Tokyo 101 0021 Japan URL http www diatec co jp Microsoft Windows Windows is a registered trademark of Microsoft Corporation in t...

Page 2: ...uetooth Bluetooth Fn Majestouch MINILA Air Fn DIP Bluetooth Bluetooth ver 3 0 class2 10 3 30 Cherry MX Cherry MX CHERRY 4mm 2mm Bluetooth LED LED LED FILCO Key Puller 2 3 FILCO Majestouch MINILA Air A...

Page 3: ...6 Ctrl Alt Fn 5 A B C 9 Ctrl Alt Fn 3 3 A B C A B C Bluetooth A B Bluetooth A B C Bluetooth A Bluetooth Bluetooth 5 LED NumLock CapsLock ScrollLock LED NumLock CapsLock ScrollLock LED 3 1 ON 2 3 4 5 6...

Page 4: ...etooth Windows 8 8 1 10 8 Windows 10 9 LED 10 7 3 Ctrl Alt Fn 4 LED 4 LED 3 Ctrl Alt Fn 1 2 2 1 2 Ctrl Alt Fn 3 Windows XP Vista OS 1 Bluetooth 2 Bluetooth 3 Bluetooth 4 Bluetooth FILCO Bluetooth Keyb...

Page 5: ...3 A 1 D 2 B 3 C 1 A A A B B C C D D B C A B 1 B 2 A A 1 A 2 B 2 3 9 Windows 10 1 2 Windows 9 7 10 3 Bluetooth 4 Bluetooth 5 Bluetooth 6 MINILA Air 1 4 3 7 FILCO Bluetooth Keyboard 8 PIN MINILA Air En...

Page 6: ...F J K L M F1 F12 Ps SR ScLk Pa Br Ins Home PgUp Bs Del End PgDn Fn F1 F12 Print Screen System Request Scroll Lock Pause Break Insert Home Page Up Back Space Delete End Page Down Win Alt cmd option iP...

Page 7: ...3 4 5 6 2 Win App ON Win App CapsLock Ctrl ON CapsLock Ctrl Esc E J ON Esc E J Shift Del O N S h i f t Del Fn ON Fn Fn ON Fn Win App ON Win App CapsLock Ctrl ON CapsLock Ctrl Esc ON Esc O N Backspace...

Page 8: ...rd 5 iPad iPhone 6 U S 7 iOS11 2 2 iOS Bluetooth iOS11 Ctrl iOS iOS iPad iPhone 15 HKEY LOCAL MACHINE SYSTEM CurrentControlSet Services i8042prt Parameters 4 LayerDriver JPN kbd106 dll OK 5 6 7 Overri...

Page 9: ...m according to local regulations Use of keyboard Any accidents may occur due to fall Please place it on a flat and stable surface Keyboard is a precision device accommo dating batteries and transforme...

Page 10: ...tically searches for devices with Bluetooth on starting from the top of connection priority After 5 minutes 19 DIP switch 1 ON 2 3 4 5 6 PC Bluetooth HID Profile Windows computers OS Windows XP Servic...

Page 11: ...yboard blinks while in Pairing Mode attempting to recognize PCs 3 3 1 2 4 the Pairing LED is blinking Check that Procedure 1 Switching to Pairing Mode from Keyboard Procedure 2 Installing Bluetooth De...

Page 12: ...be removed from the keyboard Check details below on pairing connection priorities Procedure 3 Setup from 2nd Unit Onwards maximum setup 3 units 23 When starting operation from the Settings of Windows...

Page 13: ...ring LED indicator blinks and it will be reconnected automatically Sleep mode If the keyboard is not used for 30 minutes it will automatically enter into the sleep mode The sleep mode can be released...

Page 14: ...nnection the design of the Bluetooth function does not support resume Windows from Sleep Standby mode Please use the mouse or other devices in advance to deactivate Windows Sleep Standby Mode Q Can it...

Page 15: ...rl Alt Fn 4 LED Ctrl Alt Fn LED 5 29 60 Fn Majestouch MINILA Air 60 Fn DIP Bluetooth Bluetooth Ver3 0 Class2 10 3 30 Cherry MX Cherry MX CHERRY 4mm 2mm NumLock CapsLock ScrollLock LED NumLock CapsLock...

Page 16: ...Bluetooth Keyboard PIN USB 4 8 PIN MINILA Air PIN Enter 31 Windows 7 8 8 1 10 1 2 3 Bluetooth 4 Bluetooth FILCO Bluetooth Keyboard 5 6 Enter 30 7 Bluetooth 8 9 LED 10 Windows XP Vista 1 2 3 4 FILCO B...

Page 17: ...md Win V Cmd Win Z iPad iPhone 1 29 2 iPad iPhone 3 FILCO Bluetooth Keyboard Enter 4 FILCO Bluetooth Keyboard iOS 11 2 2 iOS 33 F1 F12 Home PgUp Fn Win Alt cmd option iPad iPhone iOS iPad iPhone 33 DI...

Page 18: ...0 Class2 10 3 30 Cherry MX Cherry MX CHERRY 4mm 2mm DIP LED LED LED Bluetooth FILCO 2 35 AV OA 2M 3M IEEE802 11g b LAN Bluetooth 2 4GHz Bluetooth DIATEC FILCO Majestouch MINILA Air PC Bluetooth HID Pr...

Page 19: ...oard 5 6 Enter 30 7 Bluetooth 8 9 LED 10 OS 4 5 6 MINILA Air 7 FILCO Bluetooth Keyboard 8 MINILA Air PIN Enter 4 7 8 PIN 3 Windows 10 1 2 Windows 3 1 2 37 Bluetooth Bluetooth Bluetooth Bluetooth Bluet...

Page 20: ...40 DIP DIP OFF DIP DIP 1 ON 2 3 4 5 6 3 4 5 6 2 1 1 1 Bluetooth Windows Bluetooth Windows 2 PC PC LED 3 Bluetooth LED 30 LED Bluetooth 3 5 30 39 3 1 Ctrl Alt Fn 2 LED 3 4 5 1 4 A 1 C 2 A 3 B B 1 B 2 C...

Page 21: ...42 LED 42 Bluetooth 43 Step 43 Step 44 Step 45 Bluetooth 46 46 46 DIP 46 47 iPad iPhone 47 48 KR 41 DIP 5 FILCO Q Q LED Q Enter Shift Q BIOS 2 1 BIOS Windows USB PS 2 Q Q Q Windows Windows Windows Q...

Page 22: ...Bluetooth Bluetooth Step Ctrl Alt Fn 3 3 Ctrl Alt Fn 3 3 Ctrl Alt Fn 5 43 LED LED NumLock CapsLock ScrollLock LED NumLock CapsLock ScrollLock LED LED LED Bluetooth LED 5 6 Fn Majestouch MINILA Air Fn...

Page 23: ...N MINILA Air PIN Enter 45 Windows XP Vista 1 2 3 4 FILCO Bluetooth Keyboard 5 6 PC Enter 30 7 8 9 Search LED 10 PC Windows 7 8 8 1 10 1 2 3 Bluetooth 4 Bluetooth FILCO Bluetooth Keyboard 5 Passkey 6 p...

Page 24: ...one Bluetooth Bluetooth 3 Majestouch Convertible 2 Enter 4 Majestouch Convertible 2 iOS 11 2 2 iOS 11 2 2 47 1 2 Bluetooth 3 4 LED 2 3 5 LED 1 PC XP Vista Bluetooth 2 Bluetooth PC 3 3 4 LED 5 1 Blueto...

Page 25: ...Q Q LED PC Q Enter Shift Q PC BIOS OS 2 1 OS BIOS OS windows OS USB PS 2 Q Q PC Q Windows Windows Q Windows OS Windows 10 Windows 8 8 1 Windows 7 Windows Vista Windows XP SP2 windows OS Q PC Q Q windo...

Page 26: ...tus complies with Canadian ICES 003 and RSS 210 Operation is subject to the following two conditions 1 this device may not cause interference and 2 this device must accept any interference including i...

Reviews: