background image

11

Introduction

A welding helmet is a type of headgear used when performing certain types of welding to protect the eyes, 

face and neck from flash burn, ultraviolet light, sparks, infrared light, and heat. The helmet consists of 

several parts (see spare parts list). An automatic welding filter combines a passive UV and a passive IR 

filter with an active filter, the luminous transmittance of which varies in the visible region of the spectrum, 

depending on the irradiance from the welding arc. The luminous transmittance of the automatic welding 

filter has an initial high value (light state). After the welding arc strikes and within a defined switching time, 

the luminous transmittance of the filter changes to a low value (dark state).

Depending on the model, the helmet can be combined with a protective helmet and / or with a PAPR 

(Powered Air Purifying Respirator) system.

Safety instructions

Please read the operating instructions before using the helmet. Check that the front cover lens is fitted 

correctly. If it is not possible to eliminate errors, you must stop using the cartridge.

Precautions & protective restrictions / Risks

During the welding process, heat and radiation are released, which can cause damage to the eyes and 

skin. This product offers protection for the eyes and face. When wearing the helmet, your eyes are always 

protected against ultraviolet and infrared radiation, regardless of the shade level. To protect the rest of your 

body, appropriate protective clothing must also be worn. In some circumstances, particles and substances 

released by the welding process can trigger allergic skin reactions in correspondingly predisposed 

persons. Materials that come into contact with skin may cause allergic reactions to susceptible persons.

The protective welding helmet must only be used for welding and grinding and not for other applications. 

The manufacturer assumes no liability when the welding helmet is used for purposes other than intended or 

with disregard for the operating instructions. The helmet is suitable for all established welding procedures, 

excluding gas and laser welding

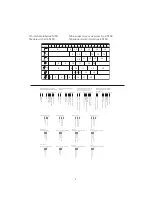
Please note the recommended protection level in accordance with 

EN169 on the cover. 

Scratched or damaged lenses must be replaced. The helmet does not replace a safety 

helmet. Depending on the model, the helmet can be combined with a protective helmet.

The helmet can affect the field of view due to constructive specifications (no view on the side without 

turning the head)  and may affect a color perception due to the light transmission of the auto darkening 

filter. As a result, signal lights or warning indicators may not be seen. Further there is an impact hazard 

due to a larger contour (head with helmet on). The helmet also reduces the audio and heat perception.

Sleep mode

The cartridge has an automatic switch-off function, which increases the service life. If the light falls on the 

catridge for a period of approx 10 minutes less than 1 Lux, it automatically switches off. To reactivate the 

cartridge,it must be briefly exposed to daylight. If the shade cartridge cannot be reactivated or does not 

darken when the welding arc is ignited, the batteries must be replaced.

Warranty & liability

Please see the instructions of the national sales organisation of the manufacturer for warranty provisions. 

For further information in this respect, please contact your official dealer. Warranty is only granted for 

material and manufacturing defects. In the case of damage caused by improper use, unauthorised 

intervention or through usage not intended by the manufacturer, the warranty or liability are no longer 

valid. Likewise, liability and the warranty are no longer valid if spare parts other than those sold by the 

manufacturer are used.

Expected Lifetime

The welding helmet has no expiration date. The product can be used as long as no visible or invisible 

damage or functional problems occur.

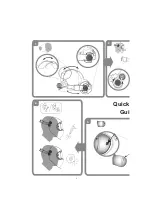
How to use (Quick Start Guide)

1. 

Head band.

 Adjust the upper adjusting band (p. 2) to the size of your head. Push in the ratchet knob 

(p. 2) and turn until the head band fits securely but without pressure.

2. 

Distance from eyes and helmet angle.

 By releasing the locking knobs (p. 2-3), the distance between 

the cartridge and the eyes can be adjusted. Adjust both sides equally and do not tilt. Then tighten the 

locking knobs again. The helmet angle can be adjusted using the rotary knob (p. 4).

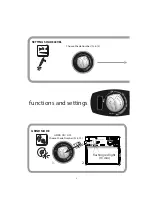
3. 

Shade Level.

 The shade level can be changed by turing the knob from shade level SL 8- SL 12 

according to standard EN 379,

4. 

Grinding mode.

 Press the Grind button (p. 4) to switch the cartridge to grinding mode. In this mode 

the cartridge is deactivated and remains in light mode shade level SL 2.5. The activated grinding 

mode is indicated by the red flashing LED (p. 4) inside the helmet. To deactivate grinding mode, press 

the Grind button level knob again. After 10 minutes, the grinding mode is automatically reset.

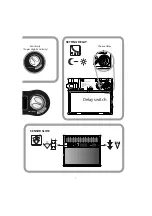
5. 

Sensitivity.

 Use the sensitivity knob (p. 5) to set the ambient light sensitivity. The position "Super 

High" is the standard sensivity setting. By turning the knob, these can be customized. In the "Super 

High" area the maximum light sensitivity can be achieved.

6. 

Sensor slider.

 The sensor slider can be set to two different positions. Depending on the position, 

the ambient light detection angle is reduced (p. 5) or increased (p. 5).

7. 

Delay switch.

 The opening knob (Delay) (p. 5) allows to select an opening delay from dark to light. 

The knob  allows infinite adjustment from dark to light between 0.05 to 1.0 s. 

Cleaning  and disinfection

The shade cartridge and the front cover lens must be cleaned with a soft cloth at regular intervals. No 

strong cleaning agents, solvents, alcohol or cleaning agents containing scouring agent must be used. 

Scratched or damaged lenses must be replaced.

Storage 

The welding helmet must be stored at room temperature and at low humidity. Storing the helmet in the 

original packaging will increase the service life of the batteries.

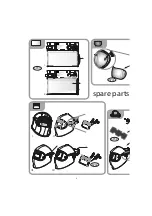
Replacing the the front cover lens (p. 6-7)

Push in one side clip to release the front cover lens and then remove it. Attach the new front cover lens to 

one side clip. Pull the front cover lens round to the second side clip and clip in place. This action requires 

some pressure to ensure that the gasket on the front cover lens has the desired effect.

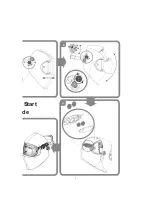
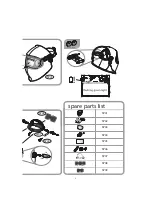
Replacing the batteries (p. 3)

The cartridge has replaceable Lithium button cell batteries, type CR2032. If you are using a welding helmet 

with a fresh air connection, you must remove the face seal before replacing the batteries. The batteries 

must be replaced when the LED on the cartridge flashes in green.

1.  Carefully remove the battery cover

2.  Remove the batteries and dispose of them in accordance with the national regulations for special waste

3.  Insert CR2032 type batteries, as shown

4.  Carefully replace the battery cover

If the shade cartridge does not darken when the welding arc is ignited, please check battery polarity. 

To check whether the batteries still have sufficient power, hold the shade cartridge against a bright 

lamp. If the green LED flashes, the batteries are empty and must be replaced immediately. If the shade 

cartridge does not operate correctly in spite of correct battery replacement, it must be declared unusable 

and must be replaced.

Removing/installing the cartridge (p. 6)

1.  Pull out the protection level knob

2.  Carefully remove the battery cover

3.  Unlock the cartridge retention spring as shown

4.  Carefully tilt the cartridge out

5.  Unlock the satellite as shown

6.  Pull the satellite out through the gap in the helmet

7.  Rotate the satellite by 90° and push through the hole in the helmet

8.  Remove / replace the shade cartridge

The cartridge is installed in the reverse order.

Troubleshooting

Cartridge does not darken

ĺ$GMXVWVHQVLWLYLW\S

ĺ&KDQJHWKHVHQVRUVOLGHUSRVLWLRQS

ĺ&OHDQVHQVRUVRUIURQWFRYHUOHQV

ĺ'HDFWLYDWHJULQGLQJPRGHS

ĺ&KHFNWKHOLJKWIORZWRWKHVHQVRU

ĺ5HSODFHWKHEDWWHULHVS

Protection level too bright

ĺFKRRVHDORZHUVKDGHOHYHOS

Protection level too dark

ĺFKRRVHDKLJKHUVKDGHOHYHOS

ĺ&OHDQRUUHSODFHIURQWFRYHUOHQVS

Cartridge flickers

ĺ$GMXVWSRVLWLRQRIWKHGHOD\NQRESRQZHOGLQJSURFHGXU

ĺ5HSODFHWKHEDWWHULHVS

Poor vision

ĺ&OHDQWKHIURQWFRYHUOHQVRUFDUWULGJH

ĺ,QFUHDVHWKHDPELHQWOLJKW

ĺ$GMXVWWKHSURWHFWLRQOHYHOWRWKHZHOGLQJSURFHGXUH

Welding helmet slips

ĺ$GMXVWWLJKWHQWKHKHDGEDQGS

Specifications

(We reserve the right to make technical changes)

Shade Level 

SL2.5 (light mode)       SL8 – SL12 (dark mode)

UV/IR protection

Maximum protection in light and dark modes

Switching time from light to dark

ȝVƒ&ƒ)ȝVƒ&ƒ)

Switching time from dark to light

0.05 - 1.0s

Dimensions of cartridge

90 x 110 x 7mm / 3.55 x4.33 x 0.28“

Dimensions of field of vision

50 x 100mm / 1.97 x 3.94“

Power supply

Solar cells, 2 pcs. LI batteries 3V replaceable (CR2032)

Weight

500g / 17.637 oz

Operating temperature

-10°C – 70°C / 14°F – 157°F

Storage temperature

-20°C – 80°C / -4°F – 176°F

Classification as per EN379

Optical class = 1       Light scatter = 1

Homogeneity = 1     Angle of vision dependency = 2

Standards

CE, ANSI Z87.1, compliance with CSA Z94.3

Spare parts (p. 6-7)

-Helmet without cartridge (SP01) 

-Repair set 1 (Potentiometer knob, Sensitivity

-Cartridge incl. satellite (SP02) 

  knob, Battery cover) (SP06)

-Front cover lens (SP03) 

-Head band with fastener (SP07)

-Repair set 2 (SP04) 

-Sweat band (SP08 / SP09)

-Inner protection lens (SP05)

For detailed article number see inside cover of this manual (2nd last page).

Declaration of conformity

See internet link adress at last page.

Legal information

This document complies with the requirements of EU regulation 2016/425 point 1.4 of Annex II.

Notified body

See last page for detailed information.

English

Summary of Contents for Powershield 2.5

Page 1: ...Manual ...

Page 2: ...2 Notes ...

Page 3: ...S 17 NEDERLANDS 18 SUOMI 19 DANSK 20 NORSK 21 POLSKI 22 ČEŠTINA 23 PYCCKNN 24 㠖 25 MAGYAR 26 TÜRKÇE 27 ȻɔɅȽȺɊɋɄɂ 29 ǼȁȁǾȃǿȀǹ 28 SLOVENSKY 30 SLOVENSKO 31 ROMÂNĂ 32 EESTI 33 LIETUVIŠKAI 34 LATVIEŠU 35 ଛ ߪ 36 FUNCTIONS 4 SPARE PARTS 6 QUICK START GUIDE 2 SPARE PARTS 39 HRVATSKI 37 ...

Page 4: ...4 Quick Gui 1 2 6 5 ...

Page 5: ...5 CR 2032 Li Mn 3V CR 2032 Li Mn 3V CR 2032 Li Mn 3V CR 2032 Li Mn 3V Start de 4 3 ...

Page 6: ...NG SHADE LEVEL PUSH GRIND functions and settings Choose Shade Number SL 8 12 GRIND ON OFF 1 2 Shade Shade Gri n d o n o ff G r i n d o n o ff flashing red light 10 min Gri n d o n o ff G r i n d o n o ff 2 5 5 12 1 1 1 2 EN 379 Choose Shade Number SL 8 12 ...

Page 7: ...Sensitivity Sensitivity Super High Sensitivity SENSOR SLIDE Choose Delay swiss made Delay switch Sensitivity SETTING DELAY 2 5 5 12 1 1 1 2 EN 379 ANSI Z87 W2 5 8 12 AS NZS 1338 1 complies with CSA Z94 3 ...

Page 8: ...ens III IV adjust headband cartridge 2 spare parts I II 2 5 5 12 1 1 1 2 EN 379 ANSI Z87 W2 5 8 12 AS NZS 1338 1 complies with CSA Z94 3 2 5 5 12 1 1 1 2 EN 379 ANSI Z87 W2 5 8 12 AS NZS 1338 1 complies with CSA Z94 3 SP02 SP03 SP08 SP05 ...

Page 9: ...9 battery change CR 203 2 Li M n 3V CR 203 2 Li M n 3V CR 2032 Li Mn 3V CR 2032 Li Mn 3V 1 4 spare parts list SP01 SP06 SP05 SP04 SP03 SP02 SP09 SP08 SP07 SP01 SP04 SP07 SP09 ...

Page 10: ...5 4 6 7 Schutzstufentabelle EN169 Shade level chart EN169 Tableau des niveaux de protection EN169 Tabella dei livelli di protezione EN169 Hersteller Nummer der Norm Mittlere Stossenergie Manufacturer Number of the standard Medium energy impact Impacts moyenne énergie Numero della norma Impatto media energia Kennzeichnung Helmschale Marking helmet shell Marquages masque Marcaggi maschera OS 175 B C...

Page 11: ...bytheredflashingLED p 4 insidethehelmet Todeactivategrindingmode press theGrindbuttonlevelknobagain After10minutes thegrindingmodeisautomaticallyreset 5 Sensitivity Use the sensitivity knob p 5 to set the ambient light sensitivity The position Super High isthestandardsensivitysetting Byturningtheknob thesecanbecustomized Inthe Super High areathemaximumlightsensitivitycanbeachieved 6 Sensor slider ...

Page 12: ...4 rougeclignotante situéeàl intérieurdumasque Pour désactiver le mode meulage réappuyez sur le bouton de réglage du degré de protection Le modemeulageestautomatiquementréactivéaprès10minutes 5 Sensibilité Le bouton de réglage de la sensibilité p 5 permet de régler la sensibilité à la lumière ambiante Le point rouge sur l échelle de réglage représente la sensibilité recommandée pour une situationst...

Page 13: ...r Schleifmodus schaltet automatisch nach10Minutenaus 5 Empfindlichkeit MitdemEmpfindlichkeitsknopf S 5 wirddieUmgebungslichtempfindlichkeiteingestellt DieGrenzezu SuperHigh entsprichtderStandardeinstellung DurchdrehendesDrehknopfeskanndiese individuellangepasstwerden ImBereich SuperHigh wirdeinesehrhoheLichtempfindlichkeiterreicht 6 Sensorschieber DerSensorschieberkannaufzweiunterschiedlichePositi...

Page 14: ...ägetautomatiskt 5 Känslighet Medknappenförkänslighet s 5 kanduställainkänslighetföromgivningsljus Gränsen för Super High området är standardinställning för ljuskänslighet Genom att vrida på ratten kan dettaavpassas Inom SuperHigh områdetkanmaximalljuskänslighetuppnås 6 Sensorreglage Sensorreglaget kan sättas i två olika positioner Allt efter position förminskas s 5 eller förstoras s 5 vinkeln för ...

Page 15: ...andolamanopolasi puòpersonalizzarelasensibilità Nell area SuperHigh siraggiungeunasensibilitàmassimaallaluce 6 Cursoredelsensore Ilcursoredelsensorepuòesserecollocatoindueposizionidiverse Asecondadella posizionel angolodiriconoscimentodellaluceambientalevienediminuito p 5 oaumentato p 5 pertanto lacassettareagisceallafontedilucecircostanteinmanierapiùomenointensa 7 Interruttoreperl apertura L inte...

Page 16: ...respectodelaluzdelambientemedianteelpomoderegulación desensibilidad p 5 Elbordeelárea SuperHigh súperalta eselajustedesensibilidadestándar Algirarelbotón sepuedenpersonalizarestosvaloresdesensibilidad Enelárea SuperHigh sepuedelograrunasensibilidad máximaalaluz 6 Cursor del sensor El cursor del sensor tiene dos posiciones diferentes Según la posición seleccionada se disminuye p 5 oaumenta p 5 elán...

Page 17: ...modus deesmerilagemdesligar se áautomaticamente 5 Sensibilidade Comobotãodasensibilidade p 5 pode seregularasensibilidadeàluzdoambiente A fronteiradeárea de SuperAlta éaconfiguraçãostandarddasensibilidade Aogirarobotão estespodem sercustomizados Naárea superalta asensibilidademáximadeluzpodeserconseguida 6 Comutadordesensores Ocomutadordesensoresajusta seemduasposiçõesdiferentes Consoante aposição...

Page 18: ...gsfactorknopindrukken Na10minuten wordtdeslijpmodusautomatischteruggezet 6 Gevoeligheid Metdegevoeligheidsknop p 5 wordtdeomgevingslichtgevoeligheidingesteld Delimietvan het SuperHigh bereikkomtovereenmetdenormalegevoeligheidsinstelling Dezekanaangepastworden dooraandeknoptedraaien Inhet SuperHigh bereikkanereenmaximalelichtgevoeligheidbereiktworden 7 Sensorschuif Desensorschuifkanoptweeverschille...

Page 19: ...kyydenympäristönvaloisuuteensäädätherkkyydensäätönupilla S 5 Herkkyyden oletusasetus on Super High alueen rajalla Asetuksia voi muuttaa kääntämällä säädintä Super High alueellasaavutetaanmaksimaalinenherkkyysvalolle 6 Tunnistinluisti Tunnistinluistin on säätää kahteen eri asentoon Asennosta riippuen ympäristön valon tunnistuksen kulma joko kapenee S 5 tai levenee S 5 ts kasetti reagoi voimakkaammi...

Page 20: ...inutterdeaktiveresslibetilstandenautomatisk 5 Følsomhed Hjelmensfølsomhedoverforomgivelseslysindstillesvedhjælpafknappentiljustering affølsomheden s 5 Grænsenved SuperHigh områdeterstandardfølsomhedsindstilling Vedat drejepåhåndtaget kandissetilpasses Maksimallysfølsomhedkanfindesi SuperHigh området 6 Sensorskyder Sensorskyderen kan indstilles til to forskellige positioner Afhængig af positionen r...

Page 21: ... Etter10minuttenblirslipemodusenautomatisktilbakestilt 5 Sensitivitet Medsensitivitetsknappen s 5 stillesomgivelseslysetinn Grensenfor SuperHigh områdeterinnstillingenforstandardfølsomhet Dissekantilpassesvedåvripåbryteren I Super High områdetkandetoppnåsenmaksimallysfølsomhet 6 Sensorbryter Sensorbryterenkanstillespåtoulikeposisjoner Avhengigavposisjonenreduseres s 5 eller økes s 5 vinkelen for r...

Page 22: ...QD F HUZRQR GLRG LH V ZHZQąWU SU áELF FHOX Z áąF HQLD WU EX V OLIRZDQLD QDOHĪ SRQRZQLH QDFLVQąü SU FLVN VWRSQLD RFKURQ 3R XSá ZLH PLQXW trybszlifowaniazostaniezresetowanyautomatycznie 5 XâRğý D SRPRFą SU FLVNX SR LRPX F XáRĞFL V PRĪQD GRVWRVRZDü F XáRĞü QD ĞZLDWáR RWRF HQLD UDQLFD Ä6XSHU LJK MHVW XVWDZLHQLHP GRP ĞOQ P 3U HNUĊFDMąF SRNUĊWáR ZDUWRĞFL WH PRĪQD LQG ZLGXDOQLH GRVWRVRZDü REV DU H Ä6XSHU...

Page 23: ...YXMH D ĤVWiYi VYČWOi NWLYRYiQt UHåLPX EURXãHQt MH LQGLNRYiQR þHUYHQČ EOLNDMtFt NRQWURONRX V XYQLWĜ NXNO UXãHQt UHåLPX EURXãHQt GRViKQHWH RSČWRYQêP VWLVNQXWtP YROLþH VWXSĖĤ RFKUDQ 5HåLP EURXãHQt VH Y SQH RSČWRYQêP VWLVNQXWtP YROLþH VWXSĖĤ RFKUDQ WODþtWNR Ä ULQG 3R PLQXWiFK VH UHåLP EURXãHQt UXãt DXWRPDWLFN 5 Citlivost QRIOtNHP FLWOLYRVWL V VH QDVWDYXMH FLWOLYRVW QD RNROQt VYČWOR UDQLFH VXSHUY VRNp ...

Page 24: ...ɢɥɶɬɪɚ ɢɡ ɬɟɦɧɨɝɨ ɩɨɥɨɠɟɧɢɹ ɜ ɫɜɟɬɥɨɟ ɨɬ ɞɨ ɫɟɤɭɧɞ 7 ɂɛɟɠɫɡɥɛ ɝɶɬɝɠɭɦɠɨɣɺ ɬɝɠɭɩɯɣɦɷɭɫɛ Ʉɨɝɞɚ ɧɚɫɬɪɨɣɤɚ Ɂɚɞɟɪɠɤɢ ɨɬɤɪɵɜɚɧɢɹ ɜɵɫɜɟɬɥɟɧɢɹ ª ɭɫɬɚɧɨɜɥɟɧɚ ɧɚ ɦɚɤɫɢɦɭɦɟ ɞɨɫɬɢɝɚɟɬɫɹ ɷɮɮɟɤɬ ɩɥɚɜɧɨɝɨ ɜɵɫɜɟɬɥɟɧɢɹ ɪɟɠɢɦ ɋɭɦɟɪɟɱɧɵɣª ɤɨɬɨɪɵɣ ɡɚɳɢɳɚɟɬ ɝɥɚɡɚ ɨɬ ɩɪɨɞɨɥɠɚɸɳɟɝɨɫɹ ɹɪɤɨɝɨ ɢɡɥɭɱɟɧɢɹ ɫɜɚɪɨɱɧɨɝɨ ɲɜɚ ɤɨɝɞɚ ɫɜɚɪɤɚ ɩɪɟɤɪɚɳɚɟɬɫɹ Ɉɞɧɚɤɨ ɚɤɬɢɜɢɪɨɜɚɜ ɷɬɨɬ ɪɟɠɢɦ ɧɟ ɢɫɩɨɥɶɡɭɣɬɟ ɪɟɠɢɦɵ ɫɜɚɪɤɢ ɧɟɛɨɥɶɲɢɦɢ ɢɧɬɟɪɜɚɥɚɦ...

Page 25: ...㒊ศ㸪 እ ᡝ ⓗ㜵 ࠋ䃱᥋微 憱ᨺⓗᚤ 崏ྍ య崏ⓗே 㐀ᡂ 微ᩄ ࠋᮦᩱ᥋ゐ ᥋ゐྍ ᘬ ⓗ ឤ 微ᩄ ࠋ 䃱 ᥋ಖ 㠃 ྈ ᅾ䃱᥋ 㗝 㸪 ᚓ ன ࠋዴᯝᮍᑗ䃱᥋ಖ 㠃 ன妫ᐃ ⓗ㸪ᡈ 㗝 㑂Ᏺᮏ సᣦ༡㸪2SWUHO ᴫ ᢎᢸ ఱ崊 ࠋ富㠃 ன㝖ẻ䃱 ග䃱 அእⓗᡤ ᖖ妨䃱᥋᪉ἲࠋ寞ᝍὀពᑒ㠃ୖ౫ᤣ 1 ⓗ᥎Ⲧಖ 于ࠋ ఇ ᶍᘧ 㜵 ල ຌ 㸪ᥦ㧗 ᑑ ࠋዴᯝ ᑕ 㜵 ⓗග ᗘᣢ ศ ᑠன X 㜵 ࠋせ 㔜᪂᥋ 㜵 㸪ᚲ桢宐ኴ㜶 䔜ụཷ ග亦ⓗ 㗝旛 ᑕࠋ ዴᯝ㜵 ἲ ḟ άᡈ ᅾᘬ 䃱ᘼ㗝 ᬯ㸪 ᚲ桢 䔜ụࠋ ಖಟ 寡 ಖಟ᮲Ḱ寞妨 2SWUHO ᮏᅜ擧 享亮ⓗᣦ ࠋ寍亭ಙᜥ寞ဆ寉 2SWUHO 亶擧ၟࠋ ಖಟẬ㝈னᮦ ᩱ ไ㐀 㝢ࠋ ன ன ᙜࠊ㠀ἲ ᨵᡈ ன㠀ไ㐀ၟ妫ᐃ ᘬ ⓗ ᆗ㸪ᴫ ᥦ౪ಖಟ㸪ஓ ᢎᢸ ఱ崊 ࠋዴᯝ 㠀 2SWUHO 擧 ⓗ 㸪2SWUHO ྠ㠞 ᥦ౪ಖಟ...

Page 26: ... környezeti fényre való érzékenység beállítása A Super High zóna szélére esik az érzékenység standard beállítása A JRPE HOIRUGtWiViYDO H W EH OHKHW iOOtWDQL D HJ pQL LJpQ HNQHN PHJIHOHOĘHQ 6XSHU LJK yQiEDQ pUKHWĘ HO D PD LPiOLV IpQ pU pNHQ VpJ 6 eU pNHOęV DEiO R y pU pNHOĘV DEiO R y NpW N O QE Ę SR tFLyED iOOtWKDWy SR tFLyWyO I JJĘHQ D N UQ H HWL IpQ pU pNHOpVpQHN V JH FV NNHQ R YDJ QĘ R D D D ND ...

Page 27: ...QDQ NÕUPÕ Õ V ÕúÕ ÕQGDQ DQODúÕOÕU ÕPSDUD PRGXQXQ NDSDWÕOPDVÕ LoLQ HQLGHQ NRUXPD GHUHFHVL G PHVLQH EDVÕQÕ GDNLND VRQUD ÕPSDUD PRGX RWRPDWLN RODUDN NDSDQÕU 5 Hassasiyet DVVDVL HW G PHVL V LOH oHYUHVHO ÕúÕN KDVVDVL HWL D DUODQÕU 6XSHU LJK DODQÕQÕQ VÕQÕUÕ VWDQGDUW GX DUOÕOÕN D DUÕGÕU PH L oHYLUHUHN EXQODU HOOHúWLULOHELOLU 6XSHU LJK DODQÕQGD PDNVLPXP ÕúÕN GX DUOÕOÕ Õ HOGH HGLOHELOLU 6 Sensörsürgüsü 6HQ...

Page 28: ...ȡȩʌȠȢ ȜİȚIJȠȣȡȖȓĮȢ IJȡȠȤȓıȝĮIJȠȢ ĮȞĮȖȞȦȡȓȗİIJĮȚ ȝİ IJȘȞ țȩțțȚȞȘ ĮȞĮȕȠıȕȒȞȠȣıĮ ijȦIJȠįȓȠįȠ ı ıIJȠ İıȦIJİȡȚțȩ IJȠȣ țȡȐȞȠȣȢ īȚĮ IJȘȞ ĮʌİȞİȡȖȠʌȠȓȘıȘ IJȠȣ IJȡȩʌȠȣ ȜİȚIJȠȣȡȖȓĮȢ IJȡȠȤȓıȝĮIJȠȢ ʌĮIJȒıIJİ ȟĮȞȐ IJȠ țȠȣȝʌȓ IJȦȞ ȕĮșȝȓįȦȞ ʌȡȠıIJĮıȓĮȢ ȂİIJȐ ȜİʌIJȐ ĮțȣȡȫȞİIJĮȚ ĮȣIJȩȝĮIJĮ IJȠ IJȡȩʌȠȢ ȜİȚIJȠȣȡȖȓĮȢ IJȡȠȤȓıȝĮIJȠȢ 5 ǽȤįțIJȚșIJȔį Ȃİ IJȠ țȠȣȝʌȓ İȣĮȚıșȘıȓĮȢ ı ȡȣșȝȓȗİIJĮȚ Ș İȣĮȚıșȘıȓĮ IJȠȣ ʌİȡȚȕȐȜȜȠȞIJȠȢ ȉȠ ʌİȡȓȖȡĮȝȝĮ IJȘȢ ʌİȡȚȠȤȒȢ 6XSHU LJKª...

Page 29: ...ɜɨ ɧɚ ɡɚɳɢɬɚɬɚ ɋɥɟɞ ɦɢɧɭɬɢ ɪɟɠɢɦɴɬ ɧɚ ɲɥɚɣɮɚɧɟ ɫɟ ɢɡɤɥɸɱɜɚ ɚɜɬɨɦɚɬɢɱɧɨ 5 ɒɮɝɬɭɝɣɭɠɦɨɩɬɭ ɋ ɱɭɜɫɬɜɢɬɟɥɧɨɫɬ ɤɨɩɱɟɬɨ ɫɬɪ ɡɚ ɨɤɨɥɧɚ ɫɜɟɬɥɢɧɚ ɱɭɜɫɬɜɢɬɟɥɧɨɫɬɬɚ ɟ ɧɚɫɬɪɨɟɧɚ Ƚɪɚɧɢɰɚ ɫ 6XSHU LJK ɟ ɧɚɫɬɪɨɣɤɚɬɚ ɩɨ ɩɨɞɪɚɡɛɢɪɚɧɟ ɑɪɟɡ ɡɚɜɴɪɬɚɧɟ ɧɚ ɤɥɸɱɚ ɬɨɜɚ ɦɨɠɟ ɞɚ ɫɟ ɩɟɪɫɨɧɚɥɢɡɢɪɚ ȼ 6XSHU LJK ɟ ɩɨɫɬɢɝɧɚɬɚ ɦɧɨɝɨ ɜɢɫɨɤɚ ɱɭɜɫɬɜɢɬɟɥɧɨɫɬ ɤɴɦ ɫɜɟɬɥɢɧɚ 6 Ɋɦɵɢɞɛɲ ɢɛ ɬɠɨɢɩɫɣɭɠ ɉɥɴɡɝɚɱɴɬ ɡɚ ɫɟɧɡɨɪɢɬɟ ɦɨɠɟ ɞɚ ɫɟ ɧɚɫɬɪɨɣɜ...

Page 30: ...WiYD Y UHåLPH RVYHWOHQLD NWLYRYDQê UHåLP EU VHQLD VD REUD XMH SRPRFRX þHUYHQHM EOLNDM FHM V YR YQ WUL SULOE N FKFHWH Y SQ Ģ UHåLP EU VHQLH QRYX VWODþWH WODþLGOR Ä ULQG 3R PLQ WDFK VD UHåLP EU VHQLD DXWRPDWLFN UHVHWXMH 5 LWOLYRVģ 1D QDVWDYHQLH FLWOLYRVWL YRþL RNROLWpPX VYHWOX SRXåLWH JRPEtN FLWOLYRVWL V UDQLFRX REODVWL Ä6XSHU LJK MH ãWDQGDUGQp QDVWDYHQLH FLWOLYRVWL 2WiþDQtP JRPEtND MH PRåQp LFK SUL...

Page 31: ... VYHWOHP QDþLQX NWLYLUDQL QDþLQ EUXãHQMH MH R QDþHQ XWULSDMRþLP UGHþLP V Y þHODGL D GHNDWLYLUDQMH QDþLQD EUXãHQMD SULWLVQLWH JXPE D QLYR DãþLWH 3R PLQXWDK VH QDþLQ EUXãHQMH VDPRGHMQR SRQDVWDYL 5 2EÿXWOMLYRVW D QDVWDYLWHY REþXWOMLYRVWL RVYHWOLWYH RNROMD XSRUDELWH JXPE D REþXWOMLYRVW V 9UHGQRVW QDVWDYLWYH 6XSHU LJK MH SULY HWD QDVWDYLWHY REþXWOMLYRVWL 3ULODJRGLWH MR ODKNR REUDþDQMHP JXPED 2EPRþMH 6X...

Page 32: ...QWUX SROL DUH HVWH UHVHWDW vQ PRG DXWRPDW 5 Sensibilitate RORVLĠL EXWRQXO GH VHQVLELOLWDWH S SHQWUX D GHWHUPLQD VHQVLELOLWDWHD OD OXPLQD DPELHQWDOă UDQLĠD RQHL Ä6XSHUULGLFDW HVWH VHWDUHD GH VHQVLELOLWDWH VWDQGDUG 3ULQ URWLUHD EXWRQXOXL DFHVWHD SRW IL SHUVRQDOL DWH ÌQ RQD Ä6XSHU LJK VH SRDWH UHDOL D R VHQVLELOLWDWH PD LPă OD OXPLQă 6 Butonglisantsenzor XWRQXO JOLVDQW DO VHQ RUXOXL SRDWH IL IL DW vQ...

Page 33: ...P GXPLVHO OlKWHVWDWDNVH OLKYLPLVUHåLLP DXWRPDDWVHOW 5 Tundlikkus Ümbritsevavalgustundlikkusemääramisekskasutagetundlikkusnuppu p 5 Super High ala piir on standardne valgustundlikkuse seadistus Piire saab seadistada nuppu keerates SuperHigh alassaabsaavutadamaksimaalsevalgustundlikkuse 6 Anduriliugur Anduriliuguritsaabseadistadakahteeriasendisse Olenevaltasendistvähendatakse p 5 võisuurendatakse p ...

Page 34: ... 3R PLQXþLǐ ãOLIDYLPR UHåLPDV DXWRPDWLãNDL DWVWDWRPDV 5 Jautris 1RUơGDPL QXVWDW WL LãRULQLR DSãYLHWLPR MDXWUƳ QDXGRNLWH MDXWULR UDQNHQơOĊ SVO WLQ DXNãWRV srities SuperHigh ribayrastandartinisjautrumonustatymas 6 XWLNOLǑ VODQNLNOLV XWLNOLǐ VODQNLNOƳ JDOLPD QXVWDW WL Ƴ GYL VNLUWLQJDV SDGơWLV 3ULNODXVRPDL QXR SDGơWLHV LãRULQLR DSãYLHWLPR DSWLNLPR NDPSDV VXPDåơMD SVO DUED SDGLGơMD SVO W NDVHWơ VWLSULD...

Page 35: ... RQDV UREHåD LU VWDQGDUWD MXWƯED LHVWDWƯMXPV 7R YDU SLHOƗJRW SDJULHåRW SRJX RQƗ 6XSHU LJK ƹRWL DXJVWV LHVSƝMDPV VDVQLHJW PDNVLPƗOR JDLVPDV MXWƯEX 6 HYƞMD VOưGQLV HYƝMD VOƯGQL YDU LHVWDWƯW GLYRV GDåƗGRV VWƗYRNƺRV WNDUƯEƗ QR VWƗYRNƺD DSNƗUWƝMƗV JDLVPDV QRWHLNãDQDV OHƼƷLV WLHN VDPD LQƗWV S YDL SDOLHOLQƗWV S SURWL NƗUWULGåV YDLUƗN YDL PD ƗN L WHLNVPƯJL UHDƧƝ X DSNƗUWƝMLHP JDLVPDV DYRWLHP 7 WYƞUäDQDV V...

Page 36: ... Ѱ ٗ ୯ ѰࡳԻ एֲ ʀѣ ࢵ ʃѦ ࢸ Ϡ ٱ ձ S ࢇࡈଜࠆ ʃѦձ ࢸଟ ܹ ݡ ТЬ ę6XSHU LJKĚࠒࠇ ۰ ফоࢂ ʃѦձ ࡶ ܹ ࡳֲ ࢊ ࢶࢉ ʃѦ ࠒࠇࢇएփ ࢸ Ϡ ٱ ձ ࢇࡈଜࠆ ʃѦձ ࢸ ଟ ܹ ݡ ТЬ ˁࢇ ࢂڂ Ϡষࢇ քࡶ ˁࡉ ʃѦձ ࢵʃ ִੁݤ ٙଗࡁଞ ८ ࡶ ࠖ ଜˈ ؑਫ਼չ ָܹࡶ ࠉࢠ ଟ ܹ ݡ ТЬ ݛ ۭ ӿࢄх ۰ ݞ ԂࢇшЕ ʦষ ɽѦձ ɼए ࠒࠇࡳԻ ࢠଜʠΟ ݤܕ ܹ ݡ ТЬ S ऌࠆ ݡ ɻ ࢵ ࠊս एࠉ Ϡ ٱ ձ S ࢇࡈଜࠆ ઝչएɼ ѿࡋ ۘ ۰ ࡵ ۘ Ի ࢷ ѸЕ ݤ ɾࡶ ট ۰ ট ए ࢸଟ ܹ ʯ ଜࠆ ߅ ࢂ ۘ զ ࡈࢻ ࢷզ ۰ Ͼࡶ ؿ ଟ ܹ ݡ ТЬ ۼ আ ܒ Ѥ ઝչएࠪ ଗਫ਼Е ࢽ ࢶࡳԻ ٕҖԜࡋ ঊࡳԻ Δଜʯ ЮʠΟ ߊ ࠠࡶ ࢇࡈଜࠆ ٕҖԡʯ Ю߅ ΰ ࡈی...

Page 37: ...HåLPD EUXãHQMD SRQRYQR SULWLVQLWH JXPE Ä ULQG 5HåLP EUXãHQMD VH QDNRQ PLQXWD DXWRPDWVNL LVNOMXþXMH 2VMHWOMLYRVW XPERP D RVMHWOMLYRVW 6 SRGHãDYD VH RVMHWOMLYRVW QD RNROQR VYMHWOR UDQLFD SUHPD 6XSHU LJK RGJRYDUD VWDQGDUGQRM SRVWDYFL 2NUHWDQMHP RNUHWQRJ JXPED WR VH PRåH LQGLYLGXDOQR SRGHVLWL 8 SRGUXþMX 6XSHU LJK SRVWLåH VH YUOR YHOLND RVMHWOMLYRVW QD VYMHWOR OL Dþ VHQ RUD OL Dþ VHQ RUD VH PRåH SRVWDY...

Page 38: ...38 Notes ...

Page 39: ...39 ...

Page 40: ...ato Salgsdato Data sprzedaĪy Datum prodeje Eladási dátum SatȚú Zarihi 䬢䬽 ଔ 䭡 ᘒ Serial No No de série Serien Nr Serienr No di serie Núm de serie N de séreie Serienr Sarjanro Serienr Serie nr Numer serri Èislo série Sorozatszám Seri Nr 䭾䮱䭩䮲䬹 䬓 Notifiedbody 1883 ECSGmbH EuropeanCertificationService Hüttfeldstrasse50 DE73430Aalen Germany ANSI compliancewithCSAZ94 3 15 EWM AG Dr Günter Henle Strasse 8 ...

Reviews: