EPSON Stylus COLOR C70/C80
Revision A
Adjustment
Adjustment
140
5.2 Adjustment
This section describes the procedure for each adjustment. Be sure to observe the
CAUTION and tables in Section 5.1.1 before starting adjustments.
5.2.1 Setup the Adjustment Program
Perform the setup operation, which is required prior to actual adjustment operation, by
following the steps below.
1.
Connect the PC and printer with parallel or USB cable.
2.
Turn the printer on.
NOTE:
To prevent unexpected trouble at setup, wait until the printer completes
the power on initialization. Once you encounter the communication error
at setup, please accede to following steps to prevent the same mistake.
2-1. Turn the printer off.
2-2. Disconnect the AC cable from the AC socket, and connect the AC
cable again.
2-3. Turn the printer on. Printer will enter the power on initializing
operation unmistakably.
3.
Execute the adjustment program (SC807010E_Win98.exe or Win95.exe) attached
to the service manual for the Stylus C70/C80.
4.
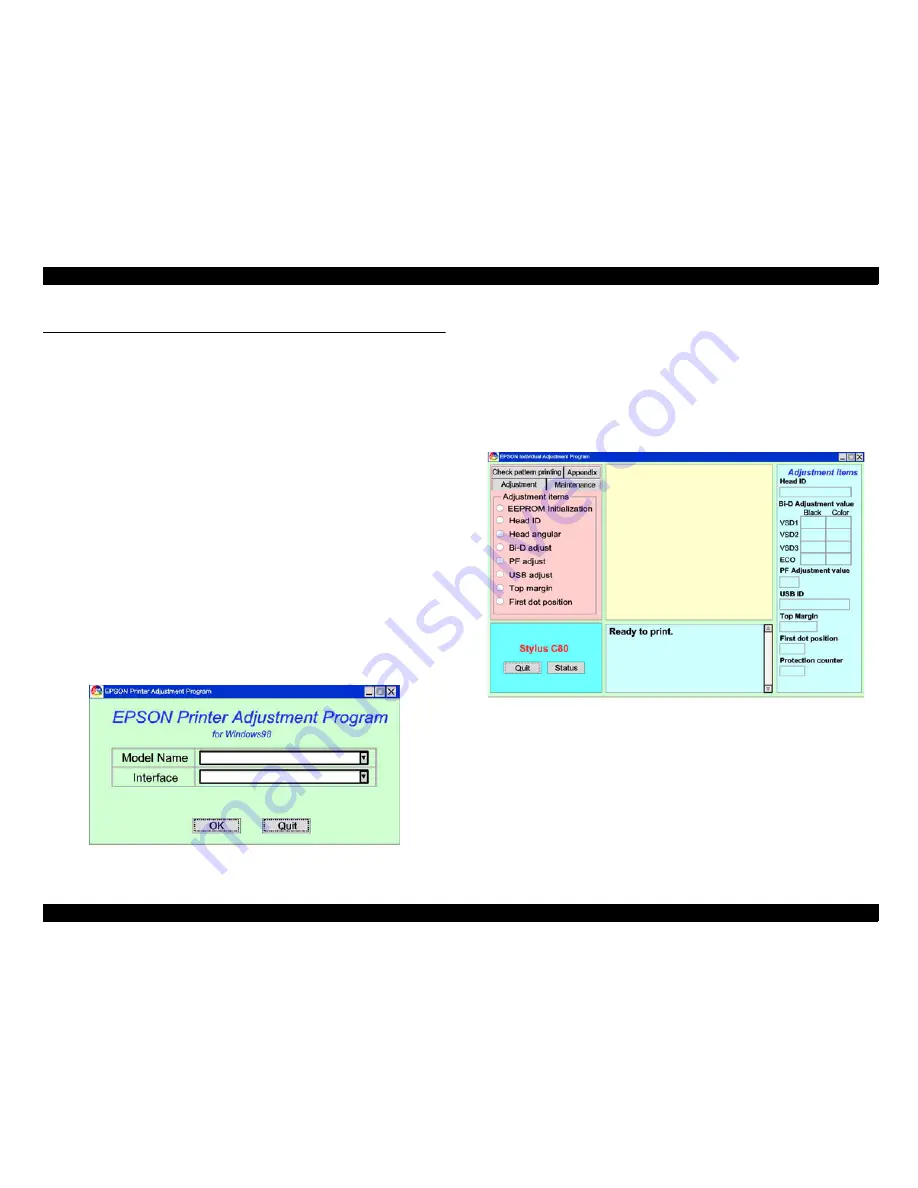
The following screen appears.
Figure 5-1. Initial Screen of Stylus C70/C80 Adjustment Program
5.
Click the "Model Name" frame, and select either Stylus C80 or Stylus C70.
6.
Click the "Interface" frame, and select your target interface port.
(Selectable ports are LPT1 to 3, and EPUSB1 to 3.)
NOTE:
There is no destination setting regardless of Stylus C80 or C70 at this
time. All default settings excepting adjustment parameter can be
registered by using "EEPROM initialization".
7.
Press OK button, then the following main screen appears.
Figure 5-2. Main Screen
Summary of Contents for Stylus Color C70
Page 1: ...EPSONStylusColorC70 C80 Color Inkjet Printer SEIJ01 004 SERVICE MANUAL ...
Page 5: ...Revision Status Revision Issued Date Description A July 31 2001 First Release ...
Page 9: ...C H A P T E R 1 PRODUCTDESCRIPTION ...
Page 35: ...C H A P T E R 2 OPERATINGPRINCIPLES ...
Page 60: ...C H A P T E R 3 TROUBLESHOOTING ...
Page 96: ...C H A P T E R 4 DISASSEMBLYANDASSEMBLY ...
Page 137: ...C H A P T E R 5 ADJUSTMENT ...
Page 169: ...C H A P T E R 6 MAINTENANCE ...
Page 182: ...C H A P T E R 7 APPENDIX ...
Page 214: ......
Page 215: ......
Page 216: ......


