Configuration
Entek IRD 6666 and 6667 Protection Monitors
13
Below is an example of these steps, describing the process to change the Alert setpoint for
channel 1 of the monitor. You use similar steps to change the value for any of the options in
a menu.
1.
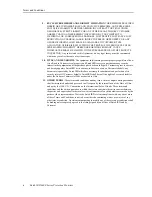
Press and hold the two Arrow buttons to display the User menu. Note that the first
option of the menu is highlighted. This means it appears in green text on a black
background (inverse video) on the monitor display.
Use the Up Arrow or Down Arrow button to move the highlight to ALM 1-3. Press
the SEL button to select the ALM 1-3 option.
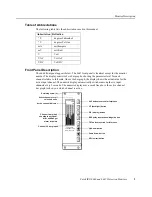
2.
The ALM 1-3 menu appears.
Press the SEL button to select the ALERT 1 option.
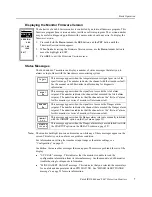
3.
The screen for the ALERT 1 option appears. The black bar indicates zero, and the
dashes indicate the alarm levels relative to the full scale bar graph.
Use the Up or Down Arrow buttons to change the current value for the Alert setpoint
for channel 1. If you press and release an Arrow button, it changes the value by one
step. If you press and hold an Arrow button, it continues to change the value while you
hold the button. The longer you hold the Arrow button, the faster the value changes.
If the current value does not change when you press the Arrow buttons, the monitor is
protected by the link security feature. Contact your Supervisor for assistance. For more
information on the link security feature, contact Entek IRD Customer Support.
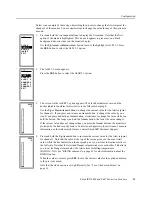
4.
Press and hold the Up Arrow button to increase the current value for the Alert setpoint
for channel 1. Note that the value at the top of the screen gives you the exact Alert
value, while the line indicator on the bar graph gives you a visual indication relative to
the full scale. Note that the Alert and Danger setpoints can cross each other. This allows
you to set the Danger alarm below the Alert alarm for falling temperatures
(RISING = NO). See “RISING submenu” on page 25 for more information about the
RISING option.
When the value is correct, press SEL to save the current value for the option and return
to the previous menu.
Note that the clock option is set up differently. See “To set the date and time” on
page 16.
CLOCK
ALM 4-6
INHIBIT
EXIT
SET
ALM 1-3
DANGER1
ALERT 2
DANGER2
ALERT 3
DANGER3
EXIT
SET
ALERT 1
90.00
o
F
95.00
o
F


