background image

121

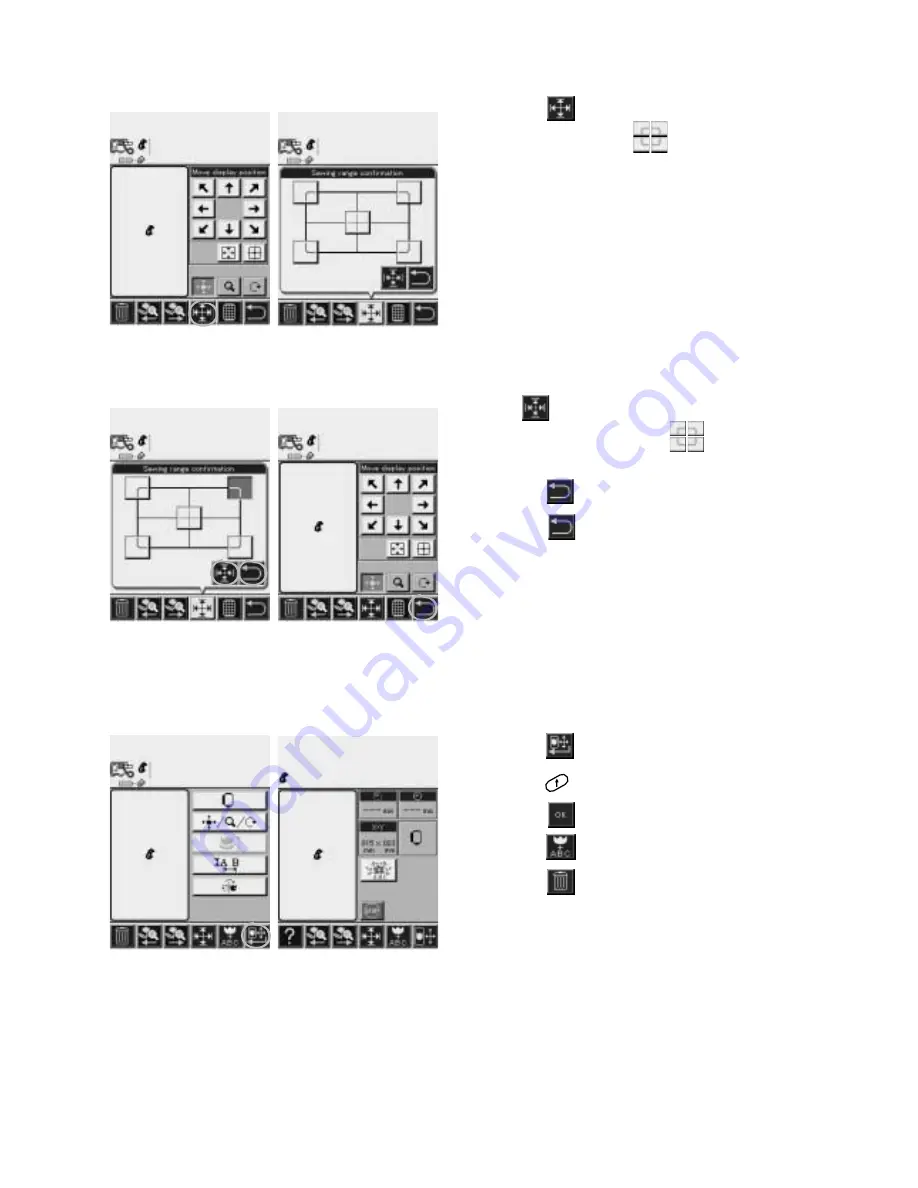
Sewing Range

5.

Touch key. 

Touch all four of the 

keys to quickly

preview boundaries of embroidery. 

Touch

key. 

Touch or touch and hold a 

key to slowly

preview boundaries of embroidery.

Touch key.

Touch key.

Final Layout

6.

Touch key.

7.

Press 

key and sew E.

8.

Touch key. 

Touch 

key to make a new selection.

Touch 

key to delete E.

Summary of Contents for XQUISIT 2

Page 1: ...I N S T R U C T I O N M A N U A L 09 04 English Elna International Corp SA Printed in JAPAN www elna com...

Page 2: ...ibed in this manual Use only attachments recommended by the manufacturer as described in this manual 3 Never operate this appliance if it has a damaged cord or plug if it is not working properly if it...

Page 3: ...nd Lock Reverse Key 35 36 SECTION III On Screen Manual Sewing Instruction Screens 37 Machine Usage Screens 38 39 Version and Update Data 39 Personalized Machine Settings 40 41 SECTION IV Sewing Techni...

Page 4: ...bric 113 Embroidery Frames 114 Securing Fabric in Frame Hoop 114 Attaching Frame Hoop 115 Removing Frame Hoop 115 Embroidering Small Areas 115 SECTION VII Embroidering Embroidering a Single Design 116...

Page 5: ...n cover 19 Handle 20 Top accessory storage 21 Handwheel always turn towards you 22 Embroidery card insert slot 23 Serial port 24 Power light switch 25 LCD brightness control 26 Foot control socket 27...

Page 6: ...F Hemmer foot 20 I Satin stitch foot 21 Walking foot 22 Sewing on button foot 23 H Multi cord foot 24 Circular sewing attachment 25 Additional spool pin and felt 26 Scissors 27 Tweezers 28 Fabric mar...

Page 7: ...se the presser foot about 6 5 mm 1 4 higher than the normal up position for easy removal of presser feet for placement of heavy fabrics under the presser foot or for attaching removing embroidery fram...

Page 8: ...the needle catches only one or two fibers of the hem resulting in an invisible hemline E Automatic buttonhole foot Place button in foot to determine the buttonhole size The machine will automatically...

Page 9: ...g fabric from slipping or puckering Great for keeping quilt layers from shifting when sewing G Invisible zipper foot Using left needle position the grooves on the underside of the foot allow the stitc...

Page 10: ...pressure The weight and characteristics of your fabrics may require less pressure than the standard 3 pressure 1 Turn off power light switch 2 Open face cover 3 Insert screwdriver 4 Turn screw counter...

Page 11: ...of position for special sewing techniques such as free motion embroidery The feed dog must always be up for normal sewing Locate the feed dog lever on the front of the free arm Slide the lever either...

Page 12: ...2 01 and 3 01 and machine sews reverse straight stitches at a slower speed Release the key and machine stops Press and hold this key while sewing all other stitches and machine lockstitches backtacks...

Page 13: ...preventing tears and is especially suited for loose knits and interlock knits Not recommended for embroidery Denim the sharp tip effectively pierces densely woven fabrics such as denim and canvas Str...

Page 14: ...resser foot Press the key until needle is raised Turn off the power light switch Turn the needle clamp screw A counterclockwise to loosen Remove the needle from the clamp 2 Insert the new needle into...

Page 15: ...ot use extension cords or plug adapters Do not touch plug with wet hands Always turn off the power light switch first and then unplug from the electrical outlet Examples when leaving the machine unatt...

Page 16: ...and release it to rewind When the foot control is connected the key can be used only to stop the machine or wind bobbin NOTE Machine can be operated using only the key without connecting the foot cont...

Page 17: ...ol setting NOTE For best viewing of LCD screen be sure to sit directly in front of machine Index This machine provides an on screen instruction manual for sewing and embroidery techniques and machine...

Page 18: ...17...

Page 19: ...quence to memory See page 98 100 When embroidery unit is attached saves design s to memory See pages 131 133 Adjustment Key Changes thread tension stitch length stitch width needle position See pages...

Page 20: ...lighted yellow cuts needle and bobbin threads See pages 35 36 Stitch Width Needle Position Key Increases or decreases stitch width or changes needle position See page 33 Stitch Length Key Increases or...

Page 21: ...way bobbin case cover 3 Remove bobbin Winding Bobbin from Top Spool Turn on power light switch 1 Place spool of thread on spool pin Firmly attach large spool cap with small end towards small spool A o...

Page 22: ...bin winding shaft cover 5 Remove bobbin winding shaft from accessory box Place bobbin on shaft and attach shaft NOTE Use top winding bobbins only CAUTION Twin needle must be removed before winding bob...

Page 23: ...nding shaft cover NOTE Be sure to correctly wind the bobbin Incorrectly wound bobbins can result in jammed threads tension problems etc Inserting the Bobbin Turn off power light switch 1 Raise the pre...

Page 24: ...will go NOTE Some specialty threads will require manual threading Turn on power light switch and touch Welcome screen 2 Using both hands pull thread into groove of thread sensor guide 1 Lower presser...

Page 25: ...0 when using specialty needles twin hemstitch wing etc when using some specialty threads 1 Lower presser foot Press key until needle is raised Raise presser foot 2 Open face plate cover 3 Place spool...

Page 26: ...m right to left over the take up lever and down into the take up lever eye 8 Proceed down through lower thread guide 1 Slide thread to the right behind needle bar thread guide 2 Lower presser foot Clo...

Page 27: ...hread loop to the back to complete threading the needle eye 3 Release needle threader and hook will catch thread pulling it through the needle eye 2 Pivot needle threader as shown and hook will go thr...

Page 28: ...d Press key twice to pick up bobbin thread 2 Raise presser foot Pull on needle thread to draw up loop of bobbin thread 3 Slide 10 cm 4 of both threads to the back under presser foot NOTE It is not nec...

Page 29: ...nded foot or feet How to Access Utility Heirloom and Quilting Groups and Folders The stitches have been grouped together according to their characteristics The groups are identified by letters or lett...

Page 30: ...ter and group number plus the last stitch number in that folder For example the Utility group has 5 folders Folder 1 U 1 12 Folder 2 U 1 24 Folder 3 U 1 36 Folder 4 U 1 48 Folder 5 U 1 53 Touch key to...

Page 31: ...recommended foot or feet Starting to Sew Select Use standard metal foot A Raise presser foot and position fabric next to a seam allowance line on the needle plate See page 9 Pull threads under foot to...

Page 32: ...y while sewing Machine will sew in reverse until key is released After sewing is complete press key Both needle thread and bobbin thread are cut and needle moves to raised position Raise presser foot...

Page 33: ...fabric underside Look at the top needle thread A and bottom bobbin thread B of the stitch Notice that there are no gaps each stitch is smooth and even Touch key if key is not visible Tension is too lo...

Page 34: ...Key Select Touch key if key is not visible Touch key to increase stitch width A Touch key to decrease stitch width B Touch key to re set stitch width to pre programmed setting The straight stitches a...

Page 35: ...34 Stitch Length Key Select Touch key if key is not visible Touch key to increase stitch length A Touch key to decrease stitch length B Touch key to re set stitch length to pre programmed setting A B...

Page 36: ...verse Backtack Key OFF OFF No reverse or lockstitch Press and hold key Machine sews in reverse until key is released Machine stops sewing ON OFF No reverse or lockstitch Press and hold key Machine sew...

Page 37: ...ss key Machine sews lockstitch stops sewing and automatically cuts the threads OFF ON Sews lockstitch Press key Machine sews lockstitch and stops sewing OFF OFF No reverse or lockstitch Press key Mach...

Page 38: ...or sew a particular technique you can access the sewing instruction screens They are organized under stitches found in one of these three groups Utility U Heirloom H or Quilt Q The information on the...

Page 39: ...e a topic and touch corresponding key Shows chart on fabric thread and needle relationship Illustrates how to thread machine using automatic top threading system Illustrates how to thread machine manu...

Page 40: ...be threaded Version and Update Data Touch the key on the Machine Usage overview screen to check which version of software data is currently loaded Go to the Elna website at www elna com for the updat...

Page 41: ...three categories of options general traditional sewing and embroidery sewing NOTE All Embroidery Options are discussed on pages 150 152 Auto re sets all option screens to original factory settings OK...

Page 42: ...e key for the language you would like displayed on the screen Touch key NOTE The country where you purchase your machine will determine what languages are available Settlement of Communication Speed E...

Page 43: ...er foot towards the back and lower presser foot Begin sewing fastening threads if desired See page 31 Gently guide the fabric along seam allowance line Do not push or pull the fabric let it feed natur...

Page 44: ...elps when sewing many layers of fabric such as welt seams used to hem jeans For best sewing results always place fabric so you can sew up and over the seam rather than into the seam When the seam is r...

Page 45: ...e the best results 1 Decrease top thread tension 2 Set stitch length to 2 5 4 0 3 Sew two or more parallel rows leaving 5 cm 2 of top and bottom thread at the beginning and end of each row 4 Pull on t...

Page 46: ...a very durable result 1 Place fabric right sides together and sew seam 2 Trim off half of one of the seam allowances 3 Open the fabrics and press seam allowances to one side press wide edge over trim...

Page 47: ...t sides of fabric together and sew seam below zipper placement Make sure to reverse sew A the stitches directly below zipper placement 3 Increase stitch length to 5 0 and baste zipper opening closed P...

Page 48: ...o fabric Raise foot and open zipper Lower foot and sew 7 Close zipper and spread fabric flat with right side facing up Set stitch length to 5 0 and baste through opened seam allowance and zipper tape...

Page 49: ...d sew seam below zipper placement Make sure to reverse sew A the stitches directly below zipper placement 3 Increase stitch length to 5 0 and baste zipper opening closed Press seam and basting seam op...

Page 50: ...h right side pin and begin sewing from point A Pivot at point B 0 7 1 cm 1 4 3 8 to the left side of center seam and continue sewing 6 Attach foot with left side pin and begin sewing from point B Pivo...

Page 51: ...side of fabric zipper will be face down Place zipper tape 0 5 cm 3 16 from fabric edge Attach zipper foot B left side pin and sew through center of right side of zipper tape from top to bottom 2 Turn...

Page 52: ...abric under foot with right groove of foot over teeth Sew down length of zipper to slider Reverse sew A Right side of fabric 3 Pin and sew other side of zipper using same method but with left groove o...

Page 53: ...piral of hemmer foot Lower hemmer foot sew by lifting up the edge of fabric to keep it feeding smoothly NOTE Select with stitch width 1 0 2 0 for variation 1 Trim about 0 6 cm 1 4 from corners to redu...

Page 54: ...l pin on bobbin winder shaft and place 2nd spool so thread pulls off of it in the opposite direction of 1st spool Manually thread 2nd spool bypassing last two thread guides Thread right needle from fr...

Page 55: ...ecommended where both elasticity and strength are needed Because of its durability once in place this stitch is not easily removed Use it to reinforce areas such as crotch and armhole seams or to cons...

Page 56: ...th lower than 5 0 when using the C foot NOTE If stitch width is lower than 5 0 attach the A foot Multi Cord Foot Gathering Over a Cord Gathering over a cord is an alternative method to the two rows of...

Page 57: ...cotton rayon or silk provide the best results Change stitch width to 3 6 and stitch length to 0 4 Attach presser foot I Apply stabilizer to the fabric for proper stitch formation Appliqu Preparation...

Page 58: ...ht On screen manual see stitch 1 08 When the zigzag width is increased decreased the stitch tapers to the right 3 Step Zigzag Stitch On screen manual see stitch 1 09 This stitch is used to finish seam...

Page 59: ...stic casing Applying Elastic On screen manual see stitches 1 10 1 11 1 12 Use Serpentine 1 10 Elastic 1 11 or Box 1 12 stitch to apply elastic directly to fabric 1 Mark elastic into quarters and match...

Page 60: ...em allowance and press 3 Fold the hem under toward right side of garment Leave a 0 6 1 cm 1 4 3 8 extension at the right 4 Position fabric so folded edge is to left side of guide 5 Make sure only the...

Page 61: ...6 Sew a fine seam in lingerie and lightweight knits The small seam size stretches and is comfortable to wear Place fabric edges so needle just clears edge when it swings off the fabric to the right Su...

Page 62: ...tch is recommended for sewing fabrics such as swimwear and stretch velour as it provides the greatest amount of stretchability and strength Seams lie flat and do not lose their shape Trim away any exc...

Page 63: ...1 22 This is a pretty hem finish for lingerie and tricot fabrics May also be used for decorative rows of stitching 1 Increase top thread tension 2 Use a lightweight fabric such as tricot Fold and stit...

Page 64: ...tch 1 24 Small eyelets may be sewn on fabric belts used for lacing cords or simply used for a decorative effect Cut the eyelet open with a seam ripper pointed scissors or an awl Arrowtack On screen ma...

Page 65: ...ition 1 Attach buttonhole foot and pull 10 cm 4 of both threads under foot 2 Place fabric under foot Lower presser foot Begin sewing without lowering buttonhole lever A 5 When bartack is complete pres...

Page 66: ...stitches 1 29 1 30 1 31 1 32 1 50 1 51 1 52 1 53 Attach patches labels crests emblems etc without pivoting fabric Use 1 29 1 30 1 31 and 1 32 for light to medium weight fabrics Stitch length is set a...

Page 67: ...h end and a compact zigzag stitch along each side Set the stitch width to narrow for lightweight fabrics and wide for heavyweight Reinforced 1 38 A variation of the classic buttonhole This version aut...

Page 68: ...d on garments made from natural fibers See page 71 1 Buttonhole foot has an underplate A as an extra support for sewing buttonholes along garment edges Attach underplate to buttonhole foot and attach...

Page 69: ...pen eyelet portion of buttonhole Place a pin just inside bartack and open with seam ripper Cutting Open a Buttonhole 11a Place a pin just inside bartack s to prevent accidentally cutting bartack s Cut...

Page 70: ...st common buttonhole found on blouses shirts pants etc It consists of a bartack at each end and a compact zigzag stitch along each side Set the stitch width to narrow for lightweight fabrics and wide...

Page 71: ...onhole 6 Stop machine just before stitches reach length of left side of buttonhole 7 Press key Sew Machine will bartack lock off stitches and stop 8 To make another buttonhole place fabric and sew Mac...

Page 72: ...ipping into each corner 2 Pass the bias square through slit and pull to wrong side of garment to form the lips of buttonhole 3 From wrong side press lips into center and fold bias fabric over lips for...

Page 73: ...e Hook the filler cord A on the spur B at the back of the buttonhole foot Bring the ends forward under the buttonhole foot Position the cord into the forks on the front of the foot C Attach the button...

Page 74: ...eep the buttons in place 3 Turn handwheel until needle is down inside left hole of button Lower presser foot 4 Turn the handwheel to position needle above right hole of button Touch the key to adjust...

Page 75: ...ntucks on fabric right side 2 Decenter needle position to the left Fold fabric on first line with wrong sides together Place folded edge next to guide Sew pintuck Sew remaining pintucks using same met...

Page 76: ...ching also known as French hand sewing was traditionally only a hand sewn art There are several stitches to choose from that will add an old world charm Best results require the use of linen cotton or...

Page 77: ...reads can be removed easily 1 Carefully cut fabric on grain Determine width of the drawn work and remove one yarn or fabric thread at each end 2 Sew down right side guiding fabric so left hand stitche...

Page 78: ...th a fine embroidery thread 50 weight or finer Use spray starch to stabilize fabric 2 Fold and press under seam allowance to wrong side of both fabrics 3 Baste folded edge of fabrics parallel to each...

Page 79: ...ntering it over the seam line Quilt Guide Quilting is produced by stitching two layers of fabric together with batting wadding in between to add dimension and warmth Traditionally used for bedspreads...

Page 80: ...el rows Insert the quilt guide into the hole 1 toward the back of the foot Slide the quilt guide to set the width between rows See page 78 Quilt Stitch On screen manual see stitch 3 03 The Quilt stitc...

Page 81: ...ges are folded under To prepare raw edge first cut appliqu design out of paper 2 Press fusible webbing to wrong side of appliqu fabric 3 Cut appliqu fabric slightly larger than paper pattern 4 Fold fa...

Page 82: ...ut the stitching lines crossing each other The more compact the stitching the more the background will flatten and make surrounded designs stand out This is a technique commonly referred to as stippli...

Page 83: ...or letters numbers S Satin See page 83 F Floral See page 83 G Geometric See page 83 I Images See page 83 X Cross Stitches See page 84 U7 Uniform 7 mm See page 84 U10 Uniform 10 mm See page 84 L Large...

Page 84: ...in S group has 3 folders Folder 1 S 4 12 Folder 2 S 4 24 Folder 3 S 4 34 Touch an illustration to select a stitch pattern Touch the button on the illustration in groups 10 11 and 12 Satin S NOTE Use I...

Page 85: ...84 Cross Stitches X NOTE Use I foot unless using key Uniform 7 mm U7 NOTE Use I foot unless using key Uniform 10 mm U10 NOTE Use T foot Large Designs L NOTE Use T foot...

Page 86: ...85 Tripled Designs T NOTE Use T foot Alphabets Numbers A 7 mm Block NOTE Use I foot unless using key...

Page 87: ...86 7 mm Script NOTE Use T foot 15 and 25 mm Script NOTE Use T foot Outline NOTE Use T foot...

Page 88: ...87 Utility U NOTE Use I foot Heirloom H NOTE Use I foot Quilt Q NOTE Use I foot...

Page 89: ...Key When you stop sewing before completing a stitch es touch this key to reset the stitch es to the beginning See page 93 Elongation Key Satin stitches may be lengthened up to 5 times their regular si...

Page 90: ...ches in the sequence hold the key until Delete All message appears Touch Yes See page 91 Review Memory Keys Use these keys to review stitches in a memorized sequence when all stitches do not appear on...

Page 91: ...ds using stabilizer appropriate to the fabric weight and project After test sewing use the fine tuning adjustment to correct uneven and distorted patterns To access fine tuning touch and keys Touch ke...

Page 92: ...10 patterns have been selected 3 green dots appear After 100 25 green dots red dots appear each representing one pattern NOTE This is a temporary memory and will be lost when the machine is turned off...

Page 93: ...ht switch and insert twin needle NOTE Twin needles are available in many different sizes and widths Before sewing always turn the handwheel to make sure the needles do not hit the foot 2 Thread machin...

Page 94: ...at beginning of sequence and then sew the five selected patterns repeatedly 6 Press key Machine will stop sewing lockstitch and cut threads 7 Touch and hold key to delete the temporary memory and dea...

Page 95: ...p sewing and lockstitch 6 Touch and hold key to delete temporary memory Press key Two Color Key Single patterns only cannot be used when combining patterns 1 Change bobbin thread color 2 Select key 3...

Page 96: ...1 Touch key Touch key 2 Select 3 Place fabric under foot and sew 4 Touch key Sew 5 Touch key Sew 6 Touch key to deactivate Sew 7 Touch key to delete temporary memory Cascade Key NOTE Because of direc...

Page 97: ...te To change diameter push tab up unlock move slide and push tab down lock 3 Locate center of circle on fabric and insert tack at that point Insert tack into circular sewing attachment Lower presser f...

Page 98: ...t appears 2 Select H E 3 Select key Select l l o 4 Select key Select 5 Touch key four times to move cursor so it is between E and l 6 Touch key to delete E 7 Select key Select e 8 Place fabric under f...

Page 99: ...not turn off power while message screen is active 6 Touch key Memory 1 will be activated Available memory capacity is indicated on the screen A in kilobytes Amount shown may not match your machine re...

Page 100: ...y 1 Touch key 2 Select Q 3 Select key Select u i l t 4 Touch key 5 Touch key 6 Touch key A message screen will appear 7 Touch key A message screen will appear 8 Touch key 9 Touch and hold key to delet...

Page 101: ...screen If not deleted the recalled memory will be added to the temporary memory 1 Touch key 2 Touch key 3 Touch key 4 Touch key 5 Place fabric under foot and sew 6 Touch and hold key to delete tempor...

Page 102: ...ight needle position Select the one most suitable for your sequence 3 Select Touch key 4 Touch key 5 Place fabric under foot and sew two sequences 6 Touch and hold key to delete temporary memory 7 Cha...

Page 103: ...dery unit using the carriage as a handle Grasp the left side and front extension to lift and move embroidery unit SECTION VI Getting Ready to Embroider CAUTION Never move the sewing machine with the e...

Page 104: ...compatible with your fabric thread and project Size 75 11 is suitable for most embroidery projects See page 13 Installing Embroidery Unit CAUTION Never grasp the carriage A to install or remove the e...

Page 105: ...Screens page 151 sseepageepage 151 Lightly touch Welcome Screen to open first screen First Screen Before the first screen opens touch key to allow carriage to move to starting position The machine wil...

Page 106: ...been arranged into folders Each folder is identified by a number Touch the numbered folder to access more designs Touch an illustration to select a design or touch the button on the illustration Custo...

Page 107: ...106 Century Bold Script Euro...

Page 108: ...107 Designs Continuous Hoop...

Page 109: ...spond to where sewing speed lever is set To safeguard your embroidery cards always store them in their original case Operation Keys See page 18 LCD Keys The following keys will appear when appropriate...

Page 110: ...116 Continuous Embroidery Key Accesses continuous embroidery designs built in or optional cards Must be used with continuous embroidery frame See page 146 Sewing Range Key Previews the dimensions of...

Page 111: ...roidery position and resume sewing To turn off the automatic bobbin winding function see page 152 1 Slide bobbin case cover button forward Lift away bobbin case cover Remove top winding bobbin Place a...

Page 112: ...ubsequent bobbin windings will be the Large quantity default setting If you want to change the default bobbin winding amount see page 152 4 Open automatic bobbin winder cover Open bottom spool pin cov...

Page 113: ...ay as illustrated 1 5 Pull approximately 4 cm 1 1 2 of thread to the right Pull the thread towards you and thread will be cut by blade A 9 Remove bobbin winder guide 10 Close bobbin winder cover NOTE...

Page 114: ...page 23 or manual top threading see page 24 Preparing the Fabric All embroidery needs some form of stabilizer that can be easily removed Use a stabilizer appropriate to the fabric and project Common...

Page 115: ...idery area is 5 5 cm x 5 5 cm 2 1 8 x 2 1 8 Embroider monograms or small designs Continuous The embroidery area is 5 cm x 12 cm 2 x 4 3 4 The edge guide and quick clamp for securing fabrics allows bor...

Page 116: ...broidery frame holder Push frame down until it clicks into place Removing Frame Hoop Push lever on embroidery frame holder to the left Lift up embroidery frame Embroidering Small Areas Attach stabiliz...

Page 117: ...reen dot appears If 10 designs have been selected 3 green dots appear After 100 25 green dots red dots appear each representing one design letter NOTE This is a temporary memory and will be lost when...

Page 118: ...Touch key a Number of color changes parts in a single design b Part of design currently being sewn c Suggested Madeira thread color d Time remaining for part being sewn correlates with where sewing sp...

Page 119: ...stitches Press to stop machine With scissors cut beginning thread tail 8 Press key Machine will sew pattern part automatically stop and cut thread Touch key 9 Thread machine with second thread color F...

Page 120: ...t sizes To change default 15 mm size see page 152 NOTE The size is limited by the number of letters being embroidered their location and rotation within the frame NOTE If the size is set lower than 15...

Page 121: ...is limited by the number of letters being embroidered their size and their location within the frame Touch key Touch key Move Display Position NOTE Elna recommends using key or key before moving the...

Page 122: ...quickly preview boundaries of embroidery Touch key Touch or touch and hold a key to slowly preview boundaries of embroidery Touch key Touch key Final Layout 6 Touch key 7 Press key and sew E 8 Touch k...

Page 123: ...habet appears Select A Touch key 2 Select B and C Touch key NOTE Touching the key decreased the spacing between A and B HINT If you want the Custom letters to connect to each other touch the key after...

Page 124: ...ween Letters 4 Touch key Use the and keys to change the spacing between letters Touch key Touch key Landscape Portrait 5 Touch key Touch key Press key to sew Delete 6 Touch and hold key Touch key to d...

Page 125: ...1 Touch key until Century Bold alphabet appears Select E Select folder 2 Select l n a Select key to add large space 2 Touch key 3 Select X q u i s i t 4 Touch key 5 Touch key Set letter size to 20 mm...

Page 126: ...125 7 Touch key until cursor is between the space and X Touch key Separate 8 Touch key 9 Touch key 10 Touch key Touch key Touch to move cursor between X and q Touch key Touch key...

Page 127: ...126 11 Touch key Touch key and key Grid 12 Touch key to turn on grid Touch key until Xquisit touches gridline Touch key to select Elna Touch until Elna touches same gridline...

Page 128: ...ey Within hoop touch screen between E and X to zoom into that area Touch key and screen for a closer view Touch key and keys to adjust if needed NOTE The design letter is only enlarged for viewing the...

Page 129: ...128 14 Touch key Touch key Touch key Touch key and key Touch key Adding Editing 15 Touch key until cursor is before E Touch key until Single Floral designs appear 16 Select folder 3 Select butterfly...

Page 130: ...erfly away from Elna and Xquisit Touch key Touch key NOTE The first design letter entered in the combination screen will be the first to sew out If you wish to change the sewing order use key or key t...

Page 131: ...ign in a memory see page 131 NOTE This key can be used from any screen to temporarily save information while selecting editing or embroidery sewing NOTE Do not turn off power light switch while machin...

Page 132: ...be activated Available memory capacity is indicated on the screen A in kilobytes Amount shown may not match your machine readout Saving Memory 2 Touch key NOTE Do not turn off power or touch any keys...

Page 133: ...temporary memory Recalling Memory NOTE Memory recall is only available from screens where alphabets and designs are selected NOTE Be sure to delete temporary memory all selected designs and lettering...

Page 134: ...133 3 Touch key 4 Touch key Deleting Memory 1 Touch key 2 Touch key 3 Touch key 4 Touch key 5 Touch key NOTE Do not turn off power or touch any keys while machine is deleting 6 Touch and hold key...

Page 135: ...Characters First Hooping 1 Select A B C Z 2 Touch key 3 Touch key 4 Touch key 5 Touch key 6 Touch key Touch key 7 Touch key 8 Touch upper part of LCD screen to move frame to top of screen Use keys for...

Page 136: ...y over line 11 Turn handwheel to lower needle into fabric through vertical Y line A 12 Touch key to memorize first needle position A NOTE If you want to change the memorized needle position touch key...

Page 137: ...y to memorize third needle position C Point C must be at least 5 cm 2 away from A and B 19 Sew Second Hooping 1 Touch lower part of LCD screen to move frame to bottom of screen Use keys for final posi...

Page 138: ...wheel to lower needle into fabric through vertical line E 9 Touch key to memorize second needle position E Point E must be at least 5 cm 2 away from D 10 Touch left portion of horizontal X line direct...

Page 139: ...138 13 Sew 14 Touch key 15 Touch key 16 Touch and hold key Additional Hoopings 1 Select next group of letters from Euro alphabet 2 Touch key 3 Touch key 4 Touch key...

Page 140: ...letter sewn 8 Touch lower part of LCD screen to move frame to bottom of screen Use keys for final positioning Touch key 9 Using screen as a guide rehoop fabric Attach frame 10 Touch key 11 Touch uppe...

Page 141: ...o fabric through vertical line H 16 Touch key to memorize second needle position H Point H must be at least 5 cm 2 away from G 17 Touch left portion of horizontal X line to move frame Use keys to posi...

Page 142: ...is within the frame lines 6 Touch key 7 Look at screen and remember that at least one complete design must appear on LCD screen Example has 2 complete designs if any part of a design is not within hoo...

Page 143: ...TE If you want to change the memorized needle position touch key 13 Touch lower portion of vertical Y line directly on LCD screen to move frame 14 Use keys to position needle directly over line Turn h...

Page 144: ...and return to step 5 19 Final Layout screen appears showing first design that will be sewn Sew design 20 After first design is complete the next design will appear in the Final Layout screen NOTE Do...

Page 145: ...l within the triangular guidemarks on the frame See page 141 step 8 NOTE Always refer to screen shown in the above step before hooping the fabric Attach frame to machine 6 Touch key 7 Touch upper port...

Page 146: ...eel to lower needle into fabric through horizontal line F 15 Touch key to memorize third needle position F Point F must be at least 5 cm 2 away from D and E NOTE If the Select Pattern message appears...

Page 147: ...e end of each design repeat so each subsequent hooping has a precise point for the start needle position 1 Touch key 2 Select a built in continuous embroidery design OR Insert optional continuous embr...

Page 148: ...ecure fabric 7 Touch key Sew After sewing is complete Touch key twice Additional Hoopings 8 Pull up lever to the left until upper frame lifts up Move fabric backwards keeping fabric edge against frame...

Page 149: ...the needle thread breaks raise the needle and presser foot Move the carriage see page 149 and rethread If the bobbin thread breaks cut the needle thread remove embroidery frame and reinsert bobbin At...

Page 150: ...change scrolls off the final layout screen Touch key Move Carriage Carriage should be moved before re threading needle Touch key Touch key Touch key Thread needle See page 23 Touch key within the mes...

Page 151: ...elationship Illustrates how to thread machine using automatic top threading system Illustrates how to thread machine manually Transfers designs between Xpressive software and Xquisit See page 153 Iden...

Page 152: ...ep Sound Touch key Touch key Beep sound when keys are touched is turned off Beep sound will continue to signal errors regardless of setting Mm Inch Indication Switching Select key or key for design si...

Page 153: ...be set so upper thread is slightly visible on fabric wrong side If set too tight fabric may pucker thread may break or bobbin thread may show on top surface of fabric Setting Auto Bobbin Thread Windi...

Page 154: ...d set in Xquisit options screen See page 151 Xquisit LCD screen should show a design selection screen Touch key to open Machine Usage screen Touch key Design data is transferred to Xquisit Do not clos...

Page 155: ...r supply plug from electrical outlet before performing any maintenance Cleaning the Bobbin Area Loose threads and dust may cause puckered stitches thread breakage or may interfere with the operation o...

Page 156: ...hat the knob A fits next to the stopper B in the hook area Replace the needle plate replace needle plate screws After cleaning replace bobbin needle and presser foot Cleaning Auto Bobbin Thread Winder...

Page 157: ...ew light bulb with grooves in bulb base and push bulb into place 5 Fit mounting base over bulb base aligning groove Place mounting base into original position and replace screw Close face plate cover...

Page 158: ...inserted 2 The needle is bent or blunt 3 The needle clamp screw is loose 4 The needle thread tension is too tight 5 The fabric and threads are not pulled to the back when sewing is finished 6 The nee...

Page 159: ...r being pulled when embroidering 1 Threads have been caught in the hook area 2 The carriage is touching something around the machine 3 Dust or lint has collected in the feed dog 1 Needle is not raised...

Page 160: ...09 123 A Access Utility Stitches Key 89 Accessories 5 Accessory Box 4 6 Add Length Key 146 Adjustment Key 18 32 34 Alphabets Embroidery 104 106 Alphabets Numbers A 85 86 97 98 Angle Lines on Needle Pl...

Page 161: ...Memory Key 89 109 128 Rickrack 63 Rolled Hem 52 Rotate 120 S Saddle Stitch 54 Satin Stitches S 83 Scallop Edges 92 Scissors Key 19 35 36 88 93 Seam Allowance Lines 9 30 Select a Stitch 30 83 91 105 11...

Page 162: ...17 1177 1176 1025 1076 1181 1192 1188 1511 1156 1156 1227 1023 1220 1503 1047 1051 1232 1230 1169 1162 1534 1046 1109 1254 1172 1199 1174 1070 1021 1034 1035 1189 1212 Madeira 1000 1001 1020 1023 1024...

Page 163: ...162...

Reviews: