


3-4
3. Projecting an Image
Digital Projection
MERCURY HD
4
Correcting the Horizontal and Vertical
Keystone Distortion (DigiScale - 3D
Reform)
Use the DigiScale - 3D Reform feature to correct keystone (trapezoidal)
distortion to make the top or bottom and the left or right side of the screen
longer or shorter so that the projected image is rectangular.
In the following description, DigiScale - 3D Reform (Cornerstone) correc-
tion can be done with the USB mouse, remote control or cabinet buttons.
When using the USB mouse connected to the
projector
Preparation: Connect the USB mouse to the projector. See page 4-3.
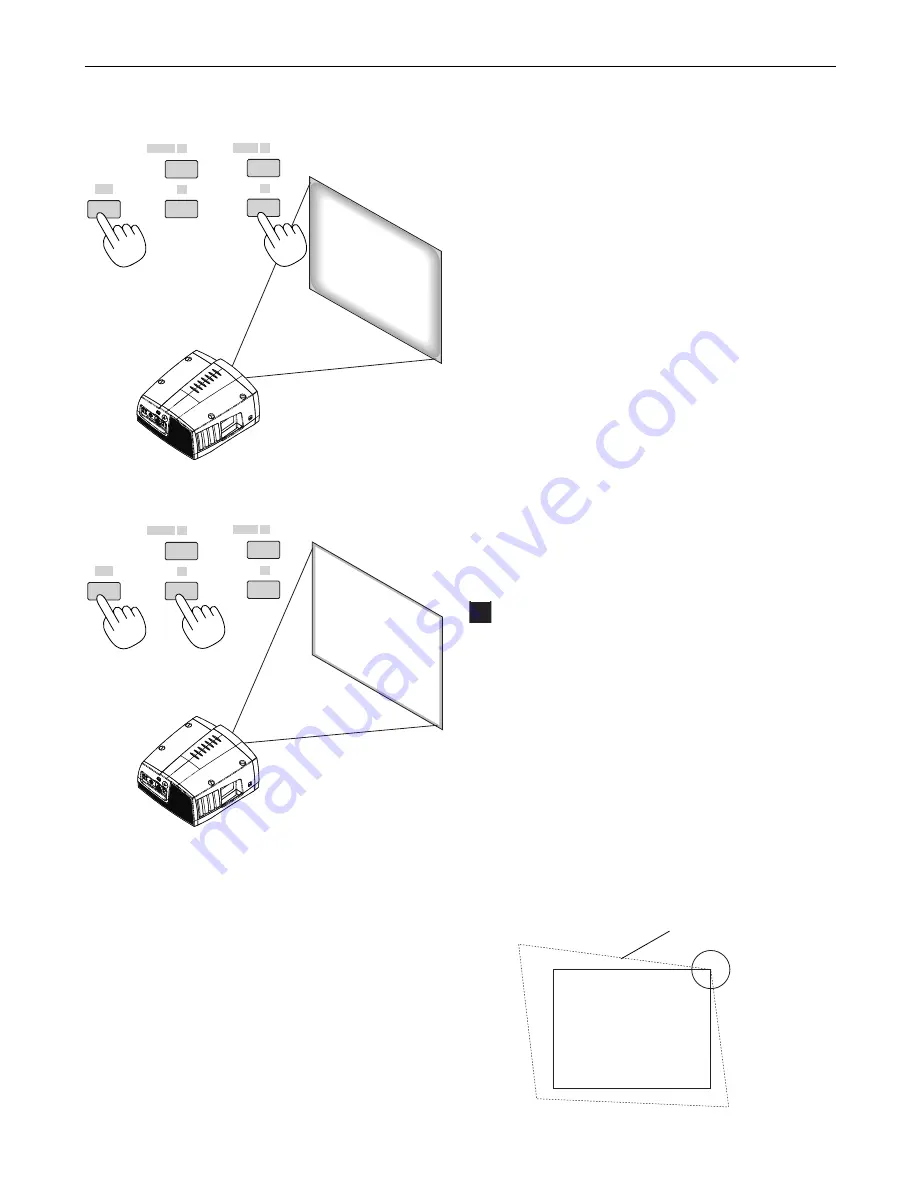
1. Project an image so that the screen is smaller than the area of the
raster.
2. Pick up any one of the corners and align the corner of the screen
with the one of the image. (The drawing shows the upper right
corner.)
Screen
Projected image
(2) Press and hold the CTL and press the ZOOM + or - button to
adjust the image size. You can also adjust the image size by
using the ZOOM + or - button on the projector cabinet.
(3) Press and hold the CTL button and press the FOCUS + or -
button to obtain the best focus. You can also adjust the focus
by using the FOCUS + or - button on the projector cabinet.
Tips on Adjusting Focus
Optimum focus adjustments can be achieved on the projector
by paying special attention in a few areas.
Focus adjustment after the projector has warmed up to
normal operating temperature is better than doing so when
the projector is cold.
Lens mechanism interacts differently when adjusting focus
from one direction to the other.
For this reason final focus adjustments should be done in a
specific direction.
For optimum focus, follow the steps below.
For the zoom and the lens shift adjustment, perform the
normal procedures.
Preparation (Recommended):
Warm up the projector for about 60 minutes.
Adjusting the Focus
1. Practice focusing
Use the FOCUS (+) or (-) button on the projector or the remote
control to increase or decrease the focus values to verify the
accuracy of focusing.
2. Try optimizing defocus
Use the FOCUS button (-) to decrease the focus values until pixel
patterns are too blurry to be visible.
3. Obtain correct focus
Use the FOCUS button (+) to obtain the best focus. Do not use the
FOCUS (-) button at this time.
Finally store the adjustments in memory.
If you adjust beyond the best focus point, go back to step 2 and
repeat the procedures. Always adjust the focus from the negative
direction towards the positive direction.
FOCUS
+
-
MAGNIFY/
ZOOM
+
-
CTL
FOCUS
+
-
MAGNIFY/
ZOOM
+
-
CTL
Summary of Contents for Mercury HD
Page 2: ...ii...
Page 6: ...vi Digital Projection MERCURY HD...
Page 8: ...viii Digital Projection MERCURY HD...
Page 32: ...2 12 2 Installation Digital Projection MERCURY HD...
Page 40: ...3 8 3 Projecting an Image Digital Projection MERCURY HD...
Page 50: ...5 6 5 Using the Viewer Digital Projection MERCURY HD...
Page 60: ...6 10 6 Using the Projector in a Network Digital Projection MERCURY HD...
Page 98: ...9 4 9 Routine Maintenance Digital Projection MERCURY HD...


