background image

90

Appendix B: Setting up Remote Viewing

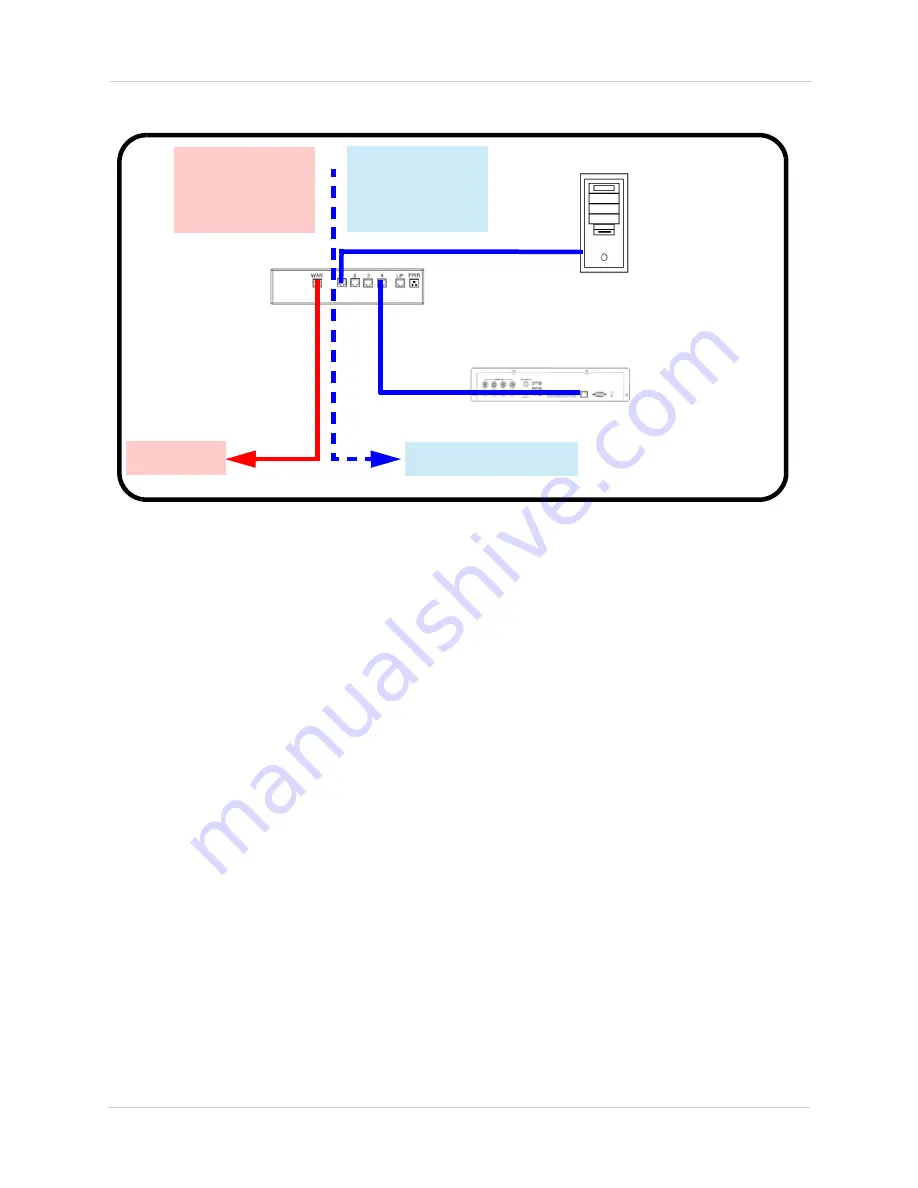
NETWORK EXAMPLE

PC

Internal IP

192.168.0.2

NVR

Internal IP

192.168.0.3

Router

Internal IP

192.168.0.1

Router

External IP

216.13.154.34

Internal Network

Internet

When a computer on the Internet needs to send data to your internal network, it sends this data 
to the external IP address of the Router. The Router then needs to decide where this data is to be 
sent to. This is where setting up Port Forwarding becomes important.

Port Forwarding tells the router which device on the internal network to send the data to. When 
you set up port forwarding on your Router, it takes the data from the external IP address:port 
number and sends that data to an internal IP address:port number (i.e. Router External IP 
216.13.154.34 to NVR Internal IP 192.168.0.3:80).

Please see resources available at 

http://www.digimerge.com/

 for more assistance with port 

forwarding.

Summary of Contents for DNR200 Series

Page 1: ...Copyright 2013 Digimerge Technologies Inc a FLIR Company Instruction Manual English Version 1 0 DNR300 Series Network Video Surveillance Recorder 8 16 1080P View Record CMS Mobile Apps HDMI H 264 www...

Page 2: ...UALIFIED SERVICE PERSONNEL The lightning flash with arrowhead symbol within an equilateral triangle is intended to alert the user to the presence of uninsulated dangerous voltage within the products e...

Page 3: ...ed by your service technician 7 Power Cord Protection Power supply cords should be routed so that they are not likely to be walked on or pinched by items placed upon or against them paying particular...

Page 4: ...ent fire electric shock or other hazards 16 Safety Check Upon completion of any service or repairs to this video product ask the service technician to perform safety checks recommended by the manufact...

Page 5: ...n a commercial environment This equipment generates uses and can radiate radio frequency energy and if not installed and used in accordance with the manufacturer s instruction manual may cause harmful...

Page 6: ...Monitoring ONVIF 2 0 conformance ensures compatibility with popular industry IP cameras Substream recording for bandwidth efficient remote playback 64 Channel CMS by FLIR included Fully PC Mac compati...

Page 7: ...8 Adjusting Color Settings 8 Using the Navigation Bar 9 Using the Camera Toolbar 9 Using Quick Playback 10 Using Digital Zoom in Live Display 10 Using Real time Backup 10 Using the Virtual Keyboard 11...

Page 8: ...nstalling FLIR SyncroIP NVR CMS 41 Adding a NVR from the Local Area Network LAN 41 Adding a NVR using a DDNS address 43 CMS Live Viewing Overview 45 Using Alarm Rec Event Search 46 Using Playback Mode...

Page 9: ...tifications 72 Android Phones 73 Compatible Devices 73 Prerequisites 73 Connecting to your NVR on an Android Phone 73 FLIR SyncroIP NVR Interface 75 Viewing Snapshots and Videos with Local Files 76 Us...

Page 10: ...r Mobile Apps 100 Internet Explorer 100 Appendix E Remote Firmware Upgrade 101 Installing a Firmware Upgrade Over the LAN 101 Installing a Firmware Upgrade Over the Internet 102 Appendix F Hard Drive...

Page 11: ...FOR POE SWITCH 1X FOR NVR QUICKSTART GUIDES SOFTWARE CD MOUSE ETHERNET CABLE HARD DRIVE SIZE NUMBER OF CHANNELS AND CAMERA CONFIGURATION MAY VARY BY MODEL PLEASE REFER TO YOUR PACKAGE FOR SPECIFIC CON...

Page 12: ...et Cable a Connect an Ethernet cable not included to the LAN port on the rear panel of system connect the other end of the Ethernet cable to an empty LAN port on your router or switch not included 5 C...

Page 13: ...o switch input types ESC In menus press to go back exit menus In playback press to return to live view 6 Directional Buttons ENTER From live view press once to open the System Information screen press...

Page 14: ...rt Connect a USB mouse or connect a USB flash drive not included for data backup or firmware upgrades 6 VIDEO OUT Video output BNC to connect the system to a secondary monitor 7 VGA VGA port to connec...

Page 15: ...us In playback press to return to live view 4 Directional Keys Enter Press once to open the System Information screen press twice to open the Main Menu Press to confirm menu selections Press to move t...

Page 16: ...tion Bar In live view while in a split screen display mode double click an individual channel to view it in full screen Double click again to return to the split screen display mode While navigating m...

Page 17: ...turn to split screen Right click to open the Quick Menu See Using the Quick Menu on page 8 Left click to open the Navigation Bar Move the mouse to the top of a channel to view the Camera Toolbar Click...

Page 18: ...eras Search Search playback recorded video See Search Playback on page 14 Record Open the Record menu to select manual recording options See Recording on page 24 Device Search Open the Device Search m...

Page 19: ...ess to certain functions and menus To open the Navigation bar Left click on the screen to open the Navigation Bar The Navigation Bar has the following options Using the Camera Toolbar The Camera Toolb...

Page 20: ...ctivated NOTE You may activate digital zoom in multiple channels at the same time 2 Click and drag inside the channel to zoom in Click and drag to pan the zoom area Right click to zoom out and select...

Page 21: ...click AutoFocus Log into the system using the admin account default User Name is admin and Password is 000000 3 Adjust the zoom and focus using the following options Use the sliders to adjust the Zoom...

Page 22: ...r Name is admin and Password is 000000 2 Click Setting General 3 Enter the current date MM DD YYYY and time HH MM SS under System Time Set the date and time Click Save 4 Click Save NOTE To configure D...

Page 23: ...channels are enabled with Continuous Recording During Continuous Recording the Record icon appears in the channel Motion Recording Cameras can be configured to record and mark events when motion is de...

Page 24: ...s admin and default Password is 000000 2 Use the calendar on the right to select the day to playback 3 Use the drop down menus to select the channels you would like to playback Click the display optio...

Page 25: ...k Select channels to playback Click inside the bar to select a playback time Select Scope of time bar Save selected clip Select video clip start end Show hide recording types Select playback device Pl...

Page 26: ...ed or USB external hard drive not included into one of the USB ports 2 From live view right click and then select Main Menu Login if prompted 3 Click Backup 4 Check the USB device you would like to fo...

Page 27: ...in VLC Media Player free download from www videolan org on PC or Mac Start Time End Time Select the start and end time for your search 7 Click Add A list of files that match your search criteria appea...

Page 28: ...te before removing the USB flash drive Viewing Backup Files To playback dav backup video files use the Player that is automatically installed on the USB device when you save a backup file NOTE The Pla...

Page 29: ...s Play pause Stop Stop recording Start recording Previous file Slow Back one frame Forward one frame Fast Next file Snapshot Full screen Shuffle repeat NOTE To view or change where manual recordings o...

Page 30: ...em information Perform firmware upgrades 3 SETTING Configure general system schedule network recording display and motion settings Restore system to factory defaults 4 DEVICE SEARCH Connect IP cameras...

Page 31: ...bitrates of connected IP cameras Log The Log sub menu allows you to search for system logs To search for system logs 1 Under Type select the log type to search for 2 Under Start Time and End Time sele...

Page 32: ...off the NVR during the upgrade process Online Users The Online Users sub menu shows a list of users connected to the system using remote devices You may click Disconnect to disconnect a user for up to...

Page 33: ...om name for the NVR HDD Full Select Overwrite for the system to begin overwriting the oldest recordings when the hard drive is full or select Stop Recording for the system to stop recording when the h...

Page 34: ...ing camera must have microphone attached Check the box in the middle to enable audio streaming to remote users Check the box on the far right to enable video streaming to remote users un check to hide...

Page 35: ...to Holidays Setting to enable holidays 2 Click Holidays Setting 3 Click days in the calendar to enable them as holidays Selected holidays are highlighted in blue 4 Click OK Click OK to save changes Ne...

Page 36: ...mber Under Time Zone select your time zone Under Update Period enter the interval your system will sync the time with the selected server TIP Click Manual Update to test the server settings entered an...

Page 37: ...ure the system to send out email alerts for motion detection or other events NOTE To send out motion detection alerts you must enable the Send Email option for motion detection on each camera For deta...

Page 38: ...th your selected settings To configure switch settings 1 Click Network Setting 2 Double click Switch Settings 3 Configure the IP Address Subnet Mask and Gateway for the internal PoE switch 4 Click OK...

Page 39: ...times that are enabled both in the Schedule menu and here 9 Configure the following system actions when motion is detected Show Message Check to enable an on screen pop up On screen pop up shows the...

Page 40: ...enable disable views based on pages On 8 channel models for example View 4 1 represents channels 1 4 and 2 represents channels 4 8 NOTE Available options depend on the number of channels your NVR has...

Page 41: ...Password is 000000 3 Click IP Search The NVR scans your LAN for compatible IP cameras CheckIP Search 4 Check the camera s you would like to add and click Add Check cameras Click Add 5 If the Status in...

Page 42: ...o the camera you would like to edit 2 Configure the connection information as needed 3 Click OK Click OK again to save changes Deleting Cameras Click next to the camera you would like to delete Advanc...

Page 43: ...configured for mirroring To select hard drive types 1 Under HDD No select the hard drive you would like to format 2 Under Set to select the hard drive type 3 Click Execute 4 Right click to exit the HD...

Page 44: ...ngsfor anoptionallowerqualityrecordingstream This is useful because you can record the Substream to the hard drive and stream it for playback to remote devices This saves bandwidth during remote playb...

Page 45: ...enable multiple users to connect using this account Group Select the group that the account will be included in 3 In the bottom portion of the screen select the permissions that will apply to the user...

Page 46: ...e enter a name for the group 3 Optional under Memo enter comments for the group 4 Configure group permissions as needed Note that any user accounts added to the group may not be given any permissions...

Page 47: ...nges Config Backup The Config Backup sub menu allows you to export your system configuration to a USB flash drive not included or to import a saved configuration You can import a saved configuration f...

Page 48: ...From live view right click and select Main Menu Login if prompted 2 Click Shutdown 3 Select one of the following Logout menu user Log out the account that is currently active Switch user Log out the a...

Page 49: ...39 Using the Main Menu...

Page 50: ...0GHz Operating System Windows 8 7 Vista Memory 2GB Video 512 MB of video memory and above Network LAN 10 100 BaseT Network Network WAN 1 Mbps upstream High speed Internet service is required to remot...

Page 51: ...www digimerge com It is recommended to visit www digimerge com for the latest software versions To start the software Double click the FLIR SyncroIP NVR CMS icon on the desktop Click Login NOTE The C...

Page 52: ...Windows Firewall alert appears click Allow 3 Check the NVR and click Add Management Click Add Management Click Search Device Check the NVR 4 Enter the User Name default admin and Password default 000...

Page 53: ...ew Adding a NVR using a DDNS address If you have NVR systems with DDNS set up you can add them to the CMS Prerequisites Create a DDNS account For details see Appendix D Setting Up DDNS Service on page...

Page 54: ...llowed by myddns flir com Port Enter the Client Port default 35000 User Enter the NVR s user name default admin Password Enter the NVR s password default 000000 4 Click Add then click OK 5 Click Devic...

Page 55: ...e NVR to the display area to view Click Device List Click Double click the NVR Click and drag the NVR to the display area to view CMS Live Viewing Overview 1 Camera Controls Digital Zoom Click and dra...

Page 56: ...n Right click NVR s Groups or Cameras to view system options 6 CMS Menus PTZ Direction Access basic PTZ controls PTZ Advanced Access advanced PTZ controls e g Auto Scan Tour etc Tools Contains the fol...

Page 57: ...rms appears below Using Playback Mode You can view recorded footage from your NVR s in the CMS software To use playback mode 1 Click Playback 2 Under Device select the NVR and channel you would like t...

Page 58: ...igure the CMS to automatically cycle through different channel arrangements Projects are used to automatically cycle through multiple tasks Configuring Tasks 1 Click Config Manager Scheme Task Config...

Page 59: ...ick OK to save changes Configuring Projects Once you have multiple tasks set up you can configure projects to automatically cycle through them To configure a project 1 Click Config Manager Scheme Task...

Page 60: ...e enter the time of day when the task will start running 7 Click Add 8 Repeat steps 6 7 for each additional task you would like to add to the project 9 Click OK Click OK to save changes Running Tasks...

Page 61: ...Edit Click Picture Edit 3 Click Add Click Add 4 Click Browse Select a jpg image on your computer to use as the E Map 5 Enter a Name and Title for your E Map of your choice Click Browse to select a jp...

Page 62: ...NVR s 10 Click next to an NVR To place cameras drag cameras from the list to the map Click Device Click Dragcamerasto the map 11 Click Save NOTE To delete all E Map data including images and camera po...

Page 63: ...ings through the Config menu Configuring CMS Options 1 Click Config Options 2 Configure the following Verify password Check to require passwords when logging into or closing the CMS Log in all devices...

Page 64: ...le for downloaded recording files Device free minimum space MB Enter the amount of minimum space in MB to maintain on the computer hard drive The system will stop recording when only this much space i...

Page 65: ...software and are separate from the passwords on the individual NVR systems NOTE To make sure users must enter their user name and password to access the CMS you must make sure Verify User is checked...

Page 66: ...ct the monitor you would like to send the channel to To open multiple channels on a secondary monitor Open your desired channel view then right click in the display area and select Output all windows...

Page 67: ...secondary monitor Click to detect monitors Click to show monitor number on screen 3 Check monitors to open them when the CMS software opens or uncheck to disable Check monitors to have them open when...

Page 68: ...ernet Explorer It is recommended to select Run as Administrator when opening Internet Explorer to ensure full functionality 2 In the address bar enter your system s IP address or DDNS address followed...

Page 69: ...the display window to view them live IE Live Display Overview NOTE Some options are not available in WAN mode 1 2 4 3 5 6 1 Cameras Click and drag to the display area to view 2 Live View Controls Open...

Page 70: ...adjust the brightness contrast saturation and hue for the selected camera Using Search Mode in IE Playback You can access recorded video from your NVR using the Internet Explorer client To access reco...

Page 71: ...ack to open or Download to save the file to your computer hard drive Configure search parameters Selectchannels for playback Click a file and then click Playback or Download Playback Controls Select p...

Page 72: ...your router You must create a DDNS account and have the DDNS settings configured in your NVR The NVR must have internet access You must have a DDNS address to log in remotely An iTunes account NOTE Yo...

Page 73: ...choice Address Enter your DDNS address e g tomsmith myddns flir com Port Enter the Client Port default 35000 Username Enter the NVR s User Name default admin Password Enter the NVR s Password default...

Page 74: ...sly added cameras PTZ Disconnect all Access Favorites Change Camera Snapshot Start stop manual record Open image settings Return to Main Menu Viewing Videos with Local File If you have saved videos us...

Page 75: ...ack mode on mobile devices For details on enabling Extra Stream Recording see Recording on page 24 To use Playback Mode 1 From the Main Menu tap Playback NOTE If Playback is not shown tap Add check Pl...

Page 76: ...etects motion Once you have received a push notification you can select it to open live video from the camera that detected motion Push notification NOTE Your cameras must have motion detection activa...

Page 77: ...t List menu To show the Event List menu tap Add and check Event List Return to the Main Menu and select Event List Tap on events to view live video from the camera Tap to view live video Device Manage...

Page 78: ...DDNS account and have the DDNS settings configured in your NVR The NVR must have internet access You must have a DDNS address to log in remotely NOTE You will need to create an iTunes account before...

Page 79: ...DDNS address e g tomsmith myddns flir com Port Enter the Client Port default 35000 Username Enter the NVR s User Name default admin Password Enter the NVR s Password default 000000 Channel amount Ente...

Page 80: ...w Slidetoselectfavorites Select different camera Open menus Device Manager Device Manager allows you to manage your NVR s To access Device Manager 1 From live view tap then 2 Tap Device Manager To del...

Page 81: ...To use Playback Mode 1 From Live View tap then 2 In Portrait Mode Tap select the start time and end time for your search and select the camera you would like to playback OR In Landscape Mode Select t...

Page 82: ...motion Push notification NOTE Your cameras must have motion detection activated to receive push notifications For details on enabling motion detection see Motion on page 28 To enable Push Notificatio...

Page 83: ...remotely view your NVR on Android tablets to make better use of the larger screen size For details see Android Tablets on page 79 Compatible Devices Android OS 2 2 and above Prerequisites Port 80 and...

Page 84: ...Enter the password Enter the number of channels tomsmith myddns flir com Name Enter a name for your NVR of your choice Address Enter your DDNS address e g tomsmith myddns flir com Port Enter the Clie...

Page 85: ...t to view additional cameras FLIR SyncroIP NVR Interface You can use FLIR SyncroIP NVR in portrait and landscape mode Double tap to open a channel in full screen Connect to camera Disconnect from came...

Page 86: ...roid Phones You can access recorded video on your NVR using your Android phone NOTE You must enable Extra Stream Recording to use playback mode on mobile devices For details on enabling Extra Stream R...

Page 87: ...reen controls to control playback Double tap to open in full screen Select previous video file Select next video file Play pause Next frame Fast Slow Enabling Push Notifications You can have the app s...

Page 88: ...ush notifications For details on enabling motion detection see Motion on page 28 To enable Push Notifications 1 From the Main menu tap Push Config NOTE If Push Config is not shown tap Add check Push C...

Page 89: ...ain Menu tap Device Manager To edit an NVR 1 Tap the NVR in Device Manager 2 Edit the connection details as needed 3 Tap Save To delete an NVR 1 Swipe the NVR you would like to delete to the right 2 T...

Page 90: ...ame for your NVR Enter the DDNS address Enter the Client Port Enter the user name Enter the password Enter the number of channels tomsmith myddns flir com Name Enter a name for your NVR of your choice...

Page 91: ...eas and select the camera you would like to open Click and then select a camera FLIR SyncroIP NVR HD Interface You can use FLIR SyncroIP NVR HD in landscape or portrait mode Double taptoopen in full s...

Page 92: ...on page 24 To use Playback Mode 1 From Live View tap then 2 In Portrait Mode Tap select the start time and end time for your search and select the camera you would like to playback OR In Landscape Mod...

Page 93: ...video from the camera that detected motion Push notification NOTE Appearance of notifications may differ depending on the model of your device NOTE Your cameras must have motion detection activated to...

Page 94: ...ce After this whenever the selected cameras detect motion you will receive a notification NOTE You can see a list of notifications through the Event List menu To show the Event List menu from live vie...

Page 95: ...Mobile Connectivity 2 Tap Tap OK to confirm Tap to delete To modify an NVR 1 Tap an NVR to select 2 Tap the NVR again to open the edit screen 3 Update the connection details as needed and then tap Sa...

Page 96: ...channel output BNC PTZ RS 485 supports Pelco D and Pelco P USB 2 ports Alarm Input 8 Channel Relay Out 3 Channel Interface 1 HDMI 1 VGA 1 BNC Resolution 1920 1080 1280 1024 1280 720 1024 768 Display S...

Page 97: ...4 8 16 Playback Function 8 Channel 16 Channel Backup Mode USB Device Network Configuration Backup To USB Device Ethernet RJ 45 port 10M 100M 1000M Network Function HTTP TCP IP IPv4 IPv6 UPNP RTSP UDP...

Page 98: ...Remote Access Overview To setup remote viewing 1 With the system powered off connect the system to the router using an Ethernet cable ROUTER Not Included INTERNET PC Not Included NVR 2 Power the syst...

Page 99: ...ernal IP address can also be found within your router settings Refer to your router s user guide for further details How Do I Enable Port Forwarding You need to enable port forwarding on your router t...

Page 100: ...outer then needs to decide where this data is to be sent to This is where setting up Port Forwarding becomes important Port Forwarding tells the router which device on the internal network to send the...

Page 101: ...tall the Auto Port Forwarding Wizard 1 Download the Auto Port Forwarding Wizard from www digimerge com and run the installer file The installation window opens 2 Click Next to continue Click Next Sele...

Page 102: ...Model Number and Version On most routers the model and version number can be found underneath the router printed on a sticker WGR614 refers to the model number v9 refers to the version number Example...

Page 103: ...tabase The Auto Port Forwarding Wizard automatically populates a list of current routers and detects the number of connected routers 1 Click to check for multiple routers Click to update router databa...

Page 104: ...and Password enter the router s username and password Optional Under HTTP Type default http and HTTP Port default 80 you may have to change the values depending on your router model Consult your rout...

Page 105: ...ser NOTE A window opens that prompts you to enter in your NVR s user name and password do not enter your DDNS log in information NOTE ActiveX warnings may appear Accept all ActiveX installation warnin...

Page 106: ...IP Address 192 168 1 100 Assigned by Router 2 Enter192 168 1 100intotheDMZ Host IP section into Router 2 EXAMPLE You may have two routers in your network In both scenarios the router that is immediate...

Page 107: ...IP address is your DMZ IP Enter the IP address obtained from Router 1 into the DMZ section of Router 2 Once you have configured Router 2 with a DMZ connection runthe Auto Port ForwardingWizard to begi...

Page 108: ...ional 3 Complete the System Information fields Product License Select your product model from the Product License drop down menu i e DNR300 Product Code MAC Address Enter the MAC address of your NVR T...

Page 109: ...To enable DDNS on your system 1 In live view right click and then click Main Menu Login using the admin account if prompted default user name is admin and default password is 000000 2 Click Setting N...

Page 110: ...address Connecting to your system using DDNS NOTE You must port forward ports on your router to NVR s IP address by default ports 35000 and 80 to connect to your system over the Internet Now that you...

Page 111: ...Updating Firmware on page 21 Installing a Firmware Upgrade Over the LAN Prerequisites Connect your NVR to a router or switch on your network Download a firmware upgrade from www digimerge com if one...

Page 112: ...P address of the NVR Download a firmware upgrade from www digimerge com if one is available Extract the contents To perform a firmware upgrade over the Internet 1 Download the Config Tool from www dig...

Page 113: ...for the upgrade to complete Do not power off the system or disconnect the power cable during upgrade The system will restart when the upgrade is complete Click System Upgrade Click Open and select th...

Page 114: ...emove the screws 4x from the back panel Slide the cover back and up to remove 3 Insert hard drive screws 4x on the hard drive and tighten them half way Insertharddrivescrews 4x and tighten half way 4...

Page 115: ...m of the front panel NOTE After installation you must format the hard drive in order to use it with the system See Formatting the Hard Drive on page 107 Removing the Hard Drive To remove the hard driv...

Page 116: ...loosen the hard drive screws Do not remove the hard drive screws 5 Turn the unit back over and remove the hard drive from the case 6 Remove the hard drive screws from the hard drive Remove hard drive...

Page 117: ...will not be erased To format a hard drive 1 From Live View right click and select Main Menu Advanced HDD Management 2 Under HDD No select the hard drive you would like to format Information about the...

Page 118: ...rnal Monitor APPENDIX G CONNECTING AN EXTERNAL MONITOR A BNC output is available to connect the NVR to an external monitor or TV The BNC output shows a duplication of the live display NVR External Mon...

Page 119: ...able to another outlet Test the outlet with another plugged device such as an electric calculator or phone charger There is no picture on selected channels camera picture is not being displayed PoE po...

Page 120: ...ll select Overwrite Click OK to save settings This enables the system to continuously record by overwriting data once the hard drive is full Mouse not detected by system Mouse cable is not firmly conn...

Page 121: ...ers installed in local network If you have multiple routers additional setup may be required For details see Configuring Multiple Routers on page 95 Could connect to system previously but no longer ca...

Page 122: ...receive product updates and information North America 1 866 816 5919 Technical support for technical installation issues Mon Fri 8 00 am to 8 00pm EST By Phone Product support is available 24 7 inclu...

Reviews: