background image

SunScan User Manual  v 1.05

SunScan Tutorial  

••••

  15

Warning! If you were already in the Psion System Screen, you’ll see a message 

Exit

System


Screen?  Press 

N

, so that you stay in the System Screen.

From this point you can launch 

SunData

, the SunScan application, but first it is a

good idea to familiarise yourself with the Workabout’s keyboard.  The main uses of
the keys are explained in the Workabout user Guide on pages 10 and 11.

The following keys are particularly important for the Workabout:

Pops up a menu of options relevant to your current activity

Move the cursor up and down menu options, or adjust the value of a set-
up parameter

Cycle through the available settings for a menu option

Carry out highlighted activity, choose menu option or accept highlighted
setting

Exit from current activity or menu, abandoning any changes

Gives you and expanded range of choices, especially in file operations

What to do if you get lost

The important thing to remember is that you can get out of any menu by pressing

On/Esc

, and out of any application by pressing 

+X

. This should get you back to the

Psion System Screen, as shown above.  If things get really stuck, you may have to

reset

 the Workabout, as explained in its manual on page 20.

Starting SunData in the Workabout


In the System Screen, use the arrow keys to highlight the 

SunData


application,

and then press 

Enter

.

SunData will load and then flash up

communicating

 as it tries to connect to

the probe.  Since you haven’t yet
connected the probe, it will let you know
that 

Communications failed

, and display

this screen (the 

title screen

):

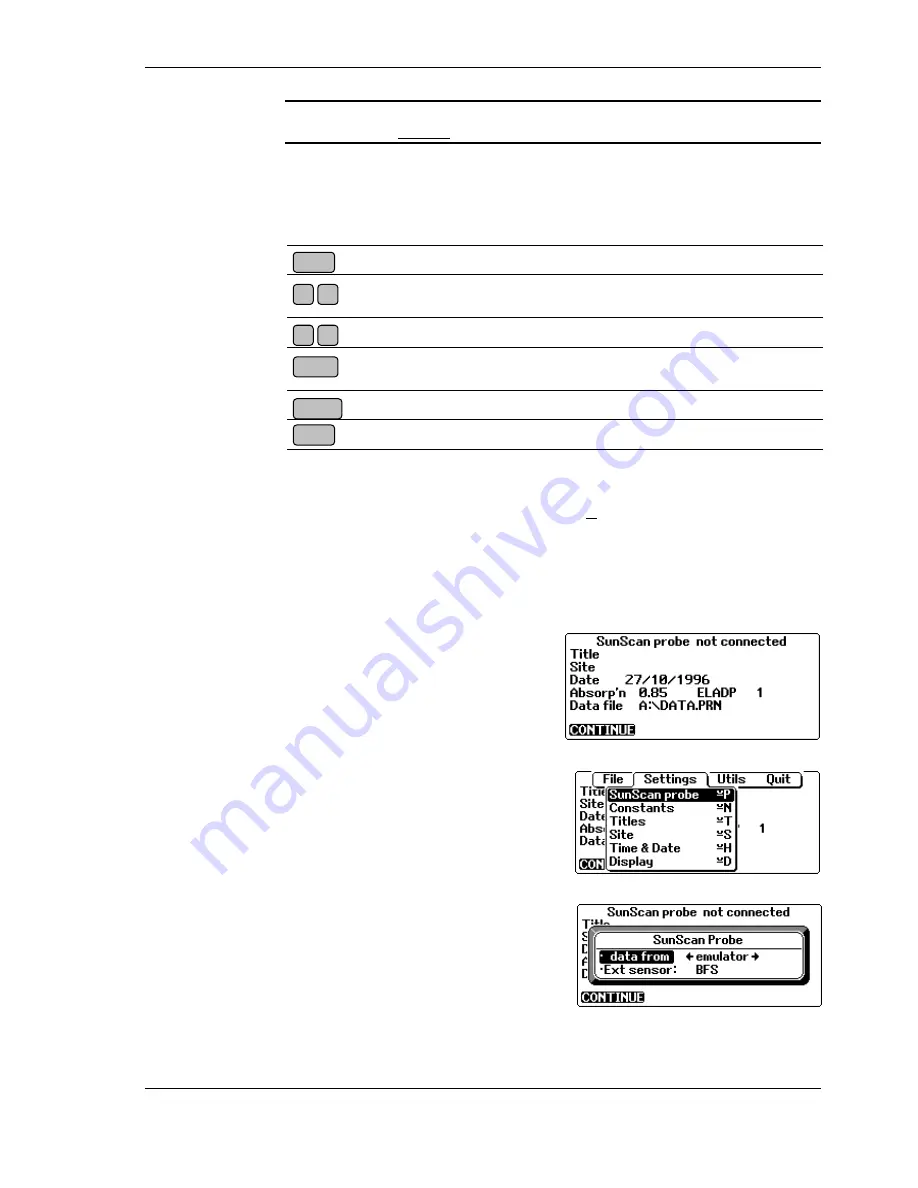
Now, you need to tell SunData to work in Emulator mode.


Press 

Menu

 and then use the 


arrow keys to select the 

Settings

 menu,

which will look like this:


Use the 

↑↑↑↑↓↓↓↓


arrow keys to highlight

SunScan Probe

, and press 

Enter

 to pop

up a dialog box with options on which sensors you have attached.


Use the  


 arrow keys to change the

D

ata from:

 setting to 

emulator

 like

this:


Set the 

Ext sensor

 to 

BFS

 so that a

Beam Fraction Sensor will also be
emulated.


Press 

Enter

 to accept this setting and return to the title screen.

 Enter

On/Esc

Menu

Tab

↑↑↑↑

↓↓↓↓

Summary of Contents for SS1-UM-1.05

Page 1: ...SunScan Canopy Analysis System User Manual SS1 UM 1 05...

Page 2: ...a registered trademark of Microsoft Corp All other trademarks are acknowledged Some names referred to are registered trademarks CE conformity The SunScan system conforms to EU regulations regarding el...

Page 3: ...this tutorial 14 What you will learn 14 Using a portable PC instead of the Workabout 14 Working with the Workabout 14 Powering up 14 Navigating around the Workabout 14 What to do if you get lost 15 St...

Page 4: ...ons 43 Planning for the sun s position 43 Advice on Absorption and ELADP values 44 Absorption 44 ELADP 44 Relationship between Mean Leaf Angle and ELADP 45 SunScan System Measurement modes 46 Workabou...

Page 5: ...Collection Terminal type DCT1 Psion Workabout 70 PC as Data Collection device 70 Carrying Case type SCC1 71 Telescopic Tripod type BFT1 71 Spares Kit type SPS1 71 Logging Cables 71 PAR Performance 72...

Page 6: ...r experiments and taking readings in the field The remainder of the manual covers such things as the theoretical basis for leaf area index estimates and a technical reference section As a new user you...

Page 7: ...t is a lightweight robust field unit with a full alphabetic keyboard for the annotation of readings It comes with a removable Flashcard which can be used for data storage and transfer You can use a po...

Page 8: ...reliminary checks as quickly as possible so explanations will be kept to a minimum The Workabout and SunScan probe Step 1 Getting a screen display Unwrap the Workabout The screen should be blank Press...

Page 9: ...will go blank Checking the Workabout hardware You should now refer the Psion Workabout User Guide chapters 1 and 2 and start familiarising yourself with the basic operation of the Psion you will need...

Page 10: ...ial if you need to restore s w lost from the Workabout unless you have purchased the optional PsiWin Windows s w and of course they give you alternative methods of transferring data files from the Wor...

Page 11: ...ab key to select either Color or Monochrome then press to expose the first working screen see below You will not see this starting plaque again but you will always be able to choose your screen mode f...

Page 12: ...ions in the PC s w If you got lost in any of the above instructions try again using the following general principles for moving around the screen a Select an option by moving the highlighted cursor to...

Page 13: ...tory name for the Working Directory and SUNDATA ICO for the Icon File Program Manager will then display the SunScan Icon Later on you can refine this arrangement and call the program from a data direc...

Page 14: ...d Read the sections with the PC logo in the margin Instructions for you to follow are bulleted like this one Working with the Workabout Powering up If you haven t already done this in the Getting Star...

Page 15: ...emember is that you can get out of any menu by pressing On Esc and out of any application by pressing X This should get you back to the Psion System Screen as shown above If things get really stuck yo...

Page 16: ...ove to the External Sensor field select the BFS option it will be emulated too Move to the OK field and press Enter or The menu line at the bottom of the screen will now show only the CONTINUE option...

Page 17: ...SunScan User Manual v 1 05 SunScan Tutorial 17 This page is intentionally blank...

Page 18: ...by pressing Del and typing in the appropriate values When everything is correct to accept it Press Menu again then select Time Date and press Enter Now set the local time and date in the dialog box Y...

Page 19: ...ories Since you are just about to start taking readings you also need to tell SunData the name of the file you want to use for storing the data and what file format you want the readings to be stored...

Page 20: ...o select DISCARD before pressing Enter in which case the reading will not be stored and optionally Use the arrow keys to select NOTE before pressing Enter so that you can add a note to the reading bef...

Page 21: ...or SunData still needs measurements of the Incident PAR and the Beam Fraction so you have to make them using the SunScan probe itself We ll go into the details of this procedure later on once you have...

Page 22: ...without constantly having to look at the Workabout one beep for READ a double beep for STORE If you hate beeps they can be turned off later Connecting the Beam Fraction Sensor If you have got a Beam F...

Page 23: ...ht as well SunData looks at the readings from the photodiodes and uses the lowest value to calculate the Diffuse component of the incident light It uses the highest photodiode values to calculate the...

Page 24: ...taken a few readings you may want to look back over the results before you transfer your data file to a PC To review your file Press Menu File Review Enter or V to call up the dialog box as shown You...

Page 25: ...the utility programs referred to in the appendices Of course if you are using a portable PC as a Data Collection Terminal instead of the Workabout your data files will already be on the hard disk and...

Page 26: ...about Don t worry about over writing an existing file you will be warned if this is about to happen You can quit this process at any stage by pressing Esc on your PC or by selecting Cancel and When sa...

Page 27: ...imultaneously with the sending message on the Workabout you will see the file being written on the PC screen and a final confirmatory message that the file has been sent correctly if all was well Pres...

Page 28: ...uble checking the physical connection of the comms cable and the COM port setting of your PC Preferably work in DOS only The above instructions have worked successfully on a variety of portable and de...

Page 29: ...e these screens are only required if you are measuring Leaf Area Index LAI and you do not have a Beam Fraction sensor attached to the probe Note screen display and data stored will be different from t...

Page 30: ...Name Use or press Tab to display a list of possible CFG files from which to restore Disk see above Review Name View data file on the Workabout screen Prompts with current data file name Select other...

Page 31: ...n Calculate and reset the individual photodiode calibration coefficients using the Beam Fraction sensor as a reference Autolog setup screen SunScan will operate unattended in whatever mode has been se...

Page 32: ...32 Menus and Screens Document code SS1 UM 1 05 Quit Exit the SunData program...

Page 33: ...r the general rules for moving around Psion screens The cursor inverse video highlights an available option Move the cursor with the yellow arrow keys to select options Press Enter to accept an option...

Page 34: ...then the yellow arrow keys to select Disk Directory and then press Enter This symbol indicates the parent directory To move there select it and press Enter This shows the Disk and subdirectory you are...

Page 35: ...e dialog box are satisfactory press Enter to accept them The Sundata icon should now be present in the System screen The identical process can be used subsequently for installing an upgraded version o...

Page 36: ...es for each reading The optional 1 Mb Flashcard can accommodate about four times these amounts You can check the available memory space on your Flashcard from the Psion system menus as indicated in th...

Page 37: ...to create a new file or select one of the existing files which will then be overwritten Restoring a configuration In the SunData program on the Workabout proceed to Menu File RestoreConfig n Press or...

Page 38: ...emulator Ext sensor BFS Leaf Angle Distn Parameter 1 5 Leaf Absorption 0 85 Group 1 Presentation Time Plot Sample Trans Spread Incid Beam Zenith LAI Notes mitted ent frac Angle 15 51 12 1 1 270 9 0 13...

Page 39: ...nt combinations of equipment BFS or not and measurement LAI or PAR or All that you have chosen Each time there is a change the headings and titles will be revised to start a new group and give you a c...

Page 40: ......

Page 41: ...connected to the SunScan probe provides the best option because you can operate with fewest restrictions However with some canopy types this may not be practical The next best option is to use the Su...

Page 42: ...f whether it is applicable to your canopy You should read the chapter on the LAI theory for a fuller appreciation of the subject Some guidance on specifying values for the typical leaf angle the ELADP...

Page 43: ...bsolute Preferably above about 200 mol m 2 s 1 Accuracy degrades below this figure Light level rate of change With the BFS avoid only the very fastest changes between bright sun and cloud With no BFS...

Page 44: ...f an ellipsoid of revolution symmetrical about the vertical axis The Leaf Angle Distribution can then be described by a single parameter the ratio of the Horizontal to Vertical axes of the Ellipsoid E...

Page 45: ...ves Nv multiplied by 2 1 6 ELADP N N h v 2 The factor 2 comes from the fact that the vertical leaves are distributed about the vertical axis so for any light ray some will be seen face on and some edg...

Page 46: ...s mode With Beam Fraction sensor With no BFS PAR display This display is most often used for simple light interception measurements which can later be processed to give values of the fractional interc...

Page 47: ...the Autolog process From time to time when a reading is logged the screen will briefly show a Logging in progress message At any time if you want to check the status of the Autolog press On Esc to ac...

Page 48: ...PAR or All This section helps with practical comments and advice The probe GO button The red button on the probe handle allows you to initiate and store repetitive readings from the probe without nee...

Page 49: ...terminal case and strap supplied with the Workabout should enable you to operate the keyboard with one hand BFS handling in the field The Beam Fraction sensor is definitely recommended for taking mos...

Page 50: ...ing the elevation Levelling the BFS The BFS is equipped with a miniature bubble level The tripod supplied has 3 axis adjustment to facilitate levelling It is more important to level the BFS accurately...

Page 51: ...and after taking a lot of readings Mount the SunScan probe and your BFS horizontally in uniform sunlight Place the shade ring horizontal as well Make sure the probe and BFS diffusers are clean In the...

Page 52: ...gs In completely overcast conditions it might contribute a small error of up to 0 1 to the LAI value Comparing the calibration with other PAR sensors You can carry out matching comparisons between the...

Page 53: ...urvive being immersed in water Avoid any situation where they could be flooded Internal condensation will be avoided provided that you keep the desiccant fresh Inspect the coloured indicator panels on...

Page 54: ...e distribution a point which has not generally been recognised These functions are integrals which do not have direct analytical solutions so have to be solved numerically and computable functions fit...

Page 55: ...for your canopy With these caveats the values of LAI for your canopy even if of uncertain accuracy will provide valid trends for a given canopy e g canopy growth in a season and valid comparisons bet...

Page 56: ...ith angle of the incoming direct beam Canopy elements are assumed to be completely black and randomly distributed in a horizontal slab extending to infinity in all directions Note in the following equ...

Page 57: ...on a horizontal surface due to that strip is given by I 0 2 sin cos d The total irradiance due to the hemisphere is obtained by integrating over the complete sky area d 0 2 2 sin cos 1 For each strip...

Page 58: ...ssumptions The canopy is an infinite uniform horizontal slab with leaf elements randomly distributed in proportion to the surface area of an ellipsoid as described by Campbell The incident light consi...

Page 59: ...incident Diffuse light and the sum of re emitted light from all other layers attenuated by the intervening layers This is done for both downwelling and upwelling Diffuse light A fraction of the Diffu...

Page 60: ...to 1000 Diffuse light hemispherical response sensor The previous analysis of diffuse light transmission is appropriate for a cosine corrected sensor as it only considers the vertical component of the...

Page 61: ...he amount of light absorbed by a layer assuming completely black leaves was calculated The fraction of this absorbed light re emitted by the leaves was then assumed to be re emitted in all directions...

Page 62: ...terative solution is fairly straightforward given the computing power and is much simpler than the full numerical solution Calculating zenith angles Zenith angles are calculated from latitude longitud...

Page 63: ...Agric For Meteorol 35 83 101 Marshall B and Woodward F I eds 1985 Instrumentation for Environmental Physiology SEB Seminar series 22 CUP Monteith J L Unsworth M H 1990 Principles of Environmental Phy...

Page 64: ...are low When this happens replace them as soon as you can If you get a 0 mV reading the probe has not been read Take a light reading and try B again Probe battery life With a fresh set of batteries in...

Page 65: ...f these with you if there is any chance that your Ni Cd will become exhausted when no mains power is available for recharging Warning Don t leave the Workabout without a main battery for more than a d...

Page 66: ...AR circuits of the Beam Fraction sensor and SunScan probe are very stable and are not expected to change for the lifetime of the instrument Circuit adjustment facilities in the Beam Fraction sensor ar...

Page 67: ...th insufficient memory or insufficient system resources message Close any other applications that are running Delete any unnecessary data files stored on the Internal drive From the system screen sele...

Page 68: ...ls When transferring files to a PC data is transferred but there are repeated checksum or device IO errors Reboot your PC and start again See the advice on RS232 communications in the SunScan Tutorial...

Page 69: ...lt its symptoms or error messages what components of the SunScan system you are using details of any PC you are using software version numbers and hardware serial numbers see below SunScan circuit sch...

Page 70: ...xtension cables 10 m 25 m 50 m Mounting 1 4 inch Whitworth tripod socket Environmental protected to IP65 0 60 C working temperature Size 160 x 80 x 65 mm excluding shade ring Power Provided from SunSc...

Page 71: ...eight 1 73 m Closed length 0 68 m Weight 2 5 kg Spares Kit type SPS1 A detailed list of parts can be supplied on request The kit includes electrical components which might be subject to breakdown by e...

Page 72: ...towards the red end of the spectrum but this is compensated for by the sharp cut off at 670 nm In practice we have found that these sensors read to within a few percent of an accurate PAR sensor in na...

Page 73: ...studies will be looking at the ratio of incident and transmitted light and the graph shows the SunScan and Beam Fraction sensor are very closely matched in their cosine and spectral responses so the s...

Page 74: ...e following functionality Core Function Logger Connection orange V Power supply positive Sensor power positive switched for warm up green 0V Power supply negative Sensor power negative 0V brown HI Sig...

Page 75: ...ositive Sensor power positive switched for warm up green 0V Power supply negative Sensor power negative 0V brown HI Total PAR signal output positive Input channel for Total PAR grey LO Common signal o...

Page 76: ...Psion must be copied across to the Workabout and the application installed To do this you will need to use the SLINK or RCOM file transfer utilities or the PsiWin program if you have it Once you have...

Page 77: ...or Delta T if you wish to purchase a copy The Workabout Remote Link We give you below some notes on using each of these programs In every case you must set the Workabout s Remote Link on Access this...

Page 78: ...nsfer program on your PC Close down the Remote Link on the Workabout Example using SLINK SLINK lets you initiate all the file transfer commands from the Workabout s screens and menus Consult the earli...

Page 79: ...Enter to accept when you are happy with all the details The Workabout will warn you if you have chosen a filename that already exists and offer you various options Otherwise it will proceed and brief...

Page 80: ...ate it as follows C SUNSCAN COMMS I I md sun Check the new subdirectory now exists I dir Then type I copy c sunscan psion I sun This copies both the SunData program sundata app and sys 8087 ldd which...

Page 81: ...ile You should see this appear on the communications program screen You can stop the transfer by pressing On Esc on the Workabout or Ctrl X in the communications program After the file has been sent t...

Page 82: ...regardless of whether a SunScan probe is connected Useful for learning to use the software GMT Greenwich Mean Time also called Universal Time UT The standard time used for astronomical measurements an...

Page 83: ...R within and below a canopy PRN a text file format intended for directly printable output Spread a measure of the relative variation in light intensity along the SunScan probe It is calculated as the...

Page 84: ...Comms Test 31 Communication program 79 Communications checks 12 Communications failed 15 21 Compass 47 Configuration files 35 Connect 12 Constants 18 30 Continue 16 Copyright 2 53 Cosine response 71 8...

Page 85: ...f Workabout 14 16 25 portable 7 37 PC software 16 Photodiodes 21 44 Plot name 31 PRN files 37 81 Problem reports 67 Protection moisture 51 Psion Logo screen 33 subdirectories 33 System screen 8 14 33...

Page 86: ...ities 41 Utils 31 V Version numbers 67 W Warnings field use 39 46 48 50 51 58 64 general 2 54 73 hardware 50 62 63 software 8 10 15 32 34 35 45 75 Weather preferred 41 Windows running SunData 13 Wood...

Reviews: