background image

RetroSign GRX User Manual / December 2017 

20


DELTA 

Users 

‘Users’ is used to identify the operator of the instrument. The user name is saved in the log together 
with each measurement. 

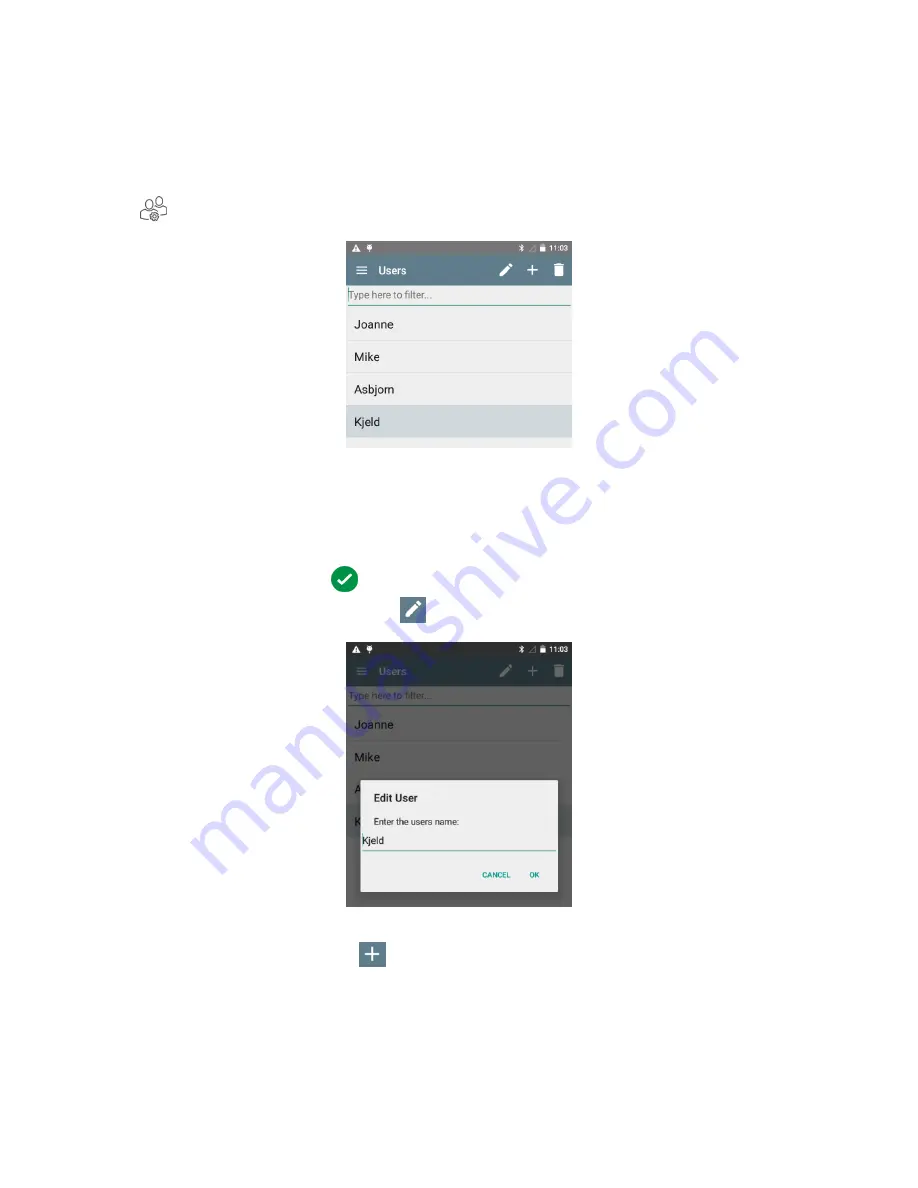
At the top of the main menu the selected user is shown. To change user, or add a new user, select   


‘Users’ from the main menu. This is then displayed on the screen: 


Here you have these five options: 

1) 

Activate

 a user by tapping the relevant user name on the list. 

2) 

Filter or find


an existing user by tapping ‘Type here to filter…’ and write the relevant filter. 

Complete by pressing 

3) 

Edit 

an existing user by pressing 

. In the pop-up box you can change the user name: 


4) 

Add 

new user by pressing 

. In the pop-up box, enter the relevant user name of the new 

user and press ‘OK’:  

Summary of Contents for RetroSign GRX-1

Page 1: ...45 72 19 40 00 roadsensors delta dk RetroSign GRX Retroreflectometer User Manual On site Quality Control of Road Traffic Signs High Visibility Clothing Conspicuity Tapes and License Plates in accorda...

Page 2: ...ler or an experienced radio TV technician for help RF Exposure statement RetroSign GRX is compliant with the requirement for RF exposure in US with 80 mm separation distance between the user and or by...

Page 3: ...COMPONENTS THE SOURCE CODE IS AVAILABLE UPON REQUEST Intended use purpose RetroSign GRX retroreflectometer is a portable field instrument used for on site inspection and quality control of retrorefle...

Page 4: ...RetroSign GRX User Manual December 2017 4 DELTA...

Page 5: ...RetroSign GRX User Manual December 2017 5 DELTA...

Page 6: ...RetroSign GRX User Manual December 2017 6 DELTA...

Page 7: ...ent geometry 13 GRX type ASTM 13 GRX type CEN 14 GRX type SAFETY 14 Battery 15 Battery charger 15 SECTION 3 Operating information 18 Getting started 18 Switching the instrument on off and stand by 18...

Page 8: ...61 Measurement 62 Log export 62 How to limit errors 63 SECTION 5 Maintenance 65 General care 65 Front lens 65 Battery 65 Battery charger 65 Calibration target 65 Calibration 66 Appendix A Specificatio...

Page 9: ...rect sheeting application RetroSign GRX combines CEN and ASTM geometries in one instrument and is available in three base models GRX 1 one entrance illumination and 1 observation angle GRX 3 one entra...

Page 10: ...tive Clothing at a 0 2 degree Observation Angle and an Entrance Angle of 4 degree discontinued Overview of RetroSign GRX It is very easy to operate the RetroSign GRX and requires a minimum of instruct...

Page 11: ...ed with magnets to the GRX and can easily be removed It defines the entrance illumination angle and is magnetically encoded for measurement standard and main observation angle The backside of the angl...

Page 12: ...omatic color recognition Sign legend and background retroreflectivity calculated contrast Sign property data collection Record temperature and relative humidity Automatic data storage USB port for dat...

Page 13: ...rring data records to a computer for further processing Factory calibrations The RetroSign GRX is factory calibrated The reference s RA value is measured in DELTA s DANAK accredited calibration labora...

Page 14: ...on angle are 0 33 GRX 1 and the three observation angles are 0 33 0 5 and 1 0 GRX 3 respectively and all available observation angles in GRX 7 i e 0 2 0 33 0 5 0 7 1 0 1 5 and 2 0 The measurement area...

Page 15: ...ble short circuiting the battery contacts Do not insert the battery in the charger if the battery is cracked Using a damaged battery may result in electric shock or fire See further details in the bat...

Page 16: ...green indicator light is flashing the battery is being fast charged Fast charging will automatically stop when the battery is fully charged For your safety Read all instructions Failure to follow all...

Page 17: ...Manual December 2017 17 DELTA Practical advice With continuous or repetitive charging cycles without interruption the charger can warm up This is of no consideration and does not indicate a technical...

Page 18: ...instrument on off and stand by Turn on press the red power button Stand by press the power button shortly to switch off RetroSign GRX and set it in stand by mode The instrument can easily be switched...

Page 19: ...on Function Explanation Measure Perform an inspection Series Select add or delete series of measurements Users Select add edit or delete a user Templates Add edit or delete templates Log Overview of c...

Page 20: ...elect Users from the main menu This is then displayed on the screen Here you have these five options 1 Activate a user by tapping the relevant user name on the list 2 Filter or find an existing user b...

Page 21: ...n inspection is defined as all the collected data and measurements on a single sign A template defines which measurements should be conducted for a specific inspection and contains information of comm...

Page 22: ...he GRX has a built in pass fail functionality that indicates the performance of the inspected sign When you have completed an inspection of a sign you will see one of these symbols The sign has passed...

Page 23: ...1 Filter or find an existing template 2 Edit an existing template 3 Add a new template 4 Delete a template Below are instructions for each of these options 1 Filter or find an existing template You fi...

Page 24: ...shows the template s that match the filter 2 Edit an existing template Edit an existing template by first tapping on the relevant template and then press at the top of the screen This is then displaye...

Page 25: ...ty to select the relevant number 0 10 Should a photo be included in the measurement Press Take Picture Optional feature Which data fields should be linked to the template Press Add new field and selec...

Page 26: ...wipe up down functionality to select the relevant number 0 10 Should a photo be included in the measurement Press Take Picture Optional feature Which data fields should be linked to the template Press...

Page 27: ...ect Series The list of series already defined in the GRX is now displayed on the screen In the bottom line of the series name a brief description of the series settings is shown Here you have these op...

Page 28: ...t Type 0 or leave the field blank if a performance check for one of these is not needed How many measurements of background and legend should been taken Use the swipe up down functionality to select t...

Page 29: ...elevant series name and type it at the top of the screen under Name Then design the new series by defining these elements Should it be a single or multiple measurements Note if Single Shot is activate...

Page 30: ...f your own data field Finish adding fields by pressing Add Any changes made to the series are automatically stored Once you have completed designing the new series press to return the series list 5 De...

Page 31: ...ity compliance testing see below section for further instructions Note You can change to single shot mode directly from the inspection screen If you do so the series chosen will be updated with this s...

Page 32: ...RetroSign GRX User Manual December 2017 32 DELTA Press Select MUTCD sign on the screen Then select the relevant MUTCD category from the list...

Page 33: ...lter the list On the next screen choose the correct variables for the sign you are about to inspect e g background color Press the drop down arrow next to the variable for a list of options see exampl...

Page 34: ...formation for further details You may alter the threshold offset value to a higher level than the required level e g 10 as in the example below Press done to transfer the information e g MUTCD code sh...

Page 35: ...eadings by pressing Next on the touch screen or press the trigger button and carefully follow the instructions on the screen Below details the different kind of actions you might be asked to do How ma...

Page 36: ...e the sign legend Place the RetroSign GRX on the element you want to measure and press Measure on the screen or press the trigger button on the GRX handle to do the measurement reading DELTA recommend...

Page 37: ...screen To redo the measurement press Redo measurement or press at the top left corner To accept the results press Confirm on the screen to confirm the measurement To stop the measurement completely pr...

Page 38: ...select the correct color from the list Continue performing your inspection by following the instruction steps on the screen At the top of the screen a process indicator highlights your progress in the...

Page 39: ...ccur on the screen For further details see section 4 Errors and warnings MUTCD Library The GRX uses the MUTCD library to identify the particular type of sign that is being inspected and to check that...

Page 40: ...ELTA Note special cases W3 1 W3 2 W3 3 and W3 5 are not supported by the GRX because these types of sign contain 3 or more colors How to work with the MUTCD library is further described in Section 3 W...

Page 41: ...t Log from the main menu and the list of series is displayed on the screen From the series list you can view series and delete inspections delete series data export series data These options are furth...

Page 42: ...og level you can view inspection tap on one of the inspections on the list to view the data of the particular inspection delete inspection swipe from right to left on the inspection and press the Dele...

Page 43: ...ns various data which is displayed on the GRX screen Below are explanations to the dataset connected to one inspection The symbol at the bottom of the screen indicates if there are several pages Use t...

Page 44: ...RetroSign GRX User Manual December 2017 44 DELTA Inspection page 1...

Page 45: ...RetroSign GRX User Manual December 2017 45 DELTA Inspection page 2...

Page 46: ...RetroSign GRX User Manual December 2017 46 DELTA Inspection page 3...

Page 47: ...se these icons Press the Delete icon to delete the whole data series Note Please be aware that all inspections within the series will be deleted Export series data Data can easily be exported to marke...

Page 48: ...e to have thumbnail pictures included in the exported files How to export data of several series Long tap on a series to enter select multiple mode In this mode you can select or deselect series by a...

Page 49: ...0 0 degrees in the kmz file You can also choose to have thumbnail pictures included in the export file Continue exporting the data by following the below steps Insert an USB stick in the USB port Pres...

Page 50: ...examples of a data transfer that is presented horizontally and vertically in an Excel data sheet and in Google Earth Fields marked green indicate that the sign has passed the pass fail check whereas...

Page 51: ...RetroSign GRX User Manual December 2017 51 DELTA Vertical view Google Earth file...

Page 52: ...if dark calibration is needed is to point the GRX and measure in a direction with no retroreflective objects i e shiny surfaces windows edges and lamps etc within a distance of at least 10 meters 33 f...

Page 53: ...screen press Done to complete the calibration session The instrument is now ready for measuring If the calibration is successful the calibration values used is stored in GRX and will be the suggested...

Page 54: ...instruction on the screen i e point the instrument in a direction with nothing 10 m 33 feet in front of it and away from any light source Press the trigger or press Calibrate to calibrate When the mes...

Page 55: ...instrument is ready for measuring Note If the measurement results still seem to be incorrect even after a dark calibration of the GRX it is recommended to contact your appointed dealer or DELTA Setti...

Page 56: ...decimal point to the measurements throughout the instrument and exported files Sound Adjust volume activate inactivate high volume beeper The instrument sound volume can be adjusted The beep function...

Page 57: ...time zone set time and date format In this setting Automatic date time and Automatic time zone can be activated and deactivated requires internet connection If one or both functions are activated the...

Page 58: ...sion fixture is mounted onto the GRX and the captive screw is tightened securely with a screwdriver see photo below Following this the GRX with the mounted extension fixture can now be mounted on the...

Page 59: ...d with the wing nut to fit the sign height Note In order to obtain correct readings when taking measurements with the extension pole make sure that the GRX angle adapter plate is in full contact with...

Page 60: ...h connection off from the GRX Go to Settings in the main menu select Bluetooth and click the On Off button Press the remote button for 15 seconds until a green and red LED flashes alternately Once you...

Page 61: ...ight be defective Warning The battery is getting low Please replace it Low battery voltage Replace battery Warning The instrument is almost out of storage Low storage space Delete unused inspections E...

Page 62: ...ler Error Dark Signal raw value too High Low on channel Reference Dark Target Hardware problem on reference channel If problem persists contact your dealer Error LED current too High Low Hardware prob...

Page 63: ...surfaces are clean free of dust and undamaged Dust and smear on the optical surfaces might influence the measured values considerably It is very important to keep the instrument front lens and the wh...

Page 64: ...sheeting types it is important to position the RetroSign GRX correctly and hold it vertically in order to obtain correct readings as seen by the driver of a vehicle When checking correct positioning...

Page 65: ...battery can be stored within a temperature range between 10 C to 60 C 14 F to 140 F but we recommend storage between 0 C to 30 C 32 F to 86 F due to lifetime considerations of the battery Allow a warm...

Page 66: ...undesanstalt and NIST National Institute of Standards and Technology For further information contact your appointed dealer or DELTA Denmark The RetroSign GRX may be calibrated with any DELTA approved...

Page 67: ...ation angles 1 0 2 0 33 0 5 0 7 1 0 1 5 2 Type SAFE Geometry CEN EN 20471 Illumination angle 5 Observation angle 0 2 Location position system GNSS Latitude Longitude Format Decimal degrees Datum WGS 8...

Page 68: ...memory stick Data transfer optional iPad app via WiFi WiFi and wireless radios Frequency band 2400 MHz to 2480 MHz Maximum transmitted radio frequency power Below 93 mW Environmental characteristics O...

Page 69: ...arch function e g background color installation date legend color MUTCD code pass fail series name Libraries for measurements functions Instant export to company back office Export to cloud drive It i...

Page 70: ...arch in App Store Note The app for RetroSign GRX is only available for iPad running IOS 10 or later versions Using the App The GRX App operates with two menus Main Menu and Manage Menu Main Menu is fo...

Page 71: ...Menu Now you will see a list of the completed series in the data set see example below From this list select a relevant series by tapping on the series name This brings up a list of the completed insp...

Page 72: ...ical presentation of data chart showing the inspection data for the legend and the background at various entrance angles 3 Photo optional image of the photo that was taken during the inspection if no...

Page 73: ...the inspection pass or fail to comply 7 Measurement data average of the measurement data for legend and background When you have finished press Main Menu at the bottom of the screen to return to the...

Page 74: ...the right shows the average inspection data in a series at various entrance angles for legend background and ration 4 Search The search function enables you to search your data set by date background...

Page 75: ...has passed the pass fail check whereas if a line is red is has failed the check 5 Map The GRX App has a mapping tool which can be used to show the locations of the individual inspections To see where...

Page 76: ...d on the map Tap on the next to the measurement ID in order to see the data associated to the inspection Manage Menu Below are instructions for each of the items in the Manage Menu 1 Series To see or...

Page 77: ...instrument Any deleted or edited series will also be transferred 2 Templates To see or alter a template select TEMPLATE in the Manage Menu Below is an example of the screen from managing series To add...

Page 78: ...ight to left on the particular user profile on the list 4 Export It is possible to export a series or all series from the iPad to Excel To export data to Excel select EXPORT in the Manage Menu Now a l...

Page 79: ...RetroSign GRX User Manual December 2017 79 DELTA The data is then exported to an Excel spreadsheet...

Page 80: ...017 80 DELTA Appendix C Delivery The RetroSign GRX instrument is delivered with the below items 1 Carrying case 2 Angel adaptor 3 RetroSign GRX instrument including battery 4 Battery charger 5 Spare b...

Reviews: