


DI–720/DI–722/DI–730 Series User Manual
Getting Started
20
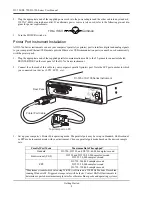
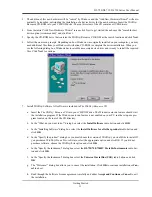
5.
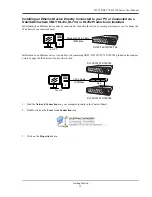
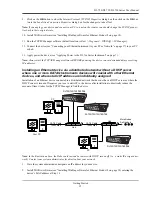
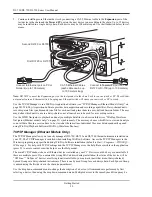
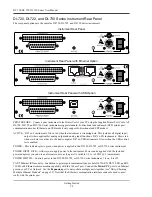
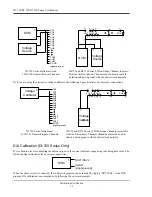
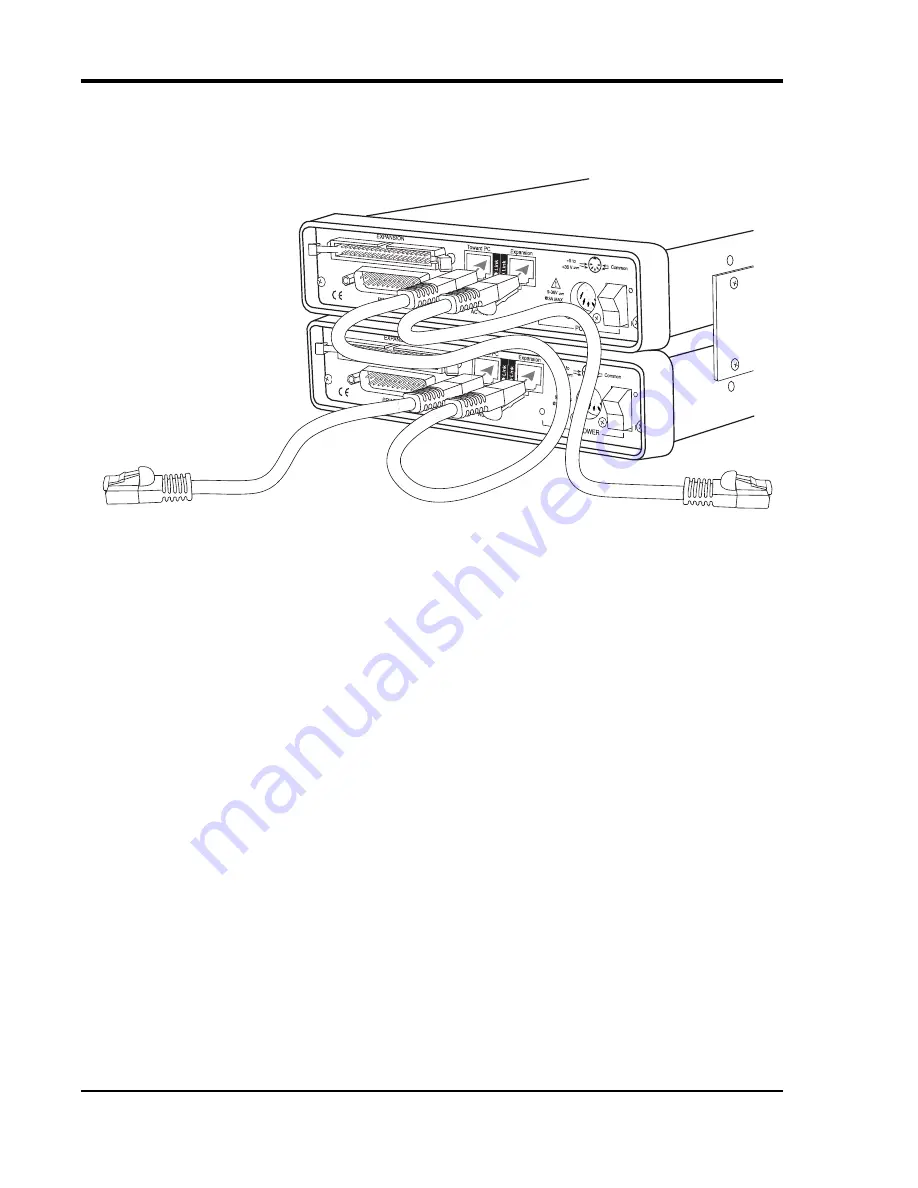
Continue installing more Ethernet devices by connecting a CAT-5 Ethernet cable to the
Expansion
port of the
last device in the chain and the
Toward PC
port on the next device you are adding to the chain. Up to 32 devices
may be installed in a single daisy chain. Each device may be 100 meters apart. Use the illustration below for ref-
erence.
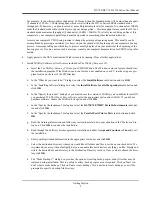
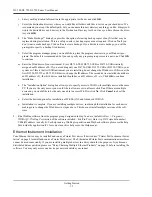
Note: DO NOT connect the Expansion port on the last product in the chain back to your network or PC. These Ether-
net products use an Ethernet switch. Looping any Ethernet switch will cause your network or PC to crash.
Use the TCP/IP Manager to run W
IN
D
AQ
Acquisition Software (see “TCP/IP Manager (Ethernet Models Only)” on
page 20). W
IN
D
AQ
Acquisition Software provides data acquisition and recording capabilities. Daisy-chained units
record separate files synchronously (one file for each unit) and place them in a user-defined Session folder. The user
may define which units to use in a daisy-chain so not all units have to be used for a recording session.
Use the WWB Navigator to playback and analyze multiple data files in a Session folder (see “WinDaq Waveform
Navigator (Ethernet models only)” on page 21) synchronously. The user may choose which files to view and analyze
so not all data files in a session have to be viewed at the same time. Individual files may be independently opened
using W
IN
D
AQ
Playback Software (W
IN
D
AQ
Waveform Browser).
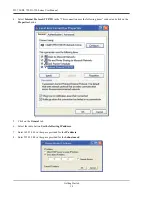
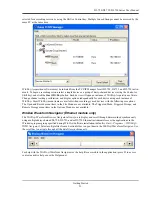
TCP/IP Manager (Ethernet Models Only)
The TCP/IP Manager allows you to easily manage all DI-720, DI-722 and DI-730 Ethernet Instruments installed on
your PC. The TCP/IP manager is installed when installing W
IN
D
AQ
Software. Access the TCP/IP Manager via the
Windows program group specified during W
IN
D
AQ
Software installation (default is
Start > Programs > WINDAQ >
IP Manager
). For help with TCP/IP settings and the TCP/IP Manager see the help files accessible in the application
(press F1 to access context-sensitive help or use the Help menu).
The main TCP/IP window shows all Ethernet devices installed on your PC. Devices could be busy or unavailable if
there are multiple users. If you entered the wrong MAC address during installation, the status of the device will be
“Off Line.” “UnSynced” devices are all single units installed to your network (units that are not daisy-chained).
Synced Groups are daisy-chained instruments. There is one Synced Group for each daisy chain. Each Synced Group
is named using the first device in the chain (in parentheses).
Use the drop down command menu to change the description of a device. All commands are performed by first
selecting a device, then using the drop down command menu. Multiple devices in the same Synced Group may be
First DI-720 or DI-730
Second DI-720 or DI-730
Connect to Ethernet port on PC or
Network (up to 100 meters)
Connect to
Toward PC
port on next
DI-720 or DI-730 (up to 100 meters)
CAT-5 Ethernet Cables
(each cable can be up
to 100 meters long)
Summary of Contents for DI-725/E
Page 2: ......
Page 4: ......
Page 6: ......
Page 10: ......
Page 32: ......
Page 40: ......
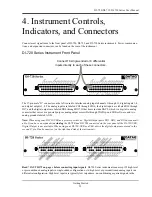
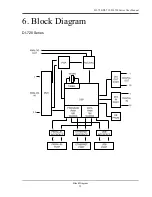
Page 45: ...DI 720 DI 722 DI 730 Series User Manual Block Diagram 35 6 Block Diagram DI 720 Series 1 32...
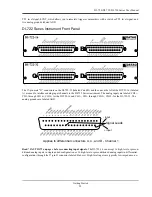
Page 46: ...DI 720 DI 722 DI 730 Series User Manual Block Diagram 36 DI 722 Series...
Page 106: ......
Page 107: ......


