


DT-50 and DT-50A Tire Changer
48
P/N 5900260 — Rev. A1 — Dec. 2020
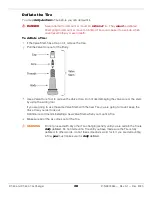
Inflate the Tire
Tire inflation has three stages:
•
Bead
sealing
is putting in a small amount of air pressure to push the Tire up against the Rim so
the rest of the air you put in does not leak out.
Remove the Valve Core before beginning the Bead
sealing
, as that allows more air to go in through the Valve Stem.
•
Bead
seating
is putting more air pressure into the Tire until you hear a “pop”, which indicates the
Beads (on both sides of the Tire) have slipped over the Bead Humps into their Bead Seats.
Put the
Valve Core back in once the Beads are seated
.
•
Inflation
is adding more air pressure to the Tire to get the pressure up to the manufacturer’s
recommended pressure for the Tire.
Do not stand over the Tire when inflating it
.
Each of these stages is covered separately below.
⚠
CAUTION
The inflation process can produce a great deal of noise. Wear ear protection when
inflating a Tire.
⚠
WARNING
Do not exceed the maximum air pressure specified by the Tire manufacturer. This
increases the chances that the Tire could explode, causing injury or death. Use the
Inflation Gauge to monitor the air pressure in the Tire you are inflating.
⚠
DANGER
If you are inflating a Tire that requires more than 60 psi, you
must
use a
for safety purposes. If a Tire fails at high
pressure, it can explode and cause serious injury or death to anyone near it. Using
a Tire Inflation Cage helps reduce the danger.
Important inflation notes:
•
Identify the
recommended
inflation pressure of the Tire (this can usually be found on a sticker on
the driver-side doorjamb of the Vehicle or in the owner’s manual) and the
maximum
inflation
pressure of the Tire (usually located on the sidewall). When inflating,
your goal is the
recommended inflation pressure
. Do
not
exceed the maximum inflation pressure when
inflating the Tire.
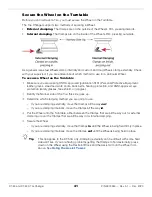
•
Make sure the Tire is restrained for inflation: either
internally
Important:
Do not inflate a Tire if it is externally clamped; external clamping interferes with
inflation.
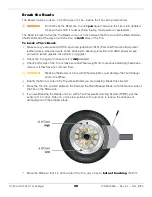
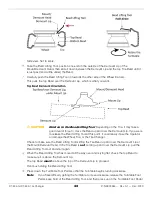
Bead Sealing
To seal a Tire’s Beads, you put a small amount of air pressure into the Tire, which pushes the Tire up
against the Rim so that additional air you put in does not leak out.
To Seal the Beads
:
Make sure you are wearing OSHA-approved (publication 3151) Personal Protective Equipment:
leather gloves, steel-toed work boots, back belts, hearing protection, and ANSI-approved eye
protection (safety glasses, face shield, or goggles).
Make sure the Valve Core has been removed.
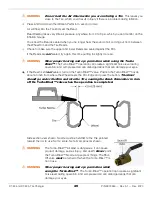
Clip the Air Chuck to the Valve Stem.
The Air Chuck includes a self-gripping clip so you do
not
have to hold it in place during inflation.
Summary of Contents for DT-50
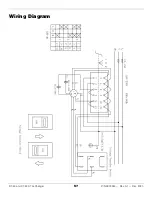
Page 57: ...DT 50 and DT 50A Tire Changer 57 P N 5900260 Rev A1 Dec 2020 Wiring Diagram...
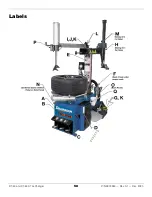
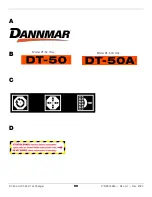
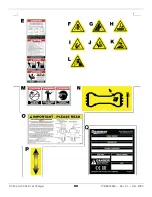
Page 58: ...DT 50 and DT 50A Tire Changer 58 P N 5900260 Rev A1 Dec 2020 Labels...
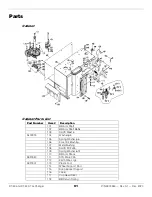
Page 60: ...DT 50 and DT 50A Tire Changer 60 P N 5900260 Rev A1 Dec 2020...
Page 73: ...DT 50 and DT 50A Tire Changer 73 P N 5900260 Rev A1 Dec 2020 Gearbox...
Page 83: ...DT 50 and DT 50A Tire Changer 83 P N 5900260 Rev A1 Dec 2020 Maintenance Log...
Page 84: ...1645 Lemonwood Drive Santa Paula CA 93060 USA 2020 Dannmar Inc All rights reserved Dannmar com...