


30
CRICKET STEPPER
OWNER’S MANUAL
m
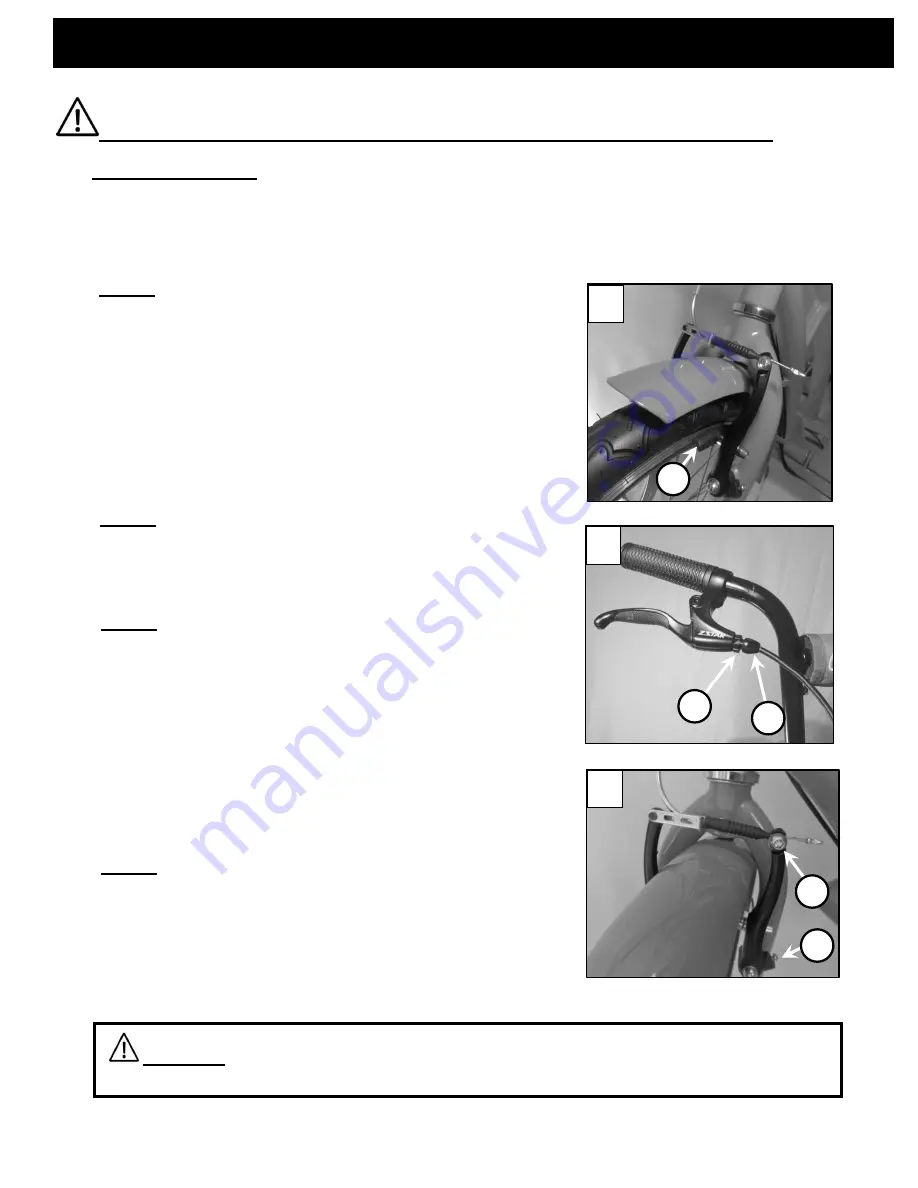
V-BRAKE FUNCTION AND ADJUSTMENTS. STEPS 1-4
A
B
C
•
STEP 2. To adjust the brake cable, thread the brake
lever adjuster in or out as needed IMAGE (B) ITEM 1,
until the desired brake adjustment is obtained. Then
proceed to tighten the lock nut. IMAGE (B) ITEM 2.
•
STEP 3. Check if extra adjustment is needed. If needed,
loosen the cable pinch bolt counter clockwise with a
5mm Allen key. Bolt located on the right v-brake arm.
IMAGE (C) ITEM 1. Adjust the cable tension on the
brake arm by pulling or loosening the cable through the
pinch cable bolt as needed. When the desired tension is
reached tighten the pinch bolt. You will have to play
with this adjustment until your brakes feel good. The
small screws IMAGE (C) ITEM 2, on each arm adjust the
spring tension, helping to center the pads around the
rim wall by screwing them in or out.
STEP 4. Verify the V-brake is properly functioning.
Stand next to the Tricycle. Squeeze the front brake
lever located on the right side of the handle bar,
and try to push the bike forward. The front wheel
should lock as you push the bike forward. The hand
brake lever shouldn't touch the handlebar when it is
on.
•
STEP 1. Verify that the rubber brake blocks are properly
adjusted. Check the rubber blocks are aligned with the rim
wall; make sure the blocks do not touch the tire when the
V-brake is on. IMAGE (A) ITEM 1.
When the V-brake is off,
the rubber brake blocks should be separated from the
rim wall. When the V-brake is on, the rubber brake
blocks should apply enough force against the rim walls
to stop the wheel form spinning, when you squeeze the
right hand brake lever. The brake hand lever should be
set so the brake blocks hit the rim when the lever is
pressed about ¼ to ½ of the way. If this is not the case
the brake needs cable tension adjustments.
CRICKET STEPPER is equipped with a V-Brake. The V-Brake serves two
functions, one safety, and for quick removal and installation of the
front wheel.
It allows the owner/user to remove the wheel following
easy simple steps and without using any tools, if extra space for storage
is needed. MORE INFORMATION ON V-BRAKE FUNCTION PAGE 22.
INFORMATION NOTE:
1
2
1
2
1
WARNING: If owner/user is not completely sure the V-brake is properly adjusted, it is
vital to consult a local bike mechanic for professional assistance.