


Programmable DC Power Supply 62000L Series User’s Manual
3-28
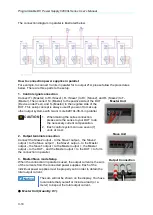
3.12.4 Calibration Procedures
This section describes the procedure to calibrate the power supply from the front panel.
shows the calibration points that should be used to calibrate the output voltage and
current for the power supply.
Table 3-1 Calibration Points
Voltage / Current
Calibration Point
CAL V
V_LO
V_HI
CAL C
C_LO
C_HI
Please follow the procedures below to calibrate the output voltage and current of the power
supply.
1. Disconnect all loads from the power supply.
2. To calibrate the output voltage, connect a DVM (e.g. Model 12061) across the output
terminals. To calibrate output current, connect an appropriate current monitoring resistor
across the output terminals and connect a DVM across the terminals of the monitoring
resistor.
3. Unsecure the power supply according to the procedure given in the
section 3.12.1
. If the
procedures are performed, the mode will exit when complete.
Note
1. An accurate digital multimeter is required. The model must be able to
withstand the input current, 7A, or the high current will burn out the DVM’s
current fuse and possibly damage the DVM’s circuitry.
2. The power supply needs to be in calibration mode. Use the procedures in
section 3.12.1
to check the condition and to set the display as shown below.
SECURE
OFF
4. Press the
Menu
button once. Rotate the knob to the CAL.
5. Press the
Menu
button once to confirm.
6. Rotate the knob to CAL V to calibrate output voltage, and to CAL C to calibrate output
current. Select CAL V to calibrate the output voltage.
7. Press the
Menu
button once to confirm. A blinking V_LO will show on the display.
8. Press the
Menu
button once to confirm. the supply starts running the LO voltage
adjustment. The display will look like the state below.
V_LO
01.800V
9. Read the DVM and adjust the voltage value on the display of the 62000L series to match
the measured value. For example, if the DVM’s reading is 2.029V, use the knob and the
or
buttons to adjust the display value to 2.029V. The display will look like the state
below. For accurate calibration, you should wait for the DVM reading to stabilize for
several seconds.
V_LO
1.429V
10. Press the
Menu
button once to confirm. Then the supply starts running the HI voltage
adjustment. The display will look like the state below.
V_HI
34.200V
11. Read the DVM and adjust the voltage value on the display of the 62000L series to match
the measured value. For example, if the DVM’s reading is 32.063V, use the knob and the


