background image

Install Bracket and CMK

3-9

9.

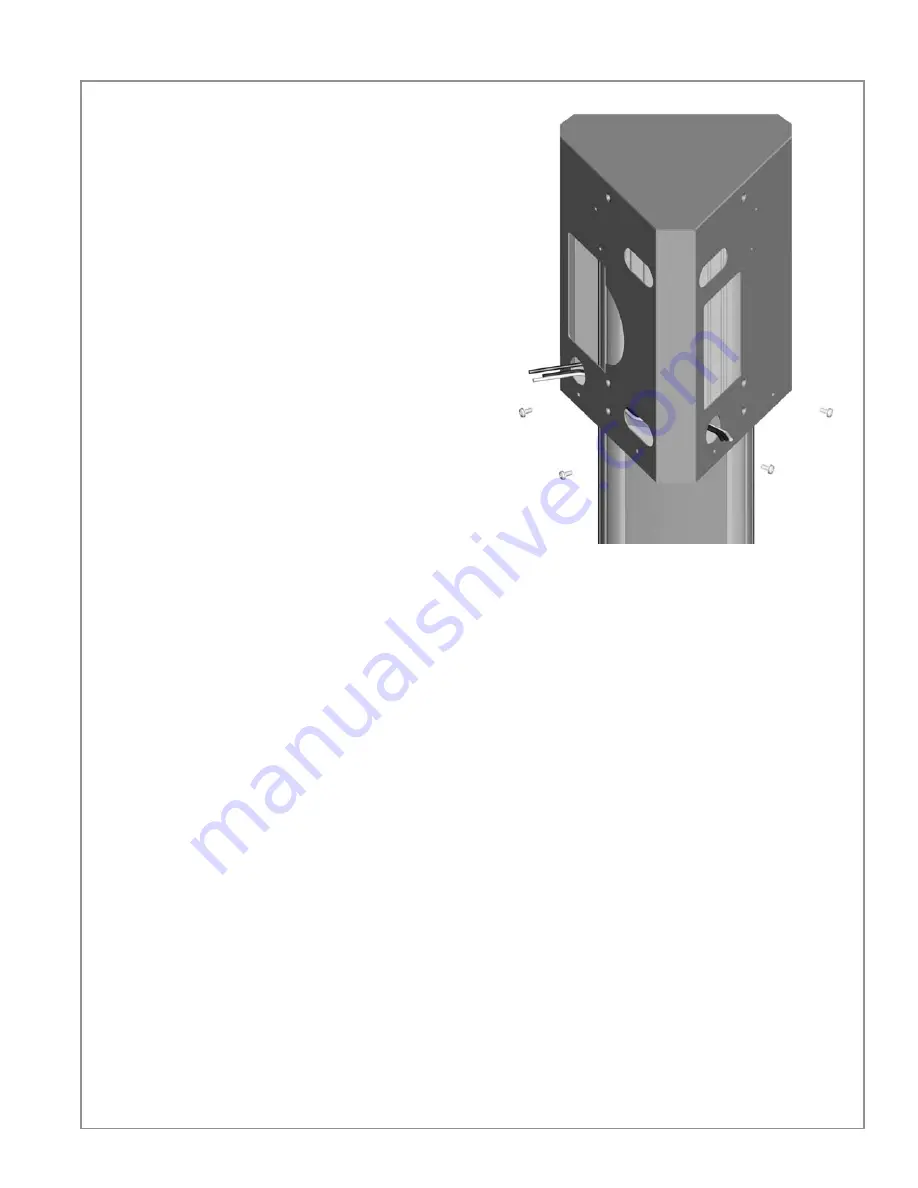
Slide the bottom brace up, aligning its holes with the 
main bracket and fastening to the main bracket using 
two #8 - 32 x 3/8” screws on each side.

You have now completed installation of the bracket and 
are ready to install the stations and charging cords as 
described in the Section 4.

#8 - 32 x 3/8” 
screws (4)

Summary of Contents for CPF25

Page 1: ...CPF25 Pedestal Mount Charging Stations Installation Guide ChargePoint Inc 254 East Hacienda Avenue Campbell CA 95008 USA US toll free 1 877 850 4562 www chargepoint com...

Page 2: ...3 7 3 4 Dual Station with Cord Management 3 10 4 Install Station s and Charging Cord s Step 3 Mount the Station s 4 1 Step 4 Connect the Service Wiring 4 2 Step 5 Connect the Charging Cord s 4 3 Step...

Page 3: ...Wrench rated to at least 100 ft lbs 15 16 24 mm 6 point Deep Socket for 5 8 nut Adjustable Wrench Bubble Level 2 Phillips Screwdriver Wire Stripper Voltage Tester T10 Torx Driver NOTE The tools listed...

Page 4: ...T10 Torx Screws 2 Spare Activation Label 1 A duplicate label is attached to the inside of the main unit KEEP this spare label because it contains important information that is needed to activate the s...

Page 5: ...Screws 4 Only two pedestal covers are needed One can be discarded depending on whether a Cord Management Kit CMK is being installed NOTE To prepare the installation site for installing a pedestal mou...

Page 6: ...k Washers 4 Single Station with Cord Management Bracket 20 x 4 Screws 4 Lock Washers 4 Dual Station no Cord Management Main Bracket Bottom Bracket Cover Internal Bracket 10 32 x 4 screws 4 8 32 x 3 8...

Page 7: ...u Install 1 5 Cord Management Kit CMK If you ordered the optional cord management kit it ships in a box containing Cord management assembly with pre installed EV CHARGING ONLY sign 1 Cable clamps 2 ex...

Page 8: ...the 5 8 nuts and washers and the 1 2 drive torque wrench with 15 16 deep socket as shown Adjust the lower nuts as necessary to ensure the mounting pole is level When level tighten the nuts on top of...

Page 9: ...wn Tighten the screws using a Phillips screwdriver NOTE As illustrated the cover you use at the back of the pedestal depends on whether your station includes a Cord Management Kit CMK Discard the extr...

Page 10: ...and its associated components to the pedestal Follow the steps associated with the particular CPF25 model you are installing Single Station no Cord Management see page 3 3 Single Station with Cord Man...

Page 11: ...installing the charging station IMPORTANT Do not unwrap the ropes Remove and discard the two 3 8 drive shipping screws from the front face of the CMK NOTE When you remove the shipping screws the coun...

Page 12: ...in front of the pedestal 3 Reinstall the ground lug to the pedestal using the 7 16 wrench and the two 1 4 x20 screws you removed 4 Run the remaining service wiring through the opening in front of the...

Page 13: ...bracket and into the stand offs on the pedestal Tighten using a Phillips screwdriver 7 Route the service wiring through the wiring hole in the front of the bracket You have now completed installation...

Page 14: ...ound lug then run a 10 gauge ground wire from the ground lug through the wiring opening in front of the pedestal 3 Reinstall the ground lug to the pedestal using the 3 8 wrench and the two screws you...

Page 15: ...old the CMK against the back of the pedestal while aligning the four 4 screws inserted in the previous step into the corresponding holes in the CMK NOTE The spacer on the pedestal should slide into th...

Page 16: ...nd wire from the service wiring to the ground lug then run two 10 gauge ground wires from the ground lug through the wiring opening in front of the pedestal 4 Reinstall the ground lug to the pedestal...

Page 17: ...nding holes in the pedestal 7 Fasten the main bracket to the pedestal using 10 32 x 4 screws and lock washers at the top and two 10 32 x 4 screws and spacers at the bottom 8 Route the service wiring t...

Page 18: ...its holes with the main bracket and fastening to the main bracket using two 8 32 x 3 8 screws on each side You have now completed installation of the bracket and are ready to install the stations and...

Page 19: ...through the opening in the front of the pedestal If installing the Power Share kit follow the steps in Appendix B before continuing 6 Insert the four 4 long 1 4 x 20 screws Install lock washers on ea...

Page 20: ...e main bracket with the corresponding holes in the top internal brace 10 Route the service wiring each of the wiring holes located in the left front corner of each main bracket 11 Fasten the main brac...

Page 21: ...its holes with the main bracket and fastening it to the main bracket using two 8 32X3 8 screws on each side You have now completed installation of the bracket and CMK and are ready to install the sta...

Page 22: ...and the bracket Position the mounting skirt against the back of the main unit as shown and hold it in place while hanging the main unit on the protruding top screw Route the service wiring through the...

Page 23: ...ng can easily reach the connectors on the charging station s terminal block 2 Strip each wire 1 2 3 Fully insert wires into the connectors on the left side of the terminal block as shown 4 On each con...

Page 24: ...s into the corresponding connectors on the right side of the terminal block as shown 3 On each connector press the white clip all the way down until it snaps into place CAUTION Ensure each wire is ful...

Page 25: ...Place the wire cover over the exposed wiring on the terminal block Using a coin lock the wire cover in place as shown NOTE To avoid damage do not use a screwdriver 2 Place the cover over the front of...

Page 26: ...d to remove any twist or kinks 2 Align the knot bearing on each rope to its corresponding mating feature on the cable clamp Turn the knot bearing clockwise approximately 1 4 turn You may need to push...

Page 27: ...the shipping box with each main unit The exact location to the parking space where the CPF25 is physically installed A smart phone with Internet access Installer account information user name and pass...

Page 28: ...share your GPS location data with the ChargePoint mobile site 6 When prompted touch OK to review the station s location on GoogleTM Maps 7 Review the station address and zoom in to review the initial...

Page 29: ...eway and the CPF25 charging stations If installing multiple radio groups use one page for each radio group this page is included in all Installation Guides Gateway CPF25 CPF25 CPF25 CPF25 CPF25 CPF25...

Page 30: ...nnections are clean and snug Electrical enclosures are clean and free of wire strands and metal shavings All covers are installed and all fasteners are tightened The LED located at the bottom of the C...

Page 31: ...powered on and activated the status light on the front of the station illuminates as follows OFF Idle including vehicle plugged in but not authorized Pulsing Yellow Authorization in progress Pulsing...

Page 32: ...y and smoothly it is likely that it s rope has come off the pulley and you must re position it You will need T25 L wrench Follow these steps 1 Using the T25 L wrench loosen the set screws on each side...

Page 33: ...the rope that doesn t move freely is facing towards you 4 Inspect the rope to ensure it is properly aligned onto the pulley 5 Carefully lower the weight back into the retractor 6 Rotate the top cap b...

Page 34: ...installed as part of the make ready Connector Type SAE J1772TM Cable Length 6 Cable Management 18 5 5 meters Cable Length 8 Cable Management 23 7 0 meters Overhead Cable Management System Yes Card Re...

Page 35: ...C Article 625 compliant Surge Protection 6kV 3000A In geographic areas subject to frequent thunder storms supplemental surge protection at the service panel is recommended EMC Compliance FCC Part 15 C...

Page 36: ...A 3 Wiring Diagram The following illustrations describes the wiring for installing a CPF25...

Page 37: ...und Connect to these systems In a wye system connect the station to ANY two lines as shown below In a delta system connect the station to a center tapped secondary only where the center tap is bonded...

Page 38: ...se components are included in the shipping box with the pedestal and can also be purchased from ChargePoint by ordering a CPF25 Pedestal Mount Kit 8 32 X 3 8 Screws 4 5 8 11 X 9 Grade 55 Bolts 4 5 8 1...

Page 39: ...on site and that the conduit and service wiring is positioned as described on the installation template It is recommended that a jig be created to position the conduit before pouring the concrete Foll...

Page 40: ...adjust these instructions to comply with codes that apply at your installation location Tools Required Electric drill or Hammer drill 1 2 chuck may be required depending on drill bits used Consumable...

Page 41: ...e until it hardens Place the plug over the long end of a bolt and then use the bolt to push the plug to the bottom of the hole 6 Fill each hole with epoxy to about 2 1 2 to 3 below the top Continue im...

Page 42: ...ed parking platform check to make sure that all pedestal mounting components are readily available at the installation site Always check local codes to ensure compliance Ensure you have adequate wirin...

Page 43: ...s shown 1 Run the L1 and L2 service wires into the hole into the hole in the bottom of the junction box NOTE Maximum wire size is 6AWG 1 Twist two 10 gauge wires approximately 18 long onto each of the...

Page 44: ...tom lip of the head assembly Remove the tape from the adhesive strip on the back of the sign With the adhesive strip facing toward the pedestal insert the top left corner of the sign under the groove...

Page 45: ...s slightly 2 Slide the sign all the way down ensuring its bottom edge is located behind the plastic cap on the cord management assembly as shown 3 Re install the top assembly Remember to tighten the s...

Page 46: ...ucts provided by CHARGEPOINT under each of the Limited Warranty and the Extended Warranty may be re manufactured or reconditioned Products or if the exact Product is no longer manufactured by CHARGEPO...

Page 47: ...ICULAR PURPOSE EVEN IF CHARGEPOINT OR DISTRIBUTOR HAS BEEN INFORMED OF SUCH PURPOSE OR AGAINST INFRINGEMENT Some states or jurisdictions do not allow the exclusion of express or implied warranties so...

Page 48: ...the International Sale of Goods shall not apply This Limited Product Warranty is the entire and exclusive agreement between you and CHARGEPOINT with respect to its subject matter and any modification...

Page 49: ...ion you should review this manual carefully and consult with a licensed contractor licensed electrician and trained installation expert to ensure compliance with local building practices climate condi...

Page 50: ...254 East Hacienda Avenue Campbell CA 95008 USA US toll free 1 877 850 4562 www chargepoint com Document Part Number 75 001164 01 Rev 3...

Reviews: