background image

Copy

Print

Fax

Scan

Network Settings & Remote UI

Quick View- Perform Useful Tasks

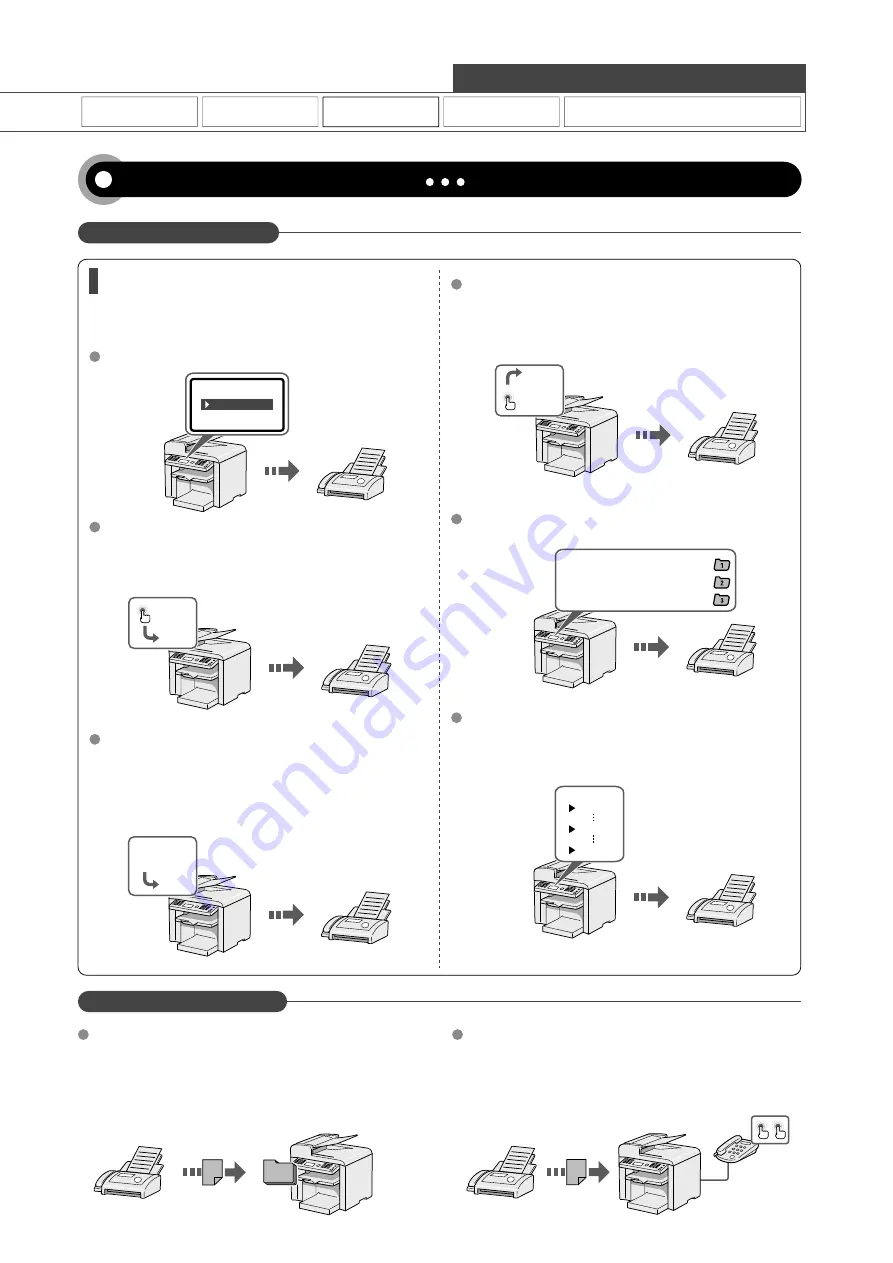
Various Sending Functions

Various Receiving Functions

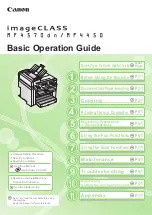
Various Methods for Specifying a Destination

You can register fax destinations in the address book. You can 
specify the destinations using various methods, enabling you to 
send documents quickly and easily.

By registering destinations in one-touch keys, you can specify 
a destination in one step.

<RXFDQUHJLVWHUXSWRGHVWLQDWLRQVLQRQHWRXFKNH\V

Because you can register up to 100 destinations under coded 
dial codes, you can register destinations which cannot be 
registered under one-touch keys.
If you forget the coded dial codes, you can specify the 
destination by searching it in the address book.

Received documents are normally printed immediately. 
However, you can store the documents temporarily in the 
memory without printing.
You can print the stored documents at any time. If you do not 
need them, you can delete them, saving paper to be used.

If an external telephone is connected, you can switch to the 
fax receiving mode immediately by dialing the ID number for 
fax receiving using the dial buttons of the telephone during a 
phone call.

You can combine multiple destinations and register them as a 
group.
Up to 50 destinations can be combined.

By scanning a document once, you can send the same 
document to multiple destinations.

Various Sending/Receiving Functions

For details, see "Using the Fax Functions" from p. 6-1.

Destination search

Destination Group

Sequential broadcast

Specifying from the sending history

One-touch keys

Coded dialing

Receiving in the Memory

Remote Receiving

B B B B B

A A A A A

C C C C C

A A A

BBB

# # #

Dial Code

A A AA
BBBB
CCCC

The previous setting

The second previous setting

The third previous setting

A A A

C C C

M M M

S S S


Summary of Contents for imageCLASS MF4450

Page 1: ...1 6 Using the Scan Functions P 7 1 7 Maintenance P 8 1 8 Troubleshooting P 9 1 9 Registering Setting the Various Functions P 10 1 10 Appendix P 11 1 11 Basic Operation Guide Be sure to read the manua...

Page 2: ...specify the copy ratio in percentage You can copy 1 sided documents on both sides of paper You can sort copies into sets arranged in page order You can reduce multiple documents to copy them onto one...

Page 3: ...t on a computer display Some printer driver settings are provided as Profiles beforehand You can perform printing which suits your needs only by selecting a Profile Various Printing Functions For deta...

Page 4: ...rectly from a Computer PC Fax For details see Fax in the e Manual Forwarding the Received Fax Manual Forwarding Registering Destinations in the Address Book For details see Registering Destinations in...

Page 5: ...r you can store the documents temporarily in the memory without printing You can print the stored documents at any time If you do not need them you can delete them saving paper to be used If an extern...

Page 6: ...supplied with Windows operating systems There are various scanning methods Scanning from the Scanner and Camera Wizard dialog box Scanning from the Windows Fax and Scan dialog box Scanning from Windo...

Page 7: ...nformation Remote UI On Off Configuring the machine Communication mode Communication speed Waiting time for connection DNS Configuring a computer IP address Subnet mask Gateway address As needed Confi...

Page 8: ...Glass 2 4 Loading Document in the Feeder 2 4 Paper Requirements 2 6 Paper Size 2 6 Paper Type 2 7 Printable Range 2 8 Loading Paper 2 9 In the Paper Cassette 2 9 In the Multi Purpose Tray 2 11 Precaut...

Page 9: ...nts in Memory to Other Destinations Manual Forwarding 6 14 Checking and Managing Fax Documents in Memory 6 15 Checking and Canceling Fax Jobs 6 15 Printing Received Fax Documents 6 15 Checking and Del...

Page 10: ...connected or configured properly 9 10 If You Cannot Solve a Problem 9 10 If a Power Failure Occurs 9 11 If You Cannot Solve a Problem 9 12 Customer Support U S A 9 12 Customer Support Canada 9 12 Prin...

Page 11: ...curity Before Using the Machine Document and Paper Handling Copying Printing from a Computer Registering Destinations in the Address Book Using the Fax Functions Using the Scan Functions Maintenance T...

Page 12: ...ons Used in This Manual The following symbols and key names are a few examples of how keys to be pressed are expressed in this manual Operation panel keys Key icon Key name Example Stop Display Specif...

Page 13: ...d to rain or snow A location near a water faucet or water A location exposed to direct sunlight A location subject to high temperatures A location near open flames When installing the machine gently l...

Page 14: ...e machine If these items come into contact with a high voltage area inside the machine this may result in a fire or electrical shock If these items are dropped or spilled inside the machine immediatel...

Page 15: ...d in a bundle A part of the power cord is put in an aisle The power cord is put in front of the heating appliance CAUTION The fixing unit and its surroundings inside the machine become hot during use...

Page 16: ...e into direct contact with your skin If the toner comes into contact with your skin wash with soap If the skin becomes irritated or you inhale the toner consult a physician immediately Do not pull out...

Page 17: ...e Air conditioner Shredder Equipment that consumes a large amount of electricity Equipment that generates electrical noise When unplugging the power cord keep interval of 5 seconds or more before plug...

Page 18: ...achine is designed with the latest technology to provide trouble free operation If you encounter a problem with the machine s operation try to solve it by using the information in Chapter 9 If you can...

Page 19: ...event that this product including the SOFTWARE is shipped transferred or exported into any country 2 Rights holders of the SOFTWARE retain in all respects the title ownership and intellectual propert...

Page 20: ...of the FCC Rules These limits are designed to provide reasonable protection against harmful interference in a residential installation This equipment generates uses and can radiate radio frequency en...

Page 21: ...lities and services that may affect the operation of this equipment When such changes are necessary the telephone company is required to give adequate prior notice to the user However if advance notic...

Page 22: ...duelle conforme aux normes industrielles savoir ligne t l phonique 2 500 pour appareil clavier ou 500 pour appareil cadran impulsions Il est galement possible de raccorder ce t l copieur un syst me t...

Page 23: ...cannot escape from the machine during any phase of user operation CDRH Regulations The Center for Devices and Radiological Health CDRH of the U S Food and Drug Administration implemented regulations f...

Page 24: ...xviii...

Page 25: ...Scan Mode 1 6 Navigating the Menu 1 7 Entering the Menu Screen 1 7 Scrolling Through Menu Items 1 7 Selecting a Menu Item 1 7 Specifying values using the navigation keys 1 8 Returning to the Default S...

Page 26: ...Place documents here 6 Document return tray Documents are returned here 7 Operation panel Controls the machine using this panel Operation Panel P 1 5 8 Output tray Copies printed documents and faxes...

Page 27: ...work via a LAN cable 5 Power switch Turn the power ON or OFF 6 External device jack Connect an external telephone 7 Telephone line jack Connect a telephone line 8 Power socket Connect the power cord I...

Page 28: ...e Machine Multi purpose Tray 1 1 Paper guides Adjust to the width of the paper Paper Cassette 1 2 1 Dust cover Protects paper in the paper cassette from dirt and dust 2 Paper guides Adjust the paper g...

Page 29: ...eset key Press to reset the settings Press to reset the copy scan fax mode to the standard mode Back key Press to return to the previous screen key Press to scroll up or to increase a value key Press...

Page 30: ...tly selected item will be highlighted with a black background and pressing OK will advance to the next screen Copy Press Start 100 LTR Density 0 Original Type Text 2 Sided Off 1 01 Fax Mode When using...

Page 31: ...the screen press or to scroll through menu items The currently selected item is highlighted with a black background Menu Preferences Timer Settings Copy Settings Fax TX Settings Selecting a Menu Item...

Page 32: ...the numeric keys Text Input Method P 1 9 When entering a series of numbers or letters such as PIN System Manager PIN Apply 1 2 3 4 5 6 7 8 9 0 BS Press or to select a number or character and then pres...

Page 33: ...umeric keys or Symbols Keys used Entry mode A Entry mode a Entry mode 12 _ 1 ABC abc 2 DEF def 3 GHI ghi 4 JKL jkl 5 MNO mno 6 PQRS pqrs 7 TUV tuv 8 WXYZ wxyz 9 Not available 0 _ Not available Moving...

Page 34: ...Numeric keys Clear 1 Use the numeric keys to enter numbers IP Address 192 168 000 080 Apply 1 2 3 4 5 6 7 8 9 0 BS Enter numbers by three digits To specify 192 168 0 80 enter 192 168 000 080 If the n...

Page 35: ...nute interval The default value for this setting is 10 minutes 5 Press Menu to close the menu screen NOTE When entering sleep mode Energy Saver will be lit green To enter sleep mode manually Press Ene...

Page 36: ...wing three options MM DD YYYY DD MM YYYY YYYY MM DD 12 24 Hour Clock Specifies the display format for time Press or to select a display format and then press OK You can select a display format from th...

Page 37: ...aper 2 9 In the Paper Cassette 2 9 In the Multi Purpose Tray 2 11 Precautions when Loading Paper 2 12 Paper Loading Capacity 2 12 Paper Loading Orientation 2 13 When printing paper with a letterhead o...

Page 38: ...per IMPORTANT When placing document Place the document after glue ink or correction fluid on the document is completely dry To prevent paper jams in the feeder Do not use any of the following Wrinkled...

Page 39: ...ocument and Paper Handling FAX Platen Glass Feeder 1 8 in 3 mm 1 8 in 3 mm 3 64 in 1 mm 3 64 in 1 mm 1 8 in 3 mm 1 8 in 3 mm 3 64 in 1 mm 3 64 in 1 mm Scan Platen Glass Feeder 1 16 in 1 5 mm 1 16 in 1...

Page 40: ...tly The machine is ready to scan the document When scanning is complete remove the document from the platen glass Loading Document in the Feeder 1 Open the document feeder 2 Spread the document guides...

Page 41: ...oaded If more than 35 documents are loaded paper jams may occur or the documents may not be scanned While scanning a document Do not add or remove documents When scanning documents is complete Remove...

Page 42: ...ap 8 1 8 x 13 3 8 206 mm x 338 mm Envelope COM10 4 1 8 x 9 1 2 104 7 mm x 241 3 mm 3 Envelope Monarch 3 7 8 x 7 1 2 98 4 mm x 190 5 mm 3 Envelope C5 6 3 8 x 9 162 mm x 229 mm 3 Envelope B5 6 7 8 x 9 7...

Page 43: ...may be not as good when Plain Paper L is set 3 Use only the transparencies designed for laser printers 4 You can set Envelope Monarch only in the multi purpose tray To prevent paper jams do not use t...

Page 44: ...haded area indicates the approximate printable area of A4 paper Note that the margin widths listed below are rough standards and there may be slight variations in actual use 1 4 in 5 mm 1 4 in 5 mm 1...

Page 45: ...2 1 Lift the dust cover 2 Spread the paper guides a little wider than the paper size If you want to change the size of the paper to be loaded be sure to register the paper size in Setting a Paper Size...

Page 46: ...ntil the edge of the envelope stack meets the back of the paper cassette 4 Adjust the paper guides to the width of the paper 5 Adjust the paper guide to the length of the paper 6 Close the dust cover...

Page 47: ...he paper into the multi purpose tray with the print side face up Paper Loading Capacity P 2 12 Paper Loading Orientation P 2 13 Ensure that the paper stack does not exceed the load limit guides A A Wh...

Page 48: ...t exceed the load limit mark when loading paper Ensure that the paper stack does not exceed the line of the load limit mark If the paper stack exceeds the load limit mark lines this may result in misf...

Page 49: ...g 3 with the front side face down with the front side face down 1 When Paper Feed Method Switch is set to Print Speed Priority the default setting Selecting Print Side MF4570dn Only P 2 16 2 When Pape...

Page 50: ...e and then press OK Paper Requirements P 2 6 When registering the custom paper see Setting a Custom Paper Size P 2 14 Paper Size LTR LGL STMT EXEC 4 Press or to select a paper type and then press OK P...

Page 51: ...ress or to specify the size and then press OK You can also enter values using the numeric keys Set Length for X 3 3 8_1 2 3 Press or to select Apply and then press OK Specify Size Apply X 3 Y 8_1 4 X...

Page 52: ...paper When setting this item to Print Side Priority The sides to be printed for 2 sided printing and 1 sided printing match Even when using previously printed paper you do not need to switch the side...

Page 53: ...up Load paper with the front side first page face down Print Side Priority When specifying Print Side Priority load paper as follows Feeding direction For details on the procedure for loading paper wh...

Page 54: ...2 18 Document and Paper Handling...

Page 55: ...ing and Canceling using the Status Monitor Cancel Key 3 3 Copy Settings 3 4 Adjusting the Density 3 4 Selecting Image Quality Copy 3 4 2 Sided Copying MF4570dn Only 3 5 Enlarging Reducing Copies 3 6 M...

Page 56: ...o 7 items for details see P 3 3 to P 3 6 Density Image quality 2 Sided MF4570dn only Enlarged reduced Reduced layout Collating Sharpness The settings that are specified here apply only to copy operati...

Page 57: ...o by pressing Stop The copy job is canceled Cancel No Yes Details To check the job before canceling press or to select Details and then press OK Checking and Canceling using the Status Monitor Cancel...

Page 58: ...e screen Setting screen Copy Press Start 100 LTR Density 0 Original Type Text 2 Sided Off 1 01 Original Type Text Text Photo High Spee Text Photo Photo Text This setting is suitable for documents that...

Page 59: ...OK 2 Sided Off 1 2 Sided Format Settings 2 Press or to select 1 2 Sided OK Format Settings 1 2 Sided 3 Press or to select the orientation of the document OK Original Orientation Portrait Landscape 4...

Page 60: ...using the numeric keys Custom Ratio 100 25 400 Press or to select Copy Ratio Multiple Documents onto One Sheet N on 1 Copy mode screen Setting screen Copy Press Start 100 LTR 2 Sided Off Copy Ratio 1...

Page 61: ...three copies of a three page document printouts of a complete job are grouped and arranged in this page order 1 2 3 1 2 3 1 2 3 Press or to select On OK Emphasize the Outline of an Image Sharpness Cop...

Page 62: ...d Copy and then press OK N on 1 Off 2 on 1 4 on 1 ID Card Copy 5 Press Start After scanning the document completely proceed to the next step 6 Turn and place the card Place the card with a 1 4 5 mm sp...

Page 63: ...select Change Defaults and then press OK Copy Settings Change Defaults Correct Density 4 Press or to select a setting item and then press OK Change Defaults Apply No of Copies 01 Density 0 Original Ty...

Page 64: ...3 10 Copying...

Page 65: ...de or Print Driver Guide To view how to use each function Print Driver s Help To view how to display the Print Driver Guide or Print Driver s Help see For Macintosh Users P 11 4 Installing the Printer...

Page 66: ...oftware required for printing from an application The printer driver will convert application software s print data to print data for the printer The printer driver for this machine has the following...

Page 67: ...increase or decrease the magnification manually select Manual Scaling specify the scaling ratio for Scaling 5 Click OK NOTE Depending on the printer model you are using you may not be able to magnify...

Page 68: ...and version of the printer driver 2 sided Printing MF4570dn Only Two sided printing prints a document on both sides of the paper You can reduce paper consumption by half 1 Click Finishing For instruc...

Page 69: ...or Cancel Device Status Copy Job Status Fax Job Status Hist Print Job Status 3 Press or to select a job to be checked or canceled and then press OK Print Job Status 09 42AM Printing 09 43AM Waiting Th...

Page 70: ...4 6 Printing from a Computer...

Page 71: ...egistering and Editing via the Operation Panel 5 3 Registering and Editing One Touch Keys via the Remote UI MF4570dn Only 5 5 Registering and Editing Coded Dial Codes 5 6 Registering and Editing via t...

Page 72: ...codes Once registered entering the coded dial code will recall the destination number Registering and Editing Coded Dial Codes P 5 6 Group Dialing You can group the registered recipients up to 50 reci...

Page 73: ...en press OK Address Book PIN Apply Press OK 3 Press or to select One Touch and then press OK Register Location Coded Dial One Touch 4 Press or to select Fax and then press OK Destination Type Fax Grou...

Page 74: ...Press or to select an item that you want to edit and then press OK Name Destination One Touch Fax Apply Name CANON02 Destination 9876543 One Touch 02 5 When you finish editing press or to select Appl...

Page 75: ...de 2 Enter System Manager PIN 3 Click OK 1 1 2 3 4 Click Address One Touch 1 2 Storing a one touch key newly Proceed to Step 5 Editing a one touch key 1 Click the number or name 2 Click Edit 3 Specify...

Page 76: ...meric keys to enter the PIN and then press OK Address Book PIN Apply Press OK 3 Press or to select Coded Dial and then press OK Register Location Coded Dial One Touch 4 Press or to select Fax and then...

Page 77: ...elect a destination that you want to edit and then press OK CANON 0123456789 All A Z 0 9 4 Press or to select an item that you want to edit and then press OK Name Destination Coded Dial Fax Apply Name...

Page 78: ...2 Enter System Manager PIN 3 Click OK 1 1 2 3 4 Click Address Coded Dial 1 2 Storing a coded dial code newly Proceed to Step 5 Editing a coded dial code 1 Click the number or name 2 Click Edit 3 Spec...

Page 79: ...ewly 1 Press 2 Press or to select Register New Destination to Address Book and then press OK Register New to Addr Edit Address Book Address Book Details All A Z When the address book PIN is specified...

Page 80: ...ress Book and then press OK Register New Destin Edit Address Book Address Book Details All A Z When the address book PIN is specified Use the numeric keys to enter the PIN and then press OK Address Bo...

Page 81: ...nd then press OK Fax Delete From Group Name CANON03 Destination 0011223 Coded Dial 003 7 Press to select Yes and then press OK Delete from group No Yes 8 Press or to select Apply and then press OK Des...

Page 82: ...PIN Apply Press OK 3 Press or to select a group that you want to delete and then press OK CANON02 9876543 CANON03 0011223 GROUP 03 Destina All A Z 0 9 4 Press to select Yes and then press OK Delete f...

Page 83: ...OK Changing the name of a group 1 Click the number or name 2 Click Edit 3 Change a name of Group Name and then click OK Deleting a destination from a group 1 Select the check box for which you want t...

Page 84: ...5 14 Registering Destinations in the Address Book...

Page 85: ...in Memory 6 15 Checking and Canceling Fax Jobs 6 15 Printing Received Fax Documents 6 15 Checking and Deleting Received Fax Documents 6 16 Checking the History of Received Sent Fax Documents 6 17 Cha...

Page 86: ...ning is started The fax is sent when the scanning is finished When placing documents on the platen glass Perform the following procedure 1 Press or to select the size of the original document and then...

Page 87: ...ger transmission times Specify the scanning density You can emphasize the outline of the image in the document or decrease the contrast Press or to select Sharpness 200 dpi x 100 dpi Normal For text d...

Page 88: ...oded Dial Enter the three digit registration number 001 to 100 with the numeric keys To use this feature you need to pre register destinations in coded dials Registering and Editing One Touch Keys P 5...

Page 89: ...nd then press OK If you want to repeat the procedure from specifying the settings for the document scanning press Reset Specifying Destinations Using the Address Book After entering the characters fro...

Page 90: ...t NOTE Destinations that can be redialed A destination entered with the numeric keys You may not redial multiple destinations when entering destinations with the numeric keys Up to the last three dest...

Page 91: ...you can send the fax documents NOTE Restrictions for manual sending Scanning from the platen glass is not available The group dialing function is not available Scanning 2 sided documents is not avail...

Page 92: ...point where wait time can be added when dialing it is easier to connect to the recipient Keys to be used for this operation Pause FAX Numeric keys Start 1 Place documents Placing Documents P 2 4 Docum...

Page 93: ...Book Coded Dial Specifying Destinations P 6 4 Specify Destination Fax New Address Book Coded Dial 4 Repeat Step 2 and 3 to enter all the destinations 5 Press Start NOTE The number of destinations capa...

Page 94: ...23 Without an external telephone connected When the call is a fax When the call is a fax When the call is a fax When the call is a voice call When the call is a voice call When you pick up the handset...

Page 95: ...hone rings 3 When you pick up the handset during ringing When you do not pick up the handset during ringing You can start talking as is The machine hangs up the telephone or switches to the fax receiv...

Page 96: ...receive faxes The DRPD service allows you to assign distinctive ring patterns for two phone numbers on a single telephone line Your machine will automatically monitor incoming calls and based on the r...

Page 97: ...pply Ring Start Time 6 Incoming Ring Time After Ring RX Ring Start Time Specify how long the machine will attempt to detect a fax tone before the handset starts ringing Specify a duration between 4 se...

Page 98: ...o forward and then press OK You cannot forward received faxes during a receiving operation a normal printing operation after completion of receiving Fax RX Job Status 12 52AM Receiving 12 54AM Waiting...

Page 99: ...12 52 AM For canceling 1 Press or to select Cancel and then press OK Details Cancel Job Number 0004 Status Sending Time 01 01 12 52 AM 2 Press to select Yes and then press OK Cancel No Yes The sendin...

Page 100: ...ed in the memory are printed 6 Press Menu to close the menu screen Checking and Deleting Received Fax Documents You can check detailed information about fax documents saved in memory Also you can dele...

Page 101: ...ion OK Status Monitor Cancel 1 Press Status Monitor Cancel 2 Press or to select Fax Job Status History and then press OK Status Monitor Cancel Device Status Copy Job Status Fax Job Status Histo Print...

Page 102: ...TX Settings 3 Press or to select TX Function Settings and then press OK Fax TX Settings Basic Settings TX Function Settings Fax Setup Guide 4 Press or to select Change Defaults and then press OK TX F...

Page 103: ...x TX Settings 3 Press or to select TX Function Settings and then press OK Fax TX Settings Basic Settings TX Function Settings Fax Setup Guide 4 Press or to select ECM TX and then press OK TX Function...

Page 104: ...this option if a problem occurs when Direct is selected Adapter 2 Select this option if the problem continues when Adapter 1 is selected Off Hook Alarm Specify whether or not to sound an alarm when t...

Page 105: ...10 times Set the number of redial attempts Redial Interval 2 to 99 minutes Set an interval in minutes between redial attempts Redial When Err Occurs Off On Specifies whether or not to redial when a s...

Page 106: ...ertically only RX Page Footer Specify whether or not to print a received date day of the week time number and page number at the bottom of documents when printing received documents How to display the...

Page 107: ...r for fax receiving in Remote Receive ID Auto RX Switch Specify how long an incoming call should ring before the machine automatically switches to fax mode This option is available when the RX Mode is...

Page 108: ...0 bps 2400 bps Memory Lock Settings Normally received documents are immediately printed However you can specify whether or not to store received faxes in memory before printing You can then print the...

Page 109: ...ct TX Function Allow Driver Faxing Settings Bold Default settings Off Faxes cannot be sent by a computer s fax driver On Faxes can be sent from a computer s fax driver Restrict Sending From History Sp...

Page 110: ...or received 1 Press 2 Press Stop If only one job is processing or waiting to be sent or received you can stop the job by pressing Stop twice 3 When Cancel appears Press or to select Yes and then pres...

Page 111: ...he documents scanned by the machine can be stored in a computer If you are a Macintosh user see the Scanner Driver Guide To view how to display the Scanner Driver Guide see For Macintosh Users P 11 4...

Page 112: ...eleven or more computers are connected via a network The eleventh and subsequent computers are not displayed you cannot scan Reduce the number of computers connected to this machine via a network e Ma...

Page 113: ...er where the images are saved opens automatically after scanning By default the folder for the date when you scanned the data is created in the Pictures folder For Windows 2000 XP the folder is create...

Page 114: ...7 4 Using the Scan Functions...

Page 115: ...Streaks Appear On the Printouts or Some Parts Are Faded 8 6 About the Supplied Toner Cartridge 8 7 About Replacement Toner Cartridge 8 7 Handling Toner Cartridge 8 7 Checking the Toner Level 8 8 Using...

Page 116: ...ior Clean the machine s print area periodically to prevent toner powder and paper dust from accumulating inside 1 Turn OFF the power switch and disconnect the power cord 2 Hold the operation panel 3 L...

Page 117: ...ng the Fixing Unit In the following cases the fixing unit may be dirty Clean the fixing unit When black streaks appear on the printed paper When a toner cartridge is replaced Keys to be used for this...

Page 118: ...r inside the feeder may be dirty Clean the feeder scanning area and roller 1 Turn OFF the power switch and disconnect the power cord 2 Open the feeder cover 3 Clean the rollers A inside the feeder wit...

Page 119: ...ediately with cold water Washing with warm water sets the toner making it impossible to remove the toner stains IMPORTANT Do not touch the transfer roller A Touching the transfer roller A may damage t...

Page 120: ...ing the Toner Cartridge P 8 9 If this message does not disappear replace the toner cartridge Replacing the Toner Cartridge P 8 10 If this message is displayed the incoming fax will be stored in the me...

Page 121: ...than five minutes Store the toner cartridge in its protective bag Do not open the bag until you are ready to install the toner cartridge in the machine Keep the protective bag for the toner cartridge...

Page 122: ...solution see the following e Manual Troubleshooting Display Messages 4 Press Status Monitor Cancel to close Toner Gauge screen Using the Toner Saver Mode Set whether or not to conserve toner when cop...

Page 123: ...cedure below before replacing the toner cartridge You may print for some time until the toner is completely run out 1 Hold the operation panel 2 Lift the scanning platform If you cannot lift the scann...

Page 124: ...scanning platform Replacing the Toner Cartridge Before replacing toner cartridges see Precautions when Replacing Toner Cartridge P 8 11 NOTE Checking the toner cartridge status You can check the leve...

Page 125: ...roperly set in the machine Do not try to forcefully close the toner cover as this may damage the machine 11 Lower the scanning platform Precautions when ReplacingToner Cartridge See Maintenance and In...

Page 126: ...poor print quality Disposing of the removed sealing tape Dispose of the sealing tape according to local regulations Keep the protective bag Keep the protective bag for the toner cartridge You will ne...

Page 127: ...Canada through donations to the World Wildlife Fund Canada and The Nature Conservancy of Canada Since its inception The Canon Cartridge Recycling Program has collected huge amount of cartridges that...

Page 128: ...nt exceeds the above limits please call 1 800 OK Canon for special shipping information Please Note Do not send defective cartridges for replacement Defective cartridges under warranty should be excha...

Page 129: ...ion box can accommodate eight individual cartridge boxes Place your eight individually packaged boxes of empty cartridges into the Canon collection box Seal the box Apply the Canon Canada Inc Canada P...

Page 130: ...achine Power cord 3 Unplug the power plug from the AC power outlet 4 Remove it from the machine Telephone cables 5 Remove it from the machine Whether the cable is connected or not varies depending on...

Page 131: ...covers or trays open Make sure that the scanning platform and paper cassette are closed before carrying the machine CAUTION Set the machine down slowly and carefully Be careful not to hurt your hands...

Page 132: ...8 18 Maintenance...

Page 133: ...appear on the display 9 10 Is the telephone line connected or configured properly 9 10 If You Cannot Solve a Problem 9 10 If a Power Failure Occurs 9 11 If You Cannot Solve a Problem 9 12 Customer Sup...

Page 134: ...not touch the transfer roller A Touching the transfer roller A may damage the machine A NOTE Do not force the jammed document or paper out of the machine Contact your local authorized Canon dealer or...

Page 135: ...eeder Paper Jams Inside the Machine Referring to the procedure on the display follow the steps below to remove jammed paper 1 Hold the operation panel 2 Lift the scanning platform If you cannot lift t...

Page 136: ...paper by pulling it gently If you do not see the leading edge of the jammed paper Do not force to pull the paper and proceed to step 9 9 Lift the paper exit guide and then firmly close it Ensure that...

Page 137: ...paper by pulling it gently 18 Close the rear cover 19 Insert the toner cartridge Fit the protrusions A on each side of the toner cartridge into the guides located on each side of the machine and then...

Page 138: ...e to the fax number Cause 2 The recipient may not be using a G3 fax machine Action Ask the recipient what type of fax machine is being used and then send the document to the recipient s G3 fax machine...

Page 139: ...ge Quality Copy Cause 2 The data size exceeds the machine s available memory Action Reduce the data resolution or change the file format to reduce the data volume 054 Cause 1 A user abbreviation or a...

Page 140: ...e and then press OK However images may be printed improperly for example part of images may not be printed Change the Paper Settings menu according to the size of the loaded paper Cancel the job see S...

Page 141: ...the operation panel to exit the Sleep mode If there is no problem Are the settings proper If the machine emits the entry error tone and does not start operating when you press Start your combination o...

Page 142: ...nsure that the telephone cable is properly connected Check if the cables for the telephone line port and external device port on the back of the machine are connected inversely Configuring and Connect...

Page 143: ...n your telephone IMPORTANT Data storage for when power supply is cut off Even if power is lost due to a power failure or accidental unplugging any sent or received documents stored in the memory are b...

Page 144: ...holidays for products still under warranty 1 800 OK CANON For the location of the authorized service facility nearest you visit http www canon ca or 1 800 OK CANON If the problem cannot be corrected...

Page 145: ...Paper Type to Plain Paper L Solution 3 Change the Special Mode V settings from the operation panel e Manual Maintenance Special Mode The level of improvement according to the setting option is as foll...

Page 146: ...ing on the paper type or the operating environment the paper may be creased Solution Change the Special Mode V settings from the operation panel e Manual Maintenance Special Mode The level of improvem...

Page 147: ...onsumption increases White Specks Appear Perform one of the following solutions according to the cause Cause 1 Appropriate paper is not being used Solution Replace the paper with which can be used wit...

Page 148: ...rove the toner fixation even without changing the setting If you use this mode printing speed becomes slow The Printed Paper Has Vertical Streaks Perform one of the following solutions according to th...

Page 149: ...ce the streaks even without changing the setting As you select an option that has higher effect printing speed becomes slower Smudge Marks of Spattering Toner Appear around the Text or Patterns Perfor...

Page 150: ...use When printing a bar code with the default printing preferences the bar code may not be able to be scanned Solution Change the Special Print Mode setting to Special Settings 1 from the print driver...

Page 151: ...Registering Setting theVarious Functions You can set or change machine functions from the setting menu according to your purpose Setting Menu List 10 2 Printing a User Data List 10 2 Contents of the S...

Page 152: ...r item setting value Proceeds to the next hierarchy Also a setting value is determined and an operation is performed When Apply appears in the screen you need to select Apply and press OK after specif...

Page 153: ...onal 3 P 5 6 One Touch Dial Max 16 characters Fax Name Enter Registration No One Touch Dial Registration No Max 40 Destination Max 16 characters Group Name Enter Registration No Select Coded Dial One...

Page 154: ...97 95 90 75 Direction Vertical Horizontal Vertical Only Timer Settings Time Date Settings Copy Settings Change Defaults Toner Saver Mode Paper Feed Method Switch Gram Pound Gram Pound Switch Off On C...

Page 155: ...Server Settings mDNS Settings Use IPv6 Off On View Settings Stateless Address Settings Off On View Settings Use DHCPv6 Off On Host Name Domain Name DNS Host Name Domain Name Settings DNS Dynamic Updat...

Page 156: ...Settings Select Country Region Remote UI On Off Restrict TX Function Display Job History USB Device On Off Initialize All Other 33600 bps 14400 bps Off On Off On 9600 bps 7200 bps 4800 bps 2400 bps R...

Page 157: ...Specifications 11 2 Copy Specifications 11 2 Printer Specification 11 2 Scanner Specifications 11 3 Fax Specifications 11 3 Telephone Specifications 11 3 For Macintosh Users 11 4 Displaying Driver Gui...

Page 158: ...rect 1 1 1 0 Enlargement 1 4 00 1 2 00 1 1 29 Reduction 1 0 78 1 0 64 1 0 50 1 0 25 Zoom 0 25 to 4 00 1 increments Copy Speed Letter Plain Direct MF4570dn 26 cpm MF4450 24 cpm Successive Copying Capac...

Page 159: ...MR MMR Modem Speed 33 6 Kbps Automatic Fallback Transmission Speed Approx 3 seconds per page 2 ECM MMR transmitting from the memory at 33 6 Kbps Sending Receiving Memory Maximum approx 256 pages 2 Tot...

Page 160: ...e print features Examples Operating in the print server environment Watermark printing PageComposer Combining and printing multiple files Changing the halftone Adjusting the gamma value For informatio...

Page 161: ...Copy Mode 1 6 Copyright xiii D Date Settings 1 11 Density Copy 3 4 Fax 6 3 Disclaimers xiv Display 1 6 Display Messages 9 6 LCD Standby Mode 1 6 Document feeder tray 1 2 Document guides 1 2 Documents...

Page 162: ...per guide 1 4 O One Touch Keys 5 2 Editing 5 3 Storing 5 3 Operation Panel 1 2 1 5 Output tray 1 2 P Paper Clearing Jams 9 2 Loading 2 9 Paper Size and Type 2 14 Printable Range 2 8 Requirements 2 6 P...

Page 163: ...1 9 Time Settings 1 11 Toner Cartridge 8 6 Checking the Toner Level 8 8 Handling 8 7 Replacing Toner Cartridge 8 10 Trademarks xiii Transporting the Machine 8 16 Tray extension 1 2 Troubleshooting 9 1...

Page 164: ...n Plaza Lake Success NY 11042 U S A CANON EUROPA N V Bovenkerkerweg 59 61 1185 XB Amstelveen The Netherlands CANON CHINA CO LTD 15F Jinbao Building No 89 Jinbao Street Dongcheng District Beijing 10000...

Reviews: