


COPYRIGHT © 1999 CANON INC. CANON GP160 REV.0 FEB. 1999 PRINTED IN JAPAN (IMPRIME AU JAPON)
CHAPTER 11 INSTALLATION
11-5
B.
Installing the cartridge
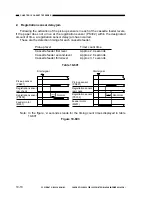
No.
Work details
Illustration/ remarks
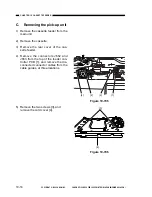
4
Remove the mirror mount fixing
screw. Open the front cover of
the main unit and put the screw
in the storage compartment for
safekeeping.
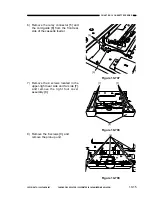
5
Open the automatic document
feeder, and remove the filament
tape which has a stamp. (Only
for those machines which are fit-
ted with an ADF).
One cause of document jams is the ADF is used
without the filament tape being removed. Thus, it is
very important to remember to remove the filament
tape.
Mirror mount fixing screw
Screw storage
compartment
Screw
No.
Work details
Illustration/ remarks
1
Lift the cartridge out of the box
while it is still in the original
packing material.
2
Open the front cover of the main
unit, and while pressing on the
release lever, pull the printer
assembly to the right.
Front cover
Printer assembly
Release lever
Summary of Contents for GP160
Page 6: ...COPYRIGHT 1999 CANON INC CANON GP160 REV 0 FEB 1999 PRINTED IN JAPAN IMPRIME AU JAPON iv ...
Page 12: ......
Page 52: ......
Page 64: ......
Page 74: ......
Page 86: ......
Page 88: ......
Page 98: ......
Page 108: ......
Page 110: ......
Page 146: ......
Page 148: ......
Page 158: ......
Page 186: ......
Page 188: ......
Page 204: ......
Page 206: ......
Page 224: ......
Page 232: ......
Page 234: ......
Page 430: ......
Page 432: ......
Page 434: ...A 2 COPYRIGHT 1999 CANON INC CANON GP160 REV 0 FEB 1999 PRINTED IN JAPAN IMPRIME AU JAPON ...
Page 436: ......
Page 482: ......
Page 622: ......
Page 623: ......
Page 625: ......
Page 627: ......
Page 635: ......


