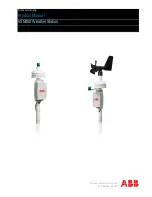
ET107 Weather Station
23
5.
Move the jumper at the top of the PCB so that it is placed over the center
and right pins (FIGURE
FIGURE 5-16. Jumper set for WindSonic1
6.
Replace electronics cover.
7.
Tighten screws.
8.
Reattach the ribbon cable to the CS I/O port.
9.
Replace enclosure cover.
5.5.5.2 WindSonic Attachment to Crossarm
1.
Remove the three Phillips screws from the end of the white mounting
shaft.
2.
Remove the protective cap covering the WindSonic sensor cable plug.
3.
Loosen the U-bolt holding the mounting shaft to the crossarm. Pull the
shaft up and out of the U-bolt (FIGURE
).
New Jumper Position