Style Parameters Programming
SMART MATRIX TWIST
- 2-30 -
Click to highlight
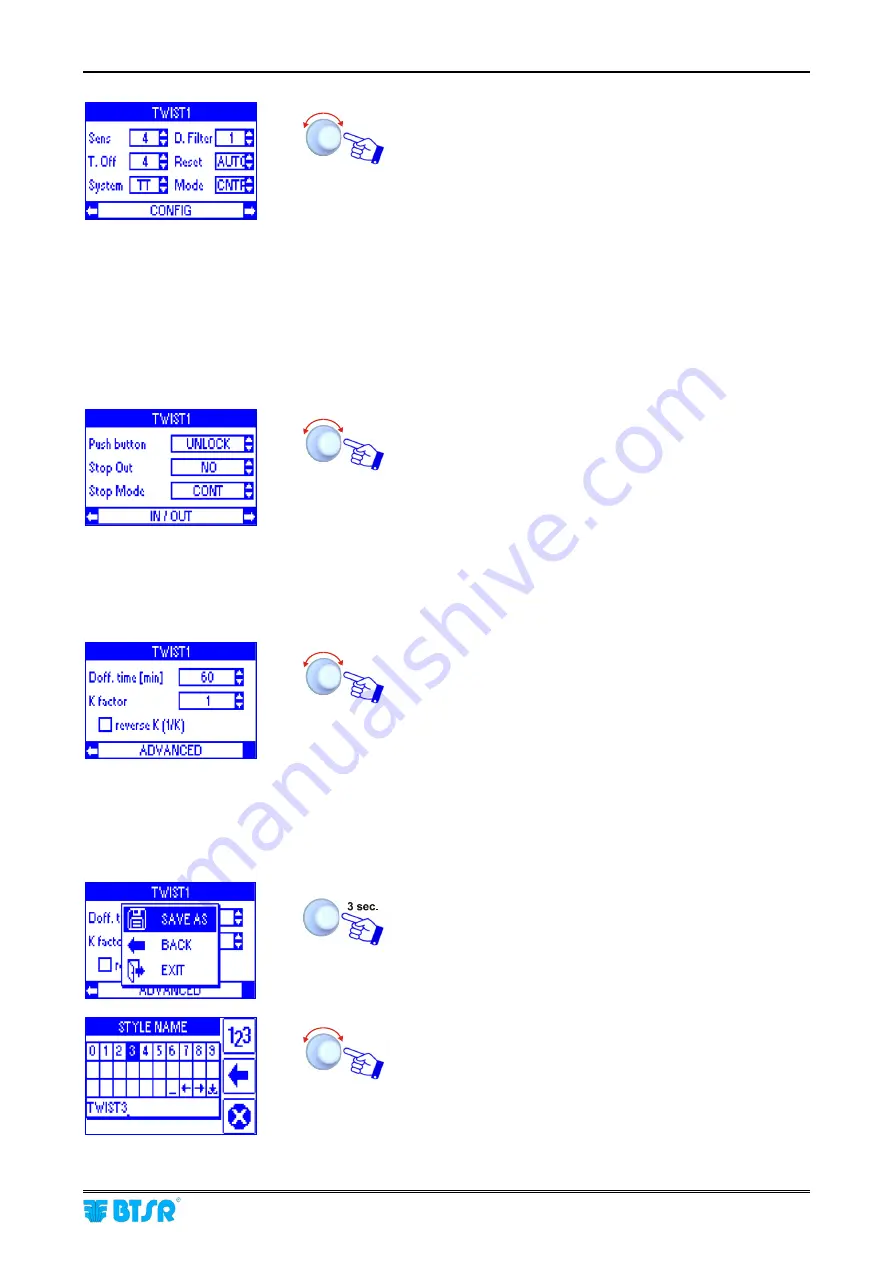
CONFIG
.
Select the
Sens
parameter
and set the
sensor
sensitivity
level [1…8].
Select the
T.Off
parameter
and set the time in which the
yarn is outside the sensor. (
the parameter is effective when
the System parameter is set to TB
) [1…8].
Select the
System
parameter and set
TT
(
Twist
) mode or
TB
(
Balloon
) mode.
Select the
D.filter
parameter and set the digital filter value
in order to reduce the yarn hairiness influence [1…8].
Select the
Reset
parameter and set
MAN.
or
AUTO.
Select the
Mode
parameter and set the sensor operating
mode (
CONTROL
or
MONITOR
).
Select again
CONFIG
and turn the selector.
Click to highlight
IN/OUT
.
Select the
Push button
parameter and set the Touch Light
button operating mode: [
UNLOCK
] or [
LOCK
].
Select the
Stop Out
parameter and set the STOP output
characteristic: [
NO
] = Normally Open contact or [
NC
] =
Normally Closed contact.
Select the
Stop Mode
parameter and set the STOP output
timing: [
CONT
] = continuous signal, [
PULSE 2S
] = 2
seconds pulse signal or [
PULSE 10S
] = 10 seconds pulse
signal.
Select again
IN/OUT
and turn the selector.
Click to highlight
ADVANCED
.
Select the
Doff.time[min]
parameter and set the minimum
working time requested to consider good a package free of
defects [1…2000].
Select the
K factor
parameter and set the twist division
factor [1…5].
Selecting
;
Reverse K (1/K)
the twists will be divided by
1/K.
At the end select again
ADVANCED
.
At this point the style parameter programming is
completed.
To activate the saving function
SAVE
to save the style,
BACK
to return to the previous screen without saving,
EXIT
to return to menu
STYLE
without saving.
Enter the name you want to assign to the new style (
e.g.
TWIST3
), then hold the selector pressed for 3 seconds.
Summary of Contents for SMART MATRIX TWIST
Page 1: ...SMART MATRIX TWIST Operating Manual ENGLISH Rev 1 2 January 2012 ...
Page 3: ...Introduction i ...
Page 4: ......
Page 8: ...Table of Contents SMART MATRIX TWIST iv Page intentionally left blank ...
Page 9: ...Connections and Electrical Interface 1 ...
Page 10: ......
Page 25: ...Operating Instructions 2 ...
Page 26: ......
Page 67: ...System Components 3 ...
Page 68: ......


