Brother DCP-T310 User Manual Download Page 248

 Home > 

Fax

 > 

Telephone Services and External Devices

 > External TAD (Telephone Answering Device)

External TAD (Telephone Answering Device)

Related Models

: MFC-T810W/MFC-T910DW

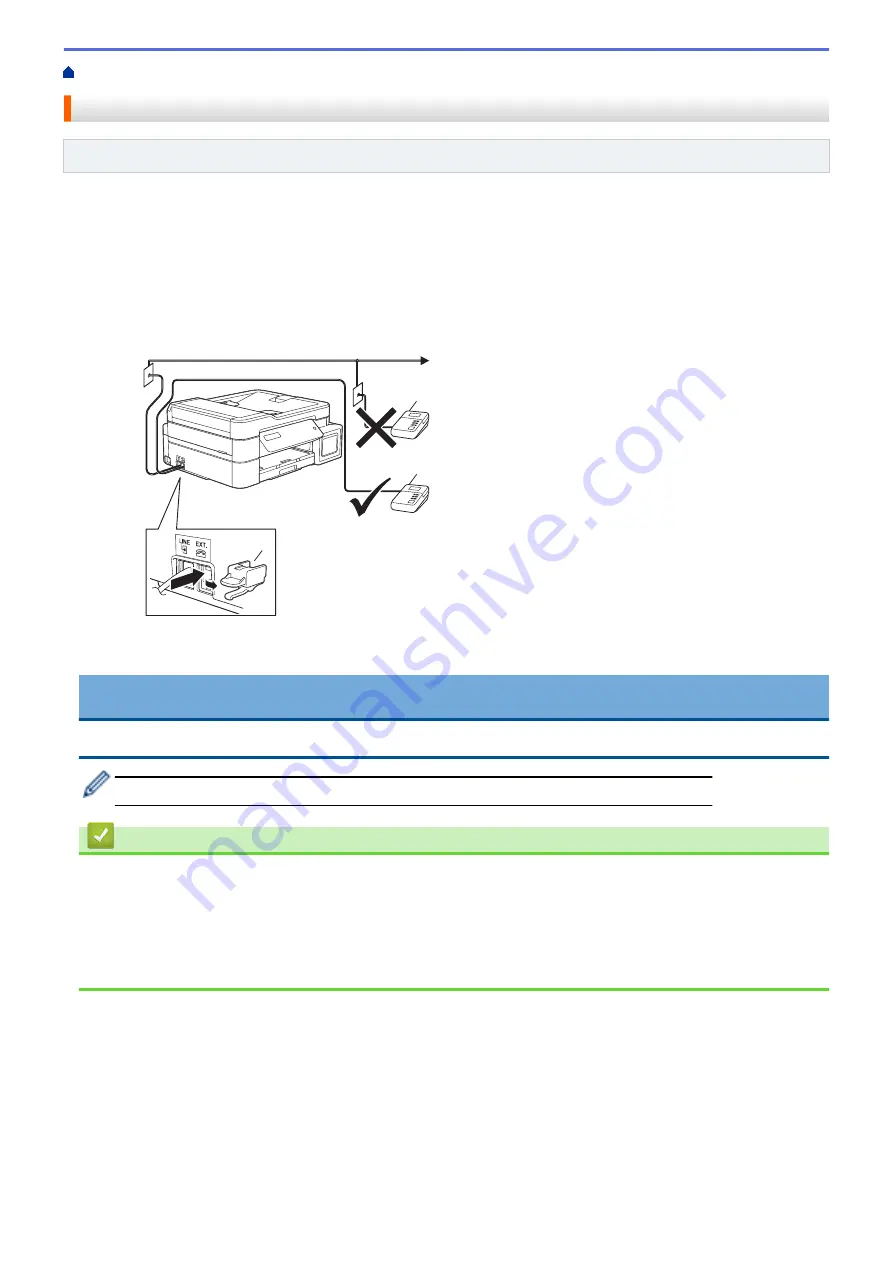
You can connect an external Telephone Answering Device (TAD) to the same line as your machine. When the
TAD answers a call, your machine will “listen” for the CNG (fax calling) tones sent by a sending fax machine. If it
hears them it will take over the call and receive the fax. If it does not hear them, it will let your TAD take a voice
message and the LCD will show 

[Telephone]

.

The external TAD must answer within two rings (we recommend setting it to two rings). This is because your
machine cannot hear the CNG tones until the external TAD has picked up the call. The sending machine will
send CNG tones for only eight to ten seconds longer. We do not recommend using the toll saver feature on your
external TAD if it needs more than four rings to activate it.

1

1

2 Protective Cap

1 TAD

2

IMPORTANT

DO NOT connect a TAD elsewhere on the same telephone line.

If you have problems receiving faxes, reduce the Ring Delay setting on your external TAD.

  Related Information

Telephone Services and External Devices

Connect an External TAD

Record an Outgoing Message (OGM) on the External TAD

Multi-line Connections (PABX)

Telephone and Fax problems


242

Summary of Contents for DCP-T310

Page 1: ...Online User s Guide DCP T310 DCP T510W DCP T710W MFC T810W MFC T910DW 2017 Brother Industries Ltd All rights reserved ...

Page 2: ... Windows 62 Print a Photo Windows 63 Print a Document Windows 64 Cancel a Print Job Windows 65 Print More Than One Page on a Single Sheet of Paper N in 1 Windows 66 Print as a Poster Windows 67 Print on Both Sides of the Paper Automatically Automatic 2 sided Printing Windows 68 Print on Both Sides of the Paper Manually Manual 2 sided Printing Windows 71 Print as a Booklet Automatically Windows 74 ...

Page 3: ...Using Nuance PaperPort 14SE or Other Windows Applications 157 Scan Using Windows Fax and Scan 162 Install BookScan Enhancer and Whiteboard Enhancer Windows 166 Scan from Your Computer Mac 167 Scan Using Brother iPrint Scan Mac 168 Scan Using TWAIN Compliant Applications Mac 169 Copy 172 Copy a Document 173 Enlarge or Reduce Copied Images 175 Sort Copies 177 Make Page Layout Copies N in 1 or Poster...

Page 4: ...n the Brother Machine 290 Print Photos from ControlCenter4 Windows 298 Edit Photos Using ControlCenter4 Windows 300 Network 302 Supported Basic Network Features 303 Network Management Software and Utilities 304 Learn about Network Management Software and Utilities 305 Additional Methods of Configuring Your Brother Machine for a Wireless Network 306 Before Configuring Your Brother Machine for a Wir...

Page 5: ...in ControlCenter4 Windows 382 Scan Using ControlCenter4 Home Mode Windows 384 Scan Using ControlCenter4 Advanced Mode Windows 385 Set Up the Brother Machine Using ControlCenter4 Windows 386 Create a Custom Tab Using ControlCenter4 Advanced Mode Windows 388 Brother iPrint Scan for Windows and Mac 390 Brother iPrint Scan Overview 391 Troubleshooting 392 Error and Maintenance Messages 393 Transfer Yo...

Page 6: ... the Machine s Printer Platen 486 Clean the Paper Feed Rollers 487 Clean the Base Pad 489 Clean the Paper Pick up Rollers 490 Check Your Brother Machine 491 Check the Print Quality 492 Check the Print Alignment from Your Brother Machine 496 Monitor Machine Status from Your Computer Windows 498 Monitor Machine Status from Your Computer Mac 502 Correct the Paper Feed to Clear Vertical Lines 503 Chan...

Page 7: ...Home Before You Use Your Brother Machine Before You Use Your Brother Machine Definitions of Notes Trademarks Important Note 1 ...

Page 8: ...y hazardous situation which if not avoided may result in damage to property or loss of product functionality NOTE NOTE specifies the operating environment conditions for installation or special conditions of use Tips icons indicate helpful hints and supplementary information Electrical Hazard icons alert you to possible electrical shock Bold Bold style identifies buttons on the machine s control p...

Page 9: ...Permissions Mozilla and Firefox are registered trademarks of the Mozilla Foundation The Bluetooth word mark and logos are registered trademarks owned by the Bluetooth SIG Inc and any use of such marks by Brother Industries Ltd and related companies is under license Other trademarks and trade names are those of their respective owners Intel is a trademark of Intel Corporation in the U S and or othe...

Page 10: ...10DW are used unless otherwise specified In this User s Guide the illustrations of the DCP T710W MFC T910DW are used unless otherwise specified The screens in this User s Guide are for illustration purposes only and may differ from the actual screens Unless otherwise specified the screens in this manual are from Windows 7 and macOS v10 12 x Screens on your computer may vary depending on your opera...

Page 11: ...Home Introduction to Your Brother Machine Introduction to Your Brother Machine Before Using Your Machine Control Panel Overview LCD Overview Access Brother Utilities Windows 5 ...

Page 12: ...ing or receiving a fax into memory or while scanning a document into the computer Fax sending will not be stopped during printing from your computer However when the machine is copying or receiving a fax on paper it pauses the printing operation and then continues printing when copying or fax receiving has finished DCP models do not support the fax feature Firewall Windows If your computer is prot...

Page 13: ...2 Mode buttons FAX Press to switch the machine to Fax mode SCAN Press to switch the machine to Scan mode COPY Press to switch the machine to Copy mode PHOTO WEB Press to switch the machine to Photo Web mode 3 Settings buttons Clear Back Press to go back to the previous menu level Settings Press to access the main menu OK Press to select a setting d or c Press to adjust the ring volume while the ma...

Page 14: ... and telephone numbers Use as a keyboard to enter text or characters 6 Stop Exit Press to stop an operation Press to exit from a menu 7 Start buttons Mono Start Press to start sending faxes in monochrome Press to start making copies in monochrome Press to start scanning documents in colour or monochrome depending on the scan setting Colour Start Press to start making copies in full colour Press to...

Page 15: ...enu buttons Clear Back Press to delete characters or to go back to the previous menu level Menu Press to access the main menu OK Press to select a setting d or c Press to adjust the ring volume while the machine is idle Press to store Speed Dial and Group numbers in the machine s memory Press to look up and dial numbers that are stored in the machine s memory a or b Press to scroll through the men...

Page 16: ... buttons Mono Start Press to start sending faxes in monochrome Press to start making copies in monochrome Press to start scanning documents in colour or monochrome depending on the scan setting Colour Start Press to start making copies in full colour Press to start scanning documents in colour or monochrome depending on the scan setting 10 Power On Off Press to turn the machine on Press and hold d...

Page 17: ...ant status message 3 Copy buttons DCP T310 DCP T510W DCP T710W Enlarge Reduce Press to enlarge or reduce copies Copy Quality Press to temporarily change the quality of your copies Number of Copies DCP T310 Press to make multiple copies Copy Scan Options Press to access temporary settings for copying or scanning 4 WiFi DCP T510W DCP T710W Press to configure the wireless settings while the machine i...

Page 18: ...Press to start making copies in full colour Press to start scanning documents in colour or monochrome depending on the scan setting 9 Power On Off Press to turn the machine on Press and hold down to turn the machine off The LCD displays Shutting Down and stays on for a few seconds before turning itself off If you turn the machine off using it will still clean the print head periodically to maintai...

Page 19: ...ireless Status Each icon in the following table shows the wireless network status Wireless network is connected A three level indicator in the Home screen displays the current wireless signal strength The wireless access point cannot be detected The wireless setting is disabled 3 Date and Time Displays the date and time set on the machine 4 Faxes in Memory Displays how many received faxes are in t...

Page 20: ...8 Tap or click Brother Utilities either on the Start screen or the desktop Windows 8 1 Move your mouse to the lower left corner of the Start screen and click if using a touch based device swipe up from the bottom of the Start screen to bring up the Apps screen When the Apps screen appears tap or click Brother Utilities Windows 10 Click Brother Brother Utilities 2 Select your machine 3 Select the o...

Page 21: ... Move your mouse to the lower left corner of the Start screen and click if using a touch based device swipe up from the bottom of the Start screen to bring up the Apps screen When the Apps screen appears tap or click Brother Utilities Windows 10 Click Brother Brother Utilities 2 Click the drop down list and then select your model name if not already selected Click Tools in the left navigation bar ...

Page 22: ...Home Paper Handling Paper Handling Load Paper Load Documents 16 ...

Page 23: ...d Paper in the Paper Tray Load Paper in the Manual Feed Slot Load Paper in the Multi purpose Tray MP Tray Unprintable Area Paper Settings Acceptable Paper and Other Print Media Error and Maintenance Messages Paper Handling and Printing Problems 17 ...

Page 24: ...per Load Paper in the Paper Tray Load Paper in the Paper Tray Load Cut Sheet Paper or Photo 2L Paper in the Paper Tray Load Legal Size Paper in the Paper Tray Load Photo Paper in the Paper Tray Load Envelopes in the Paper Tray 18 ...

Page 25: ...one size and type of paper in the paper tray at a time When you load a different paper size in the tray you must change the Paper Size setting in the machine or the paper size setting on your computer Doing this enables the machine to automatically feed paper from the appropriate tray if Auto Tray Select has been set in the machine or printer driver MFC T910DW 1 If the paper support flap 1 is open...

Page 26: ... jams and misfeeds Always make sure the paper is not curled or wrinkled 6 Gently load paper in the paper tray with the printing surface face down Make sure the paper is flat in the tray and the paper length guide 1 touches the edges of the paper 1 20 ...

Page 27: ...ith the paper you are adding Always fan the stack of paper well to prevent the machine from feeding multiple pages 7 Gently adjust the paper width guides 1 to fit the paper Make sure the paper width guides touch the edges of the paper 1 8 Close the output paper tray cover 9 Slowly push the paper tray completely into the machine 10 Pull out the paper support 1 until it locks into place and then unf...

Page 28: ... Change the Check Paper Size Setting Choose the Right Print Media Change the Paper Size and Paper Type 22 ...

Page 29: ...d a different paper size in the tray you must change the Paper Size setting in the machine or the paper size setting on your computer Doing this enables the machine to automatically feed paper from the appropriate tray if Auto Tray Select has been set in the machine or printer driver MFC T910DW This operation is available only for some countries 1 If the paper support flap 1 is open close it and t...

Page 30: ... 1 and the paper length guide 2 to fit the paper size 1 2 6 Fan the stack of paper well to avoid paper jams and misfeeds Always make sure the paper is not curled or wrinkled 7 Gently load paper in the paper tray with the printing surface face down 24 ...

Page 31: ...e tray and cause paper feed problems To add paper before the tray is empty remove the paper from the tray and combine it with the paper you are adding Always fan the stack of paper well to prevent the machine from feeding multiple pages 8 Gently adjust the paper width guides to fit the paper Make sure the paper guides touch the edges of the paper 9 Close the output paper tray cover 25 ...

Page 32: ...owly push the paper tray completely into the machine 11 Pull out the paper support 1 until it locks into place and then unfold the paper support flap 2 2 1 Related Information Load Paper in the Paper Tray 26 ...

Page 33: ...paper in the paper tray at a time When you load a different paper size in the tray you must change the Paper Size setting in the machine or the paper size setting on your computer Doing this enables the machine to automatically feed paper from the appropriate tray if Auto Tray Select has been set in the machine or printer driver MFC T910DW 1 If the paper support flap 1 is open close it and then cl...

Page 34: ...surface face down Loading more than 20 sheets of photo paper may cause paper jams 7 Gently adjust the paper width guides 1 to fit the paper Make sure the paper width guides touch the edges of the paper and the paper is flat in the tray 1 8 Slowly push the paper tray completely into the machine 28 ...

Page 35: ...t 1 until it locks into place and then unfold the paper support flap 2 2 1 Related Information Load Paper in the Paper Tray Change the Check Paper Size Setting Choose the Right Print Media Change the Paper Size and Paper Type 29 ...

Page 36: ...feed paper from the appropriate tray if Auto Tray Select has been set in the machine or printer driver MFC T910DW Before loading envelopes in the tray press the corners and sides of the envelopes to make them as flat as possible See Related Information About Envelopes 1 If the paper support flap 1 is open close it and then close the paper support 2 2 1 2 Pull the paper tray completely out of the m...

Page 37: ...Close the output paper tray cover 6 Slowly push the paper tray completely into the machine 7 Pull out the paper support 1 until it locks into place and then unfold the paper support flap 2 2 1 Related Information Load Paper in the Paper Tray About Envelopes Change the Check Paper Size Setting 31 ...

Page 38: ... Choose the Right Print Media Change the Paper Size and Paper Type 32 ...

Page 39: ...s slot one sheet at a time NOTE To prevent dust from entering the machine be sure to close the cover if you are not using the manual feed slot The machine automatically turns on Manual Feed mode when you put paper in the manual feed slot 1 Open the manual feed slot cover 2 Lift up the paper support 3 Slide the manual feed slot paper guides to fit the width of the paper you are using 33 ...

Page 40: ...4 Load only one sheet of paper in the manual feed slot with the printing surface face up 34 ...

Page 41: ...cting you to feed the next sheet DO NOT load paper in the manual feed slot when you are printing from the paper tray Doing this may cause a paper jam 5 Using both hands push one sheet of paper into the manual feed slot until the front edge touches the paper feed rollers Let go of the paper when you hear the machine pull it The LCD displays Ready When loading an envelope or a sheet of thick paper p...

Page 42: ... is placed in the manual feed slot the machine always prints from the manual feed slot The machine will eject paper loaded in the manual feed slot while a test page fax or report is being printed The machine will eject paper loaded in the manual feed slot during the machine s cleaning process Wait until the machine finishes its cleaning and then load paper in the manual feed slot Related Informati...

Page 43: ...ze and Paper Type settings if needed following the LCD instructions Load only one size and type of paper in the paper tray at a time When you load a different paper size in the tray you must change the Paper Size setting in the machine or the paper size setting on your computer Doing this enables the machine to automatically feed paper from the appropriate tray if Auto Tray Select has been set in ...

Page 44: ...4 Fan the stack of paper well to avoid paper jams and misfeeds Always make sure the paper is not curled or wrinkled You can load only one sheet of Legal Mexico Legal India Legal Folio size paper into the MP tray at a time 5 Gently load the paper in the MP tray with the printing surface face up 38 ...

Page 45: ...the machine and then load the paper 1 6 Using both hands gently adjust the MP tray paper guides to fit the paper DO NOT press the paper guides too tightly against the paper Doing this may cause the paper to fold and jam Place the paper in the centre of the MP tray between the paper guides If the paper is not centred pull it out and insert it again at the centre position 7 Pull out the paper suppor...

Page 46: ... entering the machine through the slot when you are using the MP tray Follow these steps to install the cover to the MP tray 1 Open the MP tray 2 Using both hands fit the two pins on the cover 1 into the holders in the front of the MP tray 2 2 1 3 Pull the top of the MP tray cover slightly toward the front of the machine and load paper in the MP tray with the printing surface face up 4 Push the to...

Page 47: ...Related Information Load Paper About Envelopes 41 ...

Page 48: ...nd envelopes The machine can print in the shaded areas of cut sheet paper only when the Borderless print feature is available and turned on Cut Sheet Paper Envelopes Top 1 Left 2 Bottom 3 Right 4 Cut Sheet 3 mm 3 mm 3 mm 3 mm Envelopes 12 mm 3 mm 12 mm 3 mm The Borderless print feature is not available for envelopes and 2 sided printing Related Information Load Paper Paper Handling and Printing Pr...

Page 49: ...Home Paper Handling Load Paper Paper Settings Paper Settings Change the Paper Size and Paper Type Change the Check Paper Size Setting Shrink Page Size of an Oversized Incoming Fax 43 ...

Page 50: ...size option you want and then press OK 3 Press Stop Exit The machine ejects paper with the printed surface face up onto the paper tray at the front of the machine When you use glossy paper remove each sheet at once to prevent smudging or paper jams MFC T910DW 1 Press Settings 2 Press a or b to select the following a Select General Setup Press OK b Select Tray Setting Press OK c Select the tray opt...

Page 51: ... Acceptable Paper and Other Print Media Error and Maintenance Messages Paper Handling and Printing Problems 45 ...

Page 52: ...T810W MFC T910DW DCP T510W DCP T710W MFC T810W 1 Press Menu 2 Press a or b to select the following a Select General Setup Press OK b Select Tray Setting Press OK c Select Check Paper Press OK d Select On or Off Press OK 3 Press Stop Exit MFC T910DW 1 Press Settings 2 Press a or b to select the following a Select General Setup Press OK b Select Tray Setting Press OK c Select Check Paper Press OK d ...

Page 53: ...When you print on inkjet paper coated paper and glossy paper be sure to choose the proper print media in the Basic tab of the printer driver or in the Paper Type setting on the machine When you print on Brother Photo paper load one extra sheet of the same photo paper in the paper tray When using photo paper remove each sheet at once to prevent smudging or paper jams Avoid touching the printed surf...

Page 54: ...d using the Brother paper listed in the table If Brother paper is not available in your country we recommend testing various paper types before purchasing large quantities Brother paper Paper Type Item A4 Plain BP60PA A4 Glossy Photo BP71GA4 A4 Inkjet Matte BP60MA 10 x 15 cm Glossy Photo BP71GP Related Information Acceptable Paper and Other Print Media 48 ...

Page 55: ...m moisture direct sunlight and heat Avoid touching the shiny coated side of photo paper IMPORTANT DO NOT use the following kinds of paper Damaged curled wrinkled or irregularly shaped 1 1 1 2 mm or greater curl may cause jams to occur Extremely shiny or highly textured Paper that cannot be arranged uniformly when stacked Paper made with a short grain Related Information Acceptable Paper and Other ...

Page 56: ... on them Have clasps or staples Are pre printed on the inside Are self adhesive Have double flaps Self adhesive Double flaps You may experience paper feed problems caused by the thickness size and flap shape of the envelopes you are using Before loading envelopes in the tray press the flaps edges and corners to make them as flat as possible as shown in the illustrations Fan the stack of envelopes ...

Page 57: ... Load Envelopes in the Paper Tray Load Paper in the Multi purpose Tray MP Tray Load Paper in the Manual Feed Slot 51 ...

Page 58: ...a Choose the Right Print Media Paper Type and Paper Size for Each Operation Paper Capacity of the Paper Trays Paper Weight and Thickness Load Cut Sheet Paper or Photo 2L Paper in the Paper Tray Load Photo Paper in the Paper Tray Load Envelopes in the Paper Tray Load Paper in the Manual Feed Slot 52 ...

Page 59: ...es Yes Yes India Legal 3 215 x 345 mm Yes Yes Yes Folio 3 215 9 x 330 2 mm Yes Yes Yes Executive 184 1 x 266 7 mm Yes JIS B5 4 182 x 257 mm Yes JIS B6 4 128 x 182 mm Yes A5 148 x 210 mm Yes Yes A6 105 x 148 mm Yes Cards Photo 10 x 15 cm Yes Yes Yes Photo L 9 x 13 cm Yes Photo 2L 13 x 18 cm Yes Yes Index Card 13 x 20 cm Yes Envelopes C5 Envelope 162 x 229 mm Yes DL Envelope 110 x 220 mm Yes Com 10 ...

Page 60: ... B5 JIS A5 B6 JIS A6 Envelopes C5 Com 10 DL Monarch Photo 10 x 15 cm Photo L 9 x 13 cm Photo 2L 13 x 18 cm Index card 13 x 20 cm Plain Paper Inkjet Paper Glossy Paper Recycled Paper Photo and Envelopes 1 Multi purpose tray MP tray 3 MFC T910DW A4 Letter Legal Mexico Legal India Legal Folio Executive B5 JIS A5 B6 JIS A6 Envelopes C5 Com 10 DL Monarch Photo 10 x 15 cm Photo L 9 x 13 cm Photo 2L 13 x...

Page 61: ...Inkjet Paper 64 to 200 gsm 0 08 to 0 25 mm Glossy Paper 1 2 Up to 220 gsm Up to 0 25 mm Cards Photo Card 1 2 Up to 220 gsm Up to 0 25 mm Index Card 2 Up to 120 gsm Up to 0 15 mm Envelopes 80 to 95 gsm Up to 0 52 mm 1 BP71 260 gsm paper is specially designed for Brother inkjet machines 2 Up to 300 gsm for Manual Feed Slot DCP T310 DCP T510W DCP T710W MFC T810W Related Information Choose the Right P...

Page 62: ...Home Paper Handling Load Documents Load Documents Load Documents in the Automatic Document Feeder ADF Load Documents on the Scanner Glass Unscannable Area 56 ...

Page 63: ...ed one page at a time IMPORTANT DO NOT pull on the document while it is feeding DO NOT use paper that is curled wrinkled folded ripped stapled paper clipped pasted or taped DO NOT use cardboard newspaper or fabric Make sure documents with correction fluid or written in ink are completely dry 1 Lift up and unfold the ADF document support 1 1 2 Fan the stack of paper well to avoid paper jams and mis...

Page 64: ...Related Information Load Documents Copy a Document Error and Maintenance Messages Telephone and Fax problems Other Problems 58 ...

Page 65: ...o use the scanner glass the ADF must be empty and the ADF document support must be closed 1 Lift the document cover 2 Place the document face down in the upper left corner of the scanner glass aligned with the arrow as shown in the illustration 3 Close the document cover IMPORTANT If you are scanning a book or thick document DO NOT slam or press on the document cover Related Information Load Docum...

Page 66: ...settings in the application you are using The figures below show the typical unscannable measurements Usage Document Size Top 1 Bottom 3 Left 2 Right 4 Fax A4 3 mm 3 mm 1 Letter 4 mm Legal Copy All paper sizes 3 mm Scan 1 mm 1 mm 1 The unscannable area is 1 mm when using the ADF Related Information Load Documents 60 ...

Page 67: ...Home Print Print Print from Your Computer Windows Print from Your Computer Mac 61 ...

Page 68: ...Windows Print on Both Sides of the Paper Automatically Automatic 2 sided Printing Windows Print on Both Sides of the Paper Manually Manual 2 sided Printing Windows Print as a Booklet Automatically Windows Print as a Booklet Manually Windows Print a Colour Document in Greyscale Windows Prevent Smudged Printouts and Paper Jams Windows Use a Preset Print Profile Windows Change the Default Print Setti...

Page 69: ...he type of paper you are using IMPORTANT To get the best print quality for the settings you have selected always set the Media Type option to match the type of paper you load 6 Click the Paper Size drop down list and then select your paper size 7 Select the Borderless check box if needed 8 For Colour Mode select the Natural or Vivid option 9 In the Orientation field select the Portrait or Landscap...

Page 70: ...ption to match the type of paper you load 6 Click the Paper Size drop down list and then select your paper size 7 For Colour Mode select the Natural or Vivid option 8 In the Orientation field select the Portrait or Landscape option to set the orientation of your printout If your application contains a similar setting we recommend that you set the orientation using the application 9 Type the number...

Page 71: ...rint or was sent to the print queue in error you may have to delete it to allow subsequent jobs to print 1 Double click the printer icon in the task tray 2 Select the print job you want to cancel 3 Click the Document menu 4 Select Cancel 5 Click Yes Related Information Print from Your Computer Windows Monitor Machine Status from Your Computer Windows 65 ...

Page 72: ...rientation field select the Portrait or Landscape option to set the orientation of your printout If your application contains a similar setting we recommend that you set the orientation using the application 5 Click the Multiple Page drop down list and then select the 2 in 1 4 in 1 9 in 1 or 16 in 1 option 6 Click the Page Order drop down list and then select your page order 7 Click the Border Lin...

Page 73: ...XX Printer where XXXX is the name of your model and then click the printing properties or preferences button The printer driver window appears 3 Click the Basic tab 4 Click the Multiple Page drop down list and then select the 1 in 2x2 pages or 1 in 3x3 pages option 5 Change other printer settings if needed 6 Click OK 7 Complete your print operation Related Information Print from Your Computer Wind...

Page 74: ...ther MFC XXXX Printer where XXXX is the name of your model and then click the printing properties or preferences button The printer driver window appears 3 Click the Basic tab 4 In the Orientation field select the Portrait or Landscape option to set the orientation of your printout If your application contains a similar setting we recommend that you set the orientation using the application 5 Clic...

Page 75: ...Option for Portrait Description Long Edge Right Short Edge Top Short Edge Bottom Option for Landscape Description Long Edge Top Long Edge Bottom Short Edge Right Short Edge Left 69 ...

Page 76: ...printer settings if needed The Borderless feature is not available when using this option 11 Click OK again and then complete your print operation Related Information Print from Your Computer Windows Print Settings Windows Print on Both Sides of the Paper Manually Manual 2 sided Printing Windows Print as a Booklet Automatically Windows Print as a Booklet Manually Windows 70 ...

Page 77: ...e manual 2 sided function it is possible there may be paper jams or poor print quality 1 Select the print command in your application 2 Select Brother MFC XXXX Printer where XXXX is the name of your model and then click the printing properties or preferences button The printer driver window appears 3 Click the Basic tab 4 In the Orientation field select the Portrait or Landscape option to set the ...

Page 78: ...Option for Portrait Description Long Edge Right Short Edge Top Short Edge Bottom Option for Landscape Description Long Edge Top Long Edge Bottom Short Edge Right Short Edge Left 72 ...

Page 79: ... the first side of the pages The machine prints all the odd numbered pages first Then the printer driver will stop and show the instructions required to re insert the paper 13 Re insert the paper 14 Click OK The even numbered pages will be printed If the paper is not feeding correctly it may be curled Remove the paper straighten it and put it back in the paper tray Related Information Print from Y...

Page 80: ...aper is thin it may wrinkle 1 Select the print command in your application 2 Select Brother MFC XXXX Printer where XXXX is the name of your model and then click the printing properties or preferences button The printer driver window appears 3 Click the Basic tab 4 In the Orientation field select the Portrait or Landscape option to set the orientation of your printout If your application contains a...

Page 81: ...an specify the number of sheets in each smaller booklet set from 1 15 This option can be helpful when folding a printed booklet that has a large number of pages 9 Select the Binding Offset check box if you want to specify the offset for binding in inches or millimetres 10 Click OK to return to the printer driver window 11 Change other printer settings if needed The Borderless feature is not availa...

Page 82: ...t is possible there may be paper jams or poor print quality 1 Select the print command in your application 2 Select Brother MFC XXXX Printer where XXXX is the name of your model and then click the printing properties or preferences button The printer driver window appears 3 Click the Basic tab 4 In the Orientation field select the Portrait or Landscape option to set the orientation of your printou...

Page 83: ... to specify the offset for binding in inches or millimetres 10 Click OK to return to the printer driver window 11 Change other printer settings if needed The Borderless feature is not available when using this option 12 Click OK and then click the execute button on your application dialog box to start printing 13 Click OK to print the first side of the pages The machine prints all the odd numbered...

Page 84: ...prints your document in 256 levels of greyscale 1 Select the print command in your application 2 Select Brother MFC XXXX Printer where XXXX is the name of your model and then click the printing properties or preferences button The printer driver window appears 3 Click the Advanced tab 4 For Colour Greyscale select Greyscale 5 Change other printer settings if needed 6 Click OK 7 Complete your print...

Page 85: ...ded Printing or Simplex Printing Off Select this mode to print at normal speed using a normal amount of ink Low Select this mode to print at a slower speed using a normal amount of ink High Select this mode to print at the same speed as Low but using less ink Plain Paper DCP T310 DCP T510W DCP T710W MFC T810W Off Select this mode to print at normal speed using a normal amount of ink Low Select thi...

Page 86: ...inter driver window appears 3 Click the Print Profiles tab 4 Select your profile from the print profile list The profile settings are shown on the left side of the printer driver window 5 Do one of the following If the settings are correct for your print job click OK To change the settings go back to the Basic or Advanced tab change settings and then click OK To display the Print Profiles tab at t...

Page 87: ... Print Settings Windows 81 ...

Page 88: ...anced tab and configure the print settings you want for the new Print Profile 4 Click the Print Profiles tab 5 Do one of the following To create a new print profile a Click Add Profile The Add Profile dialog box appears b Type the new profile name in the Name field c Click the icon you want to use to represent this profile from the icon list d Click OK The new Print Profile name is added to the li...

Page 89: ... Server 2016 Click Windows System Control Panel In the Hardware and Sound group click View devices and printers For Windows Server 2012 Move your mouse to the lower right corner of your desktop When the menu bar appears click Settings and then click Control Panel In the Hardware group click View devices and printers For Windows Server 2012 R2 Click Control Panel on the Start screen In the Hardware...

Page 90: ...2 Print Quality Select the print resolution you want Because print quality and speed are related the higher the quality the longer it will take to print the document 3 Paper Size Select the size of the paper you want to use You can either choose from standard paper sizes or create a custom paper size Borderless Select this option to print photos without borders Because the image data is created sl...

Page 91: ...ge of the document is printed Reverse Order Select this option to print your document in reverse order The last page of your document will be printed first 7 Multiple Page Select this option to print multiple pages on a single sheet of paper or print one page of your document on multiple sheets Page Order Select the page order when printing multiple pages on a single sheet of paper Border Line Sel...

Page 92: ...ave Mode Select this option to print using lighter colours and emphasise image outlines The amount of ink that is saved varies depending on the type of documents printed Ink Save Mode may make your printouts look different than they appear on your screen The Ink Save Mode feature is supported by technology from Reallusion Inc 4 Scaling Select these options to enlarge or reduce the size of the page...

Page 93: ...tion to print your documents at the highest quality Reduce Smudge Some types of print media may need more drying time Change this option if you have problems with smudged printouts or paper jams Retrieve Printer s Colour Data Select this option to optimise the print quality using the machine s factory settings which are set specifically for your Brother machine Use this option when you have replac...

Page 94: ...t on Both Sides of the Paper Automatically Automatic 2 sided Printing Mac Print on Both Sides of the Paper Manually Manual 2 sided Printing Mac Print More Than One Page on a Single Sheet of Paper N in 1 Mac Print a Colour Document in Greyscale Mac Prevent Smudged Printouts and Paper Jams Mac Print Options Mac 88 ...

Page 95: ...Paper Size pop up menu and then select your paper size To print photographs without margins select a borderless paper size option 5 Click the Orientation button that matches the way you want the photo to print 6 Click the application pop up menu and then select Print Settings The Print Settings options appear 7 Click the Media Type pop up menu and then select the media type you want to use IMPORTA...

Page 96: ...p up menu and then select your paper size 5 Select the Orientation option that matches the way you want the document to print 6 Click the application pop up menu and then select Print Settings The Print Settings options appear 7 Click the Media Type pop up menu and then select the media type you want to use IMPORTANT To get the best print quality for the settings you have selected always set the M...

Page 97: ...here XXXX is your model name For more page setup options click the Show Details button 3 Select the Orientation option that matches the way you want the document to print 4 Click the application pop up menu and then select Layout The Layout setting options appear 5 In the Two Sided section select the Short Edge binding or Long Edge binding option 6 Change other printer settings if needed The Borde...

Page 98: ...select Print 2 Select Brother MFC XXXX where XXXX is your model name For more page setup options click the Show Details button 3 Select the Orientation option that matches the way you want the document to print 4 Click the application pop up menu and then select Paper Handling The Paper Handling options appear 5 Click the Pages to Print pop up menu and then select the Even Only option 6 Click the ...

Page 99: ...ion pop up menu and then select Paper Handling The Paper Handling options appear 13 Click the Pages to Print pop up menu and then select the Odd Only option 14 Click the Page Order pop up menu and then select Normal 15 Click Print Related Information Print from Your Computer Mac 93 ...

Page 100: ...our model name For more page setup options click the Show Details button 3 Click the application pop up menu and then select Layout The Layout setting options appear 4 Click the Pages per Sheet pop up menu and then select the number of pages to print on each sheet 5 Select the Layout Direction option 6 Click the Border pop up menu and then select your border line type 7 Change other printer settin...

Page 101: ...eyscale 1 From an application such as Apple TextEdit click the File menu and then select Print 2 Select Brother MFC XXXX where XXXX is your model name For more page setup options click the Show Details button 3 Click the application pop up menu and then select Print Settings The Print Settings options appear 4 Click the Color Grayscale pop up menu and then select the Grayscale option 5 Change othe...

Page 102: ...on Plain Paper MFC T910DW 2 sided Printing or Simplex Printing Off Select this mode to print at normal speed using a normal amount of ink Low Select this mode to print at a slower speed using a normal amount of ink High Select this mode to print at the same speed as Low but using less ink Plain Paper DCP T310 DCP T510W DCP T710W MFC T810W Off Select this mode to print at normal speed using a norma...

Page 103: ...ose from standard paper sizes or create a custom paper size 2 Orientation Select the orientation portrait or landscape of your printout If your application contains a similar setting we recommend that you set the orientation using the application 3 Scale Type a value into the field to enlarge or reduce the pages in your document to fit the selected paper size 97 ...

Page 104: ... paper 3 Border Select the type of border to use when printing multiple pages on a single sheet of paper 4 MFC T910DW Two Sided Select whether to print on both sides of the paper 5 Reverse page orientation Select this option to rotate the printed image 180 degrees 6 Flip horizontally Select this option to reverse the printed image on the page horizontally from left to right 98 ...

Page 105: ...T710W MFC T810W Pages to Print Select which pages you want to print even pages or odd pages 3 Page Order Select the page order 4 Scale to fit paper size Select this option to enlarge or reduce the pages in your document to fit the selected paper size 5 Destination Paper Size Select the paper size to print on 6 Scale down only Select this option if you want to reduce the pages in your document when...

Page 106: ...he document 4 Color Grayscale Select colour or greyscale printing The print speed is faster in greyscale mode than it is in colour mode If your document contains colour and you select greyscale mode your document will be printed using 256 levels of greyscale 5 MFC T910DW Paper Source Select the paper source setting according to your print conditions or purpose 6 Advanced Change Data Transfer Mode ...

Page 107: ...s problem turn off the Bi Directional Printing feature Color Settings 1 Color Mode Select the colour mode to suit your preference 2 Advanced Color Settings Click the disclosure triangle to view the Advanced Colour Settings Select the Colour Enhancement check box and then set the options using the sliders This process may take several minutes depending on the size of the image and the specification...

Page 108: ... Print More Than One Page on a Single Sheet of Paper N in 1 Mac Change the Print Setting Options When Having Printing Problems 102 ...

Page 109: ...Home Scan Scan Scan Using the Scan Button on Your Brother Machine Scan from Your Computer Windows Scan from Your Computer Mac 103 ...

Page 110: ...ave Scanned Data to a Folder as a PDF File Save Scanned Data to a USB Flash Drive Scan to an Editable Text File Using OCR Scan to Email Attachment Web Services for Scanning on Your Network Windows 7 Windows 8 and Windows 10 Change Scan Button Settings from ControlCenter4 Windows Change Scan Button Settings from Brother iPrint Scan Mac 104 ...

Page 111: ...r where you want to send data and then press OK If the LCD prompts you to enter a PIN use the control panel to enter the four digit PIN for the computer and then press OK 6 Do one of the following To change the settings press Options or Copy Scan Options and then go to the next step To use the default settings press Mono Start or Colour Start Scan Type depends on the default settings Pressing Mono...

Page 112: ... the settings 7 Press a or b to select the Scan Settings setting and then press OK To use the Scan Settings option a computer with either ControlCenter4 Windows or Brother iPrint Scan Mac software installed must be connected to the machine 8 Press a or b to select the Set at Device setting and then press OK 9 Select the scan settings you want to change and then press OK Option Description Scan Typ...

Page 113: ...r b to select the computer where you want to send data and then press OK If the LCD prompts you to enter a PIN use the control panel to enter the four digit PIN for the computer and then press OK 6 Do one of the following To change the settings press Options or Copy Scan Options and then go to the next step To use the default settings press Mono Start or Colour Start Scan Type depends on the defau...

Page 114: ... the settings 7 Press a or b to select the Scan Settings setting and then press OK To use the Scan Settings option a computer with either ControlCenter4 Windows or Brother iPrint Scan Mac software installed must be connected to the machine 8 Press a or b to select the Set at Device setting and then press OK 9 Select the scan settings you want to change and then press OK Option Description Scan Typ...

Page 115: ...o change and then press OK Option Description Scan Type Select the scan type for your document Resolution Select the scan resolution for your document File Type Select the file format for your document Document Size Select your document size ScanLongPaper ADF MFC T910DW Scan a long document using the ADF File Name Rename the file File Name Style Select the order in which the date counter number an...

Page 116: ...Your Brother machine has media drive slot for use with common data storage IMPORTANT The USB direct interface supports only USB flash drives and digital cameras that use the USB mass storage standard Other USB devices are not supported Compatible Memory Cards USB flash drive Related Information Save Scanned Data to a USB Flash Drive Print Photos Directly from a USB Flash Drive 110 ...

Page 117: ...ss a or b to select the OCR option and then press OK 5 If the machine is connected over the network press a or b to select the computer where you want to send data and then press OK If the LCD prompts you to enter a PIN use the control panel to enter the four digit PIN for the computer and then press OK 6 Do one of the following To change the settings press Options or Copy Scan Options and then go...

Page 118: ...ettings Pressing Mono Start or Colour Start does not allow you to change the settings 7 Press a or b to select the Scan Settings setting and then press OK To use the Scan Settings option a computer with either ControlCenter4 Windows or Brother iPrint Scan Mac software installed must be connected to the machine 8 Press a or b to select the Set at Device setting and then press OK 9 Select the scan s...

Page 119: ...Related Information Scan Using the Scan Button on Your Brother Machine 113 ...

Page 120: ...elect the E mail option and then press OK 5 If the machine is connected over the network press a or b to select the computer where you want to send data and then press OK If the LCD prompts you to enter a PIN use the control panel to enter the four digit PIN for the computer and then press OK 6 Do one of the following To change the settings press Options or Copy Scan Options and then go to the nex...

Page 121: ...ngs Pressing Mono Start or Colour Start does not allow you to change the settings 7 Press a or b to select the Scan Settings setting and then press OK To use the Scan Settings option a computer with either ControlCenter4 Windows or Brother iPrint Scan Mac software installed must be connected to the machine 8 Press a or b to select the Set at Device setting and then press OK 9 Select the scan setti...

Page 122: ...Related Information Scan Using the Scan Button on Your Brother Machine 116 ...

Page 123: ... and Windows 10 The Web Services protocol enables Windows 7 Windows 8 and Windows 10 users to scan using a Brother machine on the network You must install the driver via Web Services Use Web Services to Install Drivers Used for Scanning Windows 7 Windows 8 and Windows 10 Scan Using Web Services from the Brother Machine Windows 7 Windows 8 and Windows 10 Configure Scan Settings for Web Services 117...

Page 124: ...e you want to install Windows 8 Move your mouse to the lower right corner of your desktop When the menu bar appears click Settings Change PC settings Devices Add a device The machine s Web Services Name appears Windows 8 1 Move your mouse to the lower right corner of your desktop When the menu bar appears click Settings Change PC settings PC and devices Devices Add a device The machine s Web Servi...

Page 125: ...icient memory error message choose a smaller size in the Paper size setting or a lower resolution in the Resolution DPI setting DCP T510W DCP T710W MFC T810W MFC T910DW DCP T510W DCP T710W MFC T810W 1 Load your document 2 Press SCAN 3 Press a or b to select the Web Service option and then press OK 4 Press a or b to select the type of scan you want and then press OK 5 Press a or b to select the com...

Page 126: ...e and Sound group click View devices and printers 2 Right click the machine icon and then select Scan profiles The Scan Profiles dialog box appears 3 Select the scan profile you want to use 4 Make sure the scanner selected in the Scanner list is a Brother machine that supports Web Services for scanning and then click the Set as Default button 5 Click Edit The Edit Default Profile dialog box appear...

Page 127: ...s from ControlCenter4 Windows 1 Click the ControlCenter4 icon in the task tray and then click Open 2 Click the Device Settings tab 3 Click the Device Scan Settings button The Device Scan Settings dialog box appears 4 Click the tab for the Scan to action you want to change Image OCR E mail or File 5 Change the settings as needed 6 Click OK 121 ...

Page 128: ... Yes Yes Brightness Yes Yes Yes Yes Contrast Yes Yes Yes Yes Auto Crop Yes Yes Yes ID Card Scan Yes Yes Yes Yes Advanced Settings Yes Yes Yes Yes Default Yes Yes Yes Yes File Type Select the file type you want to use for the scanned data Target Application Select the destination application from the drop down list OCR Language Set the optical character recognition OCR language to match the languag...

Page 129: ...ze drop down list If you select the 1 to 2 A4 option the scanned image will be divided into two A5 size documents Brightness Set the Brightness level by dragging the slider to the right or left to lighten or darken the image If the scanned image is too light set a lower brightness level and scan the document again If the image is too dark set a higher brightness level and scan the document again Y...

Page 130: ... your computer screen the number of total pages saved and blank pages skipped Default Select this option to restore all settings to their factory setting values Related Information Scan Using the Scan Button on Your Brother Machine 124 ...

Page 131: ...click the iPrint Scan icon The Brother iPrint Scan screen appears 2 If your Brother machine is not selected click the Select your Machine button and then follow the on screen instructions to select your Brother machine 3 Click the Machine Scan Settings button and then follow the on screen instructions to change the scan settings Related Information Scan Using the Scan Button on Your Brother Machin...

Page 132: ...r Brother machine Use the software applications provided by Brother or use your favourite scanning application Scan Using ControlCenter4 Home Mode Windows Scan Using ControlCenter4 Advanced Mode Windows Scan Using Nuance PaperPort 14SE or Other Windows Applications Scan Using Windows Fax and Scan Install BookScan Enhancer and Whiteboard Enhancer Windows 126 ...

Page 133: ...e Mode Windows Use ControlCenter4 Home Mode to access your machine s main features Scan Using ControlCenter4 Home Mode Windows Save Scanned Data to a Folder as a PDF File Using ControlCenter4 Home Mode Windows Scan Settings for ControlCenter4 Home Mode Windows Change the Operation Mode in ControlCenter4 Windows 127 ...

Page 134: ...n Size if needed 6 Click Scan The machine starts scanning and the scanned image appears in the image viewer 7 If you scanned multiple pages using the ADF click the left or right arrow buttons to preview each scanned page ADF models only 8 Crop the scanned image if needed 9 Do one of the following Click Save to save scanned data Click Print to print scanned data Click Open with an Application to op...

Page 135: ...pe Using ControlCenter4 Home Mode Windows Change Scan Size Using ControlCenter4 Home Mode Windows Crop a Scanned Image Using ControlCenter4 Home Mode Windows Print Scanned Data Using ControlCenter4 Home Mode Windows Open with an Application Using ControlCenter4 Home Mode Windows 129 ...

Page 136: ...Mode Windows Select the Document Type option that matches the type of original you want to scan Option Description Photo 600 x 600 dpi 24bit Colour Text and Graph 300 x 300 dpi 24bit Colour Monochrome Text 200 x 200 dpi Black White Custom 300 x 300 dpi 24bit Colour as default Select the scan settings you want from the Custom Settings button Related Information Scan Using ControlCenter4 Home Mode W...

Page 137: ...e but produce a finer scanned image Scan Type Select from a range of scan colour depths Auto Use for any type of document This mode automatically picks an appropriate colour depth for the document Black White Use for text or line art images Grey Error Diffusion Use for photographic images or graphics Error Diffusion is a method for creating simulated grey images without using true grey dots Black ...

Page 138: ...ine will scan each document and create separate files or a single multi page file Continuous Scanning Select this option to scan multiple pages After a page is scanned select either continue scanning or finish ID Card Scan Select this check box to scan both sides of an identification card onto one page Advanced Settings Configure advanced settings by clicking the Advanced Settings button in the Sc...

Page 139: ...olCenter4 Home Mode Windows Change Scan Size Using ControlCenter4 Home Mode Windows Change Scan Size Using ControlCenter4 Home Mode Windows For faster scan speeds select the exact size of your document from the Scan Size drop down menu Related Information Scan Using ControlCenter4 Home Mode Windows 133 ...

Page 140: ...splays the scanned image so that the entire image fits in the window 3 Zoom In Zooms in on the scanned image 4 Zoom Out Zooms out of the scanned image 5 Crop and Edit Removes the outer parts of the image Click the Crop and Edit button and then change the frame to contain the area you want to keep after cropping 6 Page Counter Indicates the page number of the scanned page currently shown in the ima...

Page 141: ...c Zooms out of the image d Rotates the image counter clockwise 90 degrees e Rotates the image clockwise 90 degrees f Click and drag the frame to adjust the area to be cropped 3 Click OK The edited image appears in the image viewer Related Information Scan Using ControlCenter4 Home Mode Windows 135 ...

Page 142: ...ine and then print copies using the printer driver features that are available in ControlCenter4 1 Scan a document 2 Click Print a Shows which images are currently selected b Click the Properties button to change specific printer settings c Select the Paper Size Media Type and Layout options The current settings are enclosed in a blue square 3 Configure the print settings and then click the Start ...

Page 143: ...an Application Using ControlCenter4 Home Mode Windows The Open with an Application button lets you scan an image directly into your graphics application for editing 1 Click the Open with an Application button 2 Select the application from the drop down list and then click OK The image will be opened in the application you have selected Related Information Scan Using ControlCenter4 Home Mode Window...

Page 144: ...e setting for ControlCenter4 1 Load your document 2 Click the ControlCenter4 icon in the task tray and then click Open 3 Click the Scan tab 4 Select the Document Type 5 Change the size of your document if needed 6 Click Scan The machine starts scanning and the scanned image appears in the image viewer 7 Click the left or right arrow buttons to preview each scanned page 8 Click Save The Save dialog...

Page 145: ...st click and then type the password 10 To change the file name click the Change button if needed 11 Click the folder icon to browse and select the folder where you want to save your scanned documents 12 Click OK The scanned document is saved to the destination folder as a PDF Related Information Scan Using ControlCenter4 Home Mode Windows 139 ...

Page 146: ...work Graphics png PDF Single Page pdf recommended for scanning and sharing documents PDF Multi Page pdf recommended for scanning and sharing documents High Compression PDF Single Page pdf High Compression PDF Multi Page pdf Secure PDF Single Page pdf Secure PDF Multi Page pdf Searchable PDF Single Page pdf Searchable PDF Multi Page pdf XML Paper Specification xps the XML Paper Specification is ava...

Page 147: ... to specify the destination where you want to save your scanned documents Show Folder Select this option to automatically display the destination folder after scanning File Size Priority Adjust the data compression ratio of the scanned image Change the file size by moving the File Size Priority slider to the right or left Custom Settings Select the Custom option click the Custom Settings button an...

Page 148: ...ControlCenter4 Advanced Mode Windows Save Scanned Data to a Folder as a PDF File Using ControlCenter4 Advanced Mode Windows Scan Both Sides of an ID Card Using ControlCenter4 Advanced Mode Windows Scan to Email Attachment Using ControlCenter4 Advanced Mode Windows Scan to an Editable Text File OCR Using ControlCenter4 Advanced Mode Windows Scan to an Office File Using ControlCenter4 Advanced Mode ...

Page 149: ...can Photos and Graphics Using ControlCenter4 Advanced Mode Windows Send scanned photos or graphics directly to your computer Select Advanced Mode as the mode setting for ControlCenter4 1 Load your document 2 Click the ControlCenter4 icon in the task tray and then click Open 3 Click the Scan tab 4 Click the Image button The scan settings dialog box appears 143 ...

Page 150: ...e the file name click Change To change Destination Folder click the folder icon To preview and configure the scanned image select the PreScan check box 6 Click Scan The machine starts scanning The image opens in the application you have selected Related Information Scan Using ControlCenter4 Advanced Mode Windows 144 ...

Page 151: ... Advanced Mode Windows Save Scanned Data to a Folder as a PDF File Using ControlCenter4 Advanced Mode Windows Scan documents and save them to a folder on your computer as PDF files Select Advanced Mode as the mode setting for ControlCenter4 1 Load your document 2 Click the ControlCenter4 icon in the task tray and then click Open 3 Click the Scan tab 145 ...

Page 152: ...down list click and then type the password 6 Click the folder icon to browse and select the folder where you want to save your scanned documents 7 Change the scan settings such as file format file name resolution and colour if needed To preview and configure the scanned image select the PreScan check box 8 Click Scan The machine starts scanning The file is saved in the folder you selected Related ...

Page 153: ... Card Using ControlCenter4 Advanced Mode Windows Scan Both Sides of an ID Card Using ControlCenter4 Advanced Mode Windows Select Advanced Mode as the mode setting for ControlCenter4 1 Place an ID card on the scanner glass 2 Click the ControlCenter4 icon in the task tray and then click Open 3 Click the Scan tab 147 ...

Page 154: ...7 Change the scan settings such as file format file name scan location resolution and colour if needed 8 Click Scan The machine starts scanning one side of the identification card 9 After the machine has scanned one side turn over the identification card and then click Continue to scan the other side 10 Click Finish Related Information Scan Using ControlCenter4 Advanced Mode Windows 148 ...

Page 155: ...Select Advanced Mode as the mode setting for ControlCenter4 The Scan to Email feature does not support Webmail services Use the Scan to Image or Scan to File feature to scan a document or a picture and then attach the scanned file to an email message The machine scans to your default email client 1 Load your document 2 Click the ControlCenter4 icon in the task tray and then click Open 3 Click the ...

Page 156: ...hange To change Destination Folder click the folder icon To preview and configure the scanned image select the PreScan check box 6 Click Scan The machine starts scanning Your default email application opens and the scanned image is attached to a new blank email message Related Information Scan Using ControlCenter4 Advanced Mode Windows 150 ...

Page 157: ...ed Models MFC T810W MFC T910DW Your machine can convert characters in a scanned document to text using optical character recognition OCR technology You can edit this text using your preferred text editing application Select Advanced Mode as the mode setting for ControlCenter4 1 Load your document 2 Click the ControlCenter4 icon in the task tray and then click Open 3 Click the Scan tab 4 Click the ...

Page 158: ...k Change To change Destination Folder click the folder icon To preview and configure the scanned image select the PreScan check box 6 Click Scan The machine scans the document converts it to editable text and then sends it to your default word processing application Related Information Scan Using ControlCenter4 Advanced Mode Windows 152 ...

Page 159: ...feature your computer must be connected to the Internet 1 Load your document 2 Click the ControlCenter4 icon in the task tray and then click Open 3 Click the Scan tab 4 Click the E mail or File button The scan settings dialog box appears 5 Click the File Type drop down list and then select the Microsoft Office Word docx Microsoft Office PowerPoint pptx or Microsoft Office Excel xlsx option 6 Chang...

Page 160: ...nning Yes Yes Yes Yes Auto Crop Yes Yes Yes ID Card Scan Yes Yes Yes Yes Advanced Settings Yes Yes Yes Yes Default Yes Yes Yes Yes File Type Select the file type you want to use for the scanned data For Image E mail and File Windows Bitmap bmp JPEG jpg recommended for most users when scanning pictures TIFF Single Page tif TIFF Multi Page tif Portable Network Graphics png PDF Single Page pdf recomm...

Page 161: ...save your scanned documents Scan Location Select the Folder or SharePoint radio button to specify the destination where you want to save your scanned documents Show Folder Select this option to automatically display the destination folder after scanning Show Save As Window Select this option to specify the scanned image s destination every time you scan File Size Priority Adjust the data compressi...

Page 162: ...rease the Contrast level by moving the slider to the right or left An increase emphasises dark and light areas of the image while a decrease reveals more details in grey areas You can also type a value into the field to set the Contrast level Continuous Scanning Select this option to scan multiple pages After a page is scanned select either continue scanning or finish Auto Crop Scan multiple docum...

Page 163: ...supports both TWAIN and WIA drivers the TWAIN driver recommended is used in these steps Depending on the model of your machine Nuance PaperPort 14SE may not be included If it is not included you can use other software applications that support scanning 1 Load your document 2 Start PaperPort 14SE Do one of the following Windows 7 Using your computer click Start All Programs Nuance PaperPort 14 Pape...

Page 164: ...ment Size drop down list and then select your document size 10 Click PreScan if you want to preview your image and crop unwanted portions before scanning 11 Click Start The machine starts scanning Related Information Scan from Your Computer Windows TWAIN Driver Settings Windows 158 ...

Page 165: ...you want to scan Scan Image Type Resolution Scan Type Photo Use for scanning photo images 300 x 300 dpi 24bit Colour Web Use for attaching the scanned image to web pages 100 x 100 dpi 24bit Colour Text Use for scanning text documents 200 x 200 dpi Black White 2 Resolution Select a scanning resolution from the Resolution drop down list Higher resolutions take more memory and transfer time but produ...

Page 166: ...agging the slider to the right or left to lighten or darken the image If the scanned image is too light set a lower brightness level and scan the document again If the image is too dark set a higher brightness level and scan the document again You can also type a value in the field to set the brightness level 6 Contrast Increase or decrease the Contrast level by moving the slider to the right or l...

Page 167: ...acters of the original sharper Reduce Noise Improve and enhance the quality of your scanned images with this selection The Reduce Noise option is available when selecting the 24bit Colour option and the 300 x 300 dpi 400 x 400 dpi or 600 x 600 dpi scan resolution Paper Handling Edge Fill Fill in the edges on four sides of the scanned image using the selected colour and range Continuous Scan Select...

Page 168: ...e scanner glass also called the flatbed 1 Load your document 2 Launch Windows Fax and Scan 3 Click File New Scan 4 Select the scanner you want to use 5 Click Import or OK The New Scan dialog box appears 6 Adjust the settings in the Scanner Setup dialog box if needed The scanner resolution can be set to a maximum of 1200 dpi If you want to scan at higher resolutions use the Scanner Utility software...

Page 169: ... WIA Driver Settings Windows 163 ...

Page 170: ... option from the drop down list Picture Type Image Type Select Color picture Grayscale picture Black and white picture or text or Custom Settings for the type of document you want to scan To change advanced settings click the Adjust the quality of the scanned picture link Page size The Page size option is available if you select the Document Feeder as the Paper source option 164 ...

Page 171: ...in Contrast Increase or decrease the Contrast level by moving the slider to the right or left An increase emphasises dark and light areas of the image while a decrease reveals more details in grey areas You can also type a value in the field to set the contrast level Resolution DPI Select a scanning resolution from the Resolution DPI list Higher resolutions take more memory and transfer time but p...

Page 172: ...d enhance text and images in photos taken of a whiteboard These applications are not available for Windows Server series The machine must be turned on and connected to the computer The computer must be connected to the Internet You must be logged on with Administrator access privileges 1 Click Brother Utilities 2 Select your machine from the drop down list 3 Select Do More in the left navigation b...

Page 173: ...eral ways you can use your Mac to scan photos and documents on your Brother machine Use the software applications provided by Brother or your favourite scanning application Scan Using Brother iPrint Scan Mac Scan Using TWAIN Compliant Applications Mac Scan Using AirPrint macOS 167 ...

Page 174: ...rint Scan screen appears 2 If your Brother machine is not selected click the Select your Machine button and then follow the on screen instructions to select your Brother machine 3 Click the Scan icon and then follow the on screen instructions to scan your documents Related Information Scan from Your Computer Mac Brother iPrint Scan for Windows and Mac Change Scan Button Settings from Brother iPrin...

Page 175: ...t your graphics application and then select the scan operation The scanner setup dialog box appears 2 Change the scan settings such as Resolution Scan Type or Adjust Image if needed 3 Click the Document Size pop up menu and then select your document size 4 Click the PreScan option to preview your image and crop unwanted portions before scanning After you select a document size adjust the scanning ...

Page 176: ...ur depths Black White Use for text or line art images Gray Error Diffusion Use for photographic images or graphics Error Diffusion is a method for creating simulated grey images without using true grey dots Black dots are put in a specific pattern to give a grey appearance True Gray Use for photographic images or graphics This mode is more accurate because it uses up to 256 shades of grey 24bit Co...

Page 177: ...e brightness Contrast Increase or decrease the Contrast level by moving the slider to the right or left An increase emphasises dark and light areas of the image while a decrease reveals more details in grey areas You can also type a value in the box to set the contrast Reduce Noise Improve and enhance the quality of your scanned images with this selection The Reduce Noise option is available when ...

Page 178: ...Home Copy Copy Copy a Document Enlarge or Reduce Copied Images Sort Copies Make Page Layout Copies N in 1 or Poster Copy on Both Sides of the Paper 2 sided Copy Copy an ID Card Copy Options 172 ...

Page 179: ...ol panel b Press a or b to select the copy settings When the setting you want appears press OK 6 When finished press Mono Start or Colour Start To stop copying press Stop Exit MFC T910DW 1 Make sure you have loaded the correct size paper in the paper tray 2 Load your document 3 Press COPY The LCD displays Press Start Normal Quality Plain Paper Paper Type 01 4 Enter the number of copies using the d...

Page 180: ... Load Documents in the Automatic Document Feeder ADF Load Documents on the Scanner Glass Copy Options 174 ...

Page 181: ...he available options Press OK If you selected the Custom 25 400 option enter an enlargement or reduction ratio from 25 to 400 6 When finished press Mono Start or Colour Start If you selected the Fit to Page option your machine adjusts the copy size to fit the paper size set in the machine The Fit to Page option does not work correctly when the document on the scanner glass is skewed more than thre...

Page 182: ...Start or Colour Start If you selected the Fit to Page option your machine adjusts the copy size to fit the paper size set in the machine The Fit to Page option does not work correctly when the document on the scanner glass is skewed more than three degrees Using the document guidelines on the left and top place your document in the upper left corner with the document face down on the scanner glass...

Page 183: ...F models only the machine scans the document and starts printing 7 If you are using the scanner glass repeat the following steps for each page of the document Place the next page on the scanner glass and then press a to scan the page After scanning all the pages press b to start printing MFC T910DW 1 Load your document 2 Press COPY 3 Enter the number of copies using the dial pad 4 Press a or b to ...

Page 184: ...4 or Letter You can make only one Poster copy at a time DCP T310 DCP T510W DCP T710W MFC T810W MFC T910DW DCP T310 DCP T510W DCP T710W MFC T810W 1 Load your document 2 MFC T810W Press COPY 3 Enter the number of copies in one of the following ways DCP T510W DCP T710W Press a or b on the control panel MFC T810W Enter the number of copies using the dial pad DCP T310 Press Number of Copies repeatedly ...

Page 185: ...anner glass repeat the following steps for each page of the document Place the next page on the scanner glass and then press a to scan the page After scanning all the pages press b to start printing MFC T910DW 1 Load your document 2 Press COPY 3 Enter the number of copies using the dial pad 4 Press a or b to select Page Layout Press OK 5 Press a or b to display the options and then press OK to sel...

Page 186: ...ss Mono Start or Colour Start If you placed the document in the ADF or are making a poster the machine scans the pages and starts printing 7 If you are using the scanner glass repeat the following steps for each page of the document Place the next page on the scanner glass and then press c to scan the page After scanning all the pages press d to start printing Related Information Copy 180 ...

Page 187: ...r 2 sided copying ADF models only DCP T710W MFC T810W MFC T910DW When you manually make 2 sided copies from a 2 sided document use the scanner glass You can use only A4 A5 or Letter size plain paper Portrait 1 sided to 2 sided Long Edge Flip 1 sided to 2 sided Short Edge Flip 2 sided to 2 sided 1 1 2 1 1 2 Landscape 1 sided to 2 sided Long Edge Flip 1 sided to 2 sided Short Edge Flip 2 sided to 2 ...

Page 188: ...s printing 8 If you are using the scanner glass repeat the following steps for each page of the document Place the next page on the scanner glass and then press c to scan the page After scanning all the pages press d to start printing DO NOT touch the printed page until it is ejected the second time The machine will print the first side and eject the paper and then pull the paper in to print the s...

Page 189: ...orner of the scanner glass a b c d a a 3 mm or greater top left b 207 mm c 145 mm d Scannable area 2 MFC T810W Press COPY 3 Enter the number of copies in one of the following ways DCP T510W DCP T710W Press a or b on the control panel MFC T810W Enter the number of copies using the dial pad DCP T310 Press Number of Copies repeatedly 4 Press Options or Copy Scan Options and a or b to select Layout 2i...

Page 190: ... 3 Enter the number of copies using the dial pad 4 Press a or b to select the following a Select Page Layout Press OK b Select 2in1 ID Press OK 5 Press Mono Start or Colour Start The machine starts scanning one side of the identification card 6 After the machine has scanned the first side turn over the identification card and press c to scan the other side Related Information Copy 184 ...

Page 191: ...on ratio Density Increase the density to make the text darker Decrease the density to make the text lighter Quality Select the Copy resolution for your type of document Stack Sort Select to stack or sort multiple copies Stack 1 1 2 2 Sort 2 1 2 1 Paper Type Select a paper type If copying on special paper set the machine for the type of paper you are using to get the best print quality Paper Size S...

Page 192: ... type and size for your document Enlarge Reduce 100 Enlarge Select an enlargement ratio for the next copy Reduce Select a reduction ratio for the next copy Fit to Page Adjusts the copy size to fit on the paper size you have set Custom 25 400 Enter an enlargement or reduction ratio Density Increase the density to make the text darker Decrease the density to make the text lighter Stack Sort Select t...

Page 193: ...d becomes more apparent This saves some ink and may make certain copies easier to read Set New Default Saves the copy settings that you use most often by setting them as the default settings Factory Reset Restores any changed copy settings to the factory settings Related Information Copy Copy a Document 187 ...

Page 194: ...Home Fax Fax Send a Fax Receive a Fax Voice Operations and Fax Numbers Telephone Services and External Devices Fax Reports PC FAX 188 ...

Page 195: ...er Machine Send a Fax Manually Send a Fax at the End of a Conversation Send the Same Fax to More than One Recipient Broadcasting Send a Fax in Real Time Change the Fax Auto Redial Setting Cancel a Fax in Progress Check and Cancel a Pending Fax Fax Options 189 ...

Page 196: ...K c Select the number you want and then press OK Address Book Select a number from the Address Book a Select Address Book on the control panel b Press OK To search a speed dial number press a Enter the two digit number you want using the dial pad and then press OK To search alphabetically enter the first letter of the name using the dial pad and then press OK Press a or b to select the name and th...

Page 197: ... OK b Select Outgoing Call Press OK c Select the number you want and then press OK d Press c to select Apply Caller ID Select a number from the Caller ID history Not available for Taiwan and some countries Press a or b to select the following a Select Call History Press OK b Select Caller ID History Press OK c Select the number you want and then press OK d Press c to select Apply Address Book Sele...

Page 198: ...rts scanning the first page Go to the next step 7 When the LCD displays Next page do one of the following Press c to scan another page Place the next page on the scanner glass and then press c The machine starts scanning the page Repeat this step for each additional page Press d to send the fax when finished scanning pages The machine starts sending the document Related Information Send a Fax Fax ...

Page 199: ...hone Dial the fax number using the external telephone When you hear fax tones press Mono Start If you are using the scanner glass press c to send a fax Replace the handset of the external phone MFC T910DW Not available in South Africa 1 Load your document 2 Press FAX 3 Press Hook and listen for a dial tone 4 Enter the fax number 5 When you hear fax tones press Mono Start If you are using the scann...

Page 200: ... press the Start key before hanging up 2 Load your document in the ADF or place it on the scanner glass 3 Press Mono Start If you are using the scanner glass press a to send the fax 4 Replace the handset of the external telephone MFC T910DW 1 Ask the other party to wait for fax tones beeps and to press the Start key before hanging up 2 Load your document 3 Press Mono Start If you are using the sca...

Page 201: ...ax number Press OK Repeat this step until you have entered all the fax numbers to be included in the broadcast 4 Press Mono Start 5 Do one of the following If you are using the ADF the machine starts scanning and sending the document If you are using the scanner glass the machine starts scanning the first page When the LCD displays Next Page do one of the following Press a to scan another page Pla...

Page 202: ... b Press the first letter of the name using the dial pad and then press OK c Press a or b to select the name and then press OK d Press OK again 6 When finished press a or b to select Complete Press OK 7 Press Mono Start 8 Do one of the following If you are using the ADF the machine starts scanning and sending the document If you are using the scanner glass the machine starts scanning the first pag...

Page 203: ...s a To exit without cancelling press b 5 Press Stop Exit MFC T910DW 1 Press Settings 2 Press a or b to select the following a Select Fax Press OK b Select Remaining Jobs Press OK The LCD displays the fax number being dialled and the broadcasting job number 3 Press a or b to select the broadcasting job number you want to cancel and then press OK 4 Do one of the following To cancel the entire broadc...

Page 204: ...automatic redial feature does not work when using the scanner glass MFC T810W MFC T910DW MFC T810W 1 Load your document in the ADF or place it on the scanner glass 2 Press Menu 3 Press a or b to select the following a Select Fax Press OK b Select Setup Send Press OK c Select Real Time TX Press OK d Select On or Off Press OK 4 Press Stop Exit so you can continue sending your fax 5 Enter the fax num...

Page 205: ...t five minute intervals The default setting is On MFC T810W MFC T910DW MFC T810W 1 Press Menu 2 Press a or b to select the following a Select Fax Press OK b Select Setup Send Press OK c Select Auto Redial Press OK d Select On or Off Press OK 3 Press Stop Exit MFC T910DW 1 Press Settings 2 Press a or b to select the following a Select Initial Setup Press OK b Select Fax Auto Redial Press OK c Selec...

Page 206: ...ready in progress 2 When you press Stop Exit while the machine is dialling or sending the LCD displays Cancel Job Press a to confirm MFC T910DW 1 Press Stop Exit to cancel a fax that is already in progress 2 When you press Stop Exit while the machine is dialling or sending the LCD displays Cancel Job Press c to confirm Related Information Send a Fax Telephone and Fax problems 200 ...

Page 207: ...ach fax job you want to check or cancel a Press a or b to scroll through the waiting jobs If needed select the job you want to cancel and then press OK b Press a to confirm or press b to exit without cancelling 4 When finished press Stop Exit MFC T910DW 1 Press Settings 2 Press a or b to select the following a Select Fax Press OK b Select Remaining Jobs Press OK 3 Do the following for each fax job...

Page 208: ...x sending settings press FAX Option Description Fax Resolution Set the resolution for outgoing faxes The fax quality often can be improved by changing the Fax Resolution Contrast Adjust the contrast If your document is very light or very dark changing the contrast may improve the fax quality Glass Scan Size Adjust the scan area of the scanner glass to the size of the document See Related Informati...

Page 209: ... Send a Fax from Your Brother Machine Specifications 203 ...

Page 210: ... Fax Receive a Fax Receive a Fax Receive Mode Settings Shrink Page Size of an Oversized Incoming Fax Set the Fax Receive Stamp Receive a Fax at the End of a Telephone Conversation Memory Receive Options 204 ...

Page 211: ...x Receive Mode Settings Receive Mode Settings Receive Modes Overview Choose the Correct Receive Mode Set the Number of Rings Before the Machine Answers Ring Delay Set the F T Ring Time Pseudo Double ring Set Fax Detect 205 ...

Page 212: ...g made by your machine Manual To receive a fax in Manual mode lift the handset of the external telephone or press the Hook 1 button When you hear fax tones short repeating beeps press the Start button and then select Receive to receive a fax You can also use the Fax Detect feature to receive faxes by lifting a handset on the same line as the machine External TAD External TAD mode lets an external ...

Page 213: ...e you using the voice message function of an external telephone answering device Do you want the machine to answer fax and telephone calls automatically Yes MFC T810W MFC T910DW MFC T810W 1 Press Menu 2 Press a or b to select the following a Select Fax Press OK b Select Setup Receive Press OK c Select Receive Mode Press OK For some countries If you cannot change the Receive Mode option make sure t...

Page 214: ... b to select the Fax Only Fax Tel External TAD or Manual option and then press OK 4 Press Stop Exit Related Information Receive Mode Settings Distinctive Ring Connect an External TAD Telephone and Fax problems 208 ...

Page 215: ...Select Fax Press OK b Select Setup Receive Press OK c Select Ring Delay Press OK d Select the number of times you want the line to ring before the machine answers Press OK If you select 0 the machine will answer immediately and the line will not ring at all available only for some countries 3 Press Stop Exit MFC T910DW 1 Press Settings 2 Press a or b to select the following a Select Fax Press OK b...

Page 216: ... MFC T910DW MFC T810W 1 Press Menu 2 Press a or b to select the following a Select Fax Press OK b Select Setup Receive Press OK c Select F T Ring Time Press OK d Select how long the machine will double ring to alert you to a voice call Press OK 3 Press Stop Exit Even if the caller hangs up during the pseudo double ringing the machine will continue to ring for the set time MFC T910DW 1 Press Settin...

Page 217: ...t connect a fax call when you lift an extension or external telephone handset press the remote activation code 51 If you send faxes from a computer on the same telephone line and the machine intercepts them set Fax Detect to Off MFC T810W MFC T910DW MFC T810W 1 Press Menu 2 Press a or b to select the following a Select Fax Press OK b Select Setup Receive Press OK c Select Fax Detect Press OK d Sel...

Page 218: ...he fax and your Paper Size setting MFC T810W MFC T910DW MFC T810W 1 Press Menu 2 Press a or b to select the following a Select Fax Press OK b Select Setup Receive Press OK c Select Auto Reduction Press OK d Select On or Off Press OK 3 Press Stop Exit MFC T910DW 1 Press Settings 2 Press a or b to select the following a Select Fax Press OK b Select Setup Receive Press OK c Select Auto Reduction Pres...

Page 219: ...vailable only for monochrome faxes MFC T810W MFC T910DW MFC T810W 1 Press Menu 2 Press a or b to select the following a Select Fax Press OK b Select Setup Receive Press OK c Select Fax Rx Stamp Press OK d Select On or Off Press OK 3 Press Stop Exit MFC T910DW 1 Press Settings 2 Press a or b to select the following a Select Fax Press OK b Select Setup Receive Press OK c Select Fax Rx Stamp Press OK...

Page 220: ...er party can send you a fax before you both hang up Your machine s ADF must be empty MFC T810W MFC T910DW MFC T810W 1 Ask the other party to load the fax and to press the Start or Send key 2 When you hear CNG tones slow repeated beeps press Mono Start 3 Press b to receive the fax 4 Replace the external handset MFC T910DW 1 Ask the other party to load the fax and to press the Start or Send key 2 Wh...

Page 221: ... options to direct incoming faxes while you are away from the machine You can use only one Memory Receive option at a time Memory Receive can be set to PC Fax Receive Use PC Fax Receive to Transfer Received Faxes to Your Computer Windows only Print a Fax Stored in the Machine s Memory 215 ...

Page 222: ...if your computer is turned off your machine will receive and store faxes in its memory When you start your computer and the PC FAX Receiving software runs your machine transfers faxes to your computer automatically MFC T810W MFC T910DW MFC T810W 1 Press Menu 2 Press a or b to select the following a Select Fax Press OK b Select Setup Receive Press OK c Select PC Fax Receive Press OK d Select On Pre...

Page 223: ...rk Press OK g Select Backup Print On or Backup Print Off Press OK 3 Press Stop Exit To change the destination computer repeat these steps Related Information Memory Receive Options Transfer Your Faxes or Fax Journal Report Transfer Faxes to Your Computer Receive Faxes Using PC FAX Receive Windows 217 ...

Page 224: ...After you print the fax it is erased from the machine s memory If you turn on PC Fax Receive your machine will receive and store your faxes in its memory even when your PC is turned off 1 Press Settings 2 Press a or b to select the following a Select Fax Press OK b Select Print Document Press OK 3 Press c Related Information Memory Receive Options Error and Maintenance Messages Telephone and Fax p...

Page 225: ...Home Fax Voice Operations and Fax Numbers Voice Operations and Fax Numbers Voice Operations Store Fax Numbers Set up Groups for Broadcasting 219 ...

Page 226: ...Home Fax Voice Operations and Fax Numbers Voice Operations Voice Operations Send Tone Signals Pick up a Voice Call in Fax Tel Receive Mode 220 ...

Page 227: ...s feature to send tone signals MFC T810W MFC T910DW MFC T810W 1 Press Hook 2 Press on the machine s control panel Any digits dialled after this will send tone signals When you are finished with the call the machine will return to the Pulse dialling service MFC T910DW 1 Press Hook 2 Press on the machine s control panel Any digits dialled after this will send tone signals When you are finished with ...

Page 228: ... Ring pseudo double ringing to alert you to pick up a voice call If you are at the machine lift the external telephone s handset and then press Hook button to answer If you are at an extension telephone lift the handset during the F T Ring and then press 51 between the pseudo double rings If no one is on the line or if someone wants to send you a fax send the call back to the machine by pressing 5...

Page 229: ... and Fax Numbers Store Fax Numbers Store Fax Numbers Store Address Book Numbers Store Address Book Numbers from Outgoing Calls Store Address Book Numbers from Caller ID History Change or Delete Address Book Names or Numbers 223 ...

Page 230: ... Speed Dial numbers and give each number a name 1 Press Address Book 2 Press a or b to select Set Speed Dial Press OK 3 Press a or b to select the following a Select the two digit Speed Dial number where you want to store the number Press OK b Select Name Press OK c Enter the name up to 16 characters using the dial pad Press OK d Select Fax Tel Press OK e Enter the fax or telephone number up to 20...

Page 231: ...ory Press OK b Select Outgoing Call Press OK c Select the number you want to store Press OK d Press d to select Edit e Select Add to Address Book Press OK To delete the number from the Outgoing Call history list select Delete and then press OK Press c Yes to confirm f Select Name Press OK g Enter the name up to 16 characters using the dial pad Press OK h Confirm the fax or telephone number i Selec...

Page 232: ... 1 Press FAX 2 Press a or b to select the following a Select Call History Press OK b Select Caller ID History Press OK c Select the number you want to store Press OK d Press d to select Edit e Select Add to Address Book Press OK To delete the number from the Caller ID history list select Delete and then press OK Press c Yes to confirm f Select Name Press OK g Enter the name up to 16 characters usi...

Page 233: ...the cursor under the character you want to change then press Clear Back Re enter the character Press OK 8 Press Stop Exit MFC T910DW 1 Press Address Book 2 Do one of the following To change the number press a or b to select the following a Select Change Press OK b Select the Speed Dial name where you want to change the number Press OK Do the following steps a To change the name press a or b to sel...

Page 234: ...Related Information Store Fax Numbers 228 ...

Page 235: ...ial numbers to a Group For example to add Speed Dial numbers 05 and 09 Press Address Book 0 5 Address Book 0 9 Press OK d Enter a name up to 16 characters for the Group Press OK 6 Press Stop Exit MFC T910DW First you must store each fax number in the Address Book Then you can include them as numbers in the Group Each Group uses up a Speed Dial number You can store up to six Groups or you can assig...

Page 236: ...oice Operations and Fax Numbers Change a Broadcasting Group Name Delete a Broadcasting Group Add or Delete a Broadcasting Group Member Send the Same Fax to More than One Recipient Broadcasting Store Address Book Numbers 230 ...

Page 237: ...haracters Press OK To change a character in the Group name press d or c to position the cursor under the incorrect character and then press Clear Back Enter the new character 9 Press Stop Exit MFC T910DW 1 Press Address Book 2 Press a or b to select the following a Select Change Press OK b Select the Group to change Press OK c Select Name and then press OK Enter the new Group name up to 16 charact...

Page 238: ...elect Setup Groups Press OK 5 Enter the two digit Speed Dial number for the Group you want to delete using the dial pad Press OK 6 Press b to delete the stored Group 7 Press a to confirm 8 Press Stop Exit MFC T910DW 1 Press Address Book 2 Press a or b to select Delete Press OK 3 Do the following steps a Press a or b to select the Group you want to delete b Press d or c to select the check box labe...

Page 239: ...Dial number press d or c to position the cursor under the member whose Speed Dial number you want to delete and then press Clear Back Press OK 8 Press OK again 9 Press Stop Exit MFC T910DW 1 Press Address Book 2 Press a or b to select the following a Select Change Press OK b Select the Group you want to change Press OK c Select Add Delete Press OK d Select Alphabetical Order or Numerical Order Pre...

Page 240: ...Devices Telephone Services and External Devices Distinctive Ring Caller ID Set the Telephone Line Type Voice Over Internet Protocol VoIP Telephone Line Interference External TAD Telephone Answering Device External and Extension Telephones 234 ...

Page 241: ... Ring pattern so you will know which phone number is ringing This is one way you can have a separate phone number for your machine Your machine has a Distinctive Ring function allowing you to dedicate one phone number just for receiving faxes You will need to set Distinctive Ring to On You can switch it off temporarily then turn it back on When you get a new fax number make sure you reset this fun...

Page 242: ...not change the receive mode to another mode while the Distinctive Ring is set to on When Distinctive Ring is on the touchscreen will show D R as the Receive Mode MFC T810W MFC T910DW MFC T810W 1 Press Menu 2 Press a or b to select the following a Select Fax Press OK b Select Miscellaneous Press OK c Select Distinctive Press OK d Select Set Press OK 3 Press Stop Exit Distinctive Ring is now set to ...

Page 243: ...elect Distinctive Press OK d Select Off Press OK 3 Press Stop Exit When you turn off Distinctive Ring the machine will stay in Manual mode You must set the Receive Mode again MFC T910DW 1 Press Settings 2 Press a or b to select the following a Select Fax Press OK b Select Miscellaneous Press OK c Select Distinctive Press OK d Select Off Press OK 3 Press Stop Exit When you turn off Distinctive Ring...

Page 244: ... of your caller or name if available Once you answer the call the Caller ID information disappears from the screen but the call information remains stored in the Caller ID memory The ID Unknown message means the call originated outside your Caller ID service area The ID Withheld message means the caller has intentionally blocked transmission of Caller ID information You can print a list of Caller ...

Page 245: ... matches your line s features MFC T810W MFC T910DW MFC T810W 1 Press Menu 2 Press a or b to select the following a Select Initial Setup Press OK b Select Phone Line Set Press OK c Select Normal PBX or ISDN Press OK 3 Press Stop Exit MFC T910DW 1 Press Settings 2 Press a or b to select the following a Select Initial Setup Press OK b Select Phone Line Set Press OK c Select Normal PBX or ISDN Press O...

Page 246: ...BX The machine s recall feature supports timed break recall only TBR TBR will work with most PBX systems allowing you to gain access to an outside line or transfer calls to another extension Press the Hook button to use this feature Program a press of the Hook button as part of a number stored in the Address Book When programming the Address Book number press the Hook button first the LCD displays...

Page 247: ... to a modem phone adapter splitter or other such device If you have questions about how to connect your machine to the VoIP system please contact your VoIP provider After you have connected your machine to the VoIP system check for a dial tone Lift the external telephone s handset and listen for a dial tone If there is no dial tone please contact your VoIP provider If you are having problems sendi...

Page 248: ...l TAD must answer within two rings we recommend setting it to two rings This is because your machine cannot hear the CNG tones until the external TAD has picked up the call The sending machine will send CNG tones for only eight to ten seconds longer We do not recommend using the toll saver feature on your external TAD if it needs more than four rings to activate it 1 1 2 Protective Cap 1 TAD 2 IMP...

Page 249: ... 1 Set your external TAD to one or two rings The machine s Ring Delay setting does not apply 2 Record the outgoing message on your external TAD 3 Set the TAD to answer calls 4 Set the Receive Mode on your machine to External TAD Related Information External TAD Telephone Answering Device Receive Modes Overview Choose the Correct Receive Mode Telephone and Fax problems 243 ...

Page 250: ...tones We recommend beginning your OGM with an initial five second silence because the machine cannot hear fax tones over a loud voice You may try leaving out this pause but if your machine has trouble receiving faxes then you should re record the OGM to include it 2 Limit your speaking to 20 seconds 3 End your 20 second message by giving your Remote Activation Code for people sending manual faxes ...

Page 251: ...ar to work with a particular model of fax machine we cannot guarantee that the unit will operate correctly While it is often relatively simple to connect a fax machine to a PABX Private Automatic Branch Exchange we suggest that you contact the company that installed your telephone system and ask them to connect the fax machine for you Brother does not recommend the use of a PABX line PABX limitati...

Page 252: ...xternal Devices External and Extension Telephones External and Extension Telephones Connect an External or Extension Telephone Operation from External and Extension Telephones Use a Cordless External Telephone Use the Remote Codes 246 ...

Page 253: ... Extension Telephone Connect an External or Extension Telephone Related Models MFC T810W MFC T910DW You can connect a separate telephone to your machine as shown in the diagram below 3 1 Extension telephone 2 External telephone 3 Protective Cap 1 2 Related Information External and Extension Telephones 247 ...

Page 254: ...ive the fax If the machine answers a voice call and pseudo double rings for you to take over you can take the call at an extension telephone by pressing the Remote Deactivation Code 51 If you answer a call and no one is on the line You should assume that you re receiving a manual fax Press 51 and wait for the chirp or until the LCD shows Receiving and then hang up You can also use the Fax Detect f...

Page 255: ...elephone Use a Cordless External Telephone Related Models MFC T810W MFC T910DW Once the base unit of the cordless telephone has been connected to the same telephone line as the machine you can answer calls on the cordless handset during the Ring Delay Related Information External and Extension Telephones 249 ...

Page 256: ... the machine receive the fax by pressing the Start button and then selecting the option to receive Remote Deactivation Code If you receive a voice call and the machine is in F T mode it will start to sound the F T ring pseudo double ring after the initial Ring Delay If you pick up the call on an extension telephone you can turn the F T ring off by pressing 51 make sure you press this between the r...

Page 257: ... OK c Select Remote Codes Press OK d Select On Press OK 3 To change the Remote Activation Code enter the new code Press OK 4 To change the Remote Deactivation Code enter the new code Press OK 5 Press Stop Exit MFC T910DW 1 Press Settings 2 Press a or b to select the following a Select Fax Press OK b Select Setup Receive Press OK c Select Remote Codes Press OK d Select Remote Codes again Press OK e...

Page 258: ...Home Fax Fax Reports Fax Reports Set the Transmission Verification Report s Style Set the Fax Journal s Interval Period Print Reports Set the Machine to Power Off Automatically 252 ...

Page 259: ...Off The report will not be printed MFC T810W MFC T910DW MFC T810W 1 Press Menu 2 Press a or b to select the following a Select Fax Press OK b Select Report Setting Press OK c Select XMIT Report Press OK d Select the option you want Press OK If you select On Image or ErrorOnly Image the image will not appear on the Transmission Verification Report if Real Time Transmission is set to On 3 Press Stop...

Page 260: ...Related Information Fax Reports 254 ...

Page 261: ... the memory If you want an extra report before it is due to print you can print it without erasing the jobs Every 50 Faxes The machine will print the Journal when the machine has stored 50 fax jobs 4 If you selected Every 7 Days press a or b to select the first day of the seven day countdown Press OK 5 If you selected 6 12 24 hours 2 or 7 days enter the time of day using the dial pad Press OK Ente...

Page 262: ...me of day using the dial pad Press OK Enter the time in the same time format as your machine s date and time setting 12 hour format or 24 hour format 5 If you selected Every 7 Days press a or b to select Day and then press OK Press a or b to select the first day of the seven day countdown Press OK 6 Press Stop Exit Related Information Fax Reports Set the Machine to Power Off Automatically 256 ...

Page 263: ...Home Fax PC FAX PC FAX PC FAX for Windows PC FAX for Mac 257 ...

Page 264: ...Home Fax PC FAX PC FAX for Windows PC FAX for Windows PC FAX Overview Windows Send a Fax Using PC FAX Windows Receive Faxes on Your Computer Windows 258 ...

Page 265: ... PC FAX Overview Windows PC FAX Overview Windows Reduce paper consumption and save time by using Brother s PC FAX software to send faxes directly from your machine Configure PC FAX Windows Configure your PC Fax Address Book Windows 259 ...

Page 266: ...n click the drop down list and select your model name if not already selected Click PC FAX in the left navigation bar and then click Setup Sending The PC FAX Setup dialog box appears 2 Do one of the following Click the User Information tab and then type your user information in the fields Each Microsoft account can have its own customised User Information screen for custom fax headers and cover pa...

Page 267: ...Related Information PC FAX Overview Windows 261 ...

Page 268: ... groups to personalise your Brother Address Book Add a Member to your PC FAX Address Book Windows Create a Group in your PC FAX Address Book Windows Edit Member or Group Information in your PC FAX Address Book Windows Delete a Member or Group in your PC FAX Address Book Windows Export your PC FAX Address Book Windows Import Information to your PC FAX Address Book Windows 262 ...

Page 269: ...x software 1 Do one of the following Windows 7 Click Start All Programs Brother Brother Utilities Click the drop down list and select your model name if not already selected Click PC FAX in the left navigation bar and then click Address Book Send Windows 8 and Windows 10 Launch Brother Utilities and then click the drop down list and select your model name if not already selected Click PC FAX in th...

Page 270: ...3 Type the member s information in the corresponding fields Only the Name field is required 4 Click OK Related Information Configure your PC Fax Address Book Windows 264 ...

Page 271: ...f the following Windows 7 Click Start All Programs Brother Brother Utilities Click the drop down list and select your model name if not already selected Click PC FAX in the left navigation bar and then click Address Book Send Windows 8 and Windows 10 Launch Brother Utilities and then click the drop down list and select your model name if not already selected Click PC FAX in the left navigation bar...

Page 272: ...le Names field select each name you want to include in the group and then click Add Members added to the group appear in the Group Members box 5 When finished click OK Each group can contain up to 50 members Related Information Configure your PC Fax Address Book Windows 266 ...

Page 273: ...the drop down list and select your model name if not already selected Click PC FAX in the left navigation bar and then click Address Book Send Windows 8 and Windows 10 Launch Brother Utilities and then click the drop down list and select your model name if not already selected Click PC FAX in the left navigation bar and then click Address Book Send The Address Book dialog box appears 2 Select the ...

Page 274: ...p down list and select your model name if not already selected Click PC FAX in the left navigation bar and then click Address Book Send Windows 8 and Windows 10 Launch Brother Utilities and then click the drop down list and select your model name if not already selected Click PC FAX in the left navigation bar and then click Address Book Send The Address Book dialog box appears 2 Select the member ...

Page 275: ...e drop down list and select your model name if not already selected Click PC FAX in the left navigation bar and then click Address Book Send Windows 8 and Windows 10 Launch Brother Utilities and then click the drop down list and select your model name if not already selected Click PC FAX in the left navigation bar and then click Address Book Send The Address Book dialog box appears 2 Click the Fil...

Page 276: ...rt and then click Add Select and add the items in the order you want them listed 5 If you are exporting to an ASCII file under the Divide Character section select the Tab or Comma option to separate the data fields 6 Click OK 7 Browse to the folder on your computer where you want to save the data type the file name and then click Save Related Information Configure your PC Fax Address Book Windows ...

Page 277: ... the drop down list and select your model name if not already selected Click PC FAX in the left navigation bar and then click Address Book Send Windows 8 and Windows 10 Launch Brother Utilities and then click the drop down list and select your model name if not already selected Click PC FAX in the left navigation bar and then click Address Book Send The Address Book dialog box appears 2 Click the ...

Page 278: ...xt file 5 If you are importing an ASCII file under the Divide Character section select the Tab or Comma option to separate the data fields 6 Click OK 7 Browse to the folder where you want to import the data type the file name and then click Open Related Information Configure your PC Fax Address Book Windows 272 ...

Page 279: ...hods Click the numbers on the dial pad to type the number and then click Add Send Address If you select the Dial Restriction check box a confirmation dialog box will appear for you to re type the fax number using the keyboard This feature helps to prevent transmissions to the wrong destination Click the Address Book button and then select a member or group from the Address Book If you make a mista...

Page 280: ...Receive Faxes on Your Computer Windows Receive Faxes on Your Computer Windows Use Brother s PC FAX software to receive faxes on your computer screen them and print only those faxes you want Receive Faxes Using PC FAX Receive Windows 274 ...

Page 281: ...ontinue to receive and store faxes in your Brother machine s memory The machine s LCD will display the number of stored faxes received When you start this application the software will transfer all received faxes to your computer at once You can enable the Backup Print option if you want the machine to print a copy of the fax before the fax is sent to your computer or before the computer is switch...

Page 282: ...ll Programs Brother Brother Utilities Click the drop down list and select your model name if not already selected Click PC FAX in the left navigation bar and then click Receive Windows 8 and Windows 10 Launch Brother Utilities and then click the drop down list and select your model name if not already selected Click PC FAX in the left navigation bar and then click Receive 2 Confirm the message and...

Page 283: ...appears 2 Click Settings 3 Configure these options as needed Preferences Configure to start PC FAX Receive automatically when you start Windows Save Configure the path to save PC FAX files and select the received document format Upload to Configure the path to the SharePoint server and select the option to upload automatically or manually available only for Administrators Device Select the Brother...

Page 284: ...Related Information Run Brother s PC FAX Receive on Your Computer Windows 278 ...

Page 285: ... following the instructions for a network user then the machine should already be configured for your network 1 Double click the PC FAX Receive icon in your computer task tray The PC FAX Receive window appears 2 Click Settings 3 Click Device Add 4 Select the appropriate connection method Select your machine from the automatic search results below Connected Brother machines will be displayed Select...

Page 286: ... computer name that will appear on the machine s LCD type the new name in the Enter your PC display name Max 15 Characters field 6 Click OK Related Information Run Brother s PC FAX Receive on Your Computer Windows 280 ...

Page 287: ...Windows Related Models MFC T810W MFC T910DW Receiving Status Icon Indicated Status Standby mode No unread messages Receiving messages Messages received Unread messages 1 Double click the PC FAX Receive icon in your computer task tray The PC FAX Receive window appears 2 Click any faxes in the list to view them 3 When finished click in the right top corner of the window to close it 281 ...

Page 288: ...AX Receive is active and the PC FAX Receive icon will remain in your computer task tray To close PC FAX Receive click the icon in the computer task tray and click Close Related Information Receive Faxes Using PC FAX Receive Windows 282 ...

Page 289: ... FAX for Mac PC FAX for Mac Use Brother s PC FAX software to send faxes directly from your Mac without printing them This feature helps reduce your paper consumption and save time Send Faxes from Your Application Mac 283 ...

Page 290: ...he receiving fax machine supports colour faxes 1 Create a document in a Mac application 2 From an application such as Apple TextEdit click the File menu and then select Print 3 Click the application pop up menu and then select the Send Fax option 4 Click the Output pop up menu and then select the Facsimile option 5 Type a fax number in the Input Fax Number field and then click Add The fax number i...

Page 291: ...er click the Add button after entering the first fax number and type the next fax number The destination fax numbers will be listed in the Destination Fax Numbers field 6 Click Print to send the fax Related Information PC FAX for Mac 285 ...

Page 292: ...Home PhotoCapture Center PhotoCapture Center Print Photos Directly from a USB Flash Drive Print Photos from ControlCenter4 Windows 286 ...

Page 293: ...rive Even if your machine is not connected to your computer you can print photos directly from a USB Flash memory drive scan documents and save them directly to a USB flash drive Compatible USB Flash Drives Important Information about Photo Printing Print Photos from a USB Flash Drive on the Brother Machine 287 ...

Page 294: ...chine has media drive slot for use with common data storage IMPORTANT The USB direct interface supports only USB flash drives and digital cameras that use the USB mass storage standard Other USB devices are not supported Compatible Memory Cards USB flash drive Related Information Save Scanned Data to a USB Flash Drive Print Photos Directly from a USB Flash Drive 288 ...

Page 295: ...o on will not be recognised Direct photo printing must be performed separately from photo printing operations using the computer Simultaneous operation is not available The machine can read up to 999 files 1 on a USB flash drive Be aware of the following When printing an index or image the machine will print all the valid images even if one or more images have been corrupted Corrupted images will ...

Page 296: ...Photos from a USB Flash Drive on the Brother Machine Preview and Print Photos from a USB Flash Drive Print a Photo Index Sheet Thumbnails from a USB Flash Drive Print Photos by Image Number Print Photos with Auto Cropping Print Borderless Photos from a USB Flash Drive Print the Date from Your Photo s Data Print Settings for Photos 290 ...

Page 297: ...or b to select JPEG Print Press OK 4 Press a or b to select Select Files Press OK To print all photos press a or b to select Print All and then press OK 5 Press d or c to display the photo you want to print 6 Enter the number of copies using the dial pad 7 Repeat the last two steps until you have selected all the photos you want to print Press Clear Back to go back to the previous level 8 Press OK...

Page 298: ...le names that are 20 characters or less will be printed correctly on the index sheet File names cannot be printed correctly if they contain non alphanumeric characters but non alphanumeric characters do not affect photo print settings 1 Put a USB flash drive in the USB slot 2 Press PHOTO WEB 3 Press a or b to select JPEG Print Press OK 4 Press a or b to select the following a Select Index Print Pr...

Page 299: ...age numbers you want to print using the dial pad After you have selected the image numbers press OK Enter multiple numbers at one time by using key for a hyphen or key for a comma For example enter 1 5 to print images No 1 to No 5 Enter 1 3 6 to print images No 1 No 3 and No 6 Enter up to 12 characters including commas and hyphens for the image numbers you want to print 6 Enter the number of copie...

Page 300: ...ting to Off If you set the Cropping setting to Off set the Borderless setting to Off also Cropping On Cropping Off 1 Put a USB flash drive in the USB slot 2 Press PHOTO WEB 3 Press a or b to select JPEG Print Press OK 4 Press a or b to select Select Files Press OK 5 Press d or c to display the photo you want to print 6 Enter the number of copies using the dial pad 7 Press OK 8 Press a or b to sele...

Page 301: ...aper Printing time will be slower 1 Put a USB flash drive in the USB slot 2 Press PHOTO WEB 3 Press a or b to select JPEG Print Press OK 4 Press a or b to select Select Files Press OK 5 Press d or c to display the photo you want to print 6 Enter the number of copies using the dial pad 7 Press OK 8 Press a or b to select the following a Select Borderless Press OK b Select On or Off Press OK 9 Press...

Page 302: ...r right corner To use this setting the photo must include the date 1 Put a USB flash drive in the USB slot 2 Press PHOTO WEB 3 Press a or b to select JPEG Print Press OK 4 Press a or b to select Select Files Press OK 5 Press d or c to display the photo you want to print 6 Enter the number of copies using the dial pad 7 Press OK 8 Press a or b to select the following a Select Date Print Press OK b ...

Page 303: ...ss Adjust the brightness Contrast Adjust the contrast Increasing the contrast will make an image look sharper and more vivid Cropping Crop the image around the margin to fit the paper size or print size Turn this feature off when you want to print whole images or prevent unwanted cropping Borderless Expand the printable area to fit the edges of the paper Date Print Print the date on your photo Set...

Page 304: ...o one of the following If you are using Advanced Mode click the Photo tab and then click the Photo Print button If you are using Home Mode click the Photo tab 4 Select the folder that contains the image you want to print Option Description My CC4 Folder The My CC4 Folder button lets you open the ControlCenter4 folder located in the My Pictures folder on your computer Desktop The Desktop button let...

Page 305: ...ns 10 Click the Properties button to configure the Print Quality Colour Greyscale and Colour Mode options if needed To print the image s timestamp in the lower right corner of the image select the Print Date check box 11 To change other printer settings click the Print Options button For Advanced Mode only 12 Click OK 13 Click the Preview button to view the image on screen before printing 14 Click...

Page 306: ...te Fit to Window Set the zoom level so that the image fits the window Zoom In Zoom Out Enlarge or reduce the selected image Rotate Counterclockwise Rotate Clockwise Rotate the image by 90 degrees clockwise or counter clockwise Previous Next Display the previous or next image 3 Trimming This feature allows you to remove unwanted areas from your photos 4 Image Correction Auto Correction Select this ...

Page 307: ...o enhance natural colours such as green and blue Night Scene Select this option to optimise the image adjustments for a night scene photo Soft Light Select this option to soften bright edges Related Information Print Photos from ControlCenter4 Windows 301 ...

Page 308: ...Supported Basic Network Features Network Management Software and Utilities Additional Methods of Configuring Your Brother Machine for a Wireless Network Advanced Network Features Technical Information for Advanced Users 302 ...

Page 309: ...012 2012 R2 2016 macOS Printing Yes Yes Yes Scanning Yes Yes PC Fax Send Available only for certain models 1 Yes Yes PC Fax Receive Available only for certain models 1 Yes BRAdmin Light 2 Yes Yes BRAdmin Professional 3 Yes Yes Remote Setup Available only for certain models 1 Yes Status Monitor Yes Yes Driver Deployment Wizard Yes Yes Related Information Network 1 Not available for DCP models 2 BRA...

Page 310: ...nd Utilities Network Management Software and Utilities Configure and change your Brother machine s network settings using a management utility Learn about Network Management Software and Utilities Change Machine Settings from Your Computer 304 ...

Page 311: ...ur LAN BRAdmin Professional can also log activity of Brother devices on your network and export the log data Go to your model s Downloads page on the Brother Solutions Center at support brother com to download the latest version of Brother s BRAdmin Professional utility Node name The node name appears in the current BRAdmin Professional window The default node name is BRNxxxxxxxxxxxx for a wired n...

Page 312: ...etwork we recommend using the Brother installation disc Before Configuring Your Brother Machine for a Wireless Network Configure Your Machine for a Wireless Network Using the One Push Method of Wi Fi Protected Setup WPS Configure Your Machine for a Wireless Network Using the PIN Method of Wi Fi Protected Setup WPS Configure Your Machine for a Wireless Network When the SSID is Not Broadcast Use Wi ...

Page 313: ...ors wireless may not be the best method of connection for all types of documents and applications If you are printing large files such as multi page documents with mixed text and large graphics you may want to consider selecting wired Ethernet for faster data transfer supported models only or USB for the fastest throughput speed Although the Brother machine can be used in both a wired and wireless...

Page 314: ... press Stop Exit 4 When the LCD instructs you to start WPS press the WPS button on your wireless access point router Then press OK on your machine Your machine automatically tries to connect to your wireless network If your wireless device is connected successfully the machine s LCD displays Connected You have completed the wireless network setup To install the Full Driver Software Package necessa...

Page 315: ...ge necessary for operating your machine insert the Brother installation disc into your computer or go to your model s Downloads page on the Brother Solutions Center at support brother com Related Information Additional Methods of Configuring Your Brother Machine for a Wireless Network 309 ...

Page 316: ...ction methods developed by the Wi Fi Alliance By submitting a PIN created by an Enrollee your machine to the Registrar a device that manages the wireless LAN you can set up the wireless network and security settings For more information on how to access WPS mode see the instructions provided with your wireless access point router Type A Connection when the wireless LAN access point router 1 double...

Page 317: ...ndows System Control Panel In the Hardware and Sound group click Add a device To use a Windows 7 Windows 8 or Windows 10 computer as a Registrar you must register it to your network in advance For more information see the instructions supplied with your wireless LAN access point router If you use Windows 7 Windows 8 or Windows 10 as a Registrar you can install the printer driver after the wireless...

Page 318: ...ol Panel In the Hardware and Sound group click Add a device To use a Windows 7 Windows 8 or Windows 10 computer as a Registrar you must register it to your network in advance For more information see the instructions supplied with your wireless LAN access point router If you use Windows 7 Windows 8 or Windows 10 as a Registrar you can install the printer driver after the wireless configuration by ...

Page 319: ...IP For example Network Name SSID HELLO Communication Mode Authentication Method Encryption Mode Network Key Infrastructure WPA2 PSK AES 12345678 If your router uses WEP encryption enter the key used as the first WEP key Your Brother machine supports the use of the first WEP key only 2 Press Menu 3 Press a or b to select the Network option and then press OK 4 Press a or b to select the Setup Wizard...

Page 320: ...river Software Package necessary for operating your machine insert the Brother installation disc into your computer or go to your model s Downloads page on the Brother Solutions Center at support brother com MFC T910DW Before configuring your machine we recommend writing down your wireless network settings You will need this information before you continue with the configuration 1 Check and write ...

Page 321: ...and then press OK If you selected the WPA WPA2 PSK option press a or b to select the Encryption type TKIP AES or AES and then press OK Enter the WPA key and then press OK For more information about how to enter text see the Appendix Your Brother machine supports the use of the first WEP key only 9 The machine attempts to connect to the wireless device you have selected If your wireless device is c...

Page 322: ...iguring Your Brother Machine for a Wireless Network Use Wi Fi Direct Use Wi Fi Direct Print or Scan from Your Mobile Device Using Wi Fi Direct Configure Your Wi Fi Direct Network I Cannot Complete the Wireless Network Setup Configuration 316 ...

Page 323: ...eless network configuration using the one push or PIN Method of Wi Fi Protected Setup WPS You can also configure a wireless network by manually setting a SSID and password Your Brother machine s Wi Fi Direct feature supports WPA2 security with AES encryption 1 2 1 Mobile device 2 Your Brother machine Although the Brother machine can be used in both a wired supported models only and wireless networ...

Page 324: ...s from your machine s control panel Wi Fi Direct Network Configuration Overview Configure Your Wi Fi Direct Network Using the One Push Method Configure Your Wi Fi Direct Network Using the One Push Method of Wi Fi Protected Setup WPS Configure Your Wi Fi Direct Network Using the PIN Method Configure Your Wi Fi Direct Network Using the PIN Method of Wi Fi Protected Setup WPS Configure Your Wi Fi Dir...

Page 325: ... your mobile device support Wi Fi Protected Setup WPS Option Description Yes Go to Step 4 No See Related Information Configure Your Wi Fi Direct Network Manually 4 Does your mobile device support one push configuration for Wi Fi Protected Setup WPS Option Description Yes See Related Information Configure Your Wi Fi Direct Network Using the One Push Method of Wi Fi Protected Setup WPS No See Relate...

Page 326: ... Configure Your Wi Fi Direct Network Using the PIN Method of Wi Fi Protected Setup WPS 320 ...

Page 327: ...rs Press OK on your Brother machine This will start the Wi Fi Direct setup 5 Do one of the following When your Brother machine is the G O Group Owner connect your mobile device to the machine directly When your Brother machine is not the G O it will display available device names with which to configure a Wi Fi Direct network Select the mobile device to which you want to connect and press OK Searc...

Page 328: ...ch to configure a Wi Fi Direct network Select the mobile device to which you want to connect and press OK Search for available devices again by selecting Rescan 5 If your mobile device connects successfully the machine displays Connected You have completed the Wi Fi Direct network setup Related Information Configure Your Wi Fi Direct Network Wi Fi Direct Network Configuration Overview 322 ...

Page 329: ... Fi Direct Press OK c Select Group Owner Press OK d Select On Press OK e Select Push Button Press OK 3 When Wi Fi Direct On appears press a to select On To cancel press b 4 Activate your mobile device s WPS PIN configuration method see your mobile device s user s guide for instructions when Activate Wi Fi Direct on other device and press OK appears Press OK on your Brother machine This will start ...

Page 330: ...Fi Direct on other device appears Press c on your Brother machine This will start the Wi Fi Direct setup 4 If your mobile device connects successfully the machine displays Connected You have completed the Wi Fi Direct network setup Related Information Configure Your Wi Fi Direct Network Wi Fi Direct Network Configuration Overview 324 ...

Page 331: ...hen your Brother machine is the G O Group Owner it will wait for a connection request from your mobile device When PIN Code appears enter the PIN displayed on your mobile device in the machine Press OK Follow the instructions and then go to the next step If the PIN is displayed on your Brother machine enter the PIN in your mobile device When your Brother machine is not the G O Group Owner it will ...

Page 332: ...ed on your Brother machine enter the PIN in your mobile device When your Brother machine is not the G O Group Owner it will display available device names with which to configure a Wi Fi Direct network Select the mobile device to which you want to connect and press OK Search for available devices again by selecting Rescan When Select PIN Method appears do one of the following Press c to display th...

Page 333: ...Code Press OK 3 When Wi Fi Direct On appears press a to select On To cancel press b 4 Activate your mobile device s WPS PIN configuration method see your mobile device s user s guide for instructions when Activate Wi Fi Direct on other device and press OK appears Press OK on your Brother machine This will start the Wi Fi Direct setup 5 The machine will wait for a connection request from your mobil...

Page 334: ... Direct setup 4 The machine will wait for a connection request from your mobile device If the LCD prompts you to enter a PIN enter the PIN displayed on your mobile device in the machine Press OK 5 If your mobile device connects successfully the machine displays Connected You have completed the Wi Fi Direct network setup Related Information Configure Your Wi Fi Direct Network Wi Fi Direct Network C...

Page 335: ...nd Password for three minutes Go to your mobile device s wireless network settings screen and enter the SSID name and password 5 If your mobile device connects successfully the machine s LCD displays Connected You have completed the Wi Fi Direct network setup MFC T910DW If your mobile device does not support Wi Fi Direct or WPS you must configure a Wi Fi Direct network manually 1 Press Settings 2 ...

Page 336: ...Home Network Advanced Network Features Advanced Network Features Print the Network Configuration Report 330 ...

Page 337: ...e and MAC Address on the report for example IP address 192 168 0 5 Subnet mask 255 255 255 0 Node name BRN000ca0000499 MAC Address 00 0c a0 00 04 99 DCP T510W DCP T710W MFC T810W MFC T910DW DCP T510W DCP T710W MFC T810W 1 Press Menu 2 Press a or b to select the Print Reports option and then press OK 3 Press a or b to select the Network Config option and then press OK 4 Press the Mono Start or Colo...

Page 338: ...Home Network Technical Information for Advanced Users Technical Information for Advanced Users Reset the Network Settings to Factory Default Print the WLAN Report 332 ...

Page 339: ... messages This feature restores all wired supported models only and wireless network settings to the factory settings You can also reset the print server to its factory default settings using BRAdmin Light or BRAdmin Professional DCP T510W DCP T710W MFC T810W MFC T910DW DCP T510W DCP T710W MFC T810W 1 Press Menu 2 Press a or b to select the following a Select Initial Setup Press OK b Select Reset ...

Page 340: ...rint the WLAN Report If the WLAN Report does not print check your machine for errors If there are no visible errors wait for one minute and then try to print the report again MFC T910DW 1 Press Settings 2 Press a or b to select the Print Reports option and then press OK 3 Press a or b to select the WLAN Report option and then press OK 4 Press c The machine will print the WLAN Report If the WLAN Re...

Page 341: ...and you must select a 2 4 GHz SSID ESSID Make sure the access point router is set to 2 4 GHz or 2 4 GHz 5 GHz mixed mode TS 04 The Authentication Encryption methods used by the selected wireless access point router are not supported by your machine Change the authentication and encryption methods of the wireless access point router Your machine supports the following authentication methods WPA Per...

Page 342: ...ttings 2 See the documentation provided with your WLAN access point router for information on how to find the security settings If the WLAN access point router is set to not broadcast the SSID the SSID will not automatically be detected You will have to manually enter the SSID name The Network key may also be described as the Password Security Key or Encryption Key If you do not know the SSID and ...

Page 343: ...Home Security Security Lock the Machine Settings 337 ...

Page 344: ...ne Settings Before turning on the machine s Access Lock make a careful note of your password If you forget the password you must reset all passwords stored in the machine by contacting your administrator or Brother customer service About Using TX Lock 338 ...

Page 345: ...vailable Receiving faxes PC Fax Receive If PC Fax Receive was already On While the TX Lock feature is turned on your machine will receive faxes and store them in its memory Then when TX Lock is turned off the faxes will be sent to your chosen PC While TX Lock is On the following operations are NOT available Operation from the control panel PC printing PC scanning Related Information Lock the Machi...

Page 346: ...ecurity Press OK c Select TX Lock Press OK 3 Enter a four digit number for the password Press OK 4 When the LCD displays Verify re enter the password Press OK 5 Press Stop Exit MFC T910DW 1 Press Settings 2 Press a or b to select the following a Select Fax Press OK b Select Miscellaneous Press OK c Select TX Lock Press OK 3 Enter a four digit number for the password Press OK 4 Re enter the passwor...

Page 347: ...mber of the current password Press OK 4 Enter a four digit number for the new password Press OK 5 When the LCD displays Verify re enter the new password Press OK 6 Press Stop Exit MFC T910DW 1 Press Settings 2 Press a or b to select the following a Select Fax Press OK b Select Miscellaneous Press OK c Select TX Lock Press OK d Select Set Password Press OK 3 Enter the four digit number of the curre...

Page 348: ...s OK If you enter the wrong password the LCD displays Wrong Password and stays offline The machine will stay in TX Lock Mode until the correct password is entered MFC T910DW 1 Press Settings 2 Press a or b to select the following a Select Fax Press OK b Select Miscellaneous Press OK c Select TX Lock Press OK d Select Set TX Lock Press OK 3 Enter the registered four digit password Press OK The mach...

Page 349: ...Home Mobile Web Connect Mobile Web Connect Brother Web Connect Google Cloud Print AirPrint Mobile Printing for Windows Mopria Print Service Brother iPrint Scan for mobile 343 ...

Page 350: ...r Web Connect Brother Web Connect Brother Web Connect Overview Online Services Used with Brother Web Connect Conditions for Using Brother Web Connect Set Up Brother Web Connect Scan and Upload Documents Using Brother Web Connect 344 ...

Page 351: ...se services 3 4 1 2 1 Printing 2 Scanning 3 Photos images documents and other files 4 Web Service To use Brother Web Connect your Brother machine must be connected to a network that has access to the Internet through either a wired or wireless connection For network setups that use a proxy server the machine must also be configured to use a proxy server If you are unsure of your network configurat...

Page 352: ...te com Dropbox An online file storage sharing and synchronisation service URL www dropbox com OneDrive An online file storage sharing and management service URL https onedrive live com Box An online document editing and sharing service URL www box com OneNote An online document editing and sharing service URL www onenote com For more information about any of these services refer to the respective ...

Page 353: ...Related Information Brother Web Connect 347 ...

Page 354: ...er Web Connect Conditions for Using Brother Web Connect Conditions for Using Brother Web Connect Brother Software Installation for Using Brother Web Connect Configure the Proxy Server Settings Using the Machine s Control Panel 348 ...

Page 355: ...quires a computer that has access to the Internet and has the Brother machine s software installed Windows To install the Brother Software and configure the machine to be able to print over your wired or wireless network see the Quick Setup Guide included with your Brother machine Mac To install the Full Driver Software Package go to your model s Downloads page on the Brother Solutions Center at s...

Page 356: ...ng proxy server information must be configured on the machine Proxy server address Port number User Name Password 1 Press Settings 2 Press a or b to select the following a Select Network Press OK b Select Web Connect Settings Press OK c Select Proxy Settings Press OK d Select Proxy Connection Press OK e Select On Press OK f Select the option that you want to set and then enter the proxy server inf...

Page 357: ...r Web Connect Set Up Brother Web Connect Brother Web Connect Setup Overview Create an Account for Each Online Service Before Using Brother Web Connect Apply for Brother Web Connect Access Register an Account on Your Brother Machine for Brother Web Connect 351 ...

Page 358: ...e an additional account 3 2 1 1 User registration 2 Web Service 3 Obtain account Step 2 Apply for Brother Web Connect access Start Brother Web Connect access using a computer and obtain a temporary ID 3 2 1 1 Enter account information 2 Brother Web Connect application page 3 Obtain temporary ID Step 3 Register your account information on your machine so you can access the service you want to use E...

Page 359: ...Your Brother machine can now use the service Related Information Set Up Brother Web Connect 353 ...

Page 360: ...count After creating an account log on and use the account once with a computer before using the Brother Web Connect feature Otherwise you may not be able to access the service using Brother Web Connect If you already have an account there is no need to create an additional account After you finish creating an account with the online service you want to use apply for Brother Web Connect access You...

Page 361: ...ect your model name if not already selected Click Do More in the left navigation bar and then click Brother Web Connect Windows 8 1 Move your mouse to the lower left corner of the Start screen and click if you are using a touch based device swipe up from the bottom of the Start screen to bring up the Apps screen Click Brother Utilities and then click the drop down list and select your model name i...

Page 362: ...e machine The temporary ID is valid for 24 hours 5 Close the web browser Now that you have a Brother Web Connect access ID you must register this ID on your machine and then use your machine to access the web service you want to use Related Information Set Up Brother Web Connect 356 ...

Page 363: ...r Press OK b Select Register Delete Press OK c Select Register Account Press OK 3 The machine will prompt you to enter the temporary ID you received when you applied for Brother Web Connect access Press c 4 Enter the temporary ID using the dial pad Press OK An error message will appear on the LCD if the information you entered does not match the temporary ID you received when you applied for acces...

Page 364: ...ation regarding restrictions such as the size or number of documents that can be uploaded refer to the respective service s website 1 Load your document 2 Press PHOTO WEB If information regarding the Internet connection appears on the machine s LCD read the information and press c Occasionally updates or announcements about Brother Web Connect s features will appear on the LCD Read the information...

Page 365: ...ect Google Cloud Print Google Cloud Print Google Cloud Print Overview Before Using Google Cloud Print Print from Google Chrome or Chrome OS Print from Google Drive for Mobile Print from Gmail Webmail Service for Mobile 359 ...

Page 366: ... allows you to print to a printer registered to your Google account using a network compatible device such as a mobile phone or computer without installing the printer driver on the device Printing from Android apps requires installing the Google Cloud Print app from the Google Play Store 1 2 3 4 1 Print request 2 Internet 3 Google Cloud Print 4 Printing Related Information Google Cloud Print 360 ...

Page 367: ...re Using Google Cloud Print Before Using Google Cloud Print Network Settings for Using Google Cloud Print Register Your Machine with Google Cloud Print Using Google Chrome Register Your Machine with Google Cloud Print Using Web Based Management 361 ...

Page 368: ... Models DCP T510W DCP T710W MFC T810W MFC T910DW In order to use Google Cloud Print your Brother machine must be connected to a network that has access to the Internet either through a wired or wireless connection To connect and configure your machine correctly see the Quick Setup Guide or related topics in this guide Related Information Before Using Google Cloud Print 362 ...

Page 369: ...stration process The steps in this section are examples for Windows users Screens on your computer may vary depending on your operating system and environment 1 Open Google Chrome on your computer 2 Sign in to your Google Account 3 Click the Google Chrome menu icon and then Settings Show advanced settings 4 In the Google Cloud Print section click Manage 5 Follow the on screen instructions to regis...

Page 370: ...correct date and time are set on the machine s control panel See Related Information 1 Confirm that your Brother machine is connected to the same network as your computer or mobile device 2 Start your web browser 3 Type http machine s IP address in your browser s address bar where machine s IP address is the machine s IP address For example http 192 168 1 2 You can see your machine s IP address in...

Page 371: ... follow the on screen instructions to register your machine 9 When you have finished registering your machine return to the Web Based Management screen and make sure that Registration Status is set to Registered Related Information Before Using Google Cloud Print Set the Date and Time 365 ...

Page 372: ...ted Models DCP T510W DCP T710W MFC T810W MFC T910DW 1 Make sure your Brother machine is turned on 2 Open the web page that you want to print 3 Click the Google Chrome menu icon 4 Click Print 5 Select your machine from the printer list 6 Change print options if needed 7 Click Print Related Information Google Cloud Print 366 ...

Page 373: ...0W MFC T810W MFC T910DW 1 Make sure your Brother machine is turned on 2 Access Google Drive from your Android or iOS device s web browser 3 Open the document that you want to print 4 Tap the menu icon 5 Tap Print 6 Select your machine from the printer list 7 Change print options if needed 8 Tap or Print Related Information Google Cloud Print 367 ...

Page 374: ...n 2 Access the Gmail webmail service from your Android or iOS device s web browser 3 Open the email that you want to print 4 Tap the menu icon If Print appears beside the attachment name you can also print the attachment Tap Print and then follow the instructions on your mobile device 5 Tap Print 6 Select your machine from the printer list 7 Change print options if needed 8 Tap or Print Related In...

Page 375: ...Home Mobile Web Connect AirPrint AirPrint AirPrint Overview Before Using AirPrint macOS Print Using AirPrint Scan Using AirPrint macOS Send a Fax Using AirPrint macOS 369 ...

Page 376: ...s that allows you to wirelessly print photos email web pages and documents from your iPad iPhone iPod touch and Mac computer without the need to install a driver AirPrint also lets you send faxes directly from your Mac computer without printing them and lets you scan documents to your Mac computer MFC models For more information visit Apple s website Related Information AirPrint 370 ...

Page 377: ...S add your Brother machine to the printer list on your Mac computer 1 Select System Preferences from the Apple Menu 2 Click Printers Scanners 3 Click the icon below the Printers pane on the left 4 Click Add Printer or Scanner The Add screen appears 5 Select your Brother machine and then select AirPrint from the Use pop up menu 6 Click Add Related Information AirPrint 371 ...

Page 378: ...Home Mobile Web Connect AirPrint Print Using AirPrint Print Using AirPrint Print from iPad iPhone or iPod touch Print Using AirPrint macOS 372 ...

Page 379: ... Make sure your Brother machine is turned on 2 Use Safari to open the page that you want to print 3 Tap or 4 Tap Print 5 Make sure your Brother machine is selected 6 If a different machine or no printer is selected tap Printer A list of available machines appears 7 Tap your machine s name in the list 8 Select the desired options such as the number of pages to print and 2 sided printing if supporte...

Page 380: ...computer 1 Make sure your Brother machine is turned on 2 On your Mac computer use Safari to open the page that you want to print 3 Click the File menu and then select Print 4 Make sure your Brother machine is selected If a different machine or no printer is selected click the Printer pop up menu and then select your Brother machine 5 Select the desired options such as the number of pages to print ...

Page 381: ... tab and then click the Open Scanner button The Scanner screen appears 6 If you place the document in the ADF select Use Document Feeder check box and then select the size of your document from the scan size setting pop up menu 7 Select the destination folder or destination application from the destination setting pop up menu 8 Click Show Details to change the scanning settings if needed You can c...

Page 382: ...n the example below AirPrint supports only monochrome fax documents 1 Make sure your Brother machine is turned on 2 On your Mac computer open the file that you want to send as a fax 3 Click the File menu and then select Print 4 Click the Printer pop up menu and then select Brother MFC XXXX Fax where XXXX is your model name 5 Type the fax recipient information 6 Click Fax Related Information AirPri...

Page 383: ... to print wirelessly from your Windows mobile device You can connect to the same network that your Brother machine is connected to and print without installing the printer driver on the device Many Windows apps support this function 2 1 3 1 3 1 Windows mobile device Windows 10 Mobile or later 2 Wi Fi connection 3 Your Brother machine Related Information Mobile Web Connect 377 ...

Page 384: ...he Mopria Alliance With this service you can connect to the same network as your machine and print without additional setup Many native Android apps support printing 1 2 3 1 Android 4 4 or later 2 Wi Fi Connection 3 Your Brother machine You must download the Mopria Print Service from the Google Play Store and install it on your Android device Before using this service you must turn it on Related I...

Page 385: ...ther iPrint Scan from the Google Play Store app For Apple Devices Brother iPrint Scan allows you to use features of your Brother machine directly from your Apple device Download and install Brother iPrint Scan from the App Store For Windows Devices Brother iPrint Scan allows you to use features of your Brother machine directly from your Windows device without using a computer Download and install ...

Page 386: ...Center ControlCenter Use Brother s ControlCenter software utility to quickly access your frequently used applications Using ControlCenter gives you direct access to specific applications ControlCenter4 Windows 380 ...

Page 387: ...ing ControlCenter4 Home Mode Windows Scan Using ControlCenter4 Advanced Mode Windows Set Up the Brother Machine Using ControlCenter4 Windows Create a Custom Tab Using ControlCenter4 Advanced Mode Windows Set Up the Brother Machine from Your Computer Windows Set Up Your Machine s Address Book Using ControlCenter4 Windows 381 ...

Page 388: ...enter4 Windows Change the Operation Mode in ControlCenter4 Windows ControlCenter4 has two operation modes Home Mode and Advanced Mode You can change modes at any time Home Mode Advanced Mode Home Mode ControlCenter4 Home Mode lets you access your machine s main features easily 382 ...

Page 389: ...ion mode 1 Click the ControlCenter4 icon in the task tray and then select Open 2 Click the Configuration button and then select Mode Select 3 The mode selection dialog box appears Select either the Home Mode or Advanced Mode option 4 Click OK Related Information ControlCenter4 Windows Scan Using ControlCenter4 Home Mode Windows Scan Using ControlCenter4 Advanced Mode Windows 383 ...

Page 390: ...e Mode Windows Use ControlCenter4 Home Mode to access your machine s main features Scan Using ControlCenter4 Home Mode Windows Save Scanned Data to a Folder as a PDF File Using ControlCenter4 Home Mode Windows Scan Settings for ControlCenter4 Home Mode Windows Change the Operation Mode in ControlCenter4 Windows 384 ...

Page 391: ...ControlCenter4 Advanced Mode Windows Save Scanned Data to a Folder as a PDF File Using ControlCenter4 Advanced Mode Windows Scan Both Sides of an ID Card Using ControlCenter4 Advanced Mode Windows Scan to Email Attachment Using ControlCenter4 Advanced Mode Windows Scan to an Editable Text File OCR Using ControlCenter4 Advanced Mode Windows Scan to an Office File Using ControlCenter4 Advanced Mode ...

Page 392: ...dows Related Models MFC T810W MFC T910DW 1 Click the ControlCenter4 icon in the task tray and then click Open 2 Click the Device Settings tab 3 Click the Remote Setup button 4 Configure the settings as needed Export Click to save the current configuration settings to a file Click Export to save your address book or all settings for your machine 386 ...

Page 393: ... OK Cancel Click to exit the Remote Setup Program without uploading data to the machine Apply Click to upload data to the machine without exiting the Remote Setup Program 5 Click OK If your computer is protected by a firewall and is unable to use Remote Setup you may need to configure the firewall settings to allow communication through port numbers 137 and 161 If you are using Windows Firewall an...

Page 394: ...Center4 1 Click the ControlCenter4 icon in the task tray and then click Open 2 Click the Configuration button and then select Create custom tab A custom tab is created 3 To change the name of a custom tab right click the custom tab and then select Rename custom tab 4 Click the Configuration button select Create custom button and then select the button you want to create The settings dialog box app...

Page 395: ...You can change or remove the created tab button or settings Click the Configuration button and then follow the menu Related Information ControlCenter4 Windows 389 ...

Page 396: ...Home Brother iPrint Scan for Windows and Mac Brother iPrint Scan for Windows and Mac Brother iPrint Scan Overview Scan Using Brother iPrint Scan Mac 390 ...

Page 397: ... example of Brother iPrint Scan for Windows The actual screen may differ depending on the version of the application For Windows Go to your model s Downloads page on the Brother Solutions Center at support brother com to download the latest application For Mac Download and install Brother iPrint Scan from the App Store Related Information Brother iPrint Scan for Windows and Mac Brother iPrint Scan...

Page 398: ...m Clear Cover are fully closed Paper is inserted correctly in the paper tray The interface cables are securely connected to the machine and the computer or the wireless connection is set up on both the machine and your computer For network models The access point for wireless router or hub is turned on and its link button is blinking The machine s LCD is displaying messages If you did not solve th...

Page 399: ...ll with all of the ink in the bottle if it does not exceed the upper line A message may appear on the LCD to verify whether the ink tanks were refilled Press a Yes to reset the ink dot counter for the refilled colour Press b No for the non refilled colours See Related Information Refill the Ink Tanks The machine may stop all print operations and you may not be able to use the machine until you ref...

Page 400: ...e Wi Fi Direct settings again Connection Fail The Brother machine and your mobile device cannot communicate during the Wi Fi Direct network configuration Move the mobile device closer to your Brother machine Move your Brother machine and the mobile device to an obstruction free area If you are using the PIN Method of WPS make sure you have entered the correct PIN Cover is Open The scanner cover is...

Page 401: ...tems the replacement is not covered under the warranty The need to replace these items and the time period before replacement is dependent on the number of purges and flushes required to clean the ink system These boxes acquire amounts of ink during the different purging and flushing operations The number of times a machine purges and flushes for cleaning varies depending on different situations F...

Page 402: ...lated Information Load Paper The paper was not inserted in the centre position of the manual feed slot Remove the paper and reinsert it in the centre of the manual feed slot and then follow the LCD instructions See Related Information Load Paper in the Manual Feed Slot The Jam Clear Cover is not closed correctly Make sure the Jam Clear Cover is closed evenly at both ends See Related Information Pr...

Page 403: ...m to another fax machine or to your computer See Related Information Transfer Your Faxes or Fax Journal Report Scan Unable XX The machine has a mechanical problem Disconnect the machine from the power for several minutes and then reconnect it If you cannot print received faxes transfer them to another fax machine or to your computer See Related Information Transfer Your Faxes or Fax Journal Report...

Page 404: ...f the media type is set to Plain Paper in the Basic tab and Greyscale is selected in the Advanced tab of the printer driver you can use the machine as a monochrome printer Copying If the paper type is set to Plain Paper you can make copies in monochrome Faxing If the paper type is set to Plain Paper the machine will receive and print the faxes in monochrome Refill the ink tank When you refill the ...

Page 405: ...ver IP system try changing the Compatibility to Basic for VoIP See Related Information Telephone Line Interference VoIP Document Jam The document was not inserted or fed correctly or the document scanned from the ADF was too long Remove the jammed document and then press Stop Exit Set the document in the ADF correctly See Related Information Load Documents in the Automatic Document Feeder ADF See ...

Page 406: ...m the actual amount of remaining ink If the remaining ink level is at or below the lower line under the minimum fill mark refill the ink tank A message may appear on the LCD to verify whether the ink tanks were refilled Press c Yes to reset the ink dot counter for the refilled colour Press d No for the non refilled colours See Related Information Refill the Ink Tanks Jam A Inside Front Repeat Jam ...

Page 407: ...d s or USB flash drive that you are not using Media is Full The USB flash drive you are using already contains 999 files Your machine can only save to your USB flash drive if it contains fewer than 999 files Delete unused files and try again The USB flash drive you are using does not have enough free space to scan the document Delete unused files from your USB flash drive to make some free space a...

Page 408: ...ccess a Speed Dial number that has not been stored in the machine Set up the Speed Dial number Out of Fax Memory The fax memory is full Print the faxes that are in the memory See Related Information Print a Fax Stored in the Machine s Memory Out of Memory The machine s memory is full If a fax sending or copy operation is in progress Press Stop Exit and wait until the other operations that are in p...

Page 409: ... you cannot find or remove the jammed paper see Related Information Printer Jam or Paper Jam Unable to Clean XX Unable to Init XX Unable to Print XX The machine has a mechanical problem OR A foreign object such as a paper clip or a piece of ripped paper is in the machine Open the scanner cover and remove any foreign objects and paper scraps from inside the machine If the error message continues di...

Page 410: ...ad Paper Load Paper in the Manual Feed Slot Printer Jam or Paper Jam Clean the Paper Pick up Rollers Print a Fax Stored in the Machine s Memory Change the Paper Size and Paper Type Print Settings Windows Print Options Mac Paper is Jammed Inside and in the Front of the Machine Jam A Inside Front Paper is Jammed in the Front of the Machine Jam B Front Paper is Jammed in the Back of the Machine Jam C...

Page 411: ...r Faxes to Another Fax Machine See Related Information Transfer Faxes to Your Computer You can also transfer the Fax Journal report to see if there are any faxes you must transfer See Related Information Transfer the Fax Journal Report to Another Fax Machine Related Information Error and Maintenance Messages Transfer Faxes to Another Fax Machine Transfer Faxes to Your Computer Transfer the Fax Jou...

Page 412: ...e of the following If the LCD displays No Data there are no faxes left in the machine s memory Press Stop Exit If the LCD displays Enter Fax No enter the fax number where faxes will be forwarded 5 Press Mono Start MFC T910DW 1 Press Stop Exit to interrupt the error temporarily 2 Press Settings 3 Press a or b to select the following a Select Service Press OK b Select Data Transfer Press OK c Select...

Page 413: ...memory will be sent to your computer automatically When faxes in the machine s memory are not sent to your computer Make sure you have set PC Fax Receive on the machine Press a or b to select BackupPrint On or BackupPrint Off Press OK If faxes are in the machine s memory when you set up PC Fax Receive the LCD will ask if you want to transfer the faxes to your computer Press a to transfer all faxes...

Page 414: ...ackup Print Off Press OK If faxes are in the machine s memory when you set up PC Fax Receive the LCD will ask if you want to transfer the faxes to your computer Press c to transfer all faxes in the memory to your computer Related Information Transfer Your Faxes or Fax Journal Report Use PC Fax Receive to Transfer Received Faxes to Your Computer Windows only 408 ...

Page 415: ...ess Menu 3 Press a or b to select the following a Select Service Press OK b Select Data Transfer Press OK c Select Report Trans Press OK 4 Enter the fax number where Fax Journal report will be forwarded 5 Press Mono Start MFC T910DW 1 Press Stop Exit to interrupt the error temporarily 2 Press Settings 3 Press a or b to select the following a Select Service Press OK b Select Data Transfer Press OK ...

Page 416: ... the machine was turned on the network connection may not have been established yet Wait and try again Connection Error 07 Connection failed to server Wrong Date Time Date and time settings are incorrect Set the date and time correctly Note that if the machine s power cord is disconnected the date and time settings may have reset to factory settings Authentication Error Error Messages Cause Action...

Page 417: ...er of pixels file size etc The file type is not supported The file is corrupted The file cannot be used Check the service s size or format restrictions Save the file as a different type If possible get a new uncorrupted version of the file Server Error 13 Service temporarily unavailable Try again later There is a problem with the service and it cannot be used now Wait and try again If you get the ...

Page 418: ...me Troubleshooting Document Jams Document Jams Document is Jammed in the Top of the ADF Unit Document is Jammed inside the ADF Unit Remove Paper Scraps Jammed in the ADF Error and Maintenance Messages 412 ...

Page 419: ...els DCP T710W MFC T810W MFC T910DW 1 Remove any paper that is not jammed from the ADF 2 Open the ADF cover 3 Remove the jammed document by pulling it upwards 4 Close the ADF cover 5 Press Stop Exit IMPORTANT To avoid future document jams close the ADF cover correctly by pressing it down in the centre Related Information Document Jams 413 ...

Page 420: ...it Document is Jammed inside the ADF Unit Related Models DCP T710W MFC T810W MFC T910DW 1 Remove any paper that is not jammed from the ADF 2 Lift the document cover 3 Pull the jammed document out to the left 4 Close the document cover Related Information Document Jams 414 ...

Page 421: ...emove Paper Scraps Jammed in the ADF Related Models DCP T710W MFC T810W MFC T910DW 1 Lift the document cover 2 Insert a piece of stiff paper such as cardstock into the ADF to push any small paper scraps through 3 Close the document cover Related Information Document Jams 415 ...

Page 422: ...Inside and in the Front of the Machine Jam A Inside Front Paper is Jammed in the Front of the Machine Jam B Front Paper is Jammed in the Back of the Machine Jam C Rear Paper is Jammed in the Multi purpose Tray Jam D MP tray Paper is Jammed Inside and in the Multi purpose Tray Jam E Inside MP Error and Maintenance Messages Paper Handling and Printing Problems 416 ...

Page 423: ...you unplug the machine from the power source you can transfer your faxes that are stored in the machine s memory to your computer or another fax machine so you will not lose any important messages 2 Pull the paper tray 1 completely out of the machine 1 3 Pull the two green levers inside the machine to release the jammed paper 4 Place both hands under the plastic tabs on both sides of the machine t...

Page 424: ...es across the width of the machine 1 Doing this may cause damage to the machine 1 If the print head is in the right corner as shown in the illustration 2 you cannot move it Follow these steps a Close the scanner cover and then reconnect the power cord b Open the scanner cover again and then hold down the Stop Exit button until the print head moves to the centre c Unplug the machine from the power ...

Page 425: ... concave areas with the triangle marks as shown in the illustration 3 to move the print head If ink gets on your skin or clothing immediately wash it off with soap or detergent 7 Gently close the scanner cover using both hands 8 Slowly pull the jammed paper 1 out of the machine 1 9 Make sure you look carefully inside 1 for any scraps of paper 1 419 ...

Page 426: ...er out of the machine 12 Close the Jam Clear Cover Make sure the cover is closed completely 13 Put the paper tray firmly back in the machine 14 While holding the paper tray in the machine pull out the paper support 1 until it locks into place and then unfold the paper support flap 2 2 1 15 Reconnect the power cord 420 ...

Page 427: ...nual feed slot cover 2 Load one sheet of thick A4 or Letter sized paper such as glossy paper in the manual feed slot Insert the paper deep into the manual feed slot 3 Re connect the power cord The paper you placed in the manual feed slot will be fed through the machine and ejected If the thick paper is pushing any jammed paper out remove the jammed paper Related Information Printer Jam or Paper Ja...

Page 428: ...al socket IMPORTANT Before you unplug the machine from the power source you can transfer your faxes that are stored in the machine s memory to your computer or another fax machine so you will not lose any important messages 2 Pull the paper tray 1 completely out of the machine 1 3 Pull the two green levers inside the machine to release the jammed paper 4 Place both hands under the plastic tabs on ...

Page 429: ... the scanner cover and then reconnect the power cord b Open the scanner cover again and then hold down the Stop Exit button until the print head moves to the centre c Unplug the machine from the power source and remove the jammed paper 3 2 If the paper is jammed under the print head unplug the machine from the power source and then move the print head to take out the paper Hold the concave areas w...

Page 430: ...Jam A Inside Front move the print head if needed to take out any paper remaining in this area Make sure scraps of paper are not left in the corners of the machine 1 and 2 1 2 When finished continue with the next step 6 Gently close the scanner cover using both hands 7 Slowly pull the jammed paper 1 out of the machine 1 424 ...

Page 431: ...ny scraps of paper 1 b Squeeze both levers 1 and then open the Jam Clear Cover at the back of the machine 1 c Slowly pull the jammed paper out of the machine d Close the Jam Clear Cover Make sure the cover is closed completely When finished continue with the next step 8 Put the paper tray firmly back in the machine 425 ...

Page 432: ...tray in the machine pull out the paper support 1 until it locks into place and then unfold the paper support flap 2 2 1 10 Reconnect the power cord Related Information Printer Jam or Paper Jam Error and Maintenance Messages 426 ...

Page 433: ...these steps 1 Unplug the machine from the electrical socket IMPORTANT Before you unplug the machine from the power source you can transfer your faxes that are stored in the machine s memory to your computer or another fax machine so you will not lose any important messages 2 Pull the paper tray 1 completely out of the machine 1 3 Pull the two green levers inside the machine to release the jammed p...

Page 434: ...craps of paper 1 b Squeeze both levers 1 and then open the Jam Clear Cover at the back of the machine 1 c Slowly pull the jammed paper out of the machine d Close the Jam Clear Cover Make sure the cover is closed completely When finished continue with the next step 5 Put the paper tray firmly back in the machine 428 ...

Page 435: ... tray in the machine pull out the paper support 1 until it locks into place and then unfold the paper support flap 2 2 1 7 Reconnect the power cord Related Information Printer Jam or Paper Jam Error and Maintenance Messages 429 ...

Page 436: ...ansfer your faxes that are stored in the machine s memory to your computer or another fax machine so you will not lose any important messages 2 Pull the paper tray 1 completely out of the machine 1 3 Pull the two green levers inside the machine to release the jammed paper Depending on the paper size it is easier to remove the jammed paper from the front of the machine rather than from the back of ...

Page 437: ... tray firmly back in the machine 8 While holding the paper tray in the machine pull out the paper support 1 until it locks into place and then unfold the paper support flap 2 2 1 9 Reconnect the power cord Related Information Printer Jam or Paper Jam Error and Maintenance Messages 431 ...

Page 438: ...IMPORTANT Before you unplug the machine from the power source you can transfer your faxes that are stored in the machine s memory to your computer or another fax machine so you will not lose any important messages 2 Remove any paper that is loaded on the MP tray Place the paper support back into the MP tray cover 3 Pull the paper tray 1 completely out of the machine 1 4 Pull the two green levers i...

Page 439: ... pull the paper 1 6 Close the MP tray cover 7 Put the paper tray firmly back in the machine 8 While holding the paper tray in the machine pull out the paper support 1 until it locks into place and then unfold the paper support flap 2 2 1 9 Reconnect the power cord Related Information Printer Jam or Paper Jam 433 ...

Page 440: ... Error and Maintenance Messages 434 ...

Page 441: ...you unplug the machine from the power source you can transfer your faxes that are stored in the machine s memory to your computer or another fax machine so you will not lose any important messages 2 Remove any paper that is loaded on the MP tray Place the paper support back into the MP tray cover 3 Pull the paper tray 1 completely out of the machine 1 4 Pull the two green levers inside the machine...

Page 442: ...cause damage to the machine 1 If the print head is in the right corner as shown in the illustration 2 you cannot move it Follow these steps a Close the scanner cover and then reconnect the power cord b Open the scanner cover again and then hold down the Stop Exit button until the print head moves to the centre c Unplug the machine from the power source and remove the jammed paper 436 ...

Page 443: ... If ink gets on your skin or clothing immediately wash it off with soap or detergent If your LCD error message was Jam E Inside MP or Repeat Jam E In MP move the print head if needed to take out any paper remaining in this area Make sure scraps of paper are not left in the corners of the machine 1 and 2 1 2 When finished continue with the next step 7 Gently close the scanner cover using both hands...

Page 444: ...ull the paper 1 9 Close the MP tray cover 10 Put the paper tray firmly back in the machine 11 While holding the paper tray in the machine pull out the paper support 1 until it locks into place and then unfold the paper support flap 2 2 1 12 Reconnect the power cord Related Information Printer Jam or Paper Jam 438 ...

Page 445: ... Error and Maintenance Messages 439 ...

Page 446: ...the following topics You can correct most problems yourself If you need additional help go to your model s FAQs Troubleshooting page on the Brother Solutions Center at support brother com Using non Brother supplies may affect the print quality hardware performance and machine reliability Paper Handling and Printing Problems Telephone and Fax problems Other Problems Network Problems Google Cloud Pr...

Page 447: ...indows Server 2016 Click Windows System Control Panel In the Hardware and Sound group click View devices and printers Right click the Brother MFC XXXX Printer where XXXX is your model name Click See what s printing If printer driver options appear select your printer driver Click Printer in the menu bar and make sure Use Printer Offline is not selected Windows Server 2012 Move your mouse to the lo...

Page 448: ...cument is printed There is an unprintable area on the top and bottom of the page Adjust the top and bottom margins in your document to allow for this See Related Information Unprintable Area Cannot perform Page Layout printing Check that the paper size setting in the application and in the printer driver are the same Print speed is too slow Try changing the printer driver setting The highest resol...

Page 449: ...using to power down the machine Using allows minimal power to the machine resulting in periodic but less frequent cleaning of the print head The machine prints blank pages Check the print quality See Related Information Check the Print Quality Make sure you are using Brother Original ink To prolong print head life provide the best ink economy and maintain print quality we do not recommend frequent...

Page 450: ...inter driver select Print Settings click Advanced select Other Print Options and clear the Bi Directional Printing check box Make sure you are using Brother Original ink Paper Handling Difficulties Difficulties Suggestions The machine does not feed paper Make sure the paper tray is pushed in all the way until it locks into place Make sure the Jam Clear Cover at the back of the machine is closed If...

Page 451: ...ssing lines This is usually caused by a poor telephone connection Make a copy if your copy looks good you probably had a bad connection with static or interference on the telephone line Ask the other party to send the fax again Black lines when receiving The sender s scanner may be dirty Ask the sender to make a copy to see if the problem is with the sending machine Try receiving from another fax ...

Page 452: ... Shrink Page Size of an Oversized Incoming Fax Paper Weight and Thickness Print Settings Windows Print Options Mac Print a Photo Mac Prevent Smudged Printouts and Paper Jams Windows Prevent Smudged Printouts and Paper Jams Mac Clean the Base Pad Change the Print Setting Options When Having Printing Problems Reduce Printing Noise 446 ...

Page 453: ... s handset and listen for a dial tone If there is still no dial tone ask your telephone company to check the line and or wall socket The machine does not answer when called Make sure the machine is in the correct receive mode for your setup See Related Information Choose the Correct Receive Mode Check for a dial tone If possible call your machine to hear it answer If there is still no answer check...

Page 454: ...dicated fax line and want your Brother machine to automatically answer all incoming faxes you should select Fax only mode If your Brother machine shares a line with an external answering machine you should select the External TAD mode In External TAD mode your Brother machine will receive incoming faxes automatically and voice callers will be able to leave a message on your answering machine If yo...

Page 455: ...nging the Compatibility setting to Basic for VoIP See Related Information Telephone Line Interference VoIP Available only for some countries If you connect your machine to a PBX or ISDN line set the menu setting of Telephone Line Type to your telephone line type See Related Information Set the Telephone Line Type Sending Faxes Difficulties Suggestions Cannot send a fax Check all line cord connecti...

Page 456: ...re loading the document correctly See Related Information Load Documents in the Automatic Document Feeder ADF See Related Information Load Documents on the Scanner Glass Vertical black lines when sending Black vertical lines on faxes you send are typically caused by dirt or correction fluid on the glass strip Clean the glass strip See Related Information Clean the Scanner Related Information If Yo...

Page 457: ...pause MFC T810W MFC T910DW MFC T810W 1 Press Menu 2 Press a or b to select the following a Select Initial Setup Press OK b Select Dial Tone Press OK c Select Detection or No Detection Press OK 3 Press Stop Exit MFC T910DW 1 Press Settings 2 Press a or b to select the following a Select Initial Setup Press OK b Select Dial Tone Press OK c Select Detection or No Detection Press OK 3 Press Stop Exit ...

Page 458: ... sets the modem speed at 14 400 bps 3 Press Stop Exit VoIP Voice over IP is a type of phone system that uses an Internet connection rather than a traditional phone line Brother does not recommend the use of a VoIP line VoIP limitations in general can cause some functions of the fax machine not to work correctly MFC T910DW 1 Press Settings 2 Press a or b to select the following a Select Initial Set...

Page 459: ...Related Information Telephone and Fax problems Voice Over Internet Protocol VoIP Telephone Line Interference Error and Maintenance Messages 453 ...

Page 460: ...r Glass Poor copy results when using the ADF ADF models Try using the scanner glass See Related Information Load Documents on the Scanner Glass Fit to Page does not work correctly Make sure the document is not skewed on the scanner glass Reposition the document and try again Scanning Difficulties Difficulties Suggestions TWAIN or WIA errors appear when starting to scan Windows Make sure the Brothe...

Page 461: ...computer screen Make sure the machine is not showing an error message on the machine s display Related Information If You Are Having Difficulty with Your Machine Troubleshooting Clean the Scanner Correct the Paper Feed to Clear Vertical Lines Load Documents in the Automatic Document Feeder ADF Load Documents on the Scanner Glass Print Borderless Photos from a USB Flash Drive Print Photos with Auto...

Page 462: ...he Network Connection Repair Tool Windows Where Can I Find My Brother Machine s Network Settings I Cannot Complete the Wireless Network Setup Configuration My Brother Machine Cannot Print Scan or PC FAX Receive over the Network I Want to Check that My Network Devices are Working Correctly Troubleshooting 456 ...

Page 463: ... the drop down list and select your model name if not already selected Click Tools in the left navigation bar and then click Network Connection Repair Tool If the User Account Control screen appears click Yes 2 Follow the on screen instructions 3 Check the diagnosis by printing the Network Configuration Report The Network Connection Repair Tool will start automatically if you select the Enable Con...

Page 464: ...Difficulty with Your Machine Network Problems Where Can I Find My Brother Machine s Network Settings Where Can I Find My Brother Machine s Network Settings Change Machine Settings from Your Computer Print the Network Configuration Report 458 ...

Page 465: ...ind the MAC Address on your Brother machine s control panel Wireless Your wireless LAN access point router is in stealth mode not broadcasting the SSID Enter the correct SSID name or Network Key manually Check the SSID name or the Network Key in the instructions supplied with your wireless LAN access point router and reconfigure the wireless network setup Wireless Your security settings SSID passw...

Page 466: ...ur Brother machine as a client confirm how many devices are allowed in the current Wi Fi Direct network and then check how many devices are connected Wi Fi Direct For Windows If your wireless connection has been interrupted and you have checked and tried all of the above we recommend using the Network Connection Repair Tool Related Information Network Problems Configure Your Machine for a Wireless...

Page 467: ...then double click the Device Selector icon The Device Selector window appears Reselect your network machine make sure Status is idle and then click OK Wired Wireless Your security software blocks your machine s access to the network The network PC Fax Receive feature does not work Windows Set the third party Security Firewall Software to allow PC FAX Rx To add port 54926 for Network PC FAX Rx type...

Page 468: ...he Hardware and Sound group click View devices and printers Printers Windows Server 2008 Click Start Control Panel Printers Windows Server 2012 Move your mouse to the lower right corner of your desktop When the menu bar appears click Settings Control Panel In the Hardware group click View devices and printers Printers Windows Server 2012 R2 Click Control Panel on the Start screen In the Hardware g...

Page 469: ...de name in the Windows command prompt or Mac Terminal application ping ipaddress or nodename Successful Your Brother machine is working correctly and connected to the same network as your computer Unsuccessful Your Brother machine is not connected to the same network as your computer Windows Ask the network administrator and use the Network Connection Repair Tool to fix the IP address and the subn...

Page 470: ...Windows System Command Prompt 2 Type ipconfig and then press the Enter key on your keyboard 3 Confirm the values for the IPv4 address and subnet mask 4 Type exit and then press the Enter key on your keyboard Configure the IP Address on your computer Mac 1 Select System Preferences from the Apple Menu 2 Click Network Advanced TCP IP 3 Confirm the values for the IPv4 address and subnet mask Configur...

Page 471: ...Related Information I Want to Check that My Network Devices are Working Correctly My Brother Machine Cannot Print Scan or PC FAX Receive over the Network 465 ...

Page 472: ...onfirm your network settings See Related Information Certain files may not be printable or may not appear exactly as they are displayed I cannot register my Brother machine with Google Cloud Print Make sure your machine is connected to a network with Internet access Verify that the date and time are set correctly on your machine I do not see a confirmation message on my Brother machine when I try ...

Page 473: ...he wireless access point router or to your Brother machine I cannot print Make sure your Brother machine is turned on Confirm the network settings I am trying to print a multiple page document from an iOS device but ONLY the first page is printing Make sure you are running the latest OS version Refer to the following Apple support article for more information about AirPrint support apple com kb HT...

Page 474: ...er Version Check your machine s firmware version Page Counter Check the number of total pages the machine has printed 4 Press OK 5 Press Stop Exit MFC T910DW 1 Press Settings 2 Press a or b to select Machine Info Press OK 3 Press a or b to select one of the following options Option Description Serial No Check your machine s serial number Firmware Version Check your machine s firmware version Firmw...

Page 475: ... DCP T710W MFC T810W 1 Press Menu 2 Press a or b to select the following a Select Initial Setup Press OK b Select Reset Press OK c Select the reset option you want to use Press OK 3 Press a for Reset to confirm 4 Press a for Yes to reboot the machine The machine restarts MFC T910DW 1 Press Settings 2 Press a or b to select the following a Select Initial Setup Press OK b Select Reset Press OK c Sel...

Page 476: ... print server back to its default factory settings includes Password and IP Address information 3 Address Book Fax Address Fax MFC models Address Book Fax resets the following settings Address Book and Setup Groups Station ID Name and Number Report Transmission Verification Report Address Book and Fax Journal History Caller ID history 1 and Outgoing Call Faxes in memory 4 All Settings Use the Sett...

Page 477: ...Maintenance Refill the Ink Tanks Clean Your Brother Machine Check Your Brother Machine Correct the Paper Feed to Clear Vertical Lines Change the Print Setting Options When Having Printing Problems Pack and Ship Your Brother Machine 471 ...

Page 478: ...ine CAUTION If ink gets into your eyes rinse them with water immediately If left as it is it may cause red eye or mild inflammation In case of any abnormality consult your doctor IMPORTANT Brother strongly recommends that you continue to use only Brother Original replacement ink Use or attempted use of potentially incompatible ink in the Brother machine may cause damage to the machine and or may r...

Page 479: ...e cap of the ink bottle remove the film from the ink bottle and then replace the cap IMPORTANT Replace the ink bottle cap tightly Otherwise the ink may leak DO NOT shake the ink bottles If ink stains your skin or clothing wash with soap or detergent at once 4 Remove the tip of the ink bottle 5 Make sure that the colour of the ink tank cap matches the ink colour you want to refill 473 ...

Page 480: ...fill the ink tank Refill with all of the ink in the bottle if it does not exceed the upper line 6 Point the nozzle upward so that the ink does not spill and then remove the nozzle from the ink tank NOTE If any ink remains in the ink bottle replace the cap and tip tightly and store the ink bottle upright on a level surface in a cool dark place 7 Push down on the cap of the ink tank to close it tigh...

Page 481: ...you did not refill the ink tank be sure to press b No IMPORTANT If you accidentally mix the colours by filling the wrong ink tank contact Brother customer service or your local Brother dealer Once you open an ink bottle use it up within six months Use unopened ink bottles by the expiration date written on the bottle package Related Information Routine Maintenance Error and Maintenance Messages Pap...

Page 482: ...e Print Head from Your Brother Machine Clean the Print Head from Your Computer Windows Clean the Print Head from Your Computer Mac Clean the Machine s LCD Clean the Outside of the Machine Clean the Machine s Printer Platen Clean the Paper Feed Rollers Clean the Base Pad Clean the Paper Pick up Rollers 476 ...

Page 483: ... ADF models only 2 1 ADF models only In addition to cleaning the scanner glass and glass strip with a soft lint free cloth moistened with water run your fingertip over the glass to see if you can feel anything on it If you feel dirt or debris clean the glass again concentrating on that area You may need to repeat the cleaning process three or four times To test make a copy after each cleaning atte...

Page 484: ...Related Information Clean Your Brother Machine Telephone and Fax problems Other Problems 478 ...

Page 485: ... warranty DCP T310 DCP T510W DCP T710W MFC T810W MFC T910DW DCP T310 DCP T510W DCP T710W MFC T810W 1 Press Menu 2 Press a or b to select the following a Select Maintenance Press OK b Select Cleaning Press OK c Select Black Colour or All Press OK d Select Normal Strong or Strongest Press OK 3 Press Mono Start or Colour Start The machine cleans the print head If you clean the print head at least fiv...

Page 486: ... times If the print has not improved contact Brother customer service or your local Brother dealer You can also clean the print head from your computer Related Information Clean Your Brother Machine Paper Handling and Printing Problems Clean the Print Head from Your Computer Windows Clean the Print Head from Your Computer Mac 480 ...

Page 487: ... Hardware group click View devices and printers For Windows 10 and Windows Server 2016 Click Windows System Control Panel In the Hardware and Sound group click View devices and printers 2 Right click the Brother MFC XXXX Printer icon where XXXX is your model name and then select Printing preferences If printer driver options appear select your printer driver The printer driver dialog box appears 3...

Page 488: ... Clean the Print Head from Your Brother Machine 482 ...

Page 489: ...ance 6 Select one of the following options Option Description Check Print Quality Use to print the test page and check the print quality Print Head Cleaning Use to start the cleaning process manually Select if a line or blank spaces appear in text or graphics on the test page 7 Do one of the following If you selected the Check Print Quality option click Start The machine prints the test page If yo...

Page 490: ...Machine s LCD IMPORTANT DO NOT use liquid cleaners including ethanol 1 Press and hold down to turn off the machine The LCD displays Shutting Down for a few seconds before the power goes off 2 Clean the LCD with a dry soft lint free cloth Related Information Clean Your Brother Machine 484 ...

Page 491: ...y crack the panel 1 If the paper support flap is open close it and then close the paper support 2 Pull the paper tray 1 completely out of the machine 1 3 Wipe the outside of the machine with a dry lint free cloth to remove dust 4 Lift the output paper tray cover and remove anything that is stuck inside the paper tray 5 Wipe the inside and the outside of the paper tray with a dry lint free cloth to...

Page 492: ... the machine to lift the scanner cover into the open position 2 Clean the machine s printer platen 1 and the area around it wiping off scattered ink with a dry soft lint free cloth 1 2 IMPORTANT DO NOT touch the encoder strip the thin strip of plastic that stretches across the width of the machine 2 Doing this may cause damage to the machine 3 Gently close the scanner cover using both hands 4 Reco...

Page 493: ...per Feed Rollers 1 with a soft lint free cloth moistened with water using a side to side motion After cleaning wipe the rollers with a dry soft lint free cloth to remove all moisture 1 5 MFC T910DW Lift the Jam Clear Flap 2 and then clean the back side of the Paper Feed Rollers 1 with a soft lint free cloth moistened with water After cleaning wipe the rollers with a dry soft lint free cloth to rem...

Page 494: ...Related Information Clean Your Brother Machine Paper Handling and Printing Problems 488 ...

Page 495: ... tray 1 If the paper support flap is open close it and then close the paper support 2 Pull the paper tray 1 completely out of the machine 1 3 Clean the Base Pad 1 with a soft lint free cloth moistened with water After cleaning wipe the pad with a dry soft lint free cloth to remove all moisture 1 4 Slowly push the paper tray completely into the machine Related Information Clean Your Brother Machine...

Page 496: ...kit 1 Unplug the machine from the electrical socket 2 If the paper support flap 1 is open close it and then close the paper support 2 2 1 3 Pull the paper tray completely out of the machine 4 Clean the Paper Pick up Rollers 1 with a soft lint free cloth moistened with water Slowly turn the rollers so that the whole surface is cleaned After cleaning wipe the rollers with a dry soft lint free cloth ...

Page 497: ...heck Your Brother Machine Check Your Brother Machine Check the Print Quality Check the Print Alignment from Your Brother Machine Monitor Machine Status from Your Computer Windows Monitor Machine Status from Your Computer Mac 491 ...

Page 498: ...ImproveQuality Press OK c Select Check Quality Press OK 3 Press Colour Start The machine prints the Print Quality Check Sheet 4 Check the quality of the four colour blocks on the sheet 5 The LCD asks about the print quality Do one of the following If all lines are clear and visible press a to select Yes Press Stop Exit to finish the Print Quality check If lines are missing see Poor below press b t...

Page 499: ...ck Sheet again Check the quality of the four colour blocks on the sheet again If you clean the print head at least five times and the print has not improved try cleaning the print head again up to three more times If the print has not improved contact Brother customer service or your local Brother dealer IMPORTANT DO NOT touch the print head Touching the print head may cause permanent damage and m...

Page 500: ...ng If print head cleaning is needed press c to start the cleaning procedure If print head cleaning is not needed the Ink or Maintenance screen reappears on the LCD 8 After the cleaning procedure is finished the LCD asks if you want to check the print quality again Press c Yes to start the print quality check 9 Press c again The machine prints the Print Quality Check Sheet again Check the quality o...

Page 501: ...head nozzle is clogged the printed sample looks like this After the print head nozzle is cleaned the horizontal lines are gone Related Information Check Your Brother Machine Paper Handling and Printing Problems 495 ...

Page 502: ...t The machine starts printing the Alignment Check Sheet A 4 Select the number of the test print in one of the following ways DCP T310 DCP T510W DCP T710W For pattern A press a or b to select the number of the test print that has the fewest visible vertical stripes 1 9 and then press OK MFC T810W For pattern A press the number of the test print that has the fewest visible vertical stripes 1 9 In th...

Page 503: ...umber of the test print that has the fewest visible vertical stripes 1 9 and then press OK In the example above row number 6 is the best choice Repeat this step for the rest of the patterns When the print alignment is not adjusted correctly text looks blurry or crooked like this After the print alignment is adjusted correctly text looks like this 6 Press Stop Exit Related Information Check Your Br...

Page 504: ...ted Click Tools in the left navigation bar and then click Status Monitor Windows 8 and Windows 10 Click Brother Utilities and then click the drop down list and select your model name if not already selected Click Tools in the left navigation bar and then click Status Monitor Troubleshooting Click the Troubleshooting button to access the troubleshooting website Looking for replacement supplies Clic...

Page 505: ...dicators and What They Mean Windows When you start up your computer the Brother Status Monitor icon appears on the task tray A green icon indicates the normal stand by condition A yellow icon indicates a warning A red icon indicates an error has occurred A grey icon indicates the machine is offline Related Information Monitor Machine Status from Your Computer Windows 499 ...

Page 506: ... default setting is Only when printing from this PC To turn it off follow these steps 1 Right click the Brother Status Monitor icon or window select the Status Monitor Settings option and then click Options The Options window appears 2 Select the Basic tab and then select Off for Show Status Monitor 3 Click OK Even if the Show Status Monitor feature is turned off you can check the machine s status...

Page 507: ... Status from Your Computer Windows Turn Off the Status Monitor Windows Turn Off the Status Monitor Windows 1 Right click the Brother Status Monitor icon or window and then select Exit 2 Click OK Related Information Monitor Machine Status from Your Computer Windows 501 ...

Page 508: ...ty tab and then click the Open Printer Utility button The Status Monitor screen appears Troubleshooting Click the Troubleshooting button to access the Brother Solutions Center offering FAQs Troubleshooting tips Visit the Genuine Supplies website Click the Visit the Genuine Supplies website button for more information about Brother original supplies Updating the machine s status To view the latest ...

Page 509: ... following a Select Maintenance Press OK b Select ImproveQuality Press OK c Select Correct Feed Press OK 3 Press Mono Start or Colour Start and then follow the instructions on the LCD MFC T910DW 1 Press Settings 2 Press a or b to select the following a Select General Setup Press OK b Select Maintenance Press OK c Select Impr PrintQuality Press OK d Select Correct Paper Feed Press OK 3 Press c and ...

Page 510: ...on ReduceSmudging Select this option according to whether you are using 1 sided printing if you have problems with smudged printouts or paper jams Slow Drying Select this option if you use a type of plain paper on which ink dries slowly 4 Press OK 5 Press a or b to select the option you want Press OK 6 Press Stop Exit MFC T910DW 1 Press Settings 2 Press a or b to select the following a Select Gene...

Page 511: ...oth Sides of the Paper 2 sided Copy Paper Handling and Printing Problems Prevent Smudged Printouts and Paper Jams Windows Prevent Smudged Printouts and Paper Jams Mac Print Settings Windows Print Options Mac 505 ...

Page 512: ...hanical noises have stopped Not allowing the machine to finish this parking process may lead to print problems and possible damage to the print head 1 Unplug the machine from the electrical socket 2 Unplug the machine from the telephone wall socket and take the telephone line cord out of the machine 3 Using both hands use the finger holds on each side of the machine to lift the scanner cover into ...

Page 513: ...ne in the original carton with the original packing material as shown below Do not pack the used ink bottles in the carton 1 1 2 3 3 5 4 10 Close the carton and tape it shut Related Information Routine Maintenance 507 ...

Page 514: ...mise settings and features create shortcuts and work with options displayed on the machine s LCD to make your Brother machine a more efficient work tool Change Machine Settings from the Control Panel Change Machine Settings from Your Computer 508 ...

Page 515: ...e Settings Change Machine Settings from the Control Panel Change Machine Settings from the Control Panel In the Event of Power Failure Memory Storage General Settings Print Reports Settings and Features Tables 509 ...

Page 516: ...mory Storage Your menu settings are stored permanently and will not be lost Temporary settings for example Contrast and Overseas Mode will be lost The date and time must be re entered MFC models Programmed fax timer jobs and other fax jobs in the machine s memory will be lost Related Information Change Machine Settings from the Control Panel 510 ...

Page 517: ...aylight Saving Time Automatically Change for Daylight Saving Time Manually Set Sleep Mode Countdown Set the Machine to Power Off Automatically Set the Date and Time Adjust the LCD Backlight Brightness Change How Long the LCD Backlight Stays On Set Your Station ID Set Tone or Pulse Dialling Mode Reduce Printing Noise Change the Language Displayed on the LCD 511 ...

Page 518: ...e after the last Fax Scan Copy or Web operation before the machine returns to Home screen If you select Off the machine stays in the mode you used last 1 Press Menu 2 Press a or b to select the following a Select General Setup Press OK b Select Mode Timer Press OK c Select Off 0 Sec 30 Secs 1 Min 2 Mins or 5 Mins Press OK 3 Press Stop Exit Related Information General Settings 512 ...

Page 519: ...ke a mistake or after you send or receive a fax Speaker Adjust the speaker volume 4 Press OK 5 Press a or b to select the Off Low Med or High option Press OK 6 Press Stop Exit MFC T910DW 1 Press Settings 2 Press a or b to select the following a Select General Setup Press OK b Select Volume Press OK 3 Press a or b to select one of the following options Option Description Ring Adjust the ring volume...

Page 520: ... sure you have set the correct date and time in the Date Time setting This feature is available only in some countries MFC T810W MFC T910DW MFC T810W 1 Press Menu 2 Press a or b to select the following a Select Initial Setup Press OK b Select Date Time Press OK c Select Auto Daylight Press OK d Select On or Off Press OK 3 Press Stop Exit MFC T910DW 1 Press Settings 2 Press a or b to select the fol...

Page 521: ...the correct date and time in the Date Time setting This feature is available only in some countries MFC T810W MFC T910DW MFC T810W 1 Press Menu 2 Press a or b to select the following a Select Initial Setup Press OK b Select Date Time Press OK c Select Daylight Save Press OK d Select Forward Hour or Backward Hour Press OK 3 Press Stop Exit MFC T910DW 1 Press Settings 2 Press a or b to select the fo...

Page 522: ... a fax or a print job The factory setting is five minutes When the machine goes into Sleep Mode the LCD backlight turns off DCP T310 DCP T510W DCP T710W MFC T810W MFC T910DW DCP T310 DCP T510W DCP T710W MFC T810W 1 Press Menu 2 Press a or b to select the following a Select General Setup Press OK b Select Ecology Press OK c Select Sleep Mode Press OK d Select 1 Min 2 Mins 3 Mins 5 Mins 10 Mins 30 M...

Page 523: ... MFC T810W MFC T910DW The machine is connected to a wired network MFC T810W MFC T910DW The machine is connected to a wireless network DCP T510W DCP T710W MFC T810W MFC T910DW WLAN Enable is set to On or WLAN is selected in the Network I F setting DCP T510W DCP T710W MFC T810W MFC T910DW DCP T310 DCP T510W DCP T710W MFC T810W MFC T910DW DCP T310 DCP T510W DCP T710W MFC T810W 1 Press Menu 2 Press a ...

Page 524: ... MFC T810W 4 Press a or b to select 12h Clock or 24h Clock and then press OK 5 Enter the digits for the time in one of the following ways If you selected 12h Clock Press a or b on the control panel to set the hour Press OK Repeat these steps for setting the minute DCP T310 DCP T510W DCP T710W Enter the time in 12 hour format using the dial pad and then press OK MFC T810W Press a or b to select AM ...

Page 525: ...o select AM or PM using the keyboard on the LCD and then press OK c Press a b d or c to select OK using the keyboard on the LCD and then press OK If you selected 24h Clock Enter the four digits of the time in 24 hour format using the dial pad and then press OK 10 Press Stop Exit Related Information General Settings Register Your Machine with Google Cloud Print Using Web Based Management Set Your S...

Page 526: ...FC T810W MFC T910DW DCP T310 DCP T510W DCP T710W MFC T810W 1 Press Menu 2 Press a or b to select the following a Select General Setup Press OK b Select LCD Contrast Press OK c Select Light or Dark Press OK 3 Press Stop Exit MFC T910DW 1 Press Settings 2 Press a or b to select the following a Select General Setup Press OK b Select LCD Settings Press OK c Select Backlight Press OK d Select Light Med...

Page 527: ...CD Backlight Stays On Related Models MFC T910DW Set how long the LCD backlight stays on 1 Press Settings 2 Press a or b to select the following a Select General Setup Press OK b Select LCD Settings Press OK c Select Dim Timer Press OK d Select 10Secs 30Secs 1Min 2Mins 3Mins or 5Mins Press OK 3 Press Stop Exit Related Information General Settings 521 ...

Page 528: ...en press OK For more information about how to enter text see the Appendix 5 Press Stop Exit MFC T910DW 1 Press Settings 2 Press a or b to select the following a Select Initial Setup Press OK b Select Station ID Press OK 3 Press a or b to select Fax and then press OK 4 Enter your fax number up to 20 digits using the dial pad and then press OK 5 Press a or b to select Name and then press OK 6 Enter ...

Page 529: ...he dialling mode This feature is not available in some countries MFC T810W MFC T910DW MFC T810W 1 Press Menu 2 Press a or b to select the following a Select Initial Setup Press OK b Select Tone Pulse Press OK c Select Tone or Pulse Press OK 3 Press Stop Exit MFC T910DW 1 Press Settings 2 Press a or b to select the following a Select Initial Setup Press OK b Select Tone Pulse Press OK c Select Tone...

Page 530: ...reen DCP T310 DCP T510W DCP T710W MFC T810W MFC T910DW DCP T310 DCP T510W DCP T710W MFC T810W 1 Press Menu 2 Press a or b to select the following a Select General Setup Press OK b Select Ecology Press OK c Select Quiet Mode Press OK d Select On or Off Press OK 3 Press Stop Exit MFC T910DW 1 Press Settings 2 Press a or b to select the following a Select General Setup Press OK b Select Quiet Mode Pr...

Page 531: ...T510W DCP T710W MFC T810W MFC T910DW DCP T310 DCP T510W DCP T710W MFC T810W 1 Press Menu 2 Press a or b to select the following a Select Initial Setup Press OK b Select Local Language Press OK c Select your language Press OK 3 Press Stop Exit MFC T910DW 1 Press Settings 2 Press a or b to select the following a Select Initial Setup Press OK b Select Local Language Press OK c Select your language Pr...

Page 532: ...Home Machine Settings Change Machine Settings from the Control Panel Print Reports Print Reports Reports Print a Report Fax Reports Telephone and Fax problems 526 ...

Page 533: ...indows You can view and print the Fax Journal report from your computer using the Fax Journal Report software Go to your model s Downloads page on the Brother Solutions Center at support brother com to download the software User Settings The User Settings report prints a list of your current settings Network Configuration network models The Network Configuration report prints a list of your curren...

Page 534: ... T810W 1 Press Menu 2 Press a or b to select the following a Select Print Reports Press OK b Select the report you want to print Press OK 3 Press Mono Start 4 Press Stop Exit MFC T910DW 1 Press Settings 2 Press a or b to select the following a Select Print Reports Press OK b Select the report you want to print Press OK 3 Press c 4 Press Stop Exit Related Information Print Reports Caller ID 528 ...

Page 535: ...achine Settings from the Control Panel Settings and Features Tables Settings and Features Tables Settings Tables 1 Line LCD Features Tables 1 Line LCD Settings Tables 1 8 44 9 mm Colour LCD Features Tables 1 8 44 9 mm Colour LCD 529 ...

Page 536: ...ch the ink dries very slowly Ink Low Notice Set the machine to display the ink low messages Menu General Setup Level 1 Level 2 Descriptions Mode Timer MFC T810W Set the amount of time before the machine returns to Home screen Tray Setting DCP T510W DCP T710W MFC T810W Paper Type Set the type of paper in the paper tray Paper Size Set the size of paper in the paper tray Check Paper Check the paper t...

Page 537: ...seas Mode Set to On if you have difficulty sending faxes overseas Auto Redial Set the machine to redial the last fax number if the fax did not go through because the line was busy Report Setting XMIT Report Select the initial setup for the Transmission Verification Report Journal Period Set the interval for automatic printing of the Fax Journal If you select an option other than Off and Every 50 F...

Page 538: ...address Subnet Mask Enter the Subnet mask Gateway Enter the Gateway address Node Name Enter the Node name WINS Config Select the WINS configuration mode WINS Server Specify the IP address of the primary or secondary WINS server DNS Server Specify the IP address of the primary or secondary DNS server APIPA Set the machine to allocate the IP address from the link local address range automatically IP...

Page 539: ...peed Display the connection speed when the Wi Fi Direct network is active I F Enable Turn the Wi Fi Direct connection on or off Network I F MFC T810W Select the network connection type WLAN Enable DCP T510W DCP T710W Turn wireless network connection On or Off Network Reset Restore all network settings back to the factory settings Menu Print Reports Level 1 Descriptions XMIT Verify MFC T810W Print ...

Page 540: ... each page you fax Tone Pulse MFC T810W Available only for some countries Select the dialling mode Dial Tone MFC T810W Shorten the dial tone detect pause Phone Line Set MFC T810W Available only for some countries Select the telephone line type Compatibility MFC T810W Adjust the equalisation for transmission difficulties VoIP service providers offer fax support using various standards If you regula...

Page 541: ...Level 1 Level 2 Descriptions Available only for some countries Related Information Settings and Features Tables 535 ...

Page 542: ...ext file Image Scan photos or graphics into your graphics applications E mail Send a scanned document as an email attachment Web Service Appears when you install a Web Services Scanner which is displayed in your computer s Network explorer DCP T510W DCP T710W MFC T810W Scan Scan data using the Web Service protocol Scan for E mail Scan for Fax Scan for Print COPY Options Copy Scan Options Level 1 L...

Page 543: ... Call Select a number from the Outgoing Call history and then send a fax to it Caller ID Not available for Taiwan and some countries Select a number from the Caller ID History and then send a fax to it Related Information Settings and Features Tables 537 ...

Page 544: ...aper Size Set the size of paper in the paper tray MP Tray Paper Type Set the type of paper in the paper tray Paper Size Set the size of paper in the paper tray Tray Setting Copy Tray Use Select the tray to be used for copying Tray Priority When Auto is selected in Tray Use select the order in which the machine uses paper trays that contain paper of the same size Tray Setting Fax Tray Use Select th...

Page 545: ...ve Set the machine to send faxes to your computer You can turn on the Backup Print safety feature Fax Rx Stamp Print the received time and date on the top of received faxes Report Setting XMIT Report Select the initial setup for the Transmission Verification Report Journal Period Set the interval for automatic printing of the Fax Journal If you select an option other than Off and Every 50 Faxes yo...

Page 546: ...NS Server Specify the IP address of the primary or secondary DNS server APIPA Set the machine to allocate the IP address from the link local address range automatically IPv6 Turn the IPv6 protocol on or off For more detailed information go to your model s FAQs Troubleshooting page on the Brother Solutions Center at support brother com Setup Wizard Configure your wireless network settings manually ...

Page 547: ...ngs back to the factory settings Settings Print Reports Level 1 Descriptions XMIT Verify Print a Transmission Verification Report for your last transmission Address Book Print a list of names and numbers stored in the Address Book Fax Journal Print a list of information about your last 200 incoming and outgoing faxes TX means Transmit RX means Receive User Settings Print a list of your settings Ne...

Page 548: ... did not go through because the line was busy Dial Tone Shorten the dial tone detect pause Phone Line Set Available only for some countries Select the telephone line type Compatibility Adjust the equalisation for transmission difficulties VoIP service providers offer fax support using various standards If you regularly experience fax transmission errors select Basic for VoIP Reset Machine Reset Re...

Page 549: ...nd some countries Select a number from the Caller ID History and then send a fax to it add it to the Address Book or delete it Address Book Search Dial by pressing only a few buttons Set Speed Dial Store Speed Dial numbers so you can dial by pressing only a few buttons Setup Groups Set up Group numbers for broadcasting Change Change Address Book numbers Delete Delete Address Book numbers Set New D...

Page 550: ... reduction ratio Density Adjust the density Stack Sort Select to stack or sort multiple copies Page Layout Make N in 1 2 in 1 ID or Poster copies 2 sided Copy Turn off or turn on 2 sided copying and select flip on long edge or flip on short edge Remove Background Black Copy Settings Change the amount of background colour that is removed Colour Copy Settings Set New Default Save your settings as th...

Page 551: ... it add it to the Address Book or delete it Caller ID History Not available for Taiwan and some countries Select a number from the Caller ID History and then send a fax to it add it to the Address Book or delete it WiFi You can configure the wireless settings by pressing or WiFi on the control panel Level 1 Descriptions Setup Wizard Configure your wireless network settings manually WLAN Assistant ...

Page 552: ...e Machine Settings from Your Computer Change Machine Settings from Your Computer Change the Machine Settings Using Remote Setup Where Can I Find My Brother Machine s Network Settings Network Management Software and Utilities 546 ...

Page 553: ...he Remote Setup program lets you configure many of your Brother machine s settings from your computer When you start Remote Setup the settings on your Brother machine will be downloaded to your computer and displayed on your screen If you change the settings on your computer you can upload them directly to the machine Remote Setup Windows Remote Setup Mac 547 ...

Page 554: ...Change the Machine Settings Using Remote Setup Remote Setup Windows Remote Setup Windows Set Up the Brother Machine from Your Computer Windows Set Up the Brother Machine Using ControlCenter4 Windows Set Up Your Machine s Address Book Using ControlCenter4 Windows 548 ...

Page 555: ...rograms Brother Brother Utilities Click the drop down list and select your model name if not already selected Click Tools in the left navigation bar and then click Remote Setup Windows 8 and Windows 10 Launch Brother Utilities and then click the drop down list and select your model name if not already selected Click Tools in the left navigation bar and then click Remote Setup The Remote Setup Prog...

Page 556: ...selected items on the machine You cannot print the data until it is uploaded to the machine Click Apply to upload the new data to the machine and then click Print OK Click to start uploading data to the machine and then exit the Remote Setup Program If an error message appears confirm that your data is correct and then click OK Cancel Click to exit the Remote Setup Program without uploading data t...

Page 557: ... Remote Setup you may need to configure the firewall settings to allow communication through port numbers 137 and 161 If you are using Windows Firewall and you installed the Brother software and drivers from the Brother installation disc the necessary firewall settings have already been set Related Information Remote Setup Windows ControlCenter4 Windows 551 ...

Page 558: ...p the Brother Machine Using ControlCenter4 Windows Related Models MFC T810W MFC T910DW 1 Click the ControlCenter4 icon in the task tray and then click Open 2 Click the Device Settings tab 3 Click the Remote Setup button 4 Configure the settings as needed Export Click to save the current configuration settings to a file Click Export to save your address book or all settings for your machine 552 ...

Page 559: ... OK Cancel Click to exit the Remote Setup Program without uploading data to the machine Apply Click to upload data to the machine without exiting the Remote Setup Program 5 Click OK If your computer is protected by a firewall and is unable to use Remote Setup you may need to configure the firewall settings to allow communication through port numbers 137 and 161 If you are using Windows Firewall an...

Page 560: ...nter4 Windows Related Models MFC T810W MFC T910DW Use Remote Setup through CC4 to add or change Address Book numbers on your computer 1 Click the ControlCenter4 icon in the task tray and then click Open 2 Click the Device Settings tab 3 Click the Address Book button The Address Book opens in a Remote Setup window 4 Add or update the Address Book information as needed 5 Click OK Related Information...

Page 561: ...Settings from Your Computer Change the Machine Settings Using Remote Setup Remote Setup Mac Remote Setup Mac Set Up the Brother Machine with a USB Cable Connection Mac Set Up Your Machine s Address Book with a USB Cable Connection Mac 555 ...

Page 562: ...s MFC T810W MFC T910DW Use Remote Setup to set up your Brother machine with a USB cable connection To use Remote Setup go to your model s Downloads page on the Brother Solutions Center at support brother com and download Remote Setup Remote Setup for Mac supports USB connections only 1 In the Finder menu bar click Go Applications Brother and then double click the Remote Setup icon The Remote Setup...

Page 563: ...loaded to the machine Click Apply to upload the new data to the machine and then click Print OK Click to start uploading data to the machine and then exit the Remote Setup Program If an error message appears enter the correct data again and then click OK Cancel Click to exit the Remote Setup Program without uploading data to the machine Apply Click to upload data to the machine without exiting the...

Page 564: ...numbers on your computer with a USB cable connection To use Remote Setup go to your model s Downloads page on the Brother Solutions Center at support brother com and download Remote Setup Remote Setup for Mac supports USB connections only 1 In the Finder menu bar click Go Applications Brother and then double click the Remote Setup icon The Remote Setup Program screen appears 2 In the left menu cli...

Page 565: ...Home Appendix Appendix Specifications Enter Text on Your Brother Machine Brother Numbers 559 ...

Page 566: ...240 V 50 60 Hz Other countries Power Consumption 2 DCP T310 Taiwan Copying 3 Approx 14 W Ready 7 Approx 2 5 W Sleep 7 Approx 0 8 W Power Off 7 8 Approx 0 2 W DCP T310 Copying 3 Approx 14 W Ready 7 Approx 2 5 W Sleep 7 Approx 0 7 W Power Off 7 8 Approx 0 2 W DCP T510W Taiwan Copying 3 Approx 14 W Ready 7 Approx 2 5 W Sleep 7 Approx 0 8 W Power Off 7 8 Approx 0 2 W DCP T510W Copying 3 Approx 14 W Re...

Page 567: ...4 Approx 16 W Ready 7 Approx 3 5 W Sleep 7 Approx 1 1 W Power Off 7 8 Approx 0 2 W MFC T910DW Taiwan Copying 6 Approx 16 W Ready 7 Approx 3 5 W Sleep 7 Approx 1 2 W Power Off 7 8 Approx 0 2 W MFC T910DW Copying 6 Approx 16 W Ready 7 Approx 3 5 W Sleep 7 Approx 1 2 W Power Off 7 8 Approx 0 2 W Dimensions DCP T310 DCP T510W 380 mm 583 mm 159 mm 435 mm 561 ...

Page 568: ...FC T910DW 439 mm 576 mm 309 mm 195 mm 435 mm Weights DCP T310 7 4 kg DCP T510W 7 4 kg DCP T710W 8 6 kg MFC T810W 8 7 kg MFC T910DW 9 8 kg Noise Level Sound Pressure Operating 50 dB A Approx 9 Temperature Operating 10 to 35 C Best Print Quality 20 to 33 C 562 ...

Page 569: ...mm Scanner Glass Length Max 297 mm 1 ADF models only 2 Documents that are longer than 297 mm must be fed one page at a time Print Media Specifications Paper Input Paper Tray Paper Type 1 Plain Paper Inkjet Paper coated paper Glossy Paper Recycled Paper Paper Size 2 A4 Letter Legal Mexico Legal India Legal Folio Executive B5 JIS A5 B6 JIS A6 Envelopes C5 Com 10 DL Monarch Photo 4 x 6 10 x 15 cm Pho...

Page 570: ...time Fax Specifications This feature is available for MFC models Compatibility ITU T Group 3 Modem Speed Automatic Fallback 14 400 bps Scanning Width Single sided document ADF 208 mm A4 Scanner Glass 204 mm A4 Printing Width 204 mm A4 Greyscale Monochrome 8 bit 256 levels Resolution Horizontal 203 dpi Resolution Vertical Standard 98 dpi Mono Fine 196 dpi Mono Superfine 392 dpi Mono Photo 196 dpi M...

Page 571: ...71 paper Paper Size A4 Letter Photo 10 x 15 cm Photo 2L 13 x 18 cm File Format JPEG Progressive JPEG format is not supported Scan to Media File Format JPEG PDF Colour Grey TIFF PDF Monochrome 1 USB Flash drives are not supplied with product 2 Full Speed USB 2 0 USB Mass Storage standard up to 256 GB Supported formats FAT12 FAT16 FAT32 exFAT Scanner Specifications Colour Monochrome Yes Yes TWAIN Co...

Page 572: ...card 13 x 20 cm Automatic 2 sided MFC T910DW Paper Type Plain Paper Recycled Paper Paper Size 4 A4 Letter Executive A5 B5 JIS Print Speed For detailed specifications visit www brother com 1 When printing on A4 size paper 2 When the Borderless feature is set to On 3 Photo 2L size paper is only supported by some models 4 B5 JIS size paper is supported only in some countries Interface Specifications ...

Page 573: ... brother com and download the software Network Security Wired SSL TLS IPPS HTTPS Network Security Wireless SSL TLS IPPS HTTPS Wireless Network Security SSID 32 characters WEP 64 128 bit WPA PSK TKIP AES WPA2 PSK TKIP AES Wireless Setup Support Utility WPS Yes Computer Requirements Specifications Supported Operating Systems And Software Functions Computer Platform Operating System Version PC Interf...

Page 574: ...nhancing up to 19200 x 19200 dpi 4 Nuance PaperPort 14SE supports Windows 7 SP1 Windows 8 Windows 8 1 Windows 10 Home Windows 10 Pro Windows 10 Education and Windows 10 Enterprise 5 PC Fax supports black and white only MFC models For the latest driver updates go to your model s Downloads page on the Brother Solutions Center at support brother com and download Full Driver Software Package All trade...

Page 575: ...ns such as the Station ID you may need to enter text on your machine Most dial pad buttons have three or four letters printed on the buttons The buttons for 0 and do not have printed letters because they are used for special characters Press the appropriate dial pad button the number of times shown in this reference table to access the character you want Press Button One Time Two Times Three Times...

Page 576: ...hree Times Four Times Five Times Six Times Seven Times Eight Times Nine Times 2 A B C a b c 2 A B 3 D E F d e f 3 D E 4 G H I g h i 4 G H 5 J K L j k l 5 J K 6 M N O m n o 6 M N 7 P Q R S p q r s 7 8 T U V t u v 8 T U 9 W X Y Z w x y z 9 To move the cursor to the left or right press a b d or c to select or and then press OK Inserting spaces To enter a space press a b d or c to select and then pres...

Page 577: ... Store Address Book Numbers from Caller ID History Change a Broadcasting Group Name Set Your Station ID 571 ...

Page 578: ...r product Check here for Brother driver updates too support brother com Customer Service Visit www brother com for contact information on your local Brother office Service centre locations For service centres in your area contact your local Brother Office Contact information for local Brother Offices can be found at www brother com and selecting your country Internet Addresses Brother Global Web S...

Page 579: ...Visit us on the World Wide Web www brother com ASA SAF GLF Version A ...

Reviews: