Chapter 3 Settings
47
BAS-6150
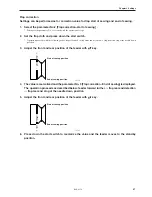
Flap correction
Settings can be performed as for correction value for flap start of sewing and end of sewing.
1.
Select the parameter No.2 [Flap correction-start of sewing] .
* Setting for the parameter No. 3 is started with the operation at step 4.
2.
Set the flap cloth and press down the start switch.
* Operation proceeds with the following order: feeder forward
→
flap front end detection
→
flap front end stop at the needle down
position
3.
Adjust the front and rear position of the feeder with
key.
4.
The value is memorized and the parameter No. 3 [Flap correction - End of sewing] is displayed.
The operation proceeds as described below: feeder forward further
→
flap rear end detection
→
flap rear end stop at the needle down position
5.
Adjust the front and rear position of the feeder with
key.
6.
Press down the start switch to memorize the value and the feeder moves to the standby
position.
1477S
Start of sewing position
End of sewing position
1478S
End of sewing position
Start of sewing position
Summary of Contents for BAS-6150
Page 2: ......
Page 11: ...Chapter 1 Machine Preparation ...
Page 29: ...Chapter 2 Sewing flow ...
Page 41: ...Chapter 3 Settings ...
Page 55: ...Chapter 4 Oiling ...
Page 59: ...Chapter 5 Adjustment For raising the head refer to 3 How to raisethehead in Chapter4 Oiling ...
Page 70: ...Chapter 5 Adjustment BAS 6150 68 ...
Page 71: ...Chapter 6 Knife replacement ...
Page 77: ...Chapter 7 Environment setting ...
Page 85: ...Chapter 7 Environment setting BAS 6150 83 Standard stacker 4 steps 0 1 3 4 2 1530S ...
Page 95: ...Chapter 8 Dipswitch ...
Page 98: ...Chapter 8 Dipswitch BAS 6150 96 ...
Page 99: ...Chapter 9 Error code List ...
Page 103: ...Chapter 10 Troubleshooting ...

