background image


Ultrospec 7500 User Manual 

• 

41 56 2050 REV03 


83 


Methods 

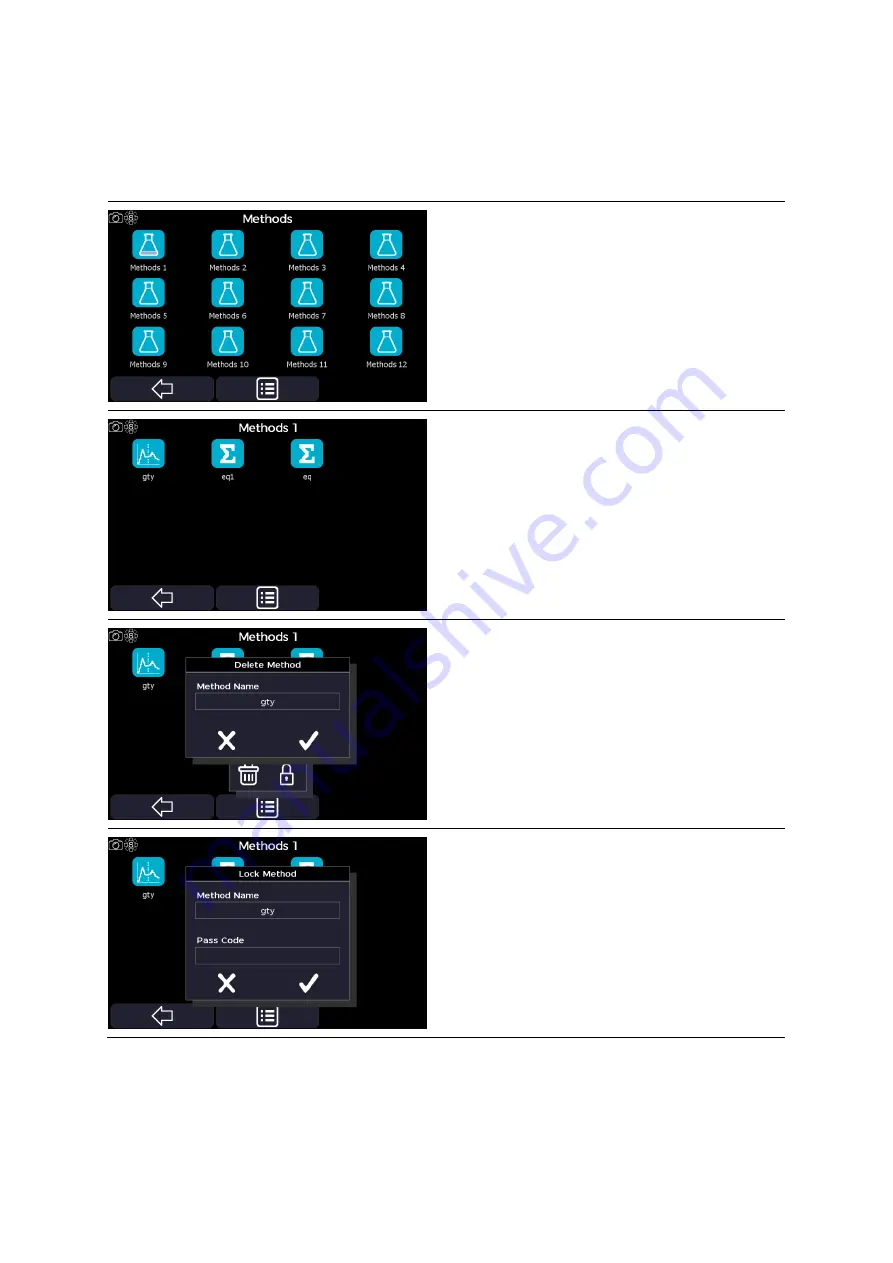
The Methods, Favourites, and USB Methods screens are accessed from the home screen. They are directories to save custom methods to, 

using the options menu from the results screen (see the Additional Options section). 


Select the methods subdirectory, where the custom method is saved. 
 

PLEASE NOTE 

This only applies to the Methods screen. When selected from the home 
screen,  the  Favourites  and  Memory  Stick  screens  directly  display  the 
saved custom method applications. 


Once the directory containing the saved custom method application is 
accessed, there are several options available. 
 
1.


To open a saved custom method, simply select the application. 


2.


To  delete  a  saved  custom  method  application,  use  the  options 
icon, the bin icon, and then select the method name to delete. 
 
Confirm the selection using the confirm icon. 


3.


To lock a saved custom method application, use the options icon, 
the lock icon, and then select the method name to lock and enter 
a pass code. 
 
Confirm the selection using the confirm icon. 

Summary of Contents for HB Ultrospec 7500

Page 1: ...ORIGINAL INSTRUCTIONS 41 56 2050 REV03 1 Ultrospec 7500 Spectrophotometer USER MANUAL...

Page 2: ...Ultrospec 7500 User Manual 41 56 2050 REV03 2 Intentionally blank...

Page 3: ...ns 12 Touchscreen Display 12 Instrument Connections 12 PVC PC Software 13 Biochrom Resolution PC Software 13 Instrument Data Output 13 Performing a Measurement 13 USER INTERFACE 14 Colour Touchscreen...

Page 4: ...otein 55 Protein Dye 60 DNA 64 RNA 67 Oligo 70 Fluorescent Dye 73 OD 600 78 Tm Calculation 80 Methods 83 Favourites 85 USB Methods 85 Sample Manager 86 Additional Options 87 Options Menu Icons 87 Stat...

Page 5: ...BLESHOOTING 97 PRINTING 98 Printing Sample Data 98 External Printer 98 Print Via Computer PVC 98 Manual Printing 98 Installing the External Printer 99 ACCESSORIES 101 Accessory Part Numbers 101 Access...

Page 6: ...Ultrospec 7500 User Manual 41 56 2050 REV03 6 Intentionally blank...

Page 7: ...te holders Wash with disinfectant appropriate for the biohazard in question Rinse with distilled water Allow to dry thoroughly before reuse To further reduce the possibility of biohazards Include an a...

Page 8: ...pharmaceutical environments they are equally as relevant in agriculture animal husbandry and fishery geological exploration food safety environmental monitoring and many manufacturing industries to na...

Page 9: ...instrument should be positioned so that the power supply cable may be readily removed in the event of a hazard or malfunction Locate the instrument in an atmosphere free from dust and corrosive fumes...

Page 10: ...FITNESS FOR A PARTICULAR USE OR OF ANY OTHER NATURE Some states do not allow this limitation on an implied warranty so the above limitation may not apply to you Returns If any defect arises within or...

Page 11: ...sample concentration and the pathlength which is the distance that the light travels through the sample UV Visible spectrophotometers are used in a number of different laboratory environments includi...

Page 12: ...Stability 0 001 A h at 340 nm for 0 A Noise 0 002 peak to peak 0 0005 RMS at 340 nm for 0 A Digital output USB Flash Drive PC via PVC software Data Export USB Flash Drive tsv native PVC format PC via...

Page 13: ...value tsv or native PVC format file Performing a Measurement The optical height z value of the instrument is 15 mm The light path is directed from LEFT to RIGHT through the cell chamber The 8 position...

Page 14: ...of this operating manual Onscreen Keyboards and Number Pad QWERTY Alphanumeric Keyboard Symbols Keyboard page 1 Symbols Keyboard page 2 Text Panel Caps Lock Confirm Alphanumeric keys Backspace Spaceba...

Page 15: ...ft backward arrow Return to the previous screen Confirm Confirm selection Cancel Cancel selection Common Icons on the Sample Measurement Screen Reference measurement Take a reference measurement Sampl...

Page 16: ...Print Print the sample data from the specified printer Auto print Toggle auto print on green or off red Go to std Curve Takes you to standard curve screen Load sample Open saved sample data Home Scre...

Page 17: ...irst time start up any future instrument starts up will only display the self calibration routine screen followed by the Home page Home Screen All applications can be accessed from the instrument Home...

Page 18: ...Login setting has been enabled on the Edit User Access Parameters screen for the default Administrator user see User Access section below for more details Once enabled the unit can be unlocked using t...

Page 19: ...es user access service and GLP settings Note that the service application is used by engineers and a passcode is required Date and Time The Date and Time application is accessed from the Settings scre...

Page 20: ...ernal Printer PC via USB or USB Mass Storage depending on what hardware is connected to the instrument 3 Set auto save to On or Off 4 If auto save is set to On select the save to hardware from USB CSV...

Page 21: ...to On or Off 2 Toggle whether to prompt per sample to On or Off to require a take measurement icon press per sample or just once per loaded changer 3 Set the default number of sample to run to betwee...

Page 22: ...the user login upon start up The default Administrator password is 1000 New accounts can be assigned to 3 permission groups Administrator has access to all features and applications Supervisor has acc...

Page 23: ...On or Off 6 If auto save is set to On select the save to hardware from USB CSV USB or Internal depending on what hardware is connected to the instrument Confirm any changes using the confirm icon GLP...

Page 24: ...hen cycle through the usernames and enter the appropriate pass code Confirm or cancel the action using the confirm or cancel icons Instrument Status The Instrument Status screen is accessed from the h...

Page 25: ...settings icon There are several setting options available 1 Create a new temporary baseline using the new baseline icon 2 Save the temporary baseline as the permanent baseline using the save baseline...

Page 26: ...the Instrument Status screen select the instrument reset icon There are several setting options available 1 Delete all user samples using the delete samples icon 2 Delete all user logins using the del...

Page 27: ...an also be used to determine the concentration of the sample by applying a known factor or a factor determined using a standard of known concentration to the single wavelength absorbance A measurement...

Page 28: ...e print to hardware from Internal Printer PC via USB or USB Mass Storage depending on what hardware is connected to the instrument Step 10 Set auto save to On or Off If auto save is set to On select t...

Page 29: ...ght to step 20 Step 16 Insert the reference sample then take a reference measurement using the reference measurement icon The acquired reference sample baseline will be applied to all subsequent sampl...

Page 30: ...imum wavelength to between 200 to 1100 nm Step 3 Select the step size from 1 0nm 0 5nm 0 2nm or 0 1nm Step 4 Select the mode from Absorbance or Transmission Step 5 Select the scan speed from Slow Medi...

Page 31: ...ass Storage depending on what hardware is connected to the instrument Step 14 Set auto save to On or Off If auto save is set to On select the save to hardware from USB CSV USB or Internal depending on...

Page 32: ...e reference measurement icon The acquired reference sample baseline will be applied to all subsequent sample measurements Step 20 Replace the previous sample with a test sample then take a sample meas...

Page 33: ...t Move the x axis cursor position right Zoom in Zoon into the area around the x and y axis cursor position Zoom out Zoon out from the area around the x and y axis cursor position Step 22 Return to the...

Page 34: ...Step 4 Set the number of sample overlays limit to Off 2 3 4 5 6 7 or 8 Step 6 Set the delay time before the first measurement to between 0 seconds and 99 minutes Confirm the settings using the confirm...

Page 35: ...o print is set to On select the print to hardware from Internal Printer PC via USB or USB Mass Storage depending on what hardware is connected to the instrument Step 16 Set auto save to On or Off If a...

Page 36: ...ents Step 21 Replace the previous sample with a test sample then take a sample measurement using the sample measurement icon Repeat for all samples Step 22 If sample overlays are active the sample ove...

Page 37: ...oon out from the area around the x and y axis cursor position Step 23 Return to the Applications screen using the exit icon in the options menu OR use the additional options to save print and or load...

Page 38: ...the incremental sample number starting value Confirm the settings using the confirm icon Step 3 Proceed to the next parameter screen using the right forward arrow Step 4 Select the source of the cali...

Page 39: ...onnected to the instrument Step 13 Set auto save to On or Off If auto save is set to On select the save to hardware from USB CSV USB or Internal depending on what hardware is connected to the instrume...

Page 40: ...e sample then take a reference measurement using the reference measurement icon The acquired reference sample baseline will be applied to all subsequent standard sample measurements Step 21 Replace th...

Page 41: ...bsorbance value by selecting the appropriate text box and entering a value between 0 3 and 3 0 A Step 26 Proceed to the next parameter screen using the right forward arrow Step 27 Set whether to use a...

Page 42: ...ample name test box and selecting the appropriate sample from the list If using a cell changer skip steps 31 through 32 and go straight to step 33 Step 31 Insert the reference sample then take a refer...

Page 43: ...ings using the confirm icon Step 6 Select the number of test sample replicates to Off 2 or 3 Step 7 Set the delay time before the first measurement to between 0 seconds and 99 minutes Confirm the sett...

Page 44: ...n what hardware is connected to the instrument Step 19 Set auto save to On or Off If auto save is set to On select the save to hardware from USB CSV USB or Internal depending on what hardware is conne...

Page 45: ...h the standards using the right forward arrow and leave the replicates function by cycling back through the standards using the left backward arrow If using a cell changer skip steps 26 through 30 and...

Page 46: ...e Repeat for all remaining standard samples if applicable Step 31 Leave the replicates function using the left backward arrow Step 32 If the source of the calibration is set to Standards skip step 32...

Page 47: ...ample name test box and selecting the appropriate sample from the list If using a cell changer skip steps 36 through 37 and go straight to step 38 Step 36 Insert the reference sample then take a refer...

Page 48: ...ement will taken at Under the Function column select the data extracted by measurement from Abs T at Peak closest to or Valley closest to For the peak and valley functions under the column select the...

Page 49: ...nal equations Step 15 Proceed to the next parameter screen using the right forward arrow Step 16 Enter any variable factors to be applied to the final equations select when the option to change the fa...

Page 50: ...ing the right forward arrow Step 19 Set auto print to On or Off If auto print is set to On select the print to hardware from Internal Printer PC via USB or USB Mass Storage depending on what hardware...

Page 51: ...x and selecting the appropriate sample from the list If using a cell changer skip steps 26 through 27 and go straight to step 28 Step 26 Insert the reference sample then take a reference measurement u...

Page 52: ...ements at 280 nm and to assess sample quality using A260 A280 and A260 A230 absorbance A ratios Step 1 Set the mode Christian Warburg BSA IgG Lysozyme Molar extinction Mass extinction E 1 or Custom St...

Page 53: ...r the Custom mode define the factors to apply to the absorbance measurements at 260 and 280 nm Step 6 Proceed to the next parameter screen using the right forward arrow Step 7 Select one of the predef...

Page 54: ...ow Step 16 Set whether to use as single cell to On or Off If set to Off set the position prompt per sample to On or Off set the number of samples to between 2 and 100 and set whether to retake the ref...

Page 55: ...Repeat for all samples Step 22 Return to the Protein screen using the exit icon in the options menu OR use the additional options to save print and or load previous measurements see the Additional Opt...

Page 56: ...or g l OR Select Custom and define the custom units that the concentration value will be reported in Step 9 Proceed to the next parameter screen using the right forward arrow Step 10 Enter the concen...

Page 57: ...p 18 Step 16 Proceed to the next parameter screen using the right forward arrow Step 17 Press the batch measurement icon then load the cell changer according to the cell changer prompt Then select the...

Page 58: ...standard sample Step 21 Proceed to the next standard measurement screen using the right forward arrow Step 22 Replace the previous standard sample with the next standard sample then take a sample meas...

Page 59: ...holder skip steps 28 through 29 and go straight to step 30 Step 28 Press the batch measurement icon then load the cell changer according to the cell changer prompt Then select the confirm icon Step 2...

Page 60: ...protein probes based on the absorbance prior to their use in microarrays All calculations applied within the Protein Dye application are described in the Useful Calculations section Step 1 Select the...

Page 61: ...ng the right forward arrow Step 7 Select the dye type from one of the predefined dyes Each dye has fixed associated parameters Dye Type Dye Abs Max Dye Ext Coeff Dye Correction Alexa Fluor 350 346 nm...

Page 62: ...Name Wavelength Molar Ext Coeff Ext coefficient L g cm BSA 280 nm 47790 0 689 SA mouse 280 nm 43780 0 637 SA human 280 nm 39310 0 567 IgG 280 nm 210000 1 400 Lysozyme 280 nm 37500 2 600 OR Select the...

Page 63: ...ether to use as single cell to On or Off If set to Off set the position prompt per sample to On or Off set the number of samples to between 2 and 100 and set whether to retake the reference between re...

Page 64: ...or load previous measurements see the Additional Options section DNA The DNA application is accessed from the home screen It can be used to perform DNA quantification measurements at 260 nm and to ass...

Page 65: ...Enter a custom value of up to four significant figures Step 6 Proceed to the next parameter screen using the right forward arrow Step 7 Set display scan to On or Off Step 8 Proceed to the next parame...

Page 66: ...If using a single cell holder or a cell changer set to use as a single cell holder skip steps 14 through 15 and go straight to step 16 Step 14 Press the batch measurement icon then load the cell chang...

Page 67: ...e options menu OR use the additional options to save print and or load previous measurements see the Additional Options section RNA The RNA application is selected from the home screen It can be used...

Page 68: ...Enter a custom value of up to four significant figures Step 6 Proceed to the next parameter screen using the right forward arrow Step 7 Set display scan to On or Off Step 8 Proceed to the next parame...

Page 69: ...If using a single cell holder or a cell changer set to use as a single cell holder skip steps 14 through 15 and go straight to step 16 Step 14 Press the batch measurement icon then load the cell chang...

Page 70: ...menu OR use the additional options to save print and or load previous measurements see the Additional Options section Oligo The Oligo application is selected from the home screen It can be used to per...

Page 71: ...Enter a custom value of up to four significant figures Step 6 Proceed to the next parameter screen using the right forward arrow Step 7 Set display scan to On or Off Step 8 Proceed to the next parame...

Page 72: ...If using a single cell holder or a cell changer set to use as a single cell holder skip steps 14 through 15 and go straight to step 16 Step 14 Press the batch measurement icon then load the cell chang...

Page 73: ...they are outside the ideal Warburg and Christian range Repeat for all samples Step 18 Return to the home screen using the exit icon in the options menu OR use the additional options to save print and...

Page 74: ...91 3 E 3 0 45 Alexa Fluor 594 590 nm 90 0 E 3 0 43 Alexa Fluor 647 650 nm 239 E 3 0 00 Alexa Fluor 660 663 nm 132 E 3 0 00 Alexa Fluor 680 679 nm 184 E 3 0 00 OR Select the custom dye and define the m...

Page 75: ...t the amount of diluent added to the initial volume of a value of up to four significant figures Implement the changes and return to the parameters screen by selecting the confirm icon Step 9 Set the...

Page 76: ...USB CSV USB or Internal depending on what hardware is connected to the instrument Step 17 Proceed to the next parameter screen using the right forward arrow Step 18 Set whether to use as single cell...

Page 77: ...traight to step 24 Step 22 Insert the reference sample then take a reference measurement using the reference measurement icon The acquired reference sample baseline will be applied to all subsequent s...

Page 78: ...r cells ml units define the multiplication factor of a value of up to four significant figures and set the multiplier 1 000 or 1 000 000 Step 2 Enter any correction factor to be applied to the absorba...

Page 79: ...her to use as single cell to On or Off If set to Off set the position prompt per sample to On or Off set the number of samples to between 2 and 100 and set whether to retake the reference between relo...

Page 80: ...on Tm Calculation The melting temperature Tm Calculation application is selected from the home screen It can be used to determine the theoretical melting point of a PCR primer at the measured concentr...

Page 81: ...next parameter screen using the right forward arrow Step 13 Set auto print to On or Off If auto print is set to On select the print to hardware from Internal Printer PC via USB or USB Mass Storage dep...

Page 82: ...the sample name test box and selecting the appropriate sample from the list If using a cell changer skip steps 20 through 21 and go straight to step 22 Step 20 Insert the reference sample then take a...

Page 83: ...Favourites and Memory Stick screens directly display the saved custom method applications Once the directory containing the saved custom method application is accessed there are several options avail...

Page 84: ...ng the confirm icon 5 By clicking on the Options icon the method folders can be renamed using the Rename icon 6 On the New Name screen select the folder you want to rename then in the New Name box typ...

Page 85: ...avourites directory when selected from any other applications screens 1 View of the Favorites folder When the Favourites folder has been selected when saving a method this method will be stored here M...

Page 86: ...lable 1 To open saved results simply highlight the applicable saved data entries then select the load sample icon 2 To delete saved results simply highlight the applicable saved data entries then sele...

Page 87: ...int Print the sample data from the specified printer All Auto print Toggle auto print on green or off red All Load sample Open saved sample data All Trace Manager Open the trace manager to load sample...

Page 88: ...ing to comma separate value file to USB flash drive Auto save to internal memory Saving to internal memory Screenshot icon Taking Screenshot and exporting as a bitmap file to USB flash drive Taking me...

Page 89: ...litre concentration M mol L 1 Mass extinction coefficient g 1 cm 1 0 1 Mass per volume concentration g L 1 E1 extinction coefficient mg 1mL 1cm 1 1 Mass per volume concentration 10g L 1 Conversions b...

Page 90: ...ml 1 ng l 1 g l 0 001 pmol l ACGT Calculated from nucleotide sequence pmol l User Defined Calculated using method described by Ahnert and Patel 197 p 272 specifically Molar Extinction Coefficient M 1c...

Page 91: ...1 N A Custom Custom Custom Molecular weight molar extinction mass extinction and E 1 are the respective values defined within the application method parameters Pathlength Factor is based on the pathle...

Page 92: ...0 A320 A230 A320 A260 is the absorbance at 260 nm A280 is the absorbance at 280 nm A230 is the absorbance at 230 nm A320 is the optional background absorbance at 320 nm References Measuring protein co...

Page 93: ...Concentration Concentration pmol l Quantity Volume Quantity is the calculated fluorescent dye quantity Volume is the value defined within the application method parameters Fluorescent Frequency of In...

Page 94: ...uence while the nucleotide pair on the right of the forward slash is the RNA sequence Buffer is the buffer concentration M is the helix initiation factor fixed at 0 0108 kcal K 1 mol 1 R is the gas co...

Page 95: ...ally A C G T U A 13 7 10 6 12 5 11 4 C 10 6 7 3 9 0 7 6 G 12 6 8 8 10 8 10 0 T U 11 7 12 3 8 1 8 6 9 5 10 0 8 4 9 8 The nucleotide on the left of the forward slash is the DNA sequence while the nucleo...

Page 96: ...REV03 96 OD 600 OD A600 Correction Cell ml A600 Correction Factor A600 is the absorbance at 600 nm Correction is value defined within the application method parameters Factor is the value defined wit...

Page 97: ...mple Possible incorrect optical alignment Contact technical support Absorbance lower than expected Incorrect sample reference Check sample and reference for contamination Check sample and reference sa...

Page 98: ...to enable the Ultrospec 7500 to transfer data into a PC environment From there the data can be printed or saved in a variety of formats including graphics and text formats or as an Excel file PVC can...

Page 99: ...o DPU S245 User guide from the supplier s website https www sii co jp sps eg download index html Open printer kit box and verify content Insert paper roll into the printer and connect the printer with...

Page 100: ...setting and character strings for testing are printed 1 Make sure that the thermal paper is in the printer and the printer is turned off 2 Press the POWER and FEED switches at the same time When the...

Page 101: ...arousel with one hand Then loosen the central finger screw with the other hand until the cell changer comes free 2 To install the new cell changer accessory align the cell changer to the accessory mot...

Page 102: ...5 9PE Phone 44 1223 423 723 84 October Hill Road Holliston Massachusetts 01746 Phone 1 508 893 8999 toll free 1 800 272 2775 Harvard Bioscience China Co Ltd Room 8C Zhongxi Tower 121 Jiangsu Road Chan...

Page 103: ...Ultrospec 7500 User Manual 41 56 2050 REV03 103 Intentionally blank...

Page 104: ......

Reviews: