background image

18

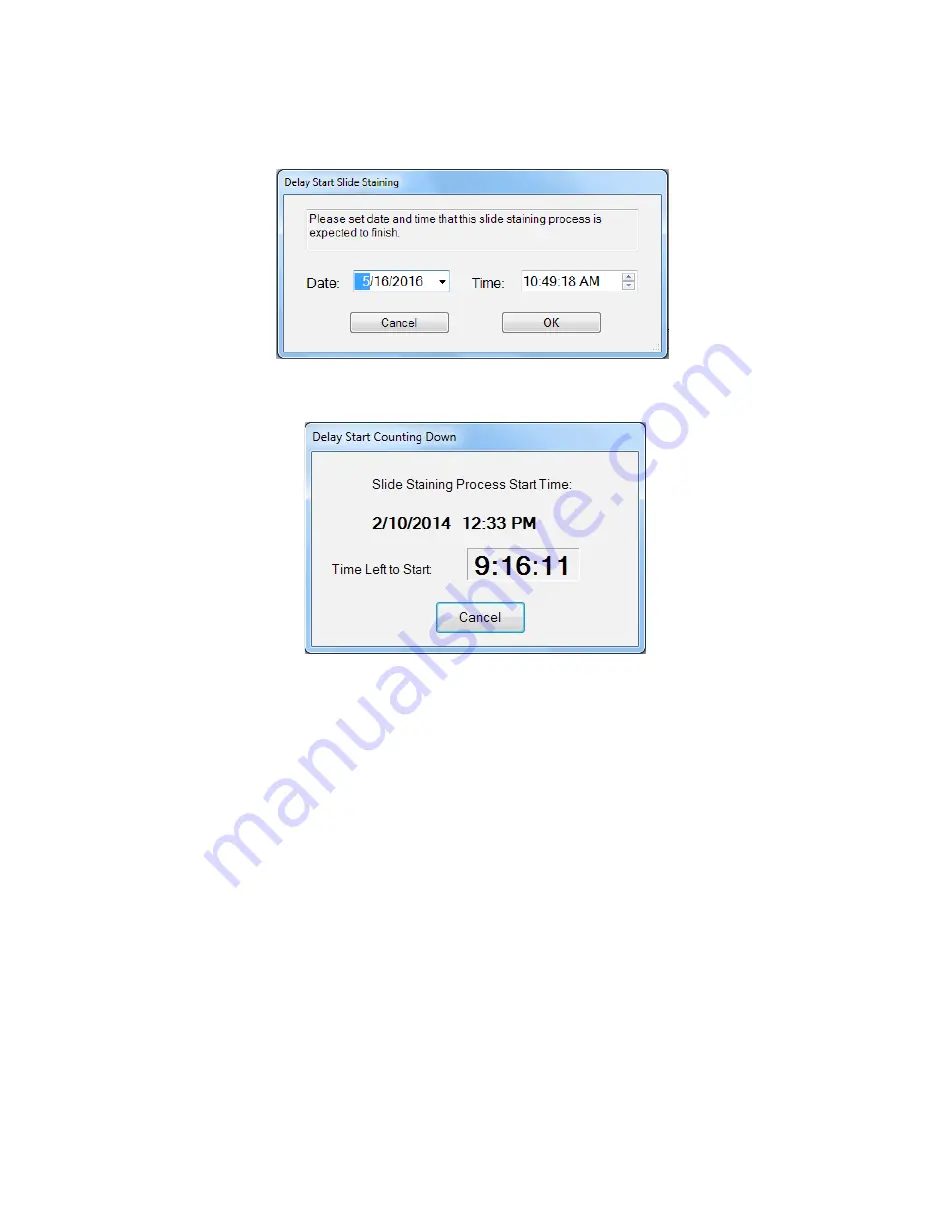
Alternatively, click the ‘Delay Start Staining Process’ button to delay the run. The ‘Delay Start Slide Staining’ window will open. Enter 
the date and time corresponding to the desired run completion date and time. Click the ‘OK’ button.

A ‘Slide Staining Process Start Time’ window will then display indicating when the run will begin as well as the ‘Time Left To Start’ 
countdown. Once the countdown completes, the staining run will begin.

If desired, the ‘Return to Main Screen’ button can be utilized to return to the Main Screen and abort the starting of the run.

Note: The ‘Load Reagent Map File’ is not available for use.

Clean Screen

Upon completion of a staining run, click the ‘Clean Screen’ button to clear all slide positions and start a new run.

Summary of Contents for ONCORE

Page 1: ...www biocare net ONCORE Manual Automated Slide Staining System ...

Page 2: ...Biocare Medical Technical Support 800 799 9499 Option 3 Customer Service 800 799 9499 Option 2 Fax 925 603 8080 Corporate Office 60 Berry Drive Pacheco CA 94553 www biocare net ...

Page 3: ...s 7 Ventilation 7 Venting exhaust 7 Humidity 7 Temperature 7 Support 8 Safety Precautions 8 Reagents and Chemicals 8 Instrument 9 Programming Cautions 9 Warning Symbols 9 System Installation 11 Packing List 11 Use after Installation 11 ONCORE System Software 13 Software Features Functions 13 Using the ONCORE Automated Slide Staining System Software 13 Logging in to the ONCORE System Software 13 ON...

Page 4: ...30 Negative Control Editor 30 Reagent Editor 32 RFID Editor 33 Custom Group Editor 36 Panel Editor 37 Change Protocol Template 39 System Utilities Security Tab 39 System Utilities Settings Tab 41 Baking Slide Settings 41 2D Barcode Format 42 Check Heater Settings 44 Save All Customizations 44 Get Device Version 44 Baking Slides Before Staining 44 Changing Software Text Language 44 System Utilities...

Page 5: ...eparation 1 each of 2 liter containers for hazardous and non hazardous waste Slide compatibility Thickness 1mm 0 127 mm Length 75 mm maximum Width 25 mm 0 38 mm LIS connectivity Compatible with XML and HL 7 messaging standards Electrical requirements 100 240 VAC 50 60 Hz 875 W Instrument dimensions W x H x D 35 in x 22 in x 24 in 84 cm x 56 cm x 61 cm with door closed 35 in x 36 in x 24 in 89 cm x...

Page 6: ...loor 4 Non Hazardous Waste Tubing and Carboy on floor 5 On Off Switch 6 Reagent Rack 7 RFID Reagent Vial Registration Position 8 Desktop Computer and Monitor 9 Label Printer 10 Report Printer Not Shown Keyboard Mouse 1 Instrument Label 2 Serial Number Label 3 Main Power Switch 4 Power Cord Receptacle 5 USB to Desktop Computer ...

Page 7: ...tioned on the left side of the instrument and is connected using the quick disconnect tubing connection included with the system The two 2 liter waste carboys are positioned below the instrument in a secondary waste container Tubing is color coded black for hazardous waste and blue for non hazardous waste 1 Reagent Rack 2 RFID Reagent Vial Registration Position 3 Slide Chamber Module ...

Page 8: ...om overflowing into the instrument During staining the Slide Chambers agitate to ensure even distribution of reagent across the slide 1 LED Indicators 2 Slide Chamber Module 3 Slide Chamber Housing 4 Slide Chamber 5 Slide Chamber Port 6 Slide Heater Plate black 7 Slide Clips System Door The ONCORE System Door allows access to the work platform The System Door locks at the start of staining run It ...

Page 9: ...number of tests remaining in the reagent vial The RFID System writes information to a new Improv Reagent Vial RFID tag while in the RFID Editor Buffer and Waste Storage The ONCORE Buffer and Waste Carboys have volume estimation markings on the applied label Use these markings to estimate the amount of liquid currently inside of the carboys Prior to the start of each run the software will display e...

Page 10: ...roperly in accordance with local regulations For a given reagent determine if it is hazardous from the SDS sheet The ONCORE Automated Slide Stainer is programmed to separate waste streams for hazardous and non hazardous waste The carboy used for the hazardous waste stream is marked Hazardous Waste This carboy must only be used for hazardous waste in order to avoid increasing the volume of any haza...

Page 11: ...mated Slide Stainer s dedicated PC Surge protection is required The backup uninterruptible power supply UPS should be placed on a surface capable of safely supporting its weight away from liquids and within 1 meter of the instrument power cord and within 1 meter of a properly grounded power outlet The use of a dedicated circuit is recommended for the instrument Avoid connecting the instrument on t...

Page 12: ...e amounts of noise A protective ground connection through the grounding conductor of the power cord is essential for safe operation of the system Operate the power switch located on the rear of the instrument to power off the ONCORE Automated Staining System if there is ever any question as to whether the instrument is operating safely Grounding the Instrument The instrument is grounded through th...

Page 13: ...ted Slide Stainer until all motion has stopped the robotic arm is in the home position and the software has been exited During a staining run the front door of the instrument must be closed before staining operation will begin Keep Buffer Carboy level with the instrument Keep Waste Carboys below the level of the instrument Make sure that Waste Tubing does not contain kinks or other obstructions Pr...

Page 14: ...nstrument and instrument labeling Power Distributed By Consult Instructions for Use consult operating instruction Consult Accompanying Documents In Vitro Diagnostic Medical Device Serial Number Authorized Representative European Community CE Marking Manufacturer ...

Page 15: ...er 1 USB cable 1 power cord Reagent Rack 3 2 liter carboys with caps 1 with quick disconnect 2 separate tubings black for hazardous blue for non hazardous Desktop computer and monitor with ONCORE System Software Label printer Report printer Uninterruptible power supply Use after Installation ONCORE Slide Stainer must be level The USB AB cable must be connected to the back of the instrument The pow...

Page 16: ...S The UPS must be plugged into the wall The power cables from the label printer and the report printer must be plugged into the power strip The power strip must be plugged into the wall Quick disconnect Tubing connection 2 Liter buffer carboy Hazardous waste color coded black Non hazardous waste color coded blue The 2 liter buffer carboy is positioned on the left side of the instrument and is conn...

Page 17: ... Software Icon from the desktop and the software will display the Login Screen Type in the User ID and Password which are case sensitive Click the Enter button ONCORE System Software Home Screen The Home Screen will appear after successful login There are eight function buttons located across the top of the Home Screen The three buttons to the left of the Date and Time feature are used in order fr...

Page 18: ...inted and scanned but not previously processed Processed Slides will recall slide label information for slides that have previously completed the staining process Recalled information may be sorted by selecting the column headings within the Slide Label Editor Select the labels that you would like to print by checking the box located between the No and Patient ID columns Then select the Print butt...

Page 19: ... The Load and Unload Slides button raises or lowers all 36 Slide Chambers simultaneously Following instrument initialization all 36 slide chambers will be in the down or closed position When the slide chambers are in the up position the Load and Unload Slides button will change to Slide Lids Down Load slides in the desired slide chambers with the label oriented towards the front of the instrument ...

Page 20: ...ed a user must then click on the Assign Protocols button The Select Protocol window will appear The top of the window gives the user three options to select Protocols Normal Negative or All Choosing Normal displays all existing Protocols in the system but does not display Negative Controls There is no distinction between a Protocol and a Positive Control Choosing Negative displays only Negative Co...

Page 21: ...system The Scan Reagents button can be used to activate the Scan Reagents feature of the Auto Start function independently A list of required reagents may be printed by clicking Print Required Reagents Selecting the Scan Reagents button will automatically open the Reagent Check screen Click the Scan Reagents button within the Reagent Check screen and the instrument will scan all 40 positions If al...

Page 22: ... window will then display indicating when the run will begin as well as the Time Left To Start countdown Once the countdown completes the staining run will begin If desired the Return to Main Screen button can be utilized to return to the Main Screen and abort the starting of the run Note The Load Reagent Map File is not available for use Clean Screen Upon completion of a staining run click the Cl...

Page 23: ...the tubing access reports and test the heaters Upon clicking the System Utilities button the user may select from the following tabs Tools Editors Security Settings Network and LIM Note A user logged in under a Technician security level will be blocked from accessing certain settings within System Utilities as noted below ...

Page 24: ...Slide lids should be open during this function The timer will count down the pre selected time to completion A user may cancel the baking process at any time during the countdown by selecting the Stop button The completion of the baking process will be indicated by a separate pop up information window To change the settings for the Baking Slides feature refer to the Settings tab within the System ...

Page 25: ... displayed as follows RunSet 2013 05 01 03 15 End The user will then find the run they wish to recall by date and time They must then select the Start version of that RunSet and click the Open button located at the bottom of the Windows Explorer window This will automatically import the slide information to the positions on the home screen that was originally loaded in the previous run Note When u...

Page 26: ...posterior of the Y axis of the port as illustrated below Do not use this feature Reserved for Biocare field Service Engineer SP1 Z2 Calibration Do not use this feature Reserved for Biocare field Service Engineer Barcode Calibration Do not use this feature Reserved for Biocare field service engineer ...

Page 27: ...an every six months It is recommended that Tubing Cleaning be performed every 3 months for optimal performance Upon clicking the Tubing Clean button within the Tools menu the Tubing Clean window will appear Follow the instructions as prompted by the Tubing Clean window and click OK Alternatively if you wish to exit the Tubing Clean function you may select Cancel Please refer to the Maintenance Sec...

Page 28: ...llowing for a specified run slide details including Position Case Block Protocol Name and each step of the protocol reagent details including Step Name Reagent Name Incubation Lot Exp ISH Report by Run Use IHC Report Template Provides the following for a specified run slide details including Position Case Block Protocol Name and each step of the protocol reagent details including Step Name Reagent...

Page 29: ... Report Generator launch and should not be necessary Clicking Set Default Report will open the Set Default Report window Choose desired default report The Default Report will be displayed when the Report Generator is invoked from the Run Completion window Clicking Configure Report Fields will open the Setup Report Fields window If Slide Layout Map is selected four fields may be configured and save...

Page 30: ...he way of the reagent rack Initialize System Selecting this button will run the instrument through a series of calibration checks and priming as well as moving the Z head to its home position Check Modules This function allows the user to verify the operation of the heating pads within the slide chamber modules and that the motion of the chambers is working Make sure to load blank slides in all sl...

Page 31: ...is feature is designed to be used when the system is set up for the first time or when checking the system before a run Prime Pump Z1 This feature allows the user to manually prime the Z1 dispense probe Prime Pump Z2 This feature allows the user to manually prime the Z2 extract probe Lock Door Unlock Door This button allows the user to manually actuate the door lock to either the locked or unlocke...

Page 32: ...isor setting only to alter 5 parameters within programmed protocols Note Some features in the Protocol Editor are reserved for future use DS2 Dewax Solution 2 Option To allow for the substitution of the DS2 component of the deparaffinization kit with Buffer an Enzyme or a Block Some antibodies are sensitive to a component of DS2 In this instance DS Buffer may be desired instead If an antibody requ...

Page 33: ...esired If an antibody requires a block and does not require enzyme digestion or antigen retrieval then AR Block would be desired Be sure to adjust the corresponding Temperature adjacent to the AR Option column to the desired temperature See Antigen Retrieval Temperature section below It is recommended to consult a Biocare representative if making changes to the AR setting Antigen Retrieval Tempera...

Page 34: ...cated at the bottom of the Protocol Editor window to save the changes To delete a protocol a user must first select the protocol by clicking the column to the far left and then select the Delete button Upon clicking Delete the software will ask for confirmation before permanently deleting the protocol Click on Go Back to Manufacturer Default to revert to Manufacturer Default Protocols The sofware ...

Page 35: ... to appear The Negative Control Window is divided into two main fields Protocols List of all of the active protocols programmed within the database Negative Control List of all of the possible negative control serum options To clear selections that are currently highlighted Click Clear Selected Protocols and or click Clear Selected Negative No permanent changes occur with this function To confirm ...

Page 36: ...level security log in The Reagent Editor allows the user to add or delete primary antibodies and probes and their associated protocol within the protocol database Within the Reagent Editor Window the user will see two fields Reagent Types and Reagents The Reagent Types field lists all of the preprogrammed protocol templates and designates them by detection system After selecting a designated proto...

Page 37: ...t as such by selecting the Yes check box This should not be necessary for antibodies All probes should be loaded as ready to use Once satisfied with the information entered the user may then click the Save button to save the addition To delete a primary antibody or Probe A user must first select highlight the appropriate protocol template under which the protocol resides within the Reagent Types f...

Page 38: ...e vial preparation instructions on the Improv vial data sheet to prepare for use Load the Improv vial to be encoded in the RFID Reagent Vial Registration Position in between Reagent Vial 40 and Slide Chamber 25 Reagent Vial Slide Chamber 25 Select RFID Editor within the Editors tab in the System Utilities window This will open the RFID Tag Editor window The ONCORE Tag Editor window has two columns...

Page 39: ...ady for use Notes Only user created reagents are available for writing to the Improv Reagent Vial RFID Tag Only 7mL Improv Reagent Vials are available for use Recommended Storage Temperature is 2 8 C Do not use the Configure RFID button Contact a Biocare Representative To add a new Manufacturer to the Manufacturer Name drop down menu Click the Manufacturer Name drop down menu and choose Add or Rem...

Page 40: ...sts all of the Available Protocols contained within the protocol database The field on the right displays the Selected Protocols that have been chosen and added to a Custom Group and are visible when that Custom Group is chosen in the drop down menu for Custom Group Name To Create a Custom Group Within the Edit Custom Groups window click the Add New Custom Group button The Add New Custom Group Nam...

Page 41: ...te a previously created Custom Group click the Custom Group Editor button to open the Edit Customs Groups window and select the Custom Group to be modified from the Custom Group Name drop down menu With the custom group name displayed in the drop down menu field click the Delete This Custom Group button NOTE The software will not ask for confirmation of deletion when performing this step It is not...

Page 42: ...er may highlight the protocol to be removed from the Selected Protocols field and click the Remove button Once satisfied with all of the information entered click Save to save changes and then click Return to close the Edit Panels window To Modify a Previously Created Panel If a user wishes to modify a previously created panel they must first open the Edit Panels window and select the Panel to be ...

Page 43: ...el users will only be able to utilize the Change Password option detailed below To Change Password The Change Password button in the Security tab allows only the currently logged in user to change their password for log in To change password click on the Change Password button The Change Password window will open Complete the fields as prompted Then click the Change button followed by the Return b...

Page 44: ...l appear To add a user click the Add User button The Add User window will open Enter the fields as prompted When finished click the Add User button A confirmation window will appear Click the OK button to close the window The Add User window will close as well Alternatively click the Return button to close the Add User window without adding a new user To delete a user click the column to the far l...

Page 45: ... Baking Slide Settings button within the Settings menu The Configure Baking window will open Users may change the values of the Temperature and Baking Time fields by clicking into those fields and changing the number values and then clicking the Save button 60 C for 30 minutes is the recommended temperature and time setting The maximum temperature allowed is 85 C The maximum time allowed is two ho...

Page 46: ...e date on the slide labels 1 MM dd yyyy 2 MM dd yy 3 yyMMdd To change the Date Format display click on the corresponding button The active Date Format will be displayed in the Date Format window Check or uncheck the box next to Copy Patient Information to New Record to either or activate or deactivate this feature When activated after a slide label is generated by clicking Save in Barcode Editor A...

Page 47: ...on To delete a Doctor s Name Choose the Doctor s Name to be deleted from the drop down menu in the Edit Doctor Name List window and click the Remove button Click the Return button to return to the Barcode Label Options window Line1 Line2 The Barcode Label Options window also allows a user to modify the Line1 and Line2 text that is displayed within the Barcode Editor Add window when making slide la...

Page 48: ... All Customizations in the Settings tab will activate this feature Get Device Version Selecting this option within the Settings tab of System Utilities will provide the user with information pertaining to the current version of the ONCORE software Baking Slides Before Staining The ONCORE Automated Slide Stainer also offers an option of having the slides undergo the baking protocol prior to the sta...

Page 49: ... sample area of the slide for IHC applications Tissues placed outside of the active staining area may result in limited or no staining The following illustration demonstrates the active staining area recommended for performing IHC on the ONCORE Automated Stainer For ISH Due to the configuration of the slide chamber and the evaporation due to the requisite high temperatures sustained for ISH applic...

Page 50: ... then wipe away with an alcohol wipe or vacuum not provided Be sure to use appropriate personal protective equipment when clearing glass shards from the ONCORE Slide Module Cleaning Immediately after removing slides from Slide Chamber Housing visually inspect for leftover fluid on the Slide Chamber Modules and the surrounding area including the black Slide Heater Plate Use alcohol wipes to clean S...

Page 51: ...e Slide Chamber Housing with alcohol wipes Dispense and Extraction Probe Tip and Wash Station Cleaning Salt may build up at the tip of the probes and on the wash station surfaces over time Use an alcohol wipe to clean the tips of the probes and wash station weekly or as often as needed to remove salt build up To clean the probe tips and wash station click on the Systems Utilities button go to the ...

Page 52: ...leaning procedure press down on black Slide Heater Plates to check for fluid oozing from underneath If fluid is observed perform a heater test If the heater test results in a bad heater note the Slide Module position and contact Biocare Technical Support Quarterly Maintenance Perform the following cleaning procedure quarterly Disinfect Buffer and Waste Carboys 1 Follow the Bottle Cleaning Procedur...

Page 53: ...nction Contact Technical Support to replace the syringe pump Unable to print a Slide Barcode Label USB cable connection between computer and printer Secure the USB connection from computer to printer Printer selection in software Select the correct printer from the Barcode Label Options screen Printer selection on computer Set Zebra Printer as Default Printer under Devices and Printers Unable to i...

Page 54: ...rt assignment Contact Technical Support to correct COM port assignment ISO15693 box is checked Contact Technical Support to uncheck ISO box in RFID Tab of System Server Low temp error message Run cancelled Start a new run Possible sensor malfunction Contact Technical Support to replace the slide module Possible heater malfunction Contact Technical Support to replace the slide module High temp erro...

Page 55: ...ltiple Probes multiple Probe enhancer RNA ORI6024 Mouse HRP Detection ORI6007 Rabbit HRP Detection ORI6008 Mouse Amp HRP Detection ORI6050 Mouse AP Detection ORI6044 Rabbit AP Detection ORI6043 Multiplex Detection 2 ORI6045 ISH HRP Detection ORI6047K ORI6025 ORI6026 Universal Negative Control Serum ORI6013 RNA Positive Control Probe ORA6057 RNA negative control probe ORA4029 DAB Chromogen Kit ORI6...

Page 56: ...odified Cap Fittings ONC004 Slide Chamber ONC005 70 Isopropyl Alcohol wipes 100 count ONC099 ONCORE Chamber Cleaning Brush ONC103 ONCORE Reagent Rack ONC007 Terminology and Abbreviations AP Alkaline Phosphatase AR Antigen Retrieval DNA Deoxyribonucleic acid DS Dewax Solution HRP Horseradish Peroxidase IHC Immunohistochemistry ISH in situ Hybridization Multiplex or Dual Double staining Rb Rabbit RF...

Page 57: ...800 799 9499 60 Berry Drive Pacheco CA 94553 www biocare net 904 017 032618 ...

Reviews: