background image

76

Safety information

Bindomatic Safety data sheets

Introduction

The disclaimer below is valid for all safety data sheets in this manual. 
For questions about Bindomatic products regarding health, safety and environment, please 
contact your Bindomatic organisation; you can find the address in the last appendix of this 
manual.

Disclaimer

The safety data sheets in this manual have been compiled to the best of our knowledge as a 
compact guide to safe handling of this product. We reserve the right to revise safety data 
sheets as new information becomes available. It is the user’s responsibility to determine the 
suitability of this information for the adoption of safety precautions as may be necessary and 
to contact the company to make sure that the sheet is the latest one issued. If and in so far as 
limitation of liability is permitted under the applicable laws, we do not accept liability for 
any inaccuracy that may occur in this information.

Summary of Contents for 301 DFS

Page 1: ...1 2 1 2 1 2 Operator Manual BINDOMATIC 301 DFS Document Finishing System...

Page 2: ...2 Part No 8K100...

Page 3: ...vant directives and referenced standards can be obtained from your Bindomatic Technologies representative North America This equipment has been tested and found to comply with the limits for a Class A...

Page 4: ...Caution In order to allow this equipment to operate in proximity to Industrial Scientific and Medical ISM equipment the external radiation from ISM equipment may have to be limited or special mitigat...

Page 5: ...mponents 8 Control Panel 10 Interface Module 13 Manual Feeder 14 Cover Trays 15 Output Tray and Document Guide 16 Document path through the Bindomatic 301 DFS 17 Chapter 3 Making the documents Documen...

Page 6: ...am clearance 58 Inserting additional sheets into a bound document 59 Problem solving table 60 Calling for service 64 Chapter 7 Technical data Product specifications 66 Paper Cover specifications 67 Sp...

Page 7: ...chine installation It describes the operation and maintenance of the 301 DFS as an automatic document maker accessory to copier printer or as a stand alone manual feed document maker There are two mac...

Page 8: ...type ___________________________________ Customer Support Representative _____________________________________ The 301 DFS requires the use of specially designed Bindomatic covers The covers are cont...

Page 9: ...cting the desired cover source and loading cassettes Additionally it describes the procedures for making documents in both automatic and manual modes Chapter 4 Customizing your 301 DFS This chapter de...

Page 10: ...ual Start button Initial capitals Specific part names of the machine are identified by initial capitals for example Interface Module Manual Feeder Cover Tray 1 etc Caution A Caution indicates an opera...

Page 11: ...o 85 Place the 301 DFS on a flat level surface Ensure that the 301 DFS is aligned to your copier printer for optimum performance Avoid locations that subject the 301 DFS to the following conditions Di...

Page 12: ...6 Introduction Product orientation Overview of the Bindomatic 301 DFS 1 Front 2 Left Side 3 Rear 4 Right Side 4 1 2 3...

Page 13: ...This chapter introduces the Bindomatic 301 DFS illustrates its major components and provides you with information you will need to begin making documents Chapter 2 Getting to know the Bindomatic 301 D...

Page 14: ...mponents of the 301 DFS Take a few minutes to become familiar with these components 1 Set Collating Door 2 Manual Feeder Door 3 Left Front Door 4 Right Front Door 5 Cover Tray 1 6 Cover Tray 2 7 Docum...

Page 15: ...w is an illustration of the location of the Bindomatic 301 DFS Operator Manual holder located on the Rear Cover of the 301 DFS View from rear of 301 DFS 1 Operator Manual 2 Operator Manual Holder BIND...

Page 16: ...e Symbol Description 1 Mimic Display Mimic Display The Mimic Display helps you locate areas that require your attention Indicator lights will go on in the applicable areas of the Mimic Display 2 Cover...

Page 17: ...ge button allows you to switch between the default and second languages All messages in the Message Display and Cover Supply Contents Display will display in the selected language 6 Energy Saver Butto...

Page 18: ...will clear automatically It will also clear when you power off the 301 DFS 8 Manual Start Button Press this button to start the binding process whenever you use the Manual Feeder When binding multiple...

Page 19: ...f the 301 DFS It is the physical link between the 301 DFS and the host machine It enables copy sets to feed from the host machine to the 301 DFS for automatic binding into documents Below is an illust...

Page 20: ...located on the left side on top of the 301 DFS It enables you to feed the copy sets manually or if applicable copy sets with covers manually Refer to chapter 3 Making the Documents for detailed instr...

Page 21: ...ty the 301 DFS will unlock the Cover Tray 2 In Use indicator Red This indicator lights when the Cover Tray contains covers the tray is currently selected and the tray is locked and ready for operation...

Page 22: ...s Full When the Output Tray is approximately three quarters full the message Output Tray Almost Full Empty Top Output Tray will appear in the Message Display of the 301 DFS Control Panel If enabled th...

Page 23: ...Input Station delivers the copy set to the Set Drive Station where the copy set sheets are aligned 4 Document Drive Station If a Cover Tray has been selected the cover is delivered to the Document Dr...

Page 24: ...18 Getting to know the Bindomatic 301 DFS Notes...

Page 25: ...r provides an overview of documents It also lists and explains the steps in the document making process There are 3 methods in producing the documents Automatic operation Manual operation with cover t...

Page 26: ...S detects the use of a non Bindomatic cover a Please Feed Set Using an Bindomatic Cover Press Reset to Continue message will appear in the Message Display of the Control Panel of the 301 DFS The 301 D...

Page 27: ...s into the Cover Trays This step is applicable only if you have selected one or both Cover Trays as the cover source When a selected Cover Tray is empty or contains the incorrect covers you must load...

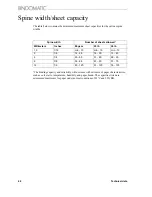
Page 28: ...eet Capacity Table to determine spine width If you are using 80 gsm or 20 lb 24 lb Bindomatic paper you can use the Spine Width Sheet Capacity Table located in chapter 7 Technical data as an alternati...

Page 29: ...1 to 13 sheets 3 0 mm 14 to 28 sheets 6 0 mm 29 to 55 sheets 9 0 mm 56 to 84 sheets 13 mm 85 to 120 sheets Table 2 Spine Widths For 11 inch Size Capacity 1 16 inch 1 to 15 sheets 1 8 inch 16 to 30 she...

Page 30: ...ded The 301 DFS will feed from Cover Tray 1 first When Cover Tray 1 empties the 301 DFS will automatically begin feeding from Cover Tray 2 It will repeat the process of switching from the full to the...

Page 31: ...you cannot select it from the Control Panel of the 301 DFS You must insert a cassette containing covers into the Cover Tray before being able to select a Cover Tray The 301 DFS alerts you in several w...

Page 32: ...evel indicator lights on the Cover Tray will go out The 301 DFS will stop accepting copy sets but will continue processing the documents already in progress Perform the following in order to proceed w...

Page 33: ...ck button for the Cover Tray The amber Please Wait indicator light will go on to advise you that the Cover Tray is unlocking When the Cover Tray is unlocked the green Ready to Open indicator light wil...

Page 34: ...go on to advise you that the Cover Tray is locking When the Cover Tray is locked the red In Use indicator light will go on NOTE The Cover Tray will not close unless it contains a cassette NOTE If the...

Page 35: ...ntil it is available as a bound document in the Output Tray of the 301 DFS NOTE When the documents exit the 301 DFS you can handle them and browse through them You should not however allow them to lie...

Page 36: ...on using the Cover Trays Use this procedure when the 301 DFS is in off line mode and you wish to use the Cover Trays as the cover source 1 Select the correct cover supply from the Control Panel of the...

Page 37: ...sure that the pages are oriented in the correct way relative to the cover NOTE Follow the orientation labels on the Manual Feeder area of the 301 DFS NOTE Binding edge of set shall be facing downwards...

Page 38: ...a bound document in the Output Tray of the 301 DFS NOTE When the documents exit the 301 DFS you can handle them and browse through them You should not however test binding strength or allow them to li...

Page 39: ...l Panel of the 301 DFS 2 Insert the copy set into the document cover according to the page orientation step a or b a For portrait vertical page orientation insert the copy set so that the top page of...

Page 40: ...ownward into the Manual Feeder NOTE Follow the orientation labels on the Manual Feeder area of the 301 DFS 5 Press the Manual Start button on the Control Panel of the 301 DFS NOTE If you are binding m...

Page 41: ...the documents exit the 301 DFS you can handle them and browse through them You should not however test binding strength or allow them to lie open until the glue in the cover spine has cooled and reach...

Page 42: ...36 Making the documents...

Page 43: ...atures that you can customise or program to meet your specific needs These features are as follows Energy Saver Spine Width Units Display Attention Lamp Sound Tone Electronic Counter Security Code Sof...

Page 44: ...p located at the top of the Control Panel of the 301 DFS This lamp illuminates to alert you to certain conditions that require your attention The default for this feature is enabled Sound Tone This fe...

Page 45: ...ings for the desired features Entering the Customer Tools mode To enter the Customer Tools mode do the following 1 Simultaneously press and release the Energy Saver and Stop buttons when no documents...

Page 46: ...mer Tools feature The features display one at a time on the second line of the Cover Supply Contents Display Pressing the New Job button enables you to cycle through the features menu Energy Saver is...

Page 47: ...played NOTE You can select from 0 to 12 As you press the New Job button the hours increment by one until you reach 12 The cycle then begins again at 0 NOTE If 0 hours and 0 minutes are selected the ti...

Page 48: ...o select Units 4 Press the Manual Start button to display the desired Units measurement NOTE You can select metric or inch As you press the Manual Start button you will switch between the two choices...

Page 49: ...ngs and exit the Lamp and Tone feature 7 Do one of the following Press the New Job button until the next feature you want to change appears on the second line of the Cover Supply Contents Display Pres...

Page 50: ...w Security Code 4 Enter a new five button Security Code NOTE You can use any combination of the Language Reset Energy Saver Stop and New Job buttons You cannot use the Manual Start button 5 Press the...

Page 51: ...l Start button to accept Software Version NOTE The software version level of the Main Board EPROM and UI Board EPROM will appear in the Cover Supply Contents Display This information is read only 4 Pr...

Page 52: ...46 Customising your Bindomatic 301 DFS Notes...

Page 53: ...Chapter 5 Maintenance This chapter contains helpful hints for maintenance of your 301 DFS and for ordering supplies instructions for storing cover cassettes and information about cleaning your 301 DF...

Page 54: ...ver cassettes according to the directions provided in this chapter Ordering supplies The 301 DFS requires the use of specially designed Bindomatic covers The covers are contained in cassettes that hav...

Page 55: ...appearance of the covers and 301 DFS performance If you experience frequent misfeeds from the Cover Trays refer to chapter 6 Problem solving for problem resolution WARNING Be careful not to damage th...

Page 56: ...50 Maintenance Cleaning the 301 DFS Clean the surface of the 301 DFS with the same cleaning solution that you use on your host machine Use a non abrasive glass cleaner or water...

Page 57: ...rious problems that can occur during the operation of the 301 DFS It includes detailed procedures for resolving specific problems as well as a general problem solving table If you are unable to correc...

Page 58: ...experiences a jam the following events will occur The Attention Lamp if enabled will flash every 15 seconds The Sound Tone if enabled will beep every 15 seconds A red light will light on the Mimic Di...

Page 59: ...Problem solving 53 F2 F3 F4 F5 F6 F7 F8 F8 F1 F9...

Page 60: ...nformation refer to the Manual processing of sheets and covers removed during jam clearance section of this chapter WARNING Close the Set Collating Door as soon as you clear the jam If you leave the d...

Page 61: ...copy set and covers removed during jam clearance section of this chapter 6 Close the Operator Jam Clearance Handle WARNING Close the Left Front door as soon as you clear the jam If you leave the door...

Page 62: ...ey are undamaged store them with your other completed documents WARNING Close the Right Front door as soon as you clear the jam If you leave the door open too long any documents waiting in the Binder...

Page 63: ...during jam clearance section of this chapter WARNING Close the Right Front door as soon as you clear the jam If you leave the door open too long any documents waiting in the Binder Module area will ov...

Page 64: ...abels adjacent to the Manual Feeder area of the 301 DFS for the correct positioning of the copy set with cover 5 Select 1 2 None as the cover source from the Cover Supply section on the Control Panel...

Page 65: ...cument may not bind properly 1 Manually insert the sheet s into the bound document at the appropriate spot s Tamp the sheet s into place as neatly as you can 2 Open the Manual Feeder door 3 Insert the...

Page 66: ...th the host machine Check the Alignment Marking to ensure that it is in the correct position and that the 301 DFS is correctly aligned with the host machine Top sheets of copy sets and loose sheets ar...

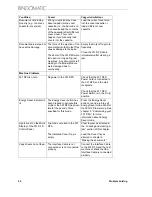
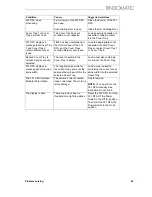
Page 67: ...e the cover is deformed Clear the jam as directed in the Locating and clearing a jam section of this chapter Load a cover cassette containing Bindomatic covers into the selected Cover Tray or insert a...

Page 68: ...Check that the 301 DFS Power Cord is connected to the 301 DFS and the wall receptacle Check that the 301 DFS Power Switch is in the On I position Energy Saver indicator is lit The Energy Saver button...

Page 69: ...ay is unlocked and cannot be selected The cover cassette in the Cover Tray is empty Load a cassette containing covers into the Cover Tray 301 DFS displays a message about required spine width The requ...

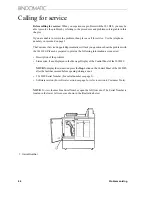
Page 70: ...DFS Please be prepared to provide the following information as requested Description of the problem Status code if any displayed in the Message Display of the Control Panel of the 301 DFS NOTE To disp...

Page 71: ...This chapter provides the product specifications and paper cover specifications for your 301 DFS It also includes the sheet capacities for the various spine widths a copy paper satisfaction guide and...

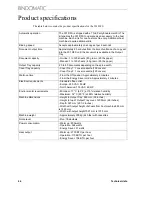
Page 72: ...e width Cover Tray capacity Cover Tray 1 1 cover cassette 150 covers Cover Tray 2 1 cover cassette 150 covers Warm up time From the Off position Approximately 2 minutes From the Energy Saver mode Appr...

Page 73: ...x 11 inch Paper weight 80 gsm 20 lb to 200 gsm 110 lb for tabs inserts and title sheets the tabs inserts and title sheets must be the same size as the sheets in the copy set 80 gsm 20 lb to 120 gsm 3...

Page 74: ...extremes of paper characteristics such as curl static temperature humidity and paper brand The capacities listed are minimums maximums for paper under normal conditions of 21 C and 50 RH Spine width N...

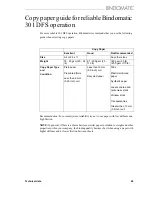
Page 75: ...nd other properties within your company the binding quality becomes best when using a paper with higher stiffness and or lower friction between sheets Copy Paper Excellent Good Not Recommended Size A4...

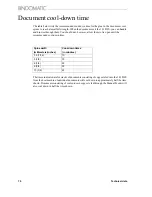
Page 76: ...w them to lie open until the recommended cool down time The times indicated are for stacks of documents consisting of copy sets fed into the 301 DFS from the host machine Individual documents will coo...

Page 77: ...ine Width Units Display 38 42 D Determining spine width 22 DFS10 location 5 Do nots 48 E Energy 39 I Identical covers 24 Inserting sheets 59 Interface Module 13 J Jam clear 52 54 locate 52 L Load a ca...

Page 78: ......

Page 79: ...73 Appendix A Safety information...

Page 80: ...chapter 7 Problem Solving Disconnect interface cable when removed from printer Electrical safety Do not use an extension cord Always connect the 301 DFS power cable directly into a properly grounded p...

Page 81: ...nance procedure that is not described in this Operator Manual or you have not been trained to do by an Bindomatic Service Representative Do not remove any covers or guards that are attached with screw...

Page 82: ...have been compiled to the best of our knowledge as a compact guide to safe handling of this product We reserve the right to revise safety data sheets as new information becomes available It is the use...

Page 83: ...Safety information 77...

Page 84: ...78 Safety information...

Reviews:

Related manuals for 301 DFS