7. Input & Communication
7.2
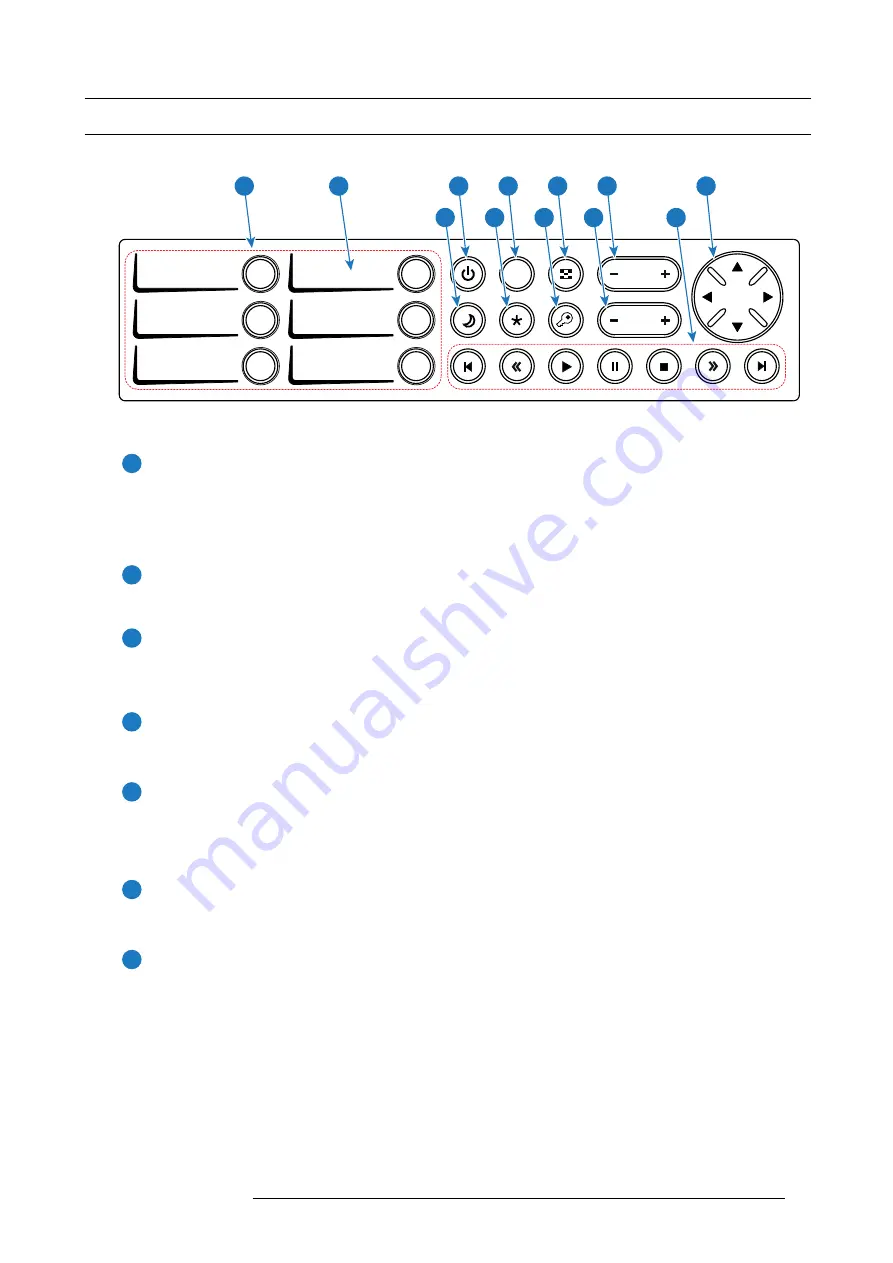
Local Keypad
Identi
fi
cation of the buttons
DOWSER
1 4
2 5
3 6
ZOOM
ZOOM
FOCUS
SHIFT
SHIFT
2
1
3
4
5
6
7
8
9
10
11
12
Image 7-2
Functionality of the buttons
1
Numeric buttons (No.1 - 6)
All the Numeric buttons (reference
1
image 7-2) of the Local Keypad have a blue backlight during normal operation. When
the authorization process is activated with the (security) Key button, the backlight color of the Numeric buttons changes to
yellow. Each button can be linked to a macro which allows you to setup the projector to your requirements with one push of
a button. The backlight color of the Numeric button is green if the macro associated with the Numeric key is activated. The
backlight color of the Numeric button is red in case one of the actions of the macro failed.
2
Marker area
Each Numeric button has a marker area (reference
2
image 7-2) where you can write down the name of the Macro.
3
Standby button
Standby button (reference
3
image 7-2) switches the lamp and lamp electronics immediately ON or OFF. The lamp cooling
fans remain active for about 5 minutes. The speed of the other fans is reduced. The backlight color of the Standby button
remains red in standby mode and changes to green in operation mode.
4
Dowser button
The Dowser button (reference
4
image 7-2) opens or closes the electronic dowser. The backlight color of the Dowser button
is green when the dowser is open and red when the dowser is closed.
5
Test Pattern button
The Test Pattern button (reference
5
image 7-2) gives direct access to a limited set of the internal test patterns of the
projector. This is a toggle button. To exit the Test Pattern mode toggle through all test patterns. Note that the convergence
test pattern is not included in this set. The backlight color of the Test Pattern button is red if one of the test patterns
is activated and green if none is activated.
6
Focus button
The Focus button (reference
6
image 7-2) allows you to focus the projected image on the screen. The backlight color of the
Focus button is red in case the end of range is reached.
7
Shift button
The Shift button (reference
7
image 7-2) allows you to shift the lens up/down or left/right. The backlight color of the
Shift button is red in case the end of range is reached.
R5905961 ZEUS 09/03/2015
43
Summary of Contents for ZEUS
Page 1: ...ZEUS Installation safety manual R5905961 00 09 03 2015 ...
Page 17: ...2 Safety PR Image 2 2 R5905961 ZEUS 09 03 2015 13 ...
Page 26: ...3 Getting started 22 R5905961 ZEUS 09 03 2015 ...
Page 44: ...6 Lenses Lens selection 40 R5905961 ZEUS 09 03 2015 ...
Page 84: ...10 Starting up 80 R5905961 ZEUS 09 03 2015 ...
Page 96: ...11 Scheimpflug 92 R5905961 ZEUS 09 03 2015 ...
Page 104: ...12 Convergence 100 R5905961 ZEUS 09 03 2015 ...
Page 128: ...13 Lamp House Lamp replacement 124 R5905961 ZEUS 09 03 2015 ...
Page 160: ...16 Removal and installation of the projector covers 156 R5905961 ZEUS 09 03 2015 ...
Page 176: ...18 Pin configurations 172 R5905961 ZEUS 09 03 2015 ...
Page 184: ...19 Environmental information 180 R5905961 ZEUS 09 03 2015 ...


