PAGE 45
W i n d o w s P C S o f t w a r e
5.5.3.2
Telephone book
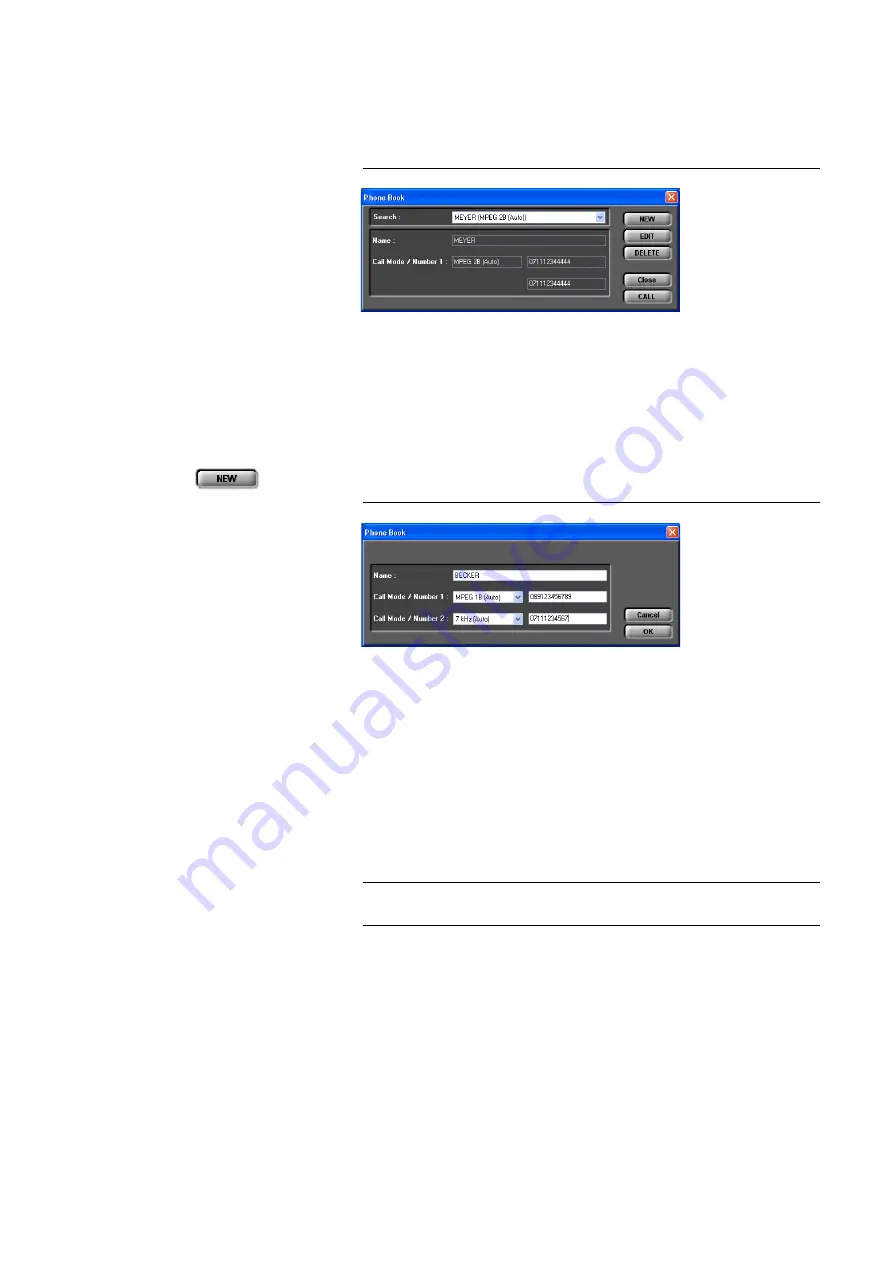
By pressing the telephone book button, the telephone book dialogue is
opened.
FIG. 19
TELEPHONE BOOK DIALOGUE
You can search an already existing entry via the die DropDown list
Search
or
you simply enter the first character of the name for which you want to search.
A search by calling numbers is not possible.
In the detailed view below, the
Name,
the
Call Mode
(transmission mode)
and the calling numbers (
Number 1/2
) are displayed.
A new entry can be created with
NEW
.
FIG. 20
NEW TELEPHONE BOOK ENTRY
Please enter the
Name
of the caller you want to add to the telephone book.
The length of the name is limited to 20 characters.
Under
Call Mode/Number 1
you need to select the transmission mode, which
is to be used when the entry is called and then enter the calling number.
If you select a 1 B transmission mode you can configure a second completely
independent connection for the second channel (
Call Mode/Number 2
). How-
ever, as transmission mode you can only select
Telephone
or
7 kHz (Auto)
.
In this way, you have the possibility to call two participants at the same time
via one telephone book entry.
For the entry field, all numeric characters ’
0’...’9’
as well as the characters ’
*
’
and
’#’
are allowed. The length of the calling number must
not exceed 20 cha-
racters
.
With a ’
-
’ placed in front of the calling number (e.g. „-123“) you can suppress
the prefix number for getting an outside line temporarily (see also Page 55,
Prefix Number).
TIP
You can copy a calling number with <
CTRL
>+<
c
> and paste it with
<
CTRL
>+<
v
>.
Summary of Contents for MAGIC AC1
Page 1: ...MAGIC DC7 Dual 7 kHz Audio Codec MAGIC AC1 ISDN Audio Codec Hardware Software Manual ...
Page 2: ... ...
Page 4: ......
Page 6: ... ...
Page 16: ...PAGE 16 C o n s t r u c t i o n ...
Page 106: ...PAGE 106 W i n d o w s P C S o f t w a r e ...
Page 114: ...PAGE 114 O p t i o n M A G I C D C 7 A C 1 K e y p a d ...
Page 116: ...PAGE 116 O p t i o n M i x e r T o o l P l u g I n ...
Page 122: ...PAGE 122 O p t i o n R e m o t e C o n t r o l S o f t w a r e FIG 82 S0 MONITOR LAYER 3 ...
Page 128: ...PAGE 128 M e n u S t r u c t u r e A1 1 System Settings RS232 see next page ...
Page 129: ...PAGE 129 M e n u S t r u c t u r e Continuation System Settings Headset see previous page ...
Page 130: ...PAGE 130 M e n u S t r u c t u r e A1 2 Operation Settings Enc follows Dec see next page ...
Page 132: ...PAGE 132 M e n u S t r u c t u r e A1 3 Presets ...
Page 133: ...PAGE 133 M e n u S t r u c t u r e A1 4 Status Information ...
Page 134: ...PAGE 134 M e n u S t r u c t u r e A1 5 Login ...
Page 135: ...PAGE 135 M e n u S t r u c t u r e A1 6 Names ...
Page 136: ...PAGE 136 M e n u S t r u c t u r e ...
Page 147: ...PAGE 147 T e c h n i c a l D a t a A 6 T E C H N I C A L D A T A M A G I C D C 7 A C 1 ...
Page 154: ...PAGE 154 S e r v i c e I n f o r m a t i o n ...
Page 160: ...PAGE 160 I n d e x ...
Page 162: ...SEITE 162 ...


