Rewinder
146
QL-800 User Guide
Installing the Rewinder
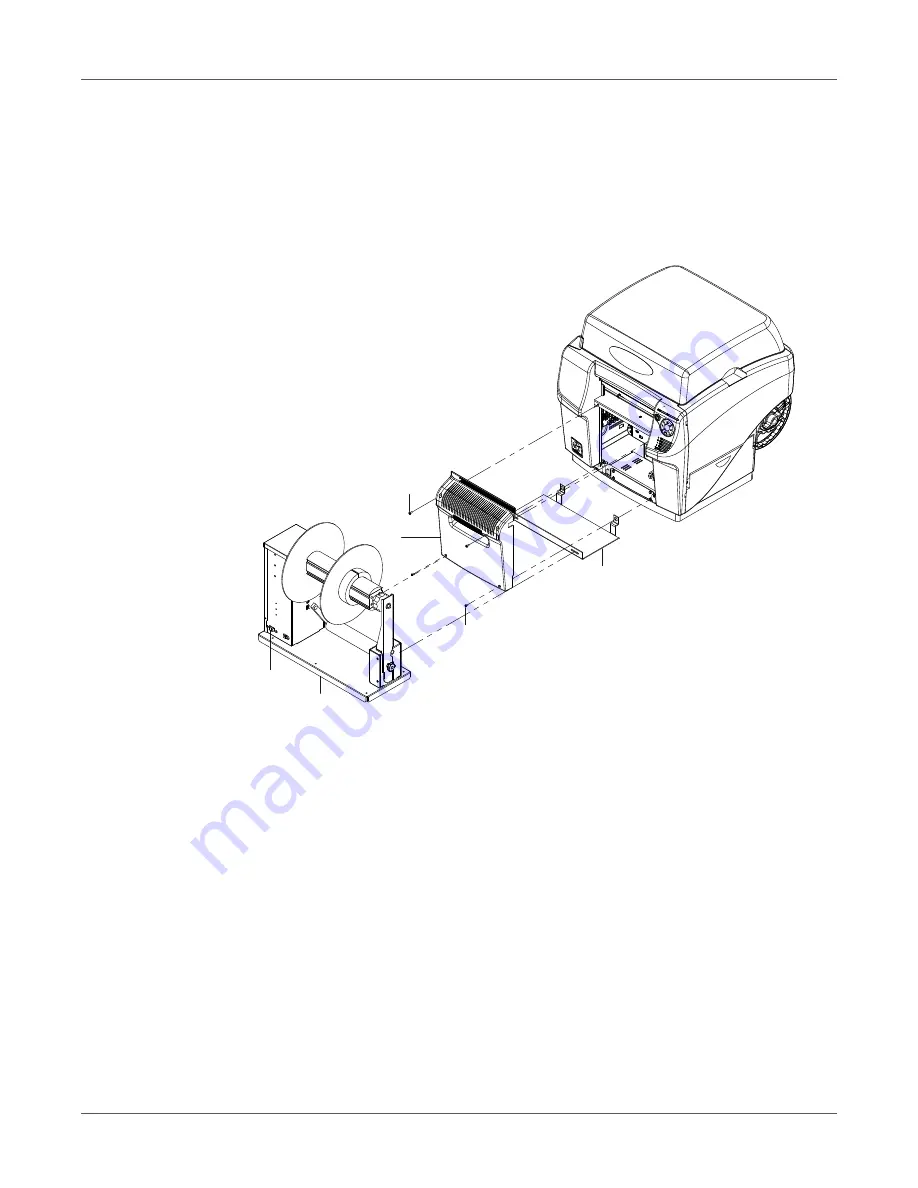
Use the following instructions to install the rewinder. Refer to the following illustration during this
process.
Note:
These instructions assume you are using the rewinder accessory only. If you are also
using the unwinder accessory, the installation procedure will differ.
when using the External Unwinder” on page 147.
1
Ensure the power switch [6] on the rewinder is in the off position.
2
Power off the printer. On the rear of the printer, turn the power inlet switch off.
3
Disconnect the accessory cover [1] by removing the two upper [2] and two lower [3] screws.
Note:
The upper and lower screws are different sizes. Keep these screws separated to
ensure correct installation later in the procedure.
4
Orient the rewinder bracket [4] as illustrated. Insert the tabs from the bracket into the printer
and align them with the lower accessory cover mounting bosses.
5
Reinstall the accessory cover [1] using the two upper [2] and two lower [3] screws. The
lower screws will capture and secure the tabs from the rewinder bracket [4].
6
Remove the two thumb screws from the rewinder [5].
7
Align the rewinder [5] with the rewinder bracket [4]. Ensure the thumb screw mounting
locations align with the slotted holes on the bracket.
[1]
[2]
[3]
[4]
[5]
[6]
Summary of Contents for QuickLabel QL800
Page 1: ...QL 800 User Guide ...
Page 2: ......
Page 38: ...Getting Started 38 QL 800 User Guide ...
Page 84: ...QL 800 Maintenance Utility 84 QL 800 User Guide ...
Page 96: ...Printer Maintenance 96 QL 800 User Guide ...
Page 128: ...Error Messages 128 QL 800 User Guide ...
Page 150: ...Rewinder 150 QL 800 User Guide ...
Page 158: ...Shipping Precautions 158 QL 800 User Guide ...
Page 168: ...Specifications 168 QL 800 User Guide ...
Page 172: ...Index 172 QL 800 User Guide ...


