background image

15.2.1.


Setting Example ................................................................................................................... 27


15.3.


 id

 setting ................................................................................................................................... 27


15.4.


pa55wd

 setting ............................................................................................................................. 27


15.5.


Restoring Function Tables to Factory Default .............................................................................. 28


15.6.


Parameter List .............................................................................................................................. 29


16.


Communication ................................................................................................................................. 33


16.1.


USB interface ............................................................................................................................... 33


16.2.


Data Format ................................................................................................................................. 35


17.


Options ............................................................................................................................................... 41


17.1.


Option list ..................................................................................................................................... 41


18.


ID Number and GMP, GLP ................................................................................................................. 42


18.1.


ID Number Setting Procedure ...................................................................................................... 42


18.2.


  GMP, GLP Report....................................................................................................................... 43


19.


Password Lock Function .................................................................................................................. 47


19.1.


Setting Procedure ........................................................................................................................ 47


19.2.


To change the function table after setting 

lock 1 

or

 2

 .............................................................. 48


19.2.1.


To change the function table in 

admin

 ................................................................................. 48


19.2.2.


To change the function table in

 gUe5t

 ................................................................................ 49


19.2.3.


Parameter list that can be changed in

 gue5t

...................................................................... 49


19.2.4.


If you forget the password .................................................................................................... 50


20.


Maintenance ....................................................................................................................................... 51


20.1.


Repair........................................................................................................................................... 51


20.2.


Check Points Before Calling Maintenance Service ..................................................................... 51


20.3.


Error code table ........................................................................................................................... 52


21.


Specifications .................................................................................................................................... 53


21.1.


Specifications list ......................................................................................................................... 53


21.2.


Dimensions .................................................................................................................................. 54


Gravity Acceleration Map ........................................................................................................................ 55


Summary of Contents for FG-150KCLWP

Page 1: ...FG CWP Series Waterproof Digital Platform Scale FG 30KCMWP FG 60KCLWP FG 150KCLWP 1WMPD4004367 ...

Page 2: ...cribed or translated into any language in any form by any means without the written permission of A D Company Ltd The contents of this manual and the specifications of the instrument covered by this manual are subject to change for improvement without notice Windows Word and Excel are registered trademarks of the Microsoft Corporation WARNING A potentially hazardous situation which if not avoided ...

Page 3: ...wer On and Off 12 8 1 1 Mobile Battery 13 8 2 Basic Operation 13 8 3 Readability 14 9 Counting Function 14 10 Comparator Function 15 10 1 How to Operate 16 10 2 Selecting the Memory Number 16 10 3 Confirming the HI LO Value 17 10 4 HI LO value setting 18 11 Display Hold Function 19 12 Impact Shock Detection Function ISD 19 13 Auto Tare Function 20 14 Sensitivity Adjustment 21 14 1 Sensitivity adju...

Page 4: ...port 43 19 Password Lock Function 47 19 1 Setting Procedure 47 19 2 To change the function table after setting lock 1 or 2 48 19 2 1 To change the function table in admin 48 19 2 2 To change the function table in gUe5t 49 19 2 3 Parameter list that can be changed in gue5t 49 19 2 4 If you forget the password 50 20 Maintenance 51 20 1 Repair 51 20 2 Check Points Before Calling Maintenance Service 5...

Page 5: ...it is operated in a residential area it might cause some interference and under these circumstances the user would be required to take at their own expense whatever measures are necessary to eliminate the interference FCC Federal Communications Commission in the U S A 1 2 Classification of Protection Provided by Enclosures This equipment complies with the IP Code IEC 60529 The meaning of the IP67 ...

Page 6: ...im light The AC adapter or a mobile battery can be used to supply power Weighing data can be transmitted to a PC using a USB cable the FG 27CWP option To communicate using FG 27CWP AD 8541 PC is required separately 9 Counting Function determines the number of objects based on the mass value total weight when each item has the same mass value 10 Comparator Function compares the displayed value meas...

Page 7: ...ating materials are apt to be charged with static electricity due to friction etc Unstable AC power supply may cause malfunctions Remove the protective film from the weighing pan before use Sensitivity adjustment should be performed for more accurate weighing when the scale is first installed or when it is moved far Refer to 14 Sensitivity adjustment for details 4 2 Precautions for Weighing Do not...

Page 8: ...k Start Guide FG 30KCMWP FG 60KCLWP FG 150KCLWP 6 Part Names AC Adapter Weighing Pan SUS304 Display Unit SUS304 USB Cable Approx 3m USB Plug Base Unit SUS304 Load Cell Cable Rear of Display Unit Leveling Feet Rating Label Serial Number Pole SUS304 Display unit knob ...

Page 9: ...ighing Weighing Units kg g pcs oz and lb is lit Note g is only used with the FG 30KCMWP This is lit when the display is held This is a function to detect impact to the mass sensor section and to display the impact level Lights up when successfully connected to the optional FG 27CWP Bluetooth communication interface While the comparator function is being used the weighed value is compared using the...

Page 10: ...ity sets the zero point there and the zero point indicator is lit when zero is displayed If tare function is in use the net is deleted Tare function Pressing the TARE key when the weighed value is a stable positive value subtracts the weight of the item on the weighing pan as the weight of the container tare weight The displayed value becomes zero value and both the zero point indicator and net in...

Page 11: ...Put the weighing pan on the base unit 7 2 Installation 1 Decide where to install the scale by considering the descriptions of 4 1 Precautions for Installing the Scale 2 Level the base unit by adjusting the four leveling feet of the base unit so that the bubble of the spirit level is centered 3 Follow the procedure below to change the display unit angle 1 Turn the two knobs display unit knobs on th...

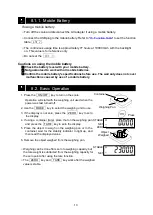
Page 12: ... 2 Pressing the ON OFF key turns on the display All indications are lit and the scale waits for the weighed value to stabilize p is displayed when the display is turned on with an object placed on the weighing pan that exceeds the working range of power on zero or when the weighed value is not stable Refer to 20 2 Check Points Before Calling Maintenance Service Automatic Power On Function The scal...

Page 13: ...ss the ON OFF key to turn on the scale Operation will start with the weighing unit used when the power was last turned off 2 Use the MODE key to select the weighing unit to use 3 If the display is not zero press the ZERO key to zero the display 4 If using a container tare place that on the weighing pan and press the TARE1 key to zero the display 5 Place the object to weigh on the weighing pan or i...

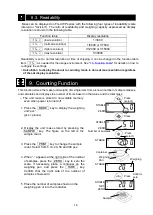
Page 14: ...unction stores the mass unit weight of a single item from a known number of sample masses and calculates and displays the number of items based on that value and the total mass The unit mass is stored in non volatile memory even when power is turned off 1 Press the MODE key to display the weighing unit pcs pcs pieces 2 Display the unit mass stored by pressing the SAMPLE key The figure on the left ...

Page 15: ...ositive value OK LO limit value Displayed value HI limit value LO Displayed value LO limit value Or when negative value Select the comparison condition in function table item Cp Refer to 15 Function Table Function table Content Cp 0 No comparison comparator function unavailable Cp 1 All weighed values are compared regardless of stability Cp 2 All stable weighed values are compared Cp 3 Weighed val...

Page 16: ...lay the selected memory number 0 9 3 Each time the PRINT key is pressed the memory number display will be switched The currently selected memory number is indicated by the mark being lit 10 2 Selecting the Memory Number 1 Press and hold the SAMPLE key while in mass display to enter comparator setting mode and push the PRINT key to change the memory number display 2 Press the TARE key to change the...

Page 17: ...O is lit and the lower limit value of the memory number selected is displayed 3 Press the MODE key HI is lit and the upper limit value of the memory number selected is displayed 4 To return to the memory number display press the MODE key 5 To return to weighing mode press the TARE key Start comparing using the memory number displayed at this time Press Press Press STABLE ZERO Press HI OK LO HI OK ...

Page 18: ...etting 4 Press the TARE key to display end HI is lit and the upper limit value blinks 5 Change the upper limit value in the same way you adjusted the lower limit 6 Press the TARE key to display end and return to the memory number display 7 Press the TARE key to return to weighing mode after end is displayed Start comparing using the memory number displayed at this time key Content Moves the blinki...

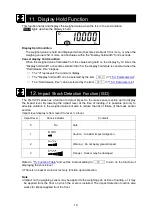
Page 19: ... 3 Parameter List 12 Impact Shock Detection Function ISD The FG CWP series has a function to detect impact to the mass sensor section and to display the impact level By lowering the impact level at the time of loading it is possible not only to alleviate variation in the weighed value but also to reduce the risk of failure of the mass sensor section Impact level display is from level 0 to level 3 ...

Page 20: ... check weighing Cp p 1 This is a method of comparing against negative mass values After a container with objects in it is placed on the weighing pan and tared take objects away while staying in the OK range to compare masses The same operation is also possible in the ordinary method of comparing but comparison results start from HI changing from HI to OK to LO as more objects are taken away With t...

Page 21: ...vity adjustment mode as shown below Method 1 using operation keys 1 Confirm that the scale is in weighing mode display shows kg g or pcs 2 Press and hold the TARE key for 4 sec or longer Release the key when Cal is displayed Then go to 14 2 Sensitivity Adjustment Using a Weight 14 3 Correcting for Gravitational Acceleration or 14 4 Restoring Sensitivity Adjustment Value to Factory Default Method 2...

Page 22: ...o end sensitivity adjustment mode press the ZERO key or CAL switch This will return you to weighing mode Press or Weighing mode Correcting for gravitational acceleration Sensitivity adjustment using a weight Restoring sensitivity adjustment value to factory default Press Press Press Press Press Press In sensitivity adjustment mode transition method Weighing mode Method 1 Press and hold Method 2 Pr...

Page 23: ...on the scale and display the value for the weight The value for the weight is the same as the weighing capacity Initial state To adjust just the zero point turn off the scale to end without performing step 5 5 To adjust with a weight value different than the weighing capacity change the value with the keys below A weight equivalent to the weighing capacity of the scale is ordinarily used If using ...

Page 24: ...y the gravitational acceleration parameter ex G9 7985 3 Press the TARE key to enter gravitational acceleration setting mode 4 To change the gravitational acceleration parameter displayed use the keys below 5 Press the TARE key to display end and save the parameter 6 To adjust using a weight return to step 2 of 14 2 Sensitivity Adjustment Using a Weight To end setting press the ZERO key or CAL swit...

Page 25: ...ou enter sensitivity adjustment mode 2 Press the MODE key two times to display ClrC 3 Press the TARE key to display ClrC no no blinks 4 Press the PRINT key to switch to ClrC go go blinks To cancel the operation press the ZERO key You will be returned to the status in step 2 5 If ClrC go is displayed press the TARE key to restore to factory default and display end To end setting press the ZERO key ...

Page 26: ... select the desired class 15 2 func setting Use the class func to determine detailed functions for weighing communication etc 1 Press the MODE key to display the class func and then press the TARE key 2 The first item is displayed Refer to the table below to change items or set details See 15 3 Parameter list for items 3 Press the TARE key to save the setting end is displayed followed by the class...

Page 27: ...5o 0 is displayed 6 Press the TARE key to save the setting end and is displayed followed by the class id To exit without saving the setting press the ZERO key id is displayed 15 3 id setting The class id is used to set the ID number required at GLP output See 18 ID Number and GMP GLP for the detailed setting procedure 15 4 pa55wd setting The class pa55wd is used to set administrator mode See 19 Pa...

Page 28: ... switch to Clrf go go blinks 4 If Clrf go is displayed press the TARE key to restore the function tables to factory default end is shown and the display turns off automatically To cancel the operation press the ZERO key The display turns off automatically In addition to the function tables the unit mass of the counting function and the limit values of the comparator function are also restored to t...

Page 29: ...tability factory settings d readability scale interval or division Automatic power off When the specified interval has passed while the display is zero the display is stable and there is no key operation the display turns off Display resolution Changes the value for readability d Resolution Readability Weighing capacity Stability band width When the weighed value is within a certain width stabilit...

Page 30: ...it length parity btpr 0 7 bit even parity 1 7 bit odd parity 2 8 bit non parity Serial interface Output mode prt 0 Key mode 1 Auto print mode A Reference zero point 2 Auto print mode B Reference last stable value 3 Stream mode 4 Key mode B Immediately 5 Command mode only 6 When comparator result is OK in Auto print mode A Reference zero point 7 When comparator result is OK in Auto print mode B Ref...

Page 31: ...ary comparison Negative comparison Cp p 0 Ordinary comparison 1 Negative comparison Comparator comparison results Cp r 0 OFF 1 ON Auto tare function at 0 OFF 1 ON Auto tare condition at t 0 0 0 seconds 1 0 5 seconds 2 1 0 seconds 3 1 5 seconds 4 2 0 seconds 5 2 5 seconds 6 3 0 seconds 7 4 0 seconds 8 5 0 seconds 9 6 0 seconds Tare initial load at f 0 OFF 1 ON Display hold width Hold 0 Display hold...

Page 32: ...ock function lock 0 OFF 1 ON 2 ON key restriction Only ZERO and TARE keys can be operated during weighing Password registration pa55no Administrator password input factory settings d readability scale interval or division Password lock function This function requires the administrator password registered in Password registration in order to make changes to the function tables If you do not require...

Page 33: ...tion software WinCT s RsCom etc 4 Connect the PC and scale via the USB cable 5 Example Press the scale s PRINT key to enable the PC to receive weighed values Details on how to use and examples Installing the USB driver set on PC as COM port 1 Open the A D website https www aandd jp and then open the Products Weighing Scales and Platform scales pages in that order Next open the FG CWP Series page C...

Page 34: ...ion 1 Connect the PC and scale via the USB cable 2 Turn on the scale and enter weighing mode 3 Click the Start button of RsCOM of WinCT Transmission and receiving of data is enabled 4 Press the scale s PRINT key to output weighed values from the scale and receive them via RsCom Note The method for outputting weighed values can be changed in the scale s function tables Transmission form Bidirection...

Page 35: ...ts of nine characters including the polarity and decimal point There are three types of units as shown below _ k g Mass data kg _ _ g Mass data g _ P C Counting data pcs As a terminator CRLF is always output CR 0Dh LF 0Ah Output data example Weighing data kg S T 0 0 1 2 3 4 5 _ k g CR LF Weighing data g S T 0 0 0 0 1 2 3 4 _ _ g CR LF Counting data pcs Q T 0 0 0 1 2 3 4 5 _ P C CR LF Data unstable...

Page 36: ...de Set to function table prt 3 Regardless of the presence or absence of the stable value mark weighed value will be output Key mode B Set to function table prt 4 Regardless of the presence or absence of the stable value mark when the PRINT key is pressed the weighed value will be output once At that time the displayed weighied value will blink once to indicate that it has been output Auto print A ...

Page 37: ...e LO limit for the memory number in use CN Set Comparator memory switching the memory in use HI Outputs the HI limit value for the memory number in use LO Outputs the LO limit value for the memory number in use CN Comparator memory recall recalling the memory in use Command example _ indicates a space 20h To request data be output immediately Command Q CR LF Response S T 0 0 1 2 3 4 5 _ k g CR LF ...

Page 38: ...t contain or decimal point Command H I 0 0 0 5 0 0 CR LF Response AK CR LF To set the LO limit value no response if erCd 0 Sends a six digit number that does not contain or decimal point Command L O 0 0 0 2 0 0 CR LF Response AK CR LF To set the comparator memory no response if erCd 0 Command C N X X CR LF XX is memory number 00 09 Response AK CR LF To output the HI limit value Command H I CR LF R...

Page 39: ...abet characters are input instead of values Check the command EC E07 Setting value error The received data exceeds the range of values that the scale can accept Check the parameter values range of the command The following is an example for function table erCd 2 Echo Back Response To zero the weighed value when it is stable no response if erCd 0 Command Z CR LF Response Z CR LF When zeroing operat...

Page 40: ...esponse C N X X CR LF To output the HI limit value Command H I CR LF Response H I 0 0 0 5 0 0 CR LF To output the LO limit value Command L O CR LF Response L O 0 0 0 2 0 0 CR LF To recall the comparator memory Command C N Response C N X X CR LF XX is memory number 00 09 The scale is not in a state where a command could be executed Then the scale will reply I Command Z CR LF Response I CR LF The sc...

Page 41: ...tion List See the optional instruction manual for details Option name Contennts FG 27CWP Bluetooth communication interface AD 8541 PC Bluetooth dongle for PC connection AD 8931 Bluetooth External Display AX TB301 AC adapter ...

Page 42: ... 1 With the display turned off while pressing and holding the TARE key press the ON OFF key to turn the display on and display the class func Use the MODE key to select the class id and then press the TARE key 2 Refer to the table below to change items or set details 3 Press the TARE key to store the setting pa55wd appears after end To cancel the restoring procedure press the ZERO key Display Char...

Page 43: ...e GMP GLP report to a personal computer select the function setting info 2 info 1 DATE and TIME are PC date and time info 2 DATE and TIME are blank handwritten Sensitivity adjustment Report 1 Perform sensitivity adjustment according to 14 2 Sensitivity Adjustment Using a Weight 2 end appears when calibration is complete 3 gmp appears and the calibration report is output 4 Cal appears again Remove ...

Page 44: ... the value using the following keys 4 With nothing on the weighing pan press the TARE key The zero point is measured and the weighed value is displayed in kg for a few seconds Then the value of the weight is displayed 5 Place a weight of the displayed value on the weighing pan and press the TARE key to measure it The weight value is displayed in kg for a few seconds 6 end appears 7 gmp appears and...

Page 45: ...LF CRLF CRLF CRLF Format info 1 Format info 2 Space ASCII 20h CR Carriage return ASCII 0Dh LF Line feed ASCII 0Ah Output of Title block and End block When weighed values are recorded as the GMP GLP report Title Block and End Block are added at the beginning and at the end of the group Title Block 1 In weighing mode press and hold the PRINT key until 55tart appears and then release the key The scal...

Page 46: ...F 1 7 1 5 3 9 CRLF CRLF CRLF S T 0 0 0 1 0 0 5 k g CRLF S T 0 0 0 2 0 1 0 k g CRLF S T 0 0 0 3 0 1 5 k g CRLF S T 0 0 0 4 0 2 0 k g CRLF CRLF E N D CRLF 1 7 1 5 5 8 CRLF CRLF S I G N A T U R E CRLF CRLF CRLF CRLF CRLF CRLF End Block 3 Press and hold the PRINT key until recend appears and then release the key The scale outputs the End Block 4 The scale automatically returns to weighing mode Format ...

Page 47: ...hing pa55no Register a password 19 1 Setting Procedure 1 With the display turned off while pressing and holding the TARE key press the ON OFF key to turn the display on and display the class func Press the MODE key to select the class pa55wd and then press the TARE key 2 pa55wd appears Refer to the table above to change items or setting details To change the password only select the setting item p...

Page 48: ...ions gUe5t The set password is not required to change the function table but the parameters that can be changed in the function table are limited 19 2 1 To Changing the Function Table in admin 1 Select admin and press the TARE key to display pa55wd 2 After about 2 seconds the password input screen appears Refer to the table below to set the password and press the TARE key If the password is correc...

Page 49: ...s off after 60 minutes Automatic power on function p on 0 OFF 1 ON The scale turns on automatically if the power plug is connected Zero tracking function trc 0 OFF 1 ON Backlight control l it 0 Always turned off 1 Always lit 2 Brightness decreases at 1 minute after stabilizing 3 Brightness decreases at 5 minutes after stabilizing 4 Brightness decreases at 30 minutes after stabilizing 5 Brightness ...

Page 50: ...2 Compare all stable data 3 Compare data except that at 4d to 4d 4 Compare stable data except that at 4d to 4d 5 Compare all data at 5d and above 6 Compare stable data at 5d and above Comparator ordinary comparison Negative comparison Cp p 0 Ordinary comparison 1 Negative comparison Impact Shock Detection i5d 0 OFF 1 ON factory settings d readability scale interval or division 19 2 4 Forgotten Pas...

Page 51: ...e Is the main power cord properly connected The scale does not display zero at first Check around the weighing pan Is there anything on the weighing pan Refer to 14 Sensitivity Adjustment and perform zero point sensitivity adjustment e is displayed Weighing error that meaning Over loaded lo ut is displayed Indicates that the sample weight is too light to set the unit weight in counting mode Cal e ...

Page 52: ...yed try turning the display off and on again Display Content error 0 is displayed The temperature sensor has failed error 3 is displayed The memory circuit has failed error 4 is displayed The internal circuitry has failed error 5 is displayed The mass sensor has failed ...

Page 53: ...0 0002 0 0005 Repeatability Standard Deviation kg 0 005 0 01 0 02 Linearity kg 0 01 0 02 0 05 Stabilization time good environment 20kg Approx 1 0 sec Factory setting Approx 0 8 sec Cond 0 setting Temperature Drift 20 ppm C typ 5 C to 35 C Display 7 segment LCD with backlight Character height 30 mm Display update Approx 10 times second Dust and water protection Complying with IP67 Operating Consiti...

Page 54: ...54 500 30 132 784 410 55 45 180 21 2 Dimensions FG 30KCMWP FG 60KCLWP FG 150KCLWP 300 220 30 240 155 380 55 122 784 300 40 175 30 370 30 280 240 155 ...

Page 55: ...m s2 Ottawa Paris 9 807 m s2 9 810 m s2 Copenhagen 9 816 m s2 Rio de Janeiro 9 788 m s2 Cyprus 9 797 m s2 Rome 9 803 m s2 Frankfurt 9 811 m s2 San Francisco 9 800 m s2 Glasgow Havana 9 816 m s2 9 788 m s2 Singapore Stockholm 9 780 m s2 9 819 m s2 Helsinki 9 819 m s2 Sydney 9 796 m s2 Jakarta 9 781 m s2 Taichung 9 789 m s2 Kolkata Calcutta 9 788 m s2 Taipei 9 790 m s2 Kuwait Lisbon London Greenwich...

Page 56: ...u Seoul 07331 Korea 전화 82 2 780 4101 팩스 82 2 782 4264 OOO A D RUS OOO ЭЙ энд ДИ РУС Почтовый адрес 121357 Российская Федерация г Москва ул Верейская дом 17 Юридический адрес 117545 Российская Федерация г Москва ул Дорожная д 3 корп 6 комн 8б 121357 Russian Federation Moscow Vereyskaya Street 17 тел 7 495 937 33 44 факс 7 495 937 55 66 A D Instruments India Private Limited 509 Udyog Vihar Phase Gur...

Reviews: