MRO 3 & 4 MANUAL
15
98-0140
Rev. F
“twist lock” high voltage polarized receptacle that has been installed by a qualified
electrician.
For 3 phase applications, the 3-wire connections must be verified to give the
correct rotation on the MRO pump. If not, specified pressure cannot be
obtained, and the pump will quickly overheat.
12. Turn on the potable water supply to the MRO. Allow the membranes to completely fill with
water. This will protect the unit from a hard start.
13. Turn on the MRO by pressing the POWER key, and allow it to run making sure the water
is properly flowing out the Reject and Product hoses.
14. Turn the REJECT FLOW CONTROL KNOB located at the bottom of the Reject Flow
meter counter-clockwise to allow the MROZ to run in full-flow Reject flush for about 15
minutes.
15. After 15 minutes, turn the REJECT FLOW CONTROL KNOB clockwise so that the Reject
flow is approximately equal to the Product water flow. Allow the product water to flow to
drain for 2 hours to ensure that all preservative is rinsed out of the system. Check for
leaks during this time.
NOTE: The MRO conductivity alarm may sound, which is normal when the MRO is in
FLUSH. Press the ALARM SILENCE key on the MRO controller to silence the
alarm. The alarm will restart after a 3 minute delay.
16. The conductivity value, after flushing and being put back into the service mode, must be
within the acceptable limit.
17. After a thorough flushing of the preservative, the MRO must be disinfected prior to being
put into service for dialysis use.
(See Disinfecting The System, Section 5).
18. When all disinfection procedures have been completed, turn on the feed water supply.
19. Press the POWER key (the display will show OPERATING after a 10 second delay).
NOTE:
The conductivity may alarm for a few seconds before dropping into the desired range.
20. Refer to the Start-Up Log Section 4.5. Complete the entire MRO Performance section;
making sure that the system is operating within all the required ranges.
WARNING:
Do not use the MRO to feed a dialysis machine until all specifications are
met.
21. When the log shows that all start-up conditions are met, the system is now ready for use.
Press the POWER key (the display will show STANDBY). Connect the PRODUCT
WATER FOR DIALYSIS HOSE to the Direct Feed Loop or Storage Tank inlet.
(Be sure
to connect the Product Water for Dialysis hose aseptically).
Summary of Contents for MRO3
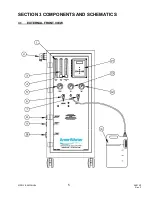
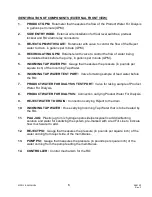
Page 8: ...MRO 3 4 MANUAL 5 98 0140 Rev F SECTION 3 COMPONENTS AND SCHEMATICS 3 1 EXTERNAL FRONT VIEW...
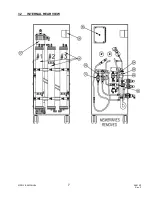
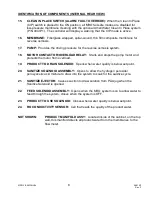
Page 10: ...MRO 3 4 MANUAL 7 98 0140 Rev F 3 2 INTERNAL REAR VIEW...
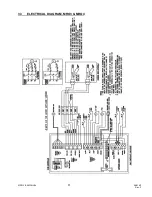
Page 12: ...MRO 3 4 MANUAL 9 98 0140 Rev F 3 3 ELECTRICAL DIAGRAM MRO3 MRO4...
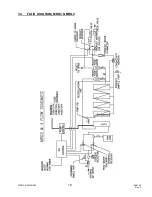
Page 13: ...MRO 3 4 MANUAL 10 98 0140 Rev F 3 4 FLUID DIAGRAM MRO3 MRO4...
Page 34: ...MRO 3 4 MANUAL 31 98 0140 Rev F FIGURE 6 2...
Page 35: ...MRO 3 4 MANUAL 32 98 0140 Rev F FIGURE 6 3...
Page 52: ...MRO 3 4 MANUAL 49 98 0140 Rev F SECTION 11 MRO3 4 SPARE PARTS LISTING...

