background image


158 


Snapshot  

This checkbox allows the user to enable the system to take a snapshot when a 
motion detection alarm is triggered. Multiple cameras can be specified to perform 
a tour.  

Alarm out  

This checkbox allows the user to enable the system to upload alarm information 
when a motion detection alarm is triggered.  

Buzzer  

This checkbox allows the user to enable the system to activate a buzzer when a 
motion detection alarm is triggered.  

Show message   This checkbox allows the user to enable the system to show an on-screen message 

when a motion detection alarm is triggered.  

  
To copy settings to another channel, click the Copy button. To confirm settings, click the Save button. To refresh 

the page, click the Refresh button. To revert to default settings, click the Default button.   

5.4.3.1.2 Video Loss  

  
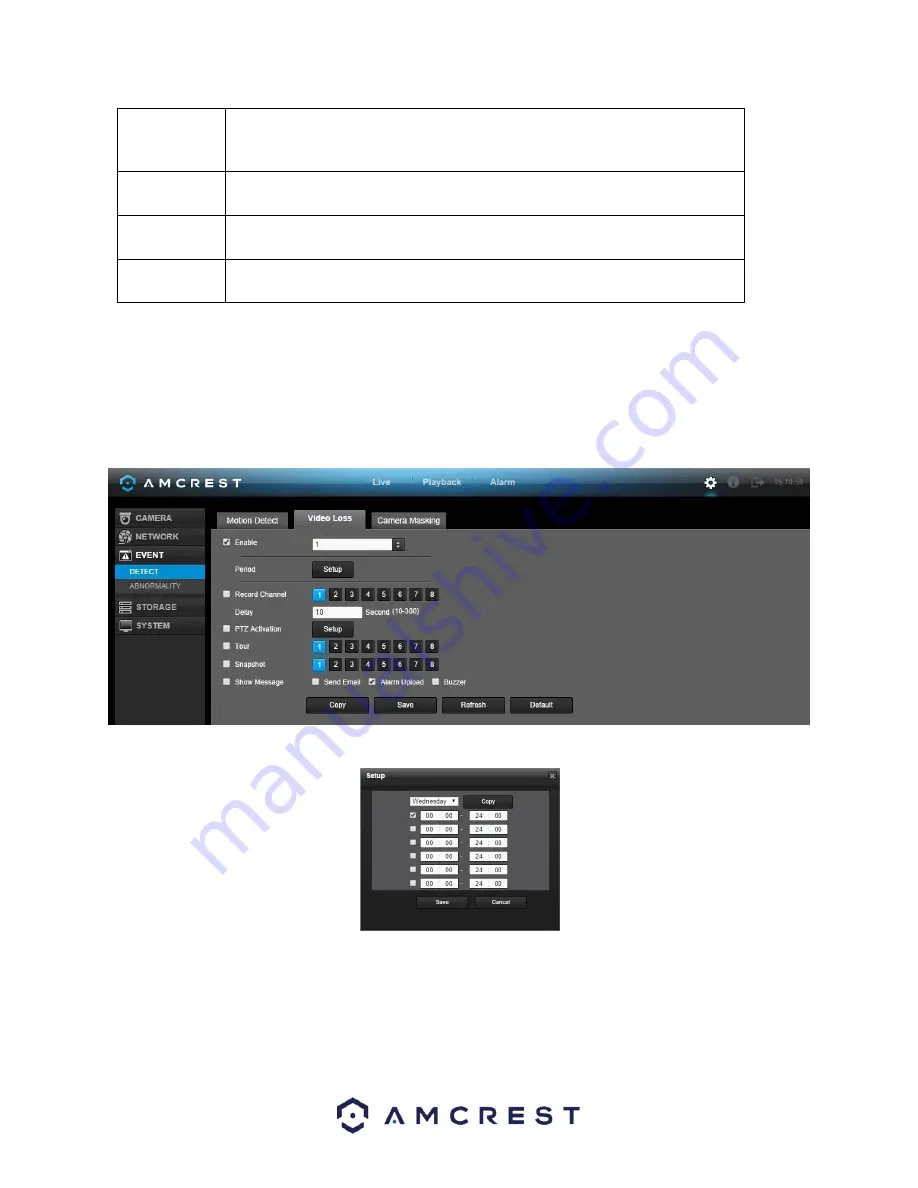
 The video loss settings screen is where the DVR can be setup to notify the user any time there is video loss on any 

of the channels. Below is a screenshot of the video loss settings screen:   


Below is a screenshot of the period setup screen:  


Below is a screenshot of the PTZ Activation screen:  

Summary of Contents for AMDVTENL8

Page 1: ...1 Amcrest 1080p Lite AMDVTENL8 DVR User Manual...

Page 2: ...formation 20 3 3 1 Power Supply Connection 20 3 3 2 Video Input Output Connections 20 3 3 2 1 Video Input Connection Information 20 3 3 2 2 Video Output Connection Information 21 3 3 3 Audio Input Out...

Page 3: ...4 2 2 Tour 43 4 4 2 3 Pattern 44 4 4 2 4 Border 44 4 4 2 5 Rotate 44 4 4 2 6 Flip 45 4 4 2 7 Reset 45 4 4 2 8 Aux On Off 45 4 4 3 Color Settings 45 4 4 4 Search 47 4 4 5 Manual Recording 47 4 5 Navig...

Page 4: ...ork 63 4 9 3 1 Online Users 63 4 9 3 2 Network Load 65 4 9 3 3 Network Test 65 4 9 4 Log 67 4 10 Main Menu Settings 68 4 10 1 Camera 68 4 10 1 1 Image Settings 68 4 10 1 2 Encode 69 4 10 1 3 Channel N...

Page 5: ...3 Record 123 4 10 5 4 HDD Detect 124 5 Web Operation 126 5 1 Local Web Access 126 5 2 Remote Web Access 127 5 2 1 UPnP DDNS Remote Access Setup 127 5 2 2 Port Forwarding Remote Access Setup 128 5 3 We...

Page 6: ...5 4 5 System 168 5 4 5 1 General 168 5 4 5 2 Display 171 5 4 5 3 Pan Tilt Zoom 174 5 4 5 4 Text Overlay 175 5 4 5 5 Account 176 5 4 5 7 Config Backup 179 5 4 5 8 Default 180 5 4 5 9 Upgrade 180 5 5 W...

Page 7: ...7 This page is left blank intentionally...

Page 8: ...est com firmware Never use the default password for your camera Always ensure that your password is at least 8 10 characters long and contains a combination of lowercase characters uppercase character...

Page 9: ...and repair work should be done by qualified service engineers We are not liable for any problems caused by unauthorized modifications or user attempted repair 5 Environment The DVR should be installed...

Page 10: ...cking and more 1 2 Features The Amcrest 1080p Lite has the following features Real time Monitoring The HDCVI has an analog output port VGA port and an HDMI port You can use a variety of monitors to di...

Page 11: ...n RS485 port the device can support PTZ decoding as well as various other decoding protocols to allow PTZ control of the attached cameras Intelligent Operation The DVR supports a variety of mouse and...

Page 12: ...n SN Icon Name Function 1 NET Network abnormality indicator light When a network error occurs or there is no network connection this light turns red 2 PWR Power indicator When DVR is on this light rem...

Page 13: ...nd multiple channel data to the HDMI port of the display device 5 VGA VGA video output port VGA video output port Output analog video signal Can connect to the monitor to view ananlog video output 6 V...

Page 14: ...14...

Page 15: ...ton Click it to boot up or shut down the device 2 Address Click it to input device number so that you can control it 3 Forward Various forward speeds and normal speed playback 4 Slow play Multiple slo...

Page 16: ...Switch current activated control go left or right In playback mode click up down button to switch playback channel In 1 window playback mode click left right button to control playback speed Aux func...

Page 17: ...nd stands for deleting the previous character Double left click mouse Implement special control operation such as double click one item in the file list to playback the video In multiple window mode d...

Page 18: ...al number of the unit is usually needed to provide support Please check that all required items for your DVR are present and accounted for To check what is included with your purchase go to http amcre...

Page 19: ...lip and then place the upper cover back on 8 Secure the screws in the rear panel and the side panel Note An HDD is included with the DVR by default To connect the HDD connect the HDD data cable and th...

Page 20: ...the same grounding to ensure the normal operation of the camera Guarantee stability and reliability of the transmission line Please use high quality well shielded BNC cable Please select suitable BNC...

Page 21: ...connect to a low impedance earphone active speaker or amplifier drive audio output device If the speaker and the microphone cannot be separated spatially it may create a feedback loop In this case you...

Page 22: ...e signal quality d 485 A B of DVR cannot parallel connect with 485 port of another device e The voltage between the A B lines of the decoder should be less than 5v 3 3 4 4 Alarm Input Output Details I...

Page 23: ...485 A B cable is for the A B cable of the PTZ decoder T T R R are four wire double duplex RS485 port T T output wire R R input wire Relay Specification Model JRC 27F Material Silver Rating Resistance...

Page 24: ...or on the camera 3 Please follow the instructions to configure a camera to enable each PTZ device on the DVR 3 3 6 USB Port On the device there is a standard USB port For information on which devices...

Page 25: ...25 2 Connect a USB mouse to the front of the DVR...

Page 26: ...26 3 Connect an Ethernet cable to your router and then connect the other end of the cable to the DVR...

Page 27: ...video extension cable to the camera s video cable and connect the camera power extension cable to the camera s power cable There should be a tag on the video cable to help you make sure the right end...

Page 28: ...camera cable to any of the video input ports 6 Connect the camera power extension cable to one of the camera power cables connect this power cable into the power brick and then plug the cable into an...

Page 29: ...29 7 Connect the DVR power cable into the back of the DVR and then plug in the DVR power adapter into an electrical socket...

Page 30: ...features that the Lite version does not For purposes of this guide we will use iOS though both apps have the same interface 1 Download and Install either the Amcrest View Lite or Amcrest View Pro app...

Page 31: ...7 Select the option that says P2P 8 Click the button that says Scan QR Code 9 Point the phone s camera at the QR code displaying on the DVR s screen Make sure the QR code fits inside of the clear box...

Page 32: ...e and admin for the password 11 Click Start Live Preview To view a video on how to setup the 1080p Lite DVR for remote access on a smartphone or tablet go to http amcrest com videos and view the video...

Page 33: ...1 2 Shutdown Note When you see the corresponding dialogue box System is shutting down Do not click the power on off button directly Do not unplug the power cable or click the power on off button to s...

Page 34: ...administrator local and remote access Username default Password default hidden user Note If three failed logins are attempted within a 30 minute time period the system will set off an alarm After five...

Page 35: ...n this screen click the Next Step button at the bottom of the screen The next screen that comes up is the Encode settings screen Make sure to click the tabs at the top for Snapshot and Overlay to conf...

Page 36: ...k the Next Step button at the bottom of the screen The next screen that comes up is the Schedule settings screen Make sure to click the tabs at the top for Record and Snapshot to configure those setti...

Page 37: ...ess is the Network settings screen Once you are satisfied with the settings on this screen click the Finished button at the bottom of the screen Once more note that these settings can be changed at an...

Page 38: ...can click and hold the left mouse button on the channel 1 window and then drag it to the channel 2 window then release the left mouse button This will switch channel 1 with channel 2 s position Use t...

Page 39: ...ck the button and the button will then show as There are two ways for you to zoom in Click and drag the mouse to select a zone You can see the interface shown below Push the middle mouse button at the...

Page 40: ...can go to the Search interface to view these snapshots 4 4 Right Click Menu By right clicking the mouse on the screen the following menu opens up 4 4 1 Video Viewing Options The DVR supports many dif...

Page 41: ...e rotation of the camera in 8 different directions If the buttons on the front panel of the DVR are used then only four of the directions will be accessible up down left right In the middle of the eig...

Page 42: ...o to menu Note The name of the command will be grayed out if the function is not supported See below for detailed information on each PTZ function To configure the functions above click the Settings b...

Page 43: ...tion allows for the use of multiple presets stringed together To create and manage tours follow the steps below Ensure you have more than 1 preset configured already Input the tour value and the prese...

Page 44: ...raining the area of movement for the cameras during any PTZ function To set up borders move the camera using the PTZ controls to the left limit then click Left to designate that position as the left l...

Page 45: ...camera may have an auxiliary function and this feature enables its use The aux number corresponds to the device s slot on the PTZ decoder 4 4 3 Color Settings Using this screen the color settings can...

Page 46: ...e video brightness is OK but the contrast is not correct Please note the video may become hazy if the value is too low If this value is too high the dark section may lack brightness while the bright s...

Page 47: ...lect a viewing mode for live viewing 4 5 3 Favorites Click the button and the system displays the favorites drop down menu Once the desired layout of cameras is achieved click this button and select A...

Page 48: ...formation Please refer to chapter 4 10 5 2 for more information 4 5 9 Network Click the button and the system goes to the network interface It is used to set the network IP address default gateway and...

Page 49: ...d pop up the following dialogue box It allows you to conveniently backup files logs configurations or update the system See the image below for the USB Device Popup screen Please refer to chapter 4 8...

Page 50: ...w information about the network or test the network status Info Event Display information about events that triggered recording Info Log Display system logs of critical events Settings Camera Review o...

Page 51: ...edundancy HDD Before you select to play from the peripheral device please connect the corresponding peripheral device You can view all recorded files in the root directory of the peripheral device Cli...

Page 52: ...the first channel of the recorded file The system can display a maximum of 128 files at one time Use the and or the mouse to view the file Select one item and then double click the mouse or click the...

Page 53: ...tton Allows for the marking of a file for later ease of access You can refer to chapter 4 8 1 3 for detailed information 9 Time bar This is used to display the record type and its period in the curren...

Page 54: ...previous position Click the Backup button after clip to save current content in a new file You can clip one channel or multiple channels The multiple channel clip operation is similar to the one chann...

Page 55: ...a specific channel This feature is useful as it allows users to search a channel s recorded files for motion without having to change the recording type to a motion detection recording During the mult...

Page 56: ...arching files system implements accurate playback for the first time Play is clicked System does not support precise playback for screenshots System supports synchronized playback and non synchronized...

Page 57: ...nformation in the current channel by time Modify Double click one marked information item The system pops up a dialogue box that allows for editing of the marked information The marked information s n...

Page 58: ...DVD burners USB devices and eSATA devices To backup recorded files select the backup device the channel file start time the end time then click the add button so the system can begin a search for the...

Page 59: ...ialogue box appears informing the user about a successful backup Note There are two file format options DAV ASF The file name format is usually Channel number Record type Time In the file name the YDM...

Page 60: ...tions The Shutdown option turns off the DVR The Logout option logs off the current user and shows the login screen so another user may login The Reboot option reboots the DVR Note If the proper author...

Page 61: ...ive is damaged and should be replaced Type This field shows the read write properties of the connected hard drive Total space This field shows the total capacity of the connected hard drive Free space...

Page 62: ...62 4 9 1 2 Record Info This screen is used to view information on recorded video specifically recording start time and end time for all media based on each hard drive 4 9 1 3 BPS...

Page 63: ...All data is measured in Kilobytes per Second KB s 4 9 1 4 Version This screen shows version information for the DVR Here information such as device model channels system version build date web interf...

Page 64: ...consists of 3 screens Online Users Load and Test 4 9 3 1 Online Users This screen is used to monitor and manage users who are online With the proper system access level users can be disconnected or b...

Page 65: ...65...

Page 66: ...n status is shown as offline if the DVR is disconnected from the internet The bottom panel is a graph that shows the fluctuation in the send and receive speed 4 9 3 3 Network Test This screen is used...

Page 67: ...Browse button to select the path You can view all connected network adapter names including Ethernet PPPoE and WIFI You can click the button on the right panel to begin the Sniffer Click the grey stop...

Page 68: ...save a maximum of 1024 log files Using the fields at the top of the page the user can search for log items and view details for each one Start Time and End Time allow the user to narrow the range in w...

Page 69: ...or window saturation The value ranges from 0 to 100 The default value is 50 The larger the number the strong the color is This value has no effect on the general brightness of the whole video The vide...

Page 70: ...the Apply button near the bottom right hand corner After completing the setup please click the save button to go back to the previous menu 4 10 1 2 Encode 4 10 1 2 1 Encode This tab is used to set th...

Page 71: ...ow for a screenshot of the Snapshot tab Below is a list of snapshot settings that can be modified on this screen Snapshot Mode This dropdown box allows the user to select a snapshot mode There are two...

Page 72: ...n system is in monitor status Time Display This button allows the user to select whether or not the system displays time on playback video Clicking the set button and allows the user to drag the times...

Page 73: ...d to set the channel type The supported channel types are coaxial CVI AHD CVBS etc as well as IP To revert to default settings click the Default button near the bottom left hand corner To confirm sett...

Page 74: ...on is enabled the user cannot modify the IP address Subnet Mask or Gateway as these values are obtained from the DHCP function To view the current IP address DHCP needs to be disabled Note When PPPoE...

Page 75: ...kbox allows the user to enable the user to process the downloaded data first The download speed is 1 5X or 2 0X compared to the normal streaming speed To revert to default settings click the Default b...

Page 76: ...click the Cancel button near the bottom right hand corner To apply the settings click the Apply button near the bottom right hand corner After completing the setup please click the save button to go...

Page 77: ...ut an email will be sent beforehand as a warning Below is a screenshot of the DDNS settings screen configured to QuickDDNS Below is an explanation of the fields that can be configured on DDNS settings...

Page 78: ...s feature Only one of them can be activated at a time o Trusted Sites This setting allows the user to enter trusted IP addresses All other addresses will be blocked o Blocked Sites This setting allows...

Page 79: ...ner 4 10 2 6 Email This screen allows for the configuring of email settings to permit the DVR to send emails when the connected cameras or alarms are triggered Below is a screenshot of the email setti...

Page 80: ...hand corner To confirm settings click the OK button near the bottom right hand corner To cancel any modifications click the Cancel button near the bottom right hand corner To apply the settings click...

Page 81: ...near the bottom left hand corner To test the current settings click Test near the bottom left hand corner To confirm settings click the OK button near the bottom right hand corner To cancel any modif...

Page 82: ...ce line item o The fifth column shows the External Port used by that service To edit this double click on the service line item To revert to default settings click the Default button near the bottom l...

Page 83: ...e MG SOFT MIB Browser This software shows device configuration Using this software the user can see how many video channels and audio channels the device has as well as view other information about th...

Page 84: ...of the multicast screen Below is an explanation of the fields in the Multicast settings screen Enable This checkbox allows the user to enable the Multicast feature for the DVR IP Address This field a...

Page 85: ...eer delay measurement ff02 6b Precision Time Protocol PTP version 2 peer delay measurement messages ff0x 114 Used for experiments To revert to default settings click the Default button near the bottom...

Page 86: ...allows the user to enter the proxy ID number To revert to default settings click the Default button near the bottom left hand corner To confirm settings click the Save button near the bottom right han...

Page 87: ...s the user to enter a time of the day when they want to receive a report about the DVR s connection to the network each day To revert to default settings click the Default button near the bottom left...

Page 88: ...displays on this screen and not through any static saved images To confirm settings click the Save button near the bottom right hand corner To cancel any modifications click the Cancel button near th...

Page 89: ...enerate a motion detection alarm when a moving signal is detected in a specified area Below is a screenshot of the motion detection settings screen Below is a description of the fields on the Motion D...

Page 90: ...esignate a motion detection zone or remove any motion detection zone markers o After the motion detection zone is set click the enter button to exit the motion detection screen Remember to click the s...

Page 91: ...ettings screen Click Default to use the default settings o In order to specify time zones in greater detail for each day click the Setup button to the left of the time bar and the Time Period setup sc...

Page 92: ...is checkbox allows the user to enable the system to record video for that channel when a motion detection alarm is triggered PTZ Activation This checkbox allows the user to enable the system to activa...

Page 93: ...is cut or the camera is unplugged from power that constitutes video loss as the signal is no longer reaching the camera If the camera s lens is obstructed by a bird pooping on it or a paintball explod...

Page 94: ...reen Click Default to use the default settings o In order to specify time zones in greater detail for each day click the Setup button to the left of the time bar and the Time Period setup screen will...

Page 95: ...tion and PTZ activation should be Tour This checkbox allows the user to enable the system to cause a PTZ tour to occur when a video loss alarm is triggered Multiple cameras can be specified to perform...

Page 96: ...been obstructed due to outside forces Below is a description of the fields on the Video Masking settings page Channel This dropdown box allows the user to pick which channel they would like to change...

Page 97: ...setup screen Click Default to use the default settings o In order to specify time zones in greater detail for each day click the Setup button to the left of the time bar and the Time Period setup scre...

Page 98: ...be Tour This checkbox allows the user to enable the system to cause a PTZ tour to occur when a video masking alarm is triggered Multiple cameras can be specified to perform a tour Snapshot This checkb...

Page 99: ...n on screen message when an HDD abnormality occurs Alarm Upload This checkbox allows the user to enable the system to upload alarm information when an HDD abnormality occurs Send Email This checkbox a...

Page 100: ...en a network abnormality occurs Send Email This checkbox allows the user to enable the system to send an email when a network abnormality occurs Record Channel This checkbox allows the user to enable...

Page 101: ...user to specify what to do when the HDD is full There are two options o Overwrite This option lets the DVR overwrite the oldest recorded video on the DVR o Stop Record This option causes the DVR to s...

Page 102: ...10 4 1 2 Date and Time This screen displays date and time settings for the DVR Below is a screenshot of the Date Time settings screen Below is an explanation of the fields on the Date Time settings s...

Page 103: ...on the DVR Server IP This field allows the user to set the NTP server IP address Clicking the Manual Update button pulls a time update from the server Port This field allows the user to set the NTP se...

Page 104: ...of the holiday is displayed Date This column shows the date that the holiday occurs on Period This column shows the range in which the holiday occurs Edit This column has a button that allows for the...

Page 105: ...ows the user to choose whether or not the channel number is displayed in the playback video Resolution This dropdown box allows the user to change the resolution of the DVR There are 4 options o 1920...

Page 106: ...ime in the tour Channel List This list allows the users to select channels add as a part of the tour The number in the corner indicates how many channels are available o Add This button allows the use...

Page 107: ...tion in pixels o CIF 352 x 240 o D1 720 x 480 Frame Rate This dropdown box allows the user to select the frame rate used by the system for zero channel encoding The range is between 1 and 30 frames pe...

Page 108: ...ox allows the user to pick the amount of data bits for the PTZ transmission The options are 5 6 7 or 8 Stop Bits This dropdown box allows the user to pick the amount of stop bits for the PTZ transmiss...

Page 109: ...the user to pick which position for the overlaid text appears Source IP This field allows the user to enter the ATM or POS IP address and port number from which the text overlay data is gathered Desti...

Page 110: ...d to change the passwords for the admin and default accounts Each user name and user group name can only contain letters numbers underline marks dashes or dots No empty spaces are allowed The maximum...

Page 111: ...ist User Name This column indicates an account s username Group Name This column shows which group the username belongs to Modify This column has a button that allows for the account s properties to b...

Page 112: ...be entered for the user This can limit the user s ability to logon from another device If left blank the user can logon from any MAC address There are a total of 98 rights that can be assigned to a u...

Page 113: ...lumn has a button that allows for the account s properties to be deleted Memo This column indicates any notes about the user group Add Group This button allows the user to add another user group On th...

Page 114: ...days can be specified Any files that exist past that many days in the past are deleted to create space on the DVR s hard drive To confirm settings click the OK button near the bottom right hand corne...

Page 115: ...ing storage capacity on the selected device New Folder This button allows the user to create a new folder on the selected device Format This button allows the user to format the selected device Import...

Page 116: ...Address User Accounts To confirm settings click the OK button near the bottom right hand corner To cancel any modifications click the Cancel button near the bottom right hand corner To apply the sett...

Page 117: ...are update process 4 10 5 Storage This set of menu items deal with storage of data on the DVR 4 10 5 1 Schedule This screen is used to specify the recording schedule for both recorded video and snapsh...

Page 118: ...the schedule There are 4 types of recordings o Regular Regular recording means that the DVR captures all footage for the specified time period Regular recording is represented by the color green o MD...

Page 119: ...the settings to Once finished on this screen click Save to return to the time period settings screen o To delete the video recording settings for a particular day click the button next to the time bar...

Page 120: ...ox allows the user to pick which channel they would like to change video recording settings for Record Type These checkboxes allow the user to select which recording type they want to configure on the...

Page 121: ...to each period to edit the time period To copy time periods click the checkboxes next to the days of the week that you d like to copy the settings to Once finished on this screen click Save to return...

Page 122: ...drives are currently connected to the DVR and displays information about them o Device Name This column shows the names of the connected hard disk drives HDD o Type This column shows the type of acces...

Page 123: ...settings page Main Stream The main stream is the stream through which the channels transmit data by default There are 3 settings that can be used for the main stream o Schedule Channels will record a...

Page 124: ...ect settings page Type This dropdown box allows the user to select which type of HDD detection report to run There are two options o Quick Detect Quick detect runs a quick hard drive error detection r...

Page 125: ...w column of the report The detailed view looks like the screenshot below The Detect Results tab shows a visual representation of the hard drive scan results The S M A R T tab shows S M A R T report re...

Page 126: ...de set to Static Click the radio button next to DHCP to change this to DHCP The IP Address Subnet Mask Default Gateway Preferred DNS and Alternate DNS should all change to 0s 4 Click Save to save thes...

Page 127: ...e port number is at least 5 digits long to prevent any port conflicts If need be change the port to a 5 digit number that is less than 65535 note the number down and click save before proceeding to th...

Page 128: ...ot work For more information on how to setup the DVR using this method see section 5 2 1 To view a video on how to setup the HDCVI for Port Forwarding remote access go to http amcrest com videos and v...

Page 129: ...ll a plugin Click install to download the plugin and then click on the plugin installation file to install the plugin 23 If the browser prompts you to allow the plugin to work on the computer hit Allo...

Page 130: ...takes the user to the Alarm interface See section 5 3 4 d Settings This button takes the user to the Settings interface See section 5 4 e Info This button takes the user to the Information interface S...

Page 131: ...of controls allows the user to change their view in the live view screen From left to right the buttons do the following Set video quality set video fluency enter full screen mode scan enter 1 window...

Page 132: ...e the audio data from the 1 channel There are 4 bidirectional talk protocols available in the system a Default b G711a c G711u d PCM 4 Instant Record Button This button allows the user to begin manual...

Page 133: ...o playback and it also allows the user to select where to start playback from 6 Playback Bar This panel allows the user to control playback It also allows the user to control playback speed and playba...

Page 134: ...a channel and a time frame from which to download any recorded video The Download to Local button opens a dialog box asks the user to where to save the downloaded file This is the Watermark screen Thi...

Page 135: ...Video loss The system triggers the alarm when video loss occurs Motion detection The system triggers the alarm when motion detection occurs Tampering The system triggers the alarm when camera is malic...

Page 136: ...s slight differences with the DVR s menu In this section the web access settings menu will be explained in depth just like the DVR settings menu had been explained in the sections above For more infor...

Page 137: ...this function when the whole video is too dark or too bright Please note the video may become hazy if the value is too high The recommended value ranges from 40 to 60 Contrast This slider is used to a...

Page 138: ...can be used to record important events and a low frame rate can be used to record scheduled events The DVR also allows for the option to set different frame rates for motion detection recordings and a...

Page 139: ...rs This string can only include numbers characters and underscores To copy settings to another channel click the Copy button To confirm settings click the Save button To refresh the page click the Ref...

Page 140: ...e to set the proper section size The system supports a maximum of 4 zones in one channel Preview Monitor There are two types of cover areas Preview means the privacy mask zone cannot be viewed by user...

Page 141: ...ck the Save button To refresh the page click the Refresh button To revert to default settings click the Default button To confirm settings click the Save button 5 4 2 Network 5 4 2 1 TCP IP 5 4 2 1 1...

Page 142: ...h is unique to this device This number is read only and is used to access a local area network LAN IP Version This dropdown allows the user to select the IP version The two options are IPV4 and IPV6 I...

Page 143: ...ing QR Code This is the unique QR code used to help the app user connect to the DVR o Note The physical design of the QR code may change based on the network settings used All QR code connections shou...

Page 144: ...3 RTSP Port This field designates the Real Time Streaming Protocol RTSP port number The default value is 554 To confirm settings click the Save button To refresh the page click the Refresh button To r...

Page 145: ...creenshot of the DDNS settings screen configured to QuickDDNS Below is an explanation of the fields that can be configured on DDNS settings screen when set to Quick DDNS type Parameter Function DDNS T...

Page 146: ...other addresses will be blocked o Blocked Sites This setting allows all IP addresses but blocks the ones that are specified Delete This button allows a user to remove a specific IP address from the I...

Page 147: ...to login to the selected SMTP server Password This field allows the user to enter the password associated with the SMTP username Sender This field allows the user to enter the sender email address Th...

Page 148: ...ick the Save button To refresh the page click the Refresh button To revert to default settings click the Default button 5 4 2 7 FTP FTP stands for File Transfer Protocol This protocol allows for remot...

Page 149: ...ge click the Refresh button To revert to default settings click the Default button 5 4 2 8 UPnP UPnP stands for Universal Plug and Play and it is a protocol used to easily connect devices to the inter...

Page 150: ...d button To confirm settings click the Save button To refresh the page click the Refresh button To revert to default settings click the Default button 5 4 2 9 SNMP SNMP stands for Simple Network Manag...

Page 151: ...the user to select which versions of SNMP are used To revert to default settings click the Default button near the bottom left hand corner To confirm settings click the Save button near the bottom rig...

Page 152: ...ngs click the Default button near the bottom left hand corner To confirm settings click the OK button near the bottom right hand corner To cancel any modifications click the Cancel button near the bot...

Page 153: ...Below is an explanation of the fields on the Alarm Center settings screen Enable This checkbox allows the user to enable the Alarm Center feature for the DVR Protocol Type This field allows the user...

Page 154: ...reens have no detection regions or sensitivity setup The motion detection icon will be present if the motion detection alarm has been triggered on the current channel To set the motion detection regio...

Page 155: ...155 Below is a screenshot of the period setup screen Below is a screenshot of the region setup screen...

Page 156: ...scription of the fields on the Motion Detection settings page Parameter Function Enable This checkbox allows the user to enable the motion detection function for a specific channel Period This setup b...

Page 157: ...o Threshold is the level that the motion detection needs to reach in order to trigger an alarm The lower the threshold the more likely that motion will trigger an alarm To designate a zone click and d...

Page 158: ...essage This checkbox allows the user to enable the system to show an on screen message when a motion detection alarm is triggered To copy settings to another channel click the Copy button To confirm s...

Page 159: ...perform a preset PTZ action based upon video loss Tour This checkbox allows the user to enable the system to cause a PTZ tour to occur when a video loss alarm is triggered Multiple cameras can be spec...

Page 160: ...there is camera masking on any of the channels Below is a screenshot of the camera masking settings screen Below is a screenshot of the period setup screen Below is a screenshot of the PTZ Activation...

Page 161: ...be specified to perform a tour Snapshot This checkbox allows the user to enable the system to take a snapshot when a camera masking alarm is triggered Multiple cameras can be specified to perform a t...

Page 162: ...Buzzer This checkbox allows the user to enable the system to activate a buzzer when an HDD error occurs To confirm settings click the Save button To refresh the page click the Refresh button 5 4 3 2 2...

Page 163: ...rror occurs Delay This field specifies in seconds how long the delay between alarm activation and buzzer activation should be To confirm settings click the Save button To refresh the page click the Re...

Page 164: ...reen Below is a screenshot of the copy screen Below is an explanation of the fields on the Schedule settings screen Parameter Function Channel This dropdown box allows the user to pick which channel t...

Page 165: ...ettings section See section 4 10 4 1 3 for more information on holiday settings Setup In order to specify time zones in greater detail for each day click the setup button to the left of the time bar a...

Page 166: ...ttings screen Parameter Function Channel This dropdown box allows the user to pick which channel they would like to change snapshot recording settings for Holiday This dropdown box allows the user to...

Page 167: ...type status and capacity The user can also use this screen to format hard drives and change hard drive properties Below is a screenshot of the HDD Manage settings screen Below is an explanation of th...

Page 168: ...nshot of the Record screen Below is an explanation of all of the fields on the Record settings page Main Stream The main stream is the stream through which the channels transmit data by default There...

Page 169: ...o reboot to activate the modification Video Standard This dropdown box allows the user to select a video standard The options are between PAL and NTSC HDD Full This dropdown box allows the user to spe...

Page 170: ...MM DD YYYY Month Day Year DD MM YYYY Day Month Year Time Format Time Format This dropdown box allows the user to specify a time format for the DVR to use There are two options 24 Hour 12 Hour Time Zo...

Page 171: ...s number indicates how many holidays are in the system Each line item has a number to signify its place in the list Status This dropdown box indicates the status of the holiday There are two options o...

Page 172: ...20 1024 768 Transparency This slider allows the user to change the transparency of the menu screens on the DVR The range goes from 0 to 100 Time Display Channel Display These checkboxes allows the use...

Page 173: ...he user to remove a channel from the tour Move Up This button allows the user to move a camera up in the tour queue Move Down This button allows the user to move a camera down in the tour queue Motion...

Page 174: ...n pixels CIF 352 x 240 D1 720 x 480 Frame Rate This dropdown box allows the user to select the frame rate used by the system for zero channel encoding The range is between 1 and 30 frames per second B...

Page 175: ...8400 57600 or 115200 Data Bit This dropdown box allows the user to pick the amount of data bits for the PTZ transmission The options are 5 6 7 or 8 Stop bit This dropdown box allows the user to pick t...

Page 176: ...n This dropdown box allows the user to pick which position for the overlaid text appears Source IP This field allows the user to enter the ATM or POS IP address and port number from which the text ove...

Page 177: ...5 4 5 5 1 User This screen is used to configure User Account settings Below is a screenshot of the User Account settings screen Below is an explanation of the fields on the User Account settings scre...

Page 178: ...imit the user s ability to logon from another device If left blank the user can logon from any MAC address There are a total of 98 rights that can be assigned to a user 5 4 5 5 2 Group This screen is...

Page 179: ...Memo This column indicates any notes about the user group Add Group This button allows the user to add another user group On the next page is a screenshot of the Add Group screen Note It is recommende...

Page 180: ...he Refresh button 5 4 5 7 Config Backup This screen is used to manage importing and exporting of system configurations This feature can be used to clone the settings from one DVR to another Below is a...

Page 181: ...to restore the DVR to default settings for the categories selected 5 4 5 9 Upgrade This screen is used to update the DVR s firmware to the latest version To conduct a system update it is required to p...

Page 182: ...rsion screen 5 5 2 Log This screen is used to keep a log of all activity on the DVR Below is a screenshot of the Log screen The system lists the following information System Operation Account Manager...

Page 183: ...ate the current search operation Detailed Information Double click a line item to open a more detailed view of that log item Clear This button deletes all log files that are currently displayed Backup...

Page 184: ...or stops running Below are a few possible reasons why this may be occurring The input voltage is too low or is not stable There is an HDD malfunction or something is wrong with the HDD cable The powe...

Page 185: ...le reasons why this may be occurring The hard drive cable is damaged The hard drive is broken The DVR s firmware is incompatible with the recorded video The recorded files have been overwritten The re...

Page 186: ...ss isn t working Below are a few possible reasons why this may be occurring Windows version is pre Windows 2000 service pack 4 Use a more recent version of Windows ActiveX controls have been disabled...

Page 187: ...ror in the DVR s firmware 19 Alarms are not working Below are a few possible reasons why this may be occurring The alarm is not setup correctly The alarm cable is not connected correctly The alarm inp...

Page 188: ...y or induced electricity Please unplug the power cable before you remove audio video signal cables RS232 cables or RS485 cables Always shut down the device properly Please use the shutdown function in...

Page 189: ...needed for all channels in Step 4 According to Formula 4 to calculate total capacity accumulation DVR during alarm video recording including motion detection c qT mi 4 i 1 a In the formula a means al...

Page 190: ...USB Flash Stick 2G Kingax Super Stick 128M Kingax Super Stick 256M Kingax Super Stick 512M Kingax Super Stick 1G Kingax Super Stick 2G Netac U210 128M Netac U210 256M Netac U210 512M Netac U210 1G Ne...

Page 191: ...apacity YDStar YDstar HDD box 40G Netac Netac 80G Iomega Iomega RPHD CG RNAJ50U287 250GB WD Elements WCAVY1205901 1 5TB Newsmy Liangjian 320GB WD Elements WDBAAR5000ABK 00 500GB WD Elements WDBAAU0015...

Page 192: ...e SV35 3 ST3250310SV 250G SATA Seagate Seagate SV35 3 ST3500320SV 500G SATA Seagate Seagate SV35 3 ST3750330SV 750G SATA Seagate Seagate SV35 3 ST31000340SV 1T SATA Seagate Seagate SV35 4 ST3320410SV...

Page 193: ...agate Seagate Constellation ES ST32000644NS 2T SATA Seagate Seagate Constellation ES ST2000NM0011 2T SATA Seagate Seagate Constellation ES ST1000NM0011 1T SATA Seagate Seagate Constellation ES ST500NM...

Page 194: ...500G SATA Westem Digital WDAV GP AVCS WD7500AVCS 63ZLB0 750G SATA Westem Digital WDAV GP AVCS WD3200AVCS 320G SATA Westem Digital WDAV GP AVCS WD2500AVCS 250G SATA Westem Digital WDAV GP EVCS WD10EVCS...

Page 195: ...Hitachi HitachiCinemaStar 7K1000 B HCT721050SLA360 500G SATA Hitachi HitachiCinemaStar 7K1000 B HCT721075SLA360 750G SATA Hitachi HitachiCinemaStar 7K1000 B HCT721010SLA360 1T SATA Maxtor DiamondMax...

Page 196: ...inch Samsung LCD 2494HS 24 inch Samsung LCD P2350 23 inch Samsung LCD P2250 22 inch Samsung LCD P2370G 23 inch Samsung LCD 2043 20 inch Samsung LCD 2243EW 22 inch Samsung LCD SMT 1922P 19 inch Samsung...

Page 197: ...K DES 1008D 10 100M self adaptive Ruijie RG S1926S There are five network modes 1 AUTO 2 HALF 10M 3 FULL 10M 4 HALF 100M 5 FULL 100M H3C H3C S1024 10 100M self adaptive TP LINK TL SF1016 10 100M self...

Page 198: ...198 Appendix F Compatible Wireless Mouse List Please refer to the following sheet for compatible wireless mouse brands Brand Model V80 Rapoo 3500 Logitech M215 Shuangfeiyan Tianyao G7 630...

Page 199: ...e so that the use of these substances or elements will not result in any severe environmental pollution any bodily injury or damage to any assets The consumer is not authorized to process such kind of...

Reviews: