Keying
Schlage • Everest full size cylinder service manual • 13
Rekeying when you have no keys
When no key is available, use standard locksmith techniques to shim the cylinder open. However, the check pin must be taken
into account. Follow these steps:
1. Using a pick or key blank, shim the six pins as usual. After the last pin is neutralized, the plug still cannot rotate or slide out
because the check pin is engaged.
2. Leaving the shim in place, insert a setup key with no steeples between the 9 depth deep
cuts. This unlocks the check pin and will also keep it from springing out of the plug in
step 4.
3. Use the setup key to turn the plug slightly in either direction and remove the shim.
4. Push the plug out gently with a plug follower. For the modular cylinder, we recommend
the M504-548 follower.
5. While the setup key is still in the plug, discard the old pins. If you are certain that the cylinder
was not previously master keyed, skip to step 7.
6. IMPORTANT: Clear the cylinder shell of any remaining master pins. If master pins remain in the shell, the following
problems may occur:
• A key cannot be inserted or removed
• One or more springs will get crushed and cause a future lockout
• Additional keys will operate the cylinder.
Using the M504-548 follower for modular cylinders, slide the flat section of the follower inside the shell and rotate the flat
section until it comes under the bible. All the master pins will then fall out. Rotate the flat section until it is opposite the
bible and slide follower until about an inch is protruding from the front of the shell. Load the proper size top pin based on
the plug total (bottom pin + any master pins). A plug follower with a groove will help guide each spring and top pin into its
chamber as you push the follower in from the back of the shell. (The 40-116 shell loading tool can make this process
easier.)
7. If you are master keying, leave the setup key in the plug. Otherwise, hold the check pin in position with your finger or thumb
while removing the setup key and inserting the new operating key.
8. Install the new pins in the plug.
9. Orient the plug so it is slightly turned with respect to the shell. Gently push the plug into the shell, pushing the follower out.
10. Test all keys for smooth operation.
11. Reinstall the cam, tailpiece, etc.
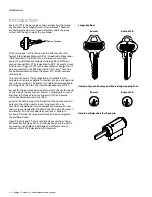
For removing plug
after shimming
Summary of Contents for Schlage D Series
Page 1: ...Schlage Manuals 2016...
Page 2: ...D Series Service manual...
Page 3: ......
Page 4: ......
Page 5: ......
Page 6: ......
Page 7: ......
Page 8: ......
Page 9: ......
Page 10: ......
Page 11: ......
Page 12: ......
Page 13: ......
Page 14: ......
Page 15: ......
Page 16: ......
Page 17: ......
Page 18: ......
Page 19: ......
Page 20: ......
Page 21: ......
Page 22: ......
Page 23: ......
Page 24: ......
Page 25: ......
Page 26: ......
Page 27: ......
Page 28: ......
Page 29: ......
Page 30: ......
Page 31: ......
Page 32: ......
Page 33: ......
Page 34: ......
Page 35: ......
Page 36: ......
Page 37: ......
Page 38: ......
Page 39: ......
Page 40: ......
Page 41: ......
Page 42: ......
Page 43: ......
Page 45: ...Schlage small format cores Service manual...
Page 46: ......
Page 48: ......
Page 49: ...Schlage SFIC service manual 5...
Page 58: ......
Page 59: ......
Page 62: ......
Page 64: ......
Page 107: ......
Page 109: ...Everest full size cylinder Service manual...
Page 110: ......
Page 129: ...B Series Service manual...
Page 130: ......
Page 150: ...22 Schlage B Series service manual Locks...
Page 165: ...Options and Parts Schlage B Series service manual 37 Notes...
Page 166: ...38 Schlage B Series service manual Options and Parts Notes...
Page 167: ......
Page 169: ...ND Series Service manual...
Page 270: ...L Series Service manual...
Page 271: ......
Page 293: ...24 Schlage L Series service manual...
Page 359: ...90 Schlage L Series service manual...
Page 444: ...Schlage L Series service manual 175...
Page 499: ...230 Schlage L Series service manual...
Page 500: ......
Page 502: ...AL Series Service manual...
Page 503: ......
Page 505: ......
Page 542: ...A Series Service manual...
Page 543: ......
Page 545: ......
Page 572: ......


