Align Technology iTero Element 5D User Manual Download Page 138

By default, this mode is enabled, but it can be disabled per case by tapping

or by default in the Scan

settings, as described in

Defining the scan settings

.

5.5.3.2

Scan color toggle

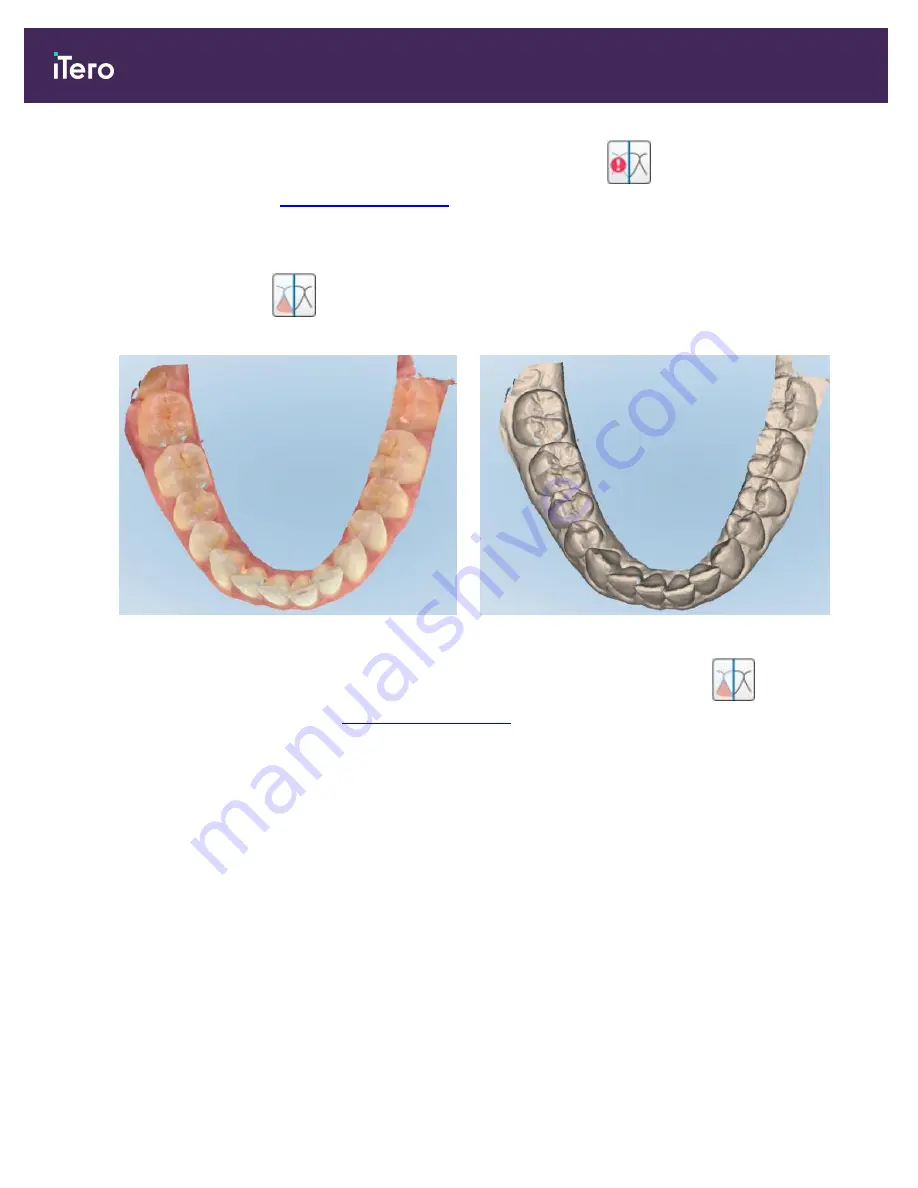
The color toggle button

allows you to toggle between color and monochromatic modes. This applies to both

scanning and viewing all case types.

Figure 109: Model displayed in color and monochrome mode

By default, models are scanned in color, but you can toggle the display per case by tapping

or by default in

the Scan settings, as described in

Defining the scan settings

.

5.5.3.3

Switching to the next scan segment

During scanning, the current segment is highlighted in blue in the navigation controls, and also displayed in the
segment indicator box, between the arrows.

Note:

Before moving to the next segment, press either of the wand buttons to stop the wand from scanning.

iTero Element 5D and iTero Element 5D Plus imaging systems User manual

110

© 2022 Align Technology, Inc. All rights reserved.

Summary of Contents for iTero Element 5D

Page 1: ...it starts with iTero Element 5D and iTero Element 5D Plus imaging systems User manual...

Page 2: ......

Page 3: ...ign Invisalign ClinCheck and iTero among others are trademarks and or service marks of Align Technology Inc or one of its subsidiaries or affiliated companies and may be registered in the U S and or o...

Page 4: ...EMC compliance This device complies with the following EMC standard IEC 60601 1 2 Medical electrical equipment Part 1 2 General requirements for basic safety and essential performance Collateral stan...

Page 5: ...waste and electronic equipment is required In compliance with the European Directive on Waste Electrical and Electronic Equipment WEEE do not dispose of this product in domestic or municipal waste Thi...

Page 6: ...manufacture including date of manufacture Temperature limit Medical device Consult the electronic instructions for use USB socket Electric battery IEC 60417 5009 STAND BY Stepping prohibited Authorize...

Page 7: ...Discard used batteries according to the manufacturer s instructions and local requirements l Replace the batteries only with the same battery type supplied by Align Electric warnings l Do not remove e...

Page 8: ...o the eyes l Avoid activating the wand while the tip of the wand is outside the patient s mouth in order to prevent eye damage l Avoid placing the wand in the cradle while the scanning operation is st...

Page 9: ...ical medical installation Avoid placing this device near frequency transmitting equipment or other sources of electrical and electromagnetic interference e g cellular phones mobile two way radios elec...

Page 10: ...Cet appareil est conforme la norme CEM suivante IEC 60601 1 2 Appareils lectrom dicaux Section 1 2 Exigences g n rales pour la s curit de base et les performances essentielles Norme collat rale ph nom...

Page 11: ...es d chets lectriques et des quipements lectroniques est requise Conform ment la directive europ enne sur les d chets d quipements lectriques et lectroniques DEEE ne jetez pas ce produit avec les d ch...

Page 12: ...l Pays de fabrication y compris la date de fabrication Limite de temp rature Dispositif m dical Consultez les instructions d utilisation lectroniques Prise USB Batterie lectrique IEC 60417 5009 EN ATT...

Page 13: ...ur CA CC d origine connect au syst me pour charger les batteries l L cran doit tre stock et utilis conform ment aux conditions environnementales indiqu es dans ce manuel N exposez pas le scanner des s...

Page 14: ...siques inflammables l Mode de fonctionnement En continu Dispositif m dical sur ordonnance Le syst me constitue un dispositif m dical sur ordonnance et ne doit tre manipul que par des prestataires de...

Page 15: ...midit l iTero Element 5D laptop configuration uniquement Si le syst me vient juste d tre amen dans le bureau en provenance d un environnement chaud froid ou humide laissez le mat riel s adapter la tem...

Page 16: ...iTero Element 5D and iTero Element 5D Plus imaging systems User manual xiv 2022 Align Technology Inc All rights reserved...

Page 17: ...10 1 iTero NIRI technology limitations 12 1 11 About this manual 12 2 Assembly instructions 13 2 1 Assembling the iTero Element 5D wheel stand configuration scanner 14 2 2 Assembling the iTero Elemen...

Page 18: ...anner between clinics 56 4 5 User interface 57 4 5 1 Scanner toolbar 60 4 5 2 Touch screen gestures 62 4 6 Defining the scanner settings 63 4 6 1 Defining the Computer settings 64 4 6 2 Defining the U...

Page 19: ...ewer 129 7 Working with orders 131 7 1 Working with returned orders 134 8 Viewing messages 136 9 Working with MyiTero 137 10 iTero scanner features and tools 138 10 1 Comparing previous scans using iT...

Page 20: ...wand and cable 183 11 2 Cleaning and disinfecting the wand 183 11 2 1 Preparation before cleaning and disinfection 184 11 2 2 Wand cleaning and disinfection 185 11 2 3 Drying wand body 186 11 2 4 Sto...

Page 21: ...per 202 D System specifications 205 D 1 iTero Element 5D wheel stand configuration system specifications 206 D 2 iTero Element 5D laptop configuration system specifications 207 D 3 iTero Element 5D Pl...

Page 22: ...gure 13 Interproximal carious lesion 11 Figure 14 Removing the wand from the cradle 23 Figure 15 Moving the scanner 24 Figure 16 Do not lift the scanner using the main handle 24 Figure 17 Do not allow...

Page 23: ...ooms within the clinic 56 Figure 49 Transporting the scanner between clinics 56 Figure 50 iTero home screen 57 Figure 51 Percentage of remaining battery charge 58 Figure 52 Help overlay 58 Figure 53 S...

Page 24: ...window with search field 90 Figure 86 Search criteria in the search field and list of matching patients 91 Figure 87 Selecting the required patient 91 Figure 88 Selected patient displayed in the New S...

Page 25: ...he toolbar and scan time 116 Figure 117 Sending the scan 117 Figure 118 Viewer option in the Past Orders pane in the Orders page 117 Figure 119 Viewer option in patient s profile page 118 Figure 120 M...

Page 26: ...ighlighted in red Fill tool 149 Figure 155 Disable A I Cleanup tool 150 Figure 156 Scan displayed with excess material showing 150 Figure 157 Eraser tool 151 Figure 158 Eraser tool options 151 Figure...

Page 27: ...image displayed in the enlarged image pane 174 Figure 190 Brightness and contrast toolbar is collapsed 175 Figure 191 Brightness and contrast toolbar 176 Figure 192 View mode with Snapshot tool 178 Fi...

Page 28: ...soft bristle brush 189 Figure 210 iTero Element 5D Plus cart Remove remaining marks and stains on the cradle using the soft bristle brush 190 Figure 211 iTero Element 5D Plus mobile Remove remaining...

Page 29: ...s a wand only configuration with any laptop that meets our minimum system requirements see iTero Element 5D and iTero Element 5D Plus hardware for more information giving you the ultimate in mobility...

Page 30: ...verification and service of the system and to serve as an order management tool l The iTero Element 5D NIRI functionality is a diagnostic aid for the detection of interproximal carious lesions above t...

Page 31: ...onitoring of interproximal carious lesions 1 8 iTero Element 5D and iTero Element 5D Plus hardware The iTero Element 5D scanner is available in two models l iTero Element 5D wheel stand configuration...

Page 32: ...e system A Full HD Touch screen B Power switch C Power LED D Wand E Cradle F Wheel base Figure 1 Front view of the iTero Element 5D imaging system iTero Element 5D and iTero Element 5D Plus imaging sy...

Page 33: ...ment 5Dimaging system 1 8 2 iTero Element 5D laptop configuration A Laptop touch screen B iTero Element 5D hub C Wand and cradle Figure 3 iTero Element 5D laptop configuration imaging system iTero Ele...

Page 34: ...uchscreen B Power switch C Main handle D Wand E Cradle F Wheel stand Figure 4 Front view of the iTero Element 5D Plus cart configuration imaging system iTero Element 5D and iTero Element 5D Plus imagi...

Page 35: ...s cart configuration imaging system 1 8 4 iTero Element 5D Plus mobile configuration Front view A Full HD touch screen computing unit B Wand C Cradle Figure 6 Front view of the iTero Element 5D Plus m...

Page 36: ...leeve B Touchpad C Side buttons Scan on off touchpad activation D Air vents E Detachable wand cable with USB connector Figure 8 iTero Element 5D wand Note In order to protect the wand cable the cable...

Page 37: ...iTero Element 5D Plus and 5D Plus Lite imaging systems contain the following exclusive software features l Confirming a new wand sleeve between patients l Toggling the 3D and viewfinder display l Tog...

Page 38: ...the brightness level in the NIRI image the higher the translucency the darker the object and vice versa Tooth enamel is translucent to NIRI and will appear dark Dentin and any interference in the enam...

Page 39: ...possible to make out the following structures Appears Translucency Enamel Dark High Interproximal caries Bright Low Dentin Bright Low The differentiation between carious lesions and dentin is based up...

Page 40: ...proximal caries For more information on using iTero NIRI technology please refer to the iTero Element 5D Clinical Guide 1 11 About this manual This manual provides general information and an overview...

Page 41: ...Assembling the iTero Element 5D laptop configuration scanner l Assembling the iTero Element 5D Plus and 5D Plus Lite scanner cart configuration l Assembling the iTero Element 5D Plus and 5D Plus Lite...

Page 42: ...r AC power Battery Click DC power Power button Wand 2 people are required for installation A Wheel stand B Wand with cable C Wand cradle D HD touch screen E External battery 1 Check the contents of th...

Page 43: ...d cradle with the Allen screw using the smaller Allen key 8 Reattach the cover behind the handle 9 Remove the magnetic cover from the back of the wheel stand frame 10 Loosen the thumbscrews and remove...

Page 44: ...ower cable inserted 15 Attach the magnetic back cover 16 Place the wand in the cradle 17 Connect the wand cable to the back of the touch screen 18 Connect the power cable on the bottom of the wheel st...

Page 45: ...ect the webcam to the USB port at the bottom of the touch screen 22 Plug the power cable into the AC power outlet and then press the Power button to switch on the scanner iTero Element 5D and iTero El...

Page 46: ...AC power outlet Notes l The hub must be connected to an AC wall outlet at all times l The laptop should be connected to an AC wall outlet during intraoral scanning 2 2 1 Installing the iTero Element 5...

Page 47: ...Check for updates to see whether there are new updates available 2 In the registered email Inbox look for the email Your iTero was shipped which includes the download instructions 3 Click the link to...

Page 48: ...act iTero Support for additional help A 2x Allen keys in the white foam on top of the post B Post C Wheel base D Upper handle in the accessory box E Main handle in the accessory box F New sleeve baske...

Page 49: ...are fully tightened 4 Move the wheel stand to an upright position and lock at least 2 wheels 5 Remove the upper handle D from the accessory box Attach it to the post B and tighten using the small Alle...

Page 50: ...ttach the computing unit by pushing in and tightening the screw 11 Tilt the screen upwards and connect the screen cable 12 Place the base of the wand I in the cradle G and then apply gentle pressure t...

Page 51: ...disconnected after each training or support session 17 Plug the power cable J into a power outlet and then press the Power button L to switch on the scanner To remove the wand from the cradle first p...

Page 52: ...nner If the scanner needs to be lifted use the upper handle and the post Do not use the main handle to lift the scanner Figure 15 Moving the scanner Figure 16 Do not lift the scanner using the main ha...

Page 53: ...the box G Power switch This section describes how to l Assemble the scanner described in Initial assembly l Move the scanner within the clinic described in Moving the scanner within the clinic l Pack...

Page 54: ...wn to standing position Ensure that the handle is securely locked in place by trying to pull it back up 5 Open the flap to remove the rest of the scanner components 6 Slide down the cradle on the slid...

Page 55: ...computing unit and then connect it to the USB port at the back of the computing unit Note The webcam is packed in the scanner box 10 Press the power button to turn on the scanner Notes l The webcam mu...

Page 56: ...the scanner it must be packed into the supplied trolley 1 Turn off the scanner and disconnect the power cable 2 For easier packing start by placing the power supply in its designated compartment in t...

Page 57: ...stand and then move it to carrying position 9 Place the computing unit in its compartment in the trolley Thread the outer strap through the handle and close the straps to ensure that it is held secur...

Page 58: ...over provides a certain level of protection against rain but is not waterproof 1 Open the VELCRO flap and slip the protective cover over the trolley handle 2 Pull down to cover the trolley and then cl...

Page 59: ...the mounting solution Optional You can purchase a 3m power cable from Align if required 4 Slide the cradle on the slider on the side of the computing unit until it clicks into place Make sure the crad...

Page 60: ...llow the power pack to dangle in the air l Never tilt the screen more than 45 degrees to make sure that the wand does not slip out of the cradle Figure 18 Never tilt the screen more than 45 degrees iT...

Page 61: ...rize yourself with the scanner s features and perform practice scans without submitting the scans For more information see Working in Demo Mode Note If you select the Demo Mode option before the Make...

Page 62: ...ring the scanner you will have to restart the scanner to access the Make It Mine option To register the scanner 1 In the Welcome page select the required language 2 Tap Make It Mine The Connect page i...

Page 63: ...igure 21 Entering the security key 4 Enter the security key and then tap Connect The scanner is now connected to the Internet and online Figure 22 Scanner is connected to the Internet and online iTero...

Page 64: ...fying the communication with Align 6 When the verification is complete tap Next The Time Zone page is displayed Figure 24 Selecting the time zone iTero Element 5D and iTero Element 5D Plus imaging sys...

Page 65: ...the system to customize the setup 8 Enter your email password and company ID in the fields provided Tap Register and then tap Next The Scanner Configuration page is displayed showing your iTero subsc...

Page 66: ...ment select the check box to accept the terms of the agreement and then tap Next The system checks for an upgrade and is upgraded to the latest version if relevant Figure 28 Checking for updates iTero...

Page 67: ...wide variety of sample cases such as clinical cases Invisalign cases and restorative cases In addition demo cases that can be used for demonstration and training purposes of the iTero Element 5D Revi...

Page 68: ...iTero Element logo at the top of the scanner screen Figure 30 iTero Element logo 2 Tap Demo Mode Figure 31 Demo Mode option iTero Element 5D and iTero Element 5D Plus imaging systems User manual 40 2...

Page 69: ...window with a list of demo users 3 To view iTero restorative cases select the Dr Demo iTero user from the Doctor Name drop down list Figure 33 Demo Login button iTero Element 5D and iTero Element 5D...

Page 70: ...on to the examples of restorative and orthodontic scan types the following demo cases with NIRI are displayed in the list of Past Orders o Demo NIRI Caries in Young o Demo NIRI Early and Established C...

Page 71: ...e 35 Past Orders pane options Note The NIRI column is not displayed for iTero Element 5D Plus Lite systems For more information on working with orders see Working with orders iTero Element 5D and iTer...

Page 72: ...Demo mode l Tap the iTero Element logo and then tap Exit Demo to exit the demo mode Figure 36 Exiting Demo mode iTero Element 5D and iTero Element 5D Plus imaging systems User manual 44 2022 Align Tec...

Page 73: ...ll in all the necessary fields and then tap the Login button Notes l In order to ensure that all Windows security patches are up to date a notification is displayed at the bottom of the Login window a...

Page 74: ...er Figure 38 Unexpected shutdown notification To log in to the scanner 1 Select your username from the Doctor Name drop down list 2 Enter the email address you used when registering with myaligntech c...

Page 75: ...Resetting your password 4 Select the Remember Me check box for the system to remember your email address in future sessions You will still need to enter your password in order to access the scanner 5...

Page 76: ...e a notification is displayed at the bottom of the Login window and home screen as soon as security updates are available For more information on installing security updates see Installing Windows sec...

Page 77: ...In the Login window tap Forgot Password Figure 41 Forgot Password button A window is displayed describing what you should do next Figure 42 Email field for forgotten password iTero Element 5D and iTer...

Page 78: ...o password policy described in iTero password policy 6 If you do not know your registered email address contact iTero Customer Support 4 1 1 1 iTero password policy When changing your password ensure...

Page 79: ...alf an hour during which time the scanner cannot be used It is recommended to install them after your last patient of the day or at any time that is convenient for you Note If you ignore the message a...

Page 80: ...nner when it is not in use Your password will not be remembered by the system By default you will be logged out after a predefined period of inactivity which can be defined in the Login settings descr...

Page 81: ...more than 4 seconds activates a hard reset which can cause problems such as gray and blue screens 4 4 Moving the scanner 4 4 1 Moving the iTero Element 5D wheel stand configuration scanner The scanne...

Page 82: ...moved between rooms within the office and while you are seated with a patient To move the scanner between rooms 1 Ensure that the wand is firmly positioned in the cradle 2 Unplug the system from the...

Page 83: ...er within the clinic The mobile configuration scanner can be carried between rooms within the clinic as well as transported between clinics When carrying the scanner you should always move the handle...

Page 84: ...disconnect the power cable 2 Disconnect the scanner components and pack them in their designated compartments in the trolley For more information see Using the trolley for transportation 3 Close and s...

Page 85: ...res Figure 50 iTero home screen The following buttons are displayed on the home screen Displays the status of the external battery l A lightning bolt indicates that the scanner is connected to the pow...

Page 86: ...ompliant and that all medical information is secure Tip You should lock the system while cleaning it in order to avoid unintended entries Settings Tap to adjust the scanner preferences for example for...

Page 87: ...information see Starting a new scan Patients Tap to view the Patients page with a list of all your patients their chart number and the date of their last scan For more information see Working with pa...

Page 88: ...ng the patient Tap to move to View mode to view the scanned model described in Viewing the scan Tap to send the scanned model to the lab described in Starting the scan Tap to create a screenshot of th...

Page 89: ...ration localization user settings and more For more information on the Settings preferences see Defining the scanner settings Tap to display a translucent Help overlay with hints to aid in the navigat...

Page 90: ...ess the relevant e manual Tap anywhere to close the Help screen and return to the relevant screen 4 5 2 Touch screen gestures The iTero software supports touch screen also known as multi touch gesture...

Page 91: ...ndow 2 Tap the settings you would like to define o Computer settings described in Defining the Computer settings o User settings defined in Defining the User settings o System settings defined in Defi...

Page 92: ...ges and return to the Settings window Figure 57 Brightness settings 4 6 1 2 Defining the default volume setting To define the default system volume tap the Volume button move the slider to the require...

Page 93: ...ect to a different Wi Fi network select the new network and enter the relevant password To reconnect to a Wi Fi network 1 Tap the Wi Fi button A list of nearby Wi Fi networks is displayed Figure 59 Li...

Page 94: ...automatically tap the network you are connected to and then tap Forget You will need to select the required network and enter the Wi Fi password the next time you want to connect Figure 61 Forgetting...

Page 95: ...down list and then tap to save the changes and return to the Settings window Figure 62 Time zone settings Note The time zone settings can be accessed only when you are logged in to the scanner iTero...

Page 96: ...n to the scanner 4 6 2 1 Defining the scan settings You can define the default settings that are taken into account when scanning a patient To define the scan settings 1 Tap the Scan Settings button F...

Page 97: ...he upper jaw Show color while scanning check box Select this check box to show the 3D model in color while scanning by default Scan Order Select the order in which to scan the jaws l Upper Jaw First l...

Page 98: ...ng range is highlighted Additional Scan Feedback Select the relevant check boxes to display areas of missing anatomy while scanning as described in Additional scan feedback l Orthodontic l Restorative...

Page 99: ...yed by default when you open the Scan Details window to fill in a new Rx To define the Rx settings 1 Tap the Rx Settings button Figure 65 Rx Settings window iTero Element 5D and iTero Element 5D Plus...

Page 100: ...lling l Invisalign iRecord l Vivera l Vivera Pre Debond l Restorative Note The list of available options changes according to the subscription package NIRI Captures Select whether NIRI data should be...

Page 101: ...IRI capture can also be disabled for a specific scan as described in Disabling NIRI capture To disable NIRI data capture by default 1 In the Settings window tap Rx Settings 2 In the Rx Settings window...

Page 102: ...3 Tap OK to confirm Figure 68 Rx Settings window NIRI Captures option disabled iTero Element 5D and iTero Element 5D Plus imaging systems User manual 74 2022 Align Technology Inc All rights reserved...

Page 103: ...ture setting Signature options License Add your license number Signature Add your signature Signature Usage Select one of the following signature options l Sign once and save for use with each Rx l Do...

Page 104: ...e server and define the export settings 4 6 3 1 Defining the login settings In order to comply with privacy and security regulations you will be logged out of the scanner after a predefined period of...

Page 105: ...ed out of the scanner Min time 10 minutes Max time 8 hours 3 Select the Keep login active during system restart check box to remember the user s password if the system restarts before the inactivity l...

Page 106: ...peed To run system diagnostics 1 Tap the Diagnostics button The network connection and speed are checked Figure 72 Diagnostics window 2 Tap to return to the Settings window iTero Element 5D and iTero...

Page 107: ...hird party software components installed on the scanner and then tap to return to the Settings window Figure 73 Licensing Information window iTero Element 5D and iTero Element 5D Plus imaging systems...

Page 108: ...hronize any new updates from the server for example new software options 4 6 3 6 Export settings You can define how long exported files should be kept before being deleted In addition you can view the...

Page 109: ...d By default this is set at 30 days Figure 75 Export Settings window deleting exported files 3 If required tap Clear Export Data Now to delete the exported files immediately 4 Tap to return to the Set...

Page 110: ...a new wand sleeve as described below 5 1 Applying a wand sleeve To apply a wand sleeve 1 Gently remove the blue protective sleeve from the wand 2 Gently slide a new sleeve onto the tip of the wand un...

Page 111: ...showing an empty Rx and the progress toolbar at the top of the window If you have an iTero Element 5D Plus Lite system the New Scan window is displayed as follows Figure 78 New Scan window iTero Elem...

Page 112: ...e between patients Note This section is not displayed for iTero Element 5D Plus Lite systems l Notes Enables you to make specific notes regarding the patient s treatment The scanning process requires...

Page 113: ...dding new patients You can add a new patient while filling in the Rx or at any time before To add a new patient 1 In the New Scan window in the Patient area tap Figure 79 New Scan window adding a new...

Page 114: ...Patient window 2 Enter the patient s first name and last name 3 If required enter a chart number 4 Tap Add to add the new patient iTero Element 5D and iTero Element 5D Plus imaging systems User manual...

Page 115: ...ote If you try adding a patient who already exists a message is displayed notifying you that a patient with the same details exists Figure 82 Message notifying that a patient with the same details exi...

Page 116: ...in the New Scan window 5 3 2 Searching for existing patients When searching for an existing patient you must enter at least 3 characters of the patient s name in the search field to see a list of pat...

Page 117: ...sting patient 1 In the Patient area tap Figure 84 New Scan window searching for an existing patient iTero Element 5D and iTero Element 5D Plus imaging systems User manual 2022 Align Technology Inc All...

Page 118: ...h search field 2 In the Search Patient window enter at least three letters in the search field to display a list of patients matching the search criteria iTero Element 5D and iTero Element 5D Plus ima...

Page 119: ...nd list of matching patients 3 Select the required patient and then tap Select Patient Figure 87 Selecting the required patient iTero Element 5D and iTero Element 5D Plus imaging systems User manual 2...

Page 120: ...ou can edit the patient s details In addition you can edit the patient s details when opening the Rx from the patient s profile page as described in Viewing the Rx To edit a patient s details 1 Search...

Page 121: ...t The Edit Patient window is displayed 3 Edit the patient s details as required and then tap Update Figure 90 Edit Patient window and Update button iTero Element 5D and iTero Element 5D Plus imaging s...

Page 122: ...me details already exists To differentiate between patients with the same details use a chart number 5 3 4 Clearing the patient details from the New Scan window If required you can remove the currentl...

Page 123: ...to create a new patient or search for an existing patient It also enables you to enter the details about the case type select whether to include NIRI data in the scan as well as add notes about the ca...

Page 124: ...tion mainly used for referencing and instead of storing the plaster model as required by law This case type can later be changed to iCast or Invisalign if required o Chair Side Milling A restorative o...

Page 125: ...pe selected fill in the relevant details o Restorative and Chair Side Milling case types described in Working with restorative scan types o iCast Select the Brackets Present check box if there are bra...

Page 126: ...d to the wand For more information see Confirming a new wand sleeve between patients Note This is not relevant for iTero Element 5D Plus Lite systems Figure 95 New sleeve attached check box 7 Tap on t...

Page 127: ...elect the Pre Treatment Scan check box if you would like to scan the patient before prepping the relevant tooth In this case the patient must be scanned twice before and after the tooth has been prepp...

Page 128: ...torative treatment options The list of treatment options is the same for all teeth except for the following o Inlay and Onlay Relevant only for the molars and premolars o Veneer Relevant only for the...

Page 129: ...ricated o Preparation Design The shape of the finishing line margin line created by the user during the preparation You can choose this for both the buccal and the lingual o Margin Design The type of...

Page 130: ...displayed in the Treatment Information area Figure 99 Treatment Information area You can change the selected treatment options at any time before sending the scan by tapping iTero Element 5D and iTer...

Page 131: ...ta is not captured saved or sent If required NIRI capture can also be disabled for all scans by default as described in Defining the Rx settings To disable NIRI for a specific scan l When starting a n...

Page 132: ...he viewfinder Figure 102 Review tool is not displayed in View mode After scanning you can view the NIRI status of each scan in the Orders page on the scanner and in MyiTero iTero Element 5D and iTero...

Page 133: ...rm the patient l Pressing either of the wand buttons or tapping OK when prompted when trying to access Scan mode as described in Confirming the new sleeve when accessing Scan mode Failure to confirm a...

Page 134: ...til you tap OK on the screen or press either of the wand buttons 5 5 Scanning the patient After you have filled in the Rx tap on the toolbar to enter Scan mode The Scan window is displayed enabling yo...

Page 135: ...ng the patient tap on the toolbar to move to View mode where you can ensure that the scan is complete before sending it to the lab or storage as described in Viewing the scan 5 5 1 Scanning guidance A...

Page 136: ...l You should be familiar with proper scanning techniques and avoid over scanning 5 5 3 Scan options In Scan mode you can select the following options l Additional scan feedback described in Additional...

Page 137: ...that need additional scanning to ensure that critical areas that could compromise the whole model are not missed Areas with missing anatomy are highlighted in red when scanning in monochromatic mode...

Page 138: ...ault models are scanned in color but you can toggle the display per case by tapping or by default in the Scan settings as described in Defining the scan settings 5 5 3 3 Switching to the next scan seg...

Page 139: ...r display By default when scanning the patient s teeth a large 3D image of the scan is displayed in the center of the screen and the area currently being scanned is displayed in the viewfinder on the...

Page 140: ...eft l To switch to a large viewfinder in the center of the screen tap the button Figure 112 Large viewfinder in the center of the screen and 3D image on the left iTero Element 5D and iTero Element 5D...

Page 141: ...the viewfinder Figure 113 Viewfinder displaying a color image left or a NIRI image right 5 5 6 Editing a scan After you have scanned the model you can edit it using the following tools l Delete Segmen...

Page 142: ...n you can l Delete selected areas of a scan as described in Working with the Eraser tool l Trim excess tissues from the scan as described in Working with the Edge Trimming tool l Manually create the d...

Page 143: ...ep or arch segments were not scanned or not stitched together properly l Bite issues l Missing bite l Bite scanned from one side only l Discrepancy between the left and the right bite scans In additio...

Page 144: ...time is displayed Figure 116 Scan timer button on the toolbar and scan time 2 Tap OK to close the window 5 7 Sending the scan After you have scanned the patient and reviewed the case to ensure that n...

Page 145: ...sage is displayed that the model is being sent and then the patient s profile page is displayed showing the status of the order 5 8 Working with the Viewer The Viewer is a tool that enables you to vie...

Page 146: ...the upper jaw Show hide the lower jaw Show both jaws Open the Review tool to view an area of interest as both NIRI and color images one below the other as described in Working with the Review tool iTe...

Page 147: ...per and lower jaws in the same window Frontal view Figure 120 Model in a 1 window view Relevant for Orthodontic case types only iTero Element 5D and iTero Element 5D Plus imaging systems User manual 2...

Page 148: ...ontic case types only Display the model in a 5 window view with the upper and lower jaws separately and both jaws from the left center and right Gallery view Each model can be controlled separately fo...

Page 149: ...die tools are disabled When the modeling process is completed and the die and margin line have been edited the changes appear in color on the model and the tools are displayed in color indicating that...

Page 150: ...de the sleeve box For more information refer to the instructions in the box Figure 124 Optical surface of the wand 2 Clean and disinfect the wand as described in Cleaning and disinfecting the wand 3 G...

Page 151: ...last scan if relevant Figure 126 Patients page Once you have selected a patient you can view the patient s profile page with the patient s details 6 1 Searching for patients If required you can search...

Page 152: ...h field and then tap the search button Figure 127 Searching for a patient The patients that match the search criteria are displayed Figure 128 Patients matching the search criteria are displayed iTero...

Page 153: ...s not displayed for iTero Element 5D Plus Lite systems From the patient s profile page you can o Create a new scan for the specific patient described in Creating a new scan for a specific patient o Vi...

Page 154: ...eady filled in To create a new scan for a specific patient 1 In the patient s profile page tap New Scan Figure 130 Patient s profile page New Scan option Note The NIRI column is not displayed for iTer...

Page 155: ...illed in Figure 131 New Scan window with patient s details already filled in 2 Fill in the rest of the Rx details according to the new requirements iTero Element 5D and iTero Element 5D Plus imaging s...

Page 156: ...profile page select the order for which to view the Rx and then tap View Rx Figure 132 Patient s profile page View Rx option Note The NIRI column is not displayed for iTero Element 5D Plus Lite syste...

Page 157: ...2 Tap to return to the patient s profile page 6 5 Viewing previous scans in the Viewer If required you can display previous scans in the Viewer iTero Element 5D and iTero Element 5D Plus imaging syste...

Page 158: ...Viewer Figure 134 Patient s profile page Viewer option The scan is displayed in the Viewer Figure 135 Scan displayed in the Viewer For more information on working with the Viewer see Working with the...

Page 159: ...Lite systems The order could have one of the following statuses depending on the case type l Rx Created The Rx has been filled in but the patient has not been scanned yet l Scanning The scan process i...

Page 160: ...Orders page is displayed showing two panes In Progress orders and Past Orders o In Progress Scans have not yet been submitted o Past Orders Scans have already been submitted iTero Element 5D and iTero...

Page 161: ...the Scan window enabling you to create a new scan or continue scanning the patient o View Scans Opens the View window enabling you to review the current scan 3 Tap an order in the Past Orders pane to...

Page 162: ...align users can also select the following Invisalign features l Invisalign Go Outcome Simulator l Invisalign Go Case Assessment l Invisalign Outcome Simulator l Invisalign Progress Assessment 7 1 Work...

Page 163: ...rned order in the In Progress pane To fix a returned case 1 Open the returned order and fix the scan according to the lab s instruction in the Notes area of the Rx 2 Return the order to the lab iTero...

Page 164: ...essages button To view the messages 1 Tap the Messages button on the home screen A list of notifications updates and other messages from Align Technology is displayed Figure 141 Messages page 2 In the...

Page 165: ...tasks such as filling in a new Rx on any supported device for example a PC or a tablet without using valuable scanner time In addition it enables viewing 3D models after they have been created by the...

Page 166: ...D Plus Lite o Working with the Snapshot tool 10 1 Comparing previous scans using iTero TimeLapse technology Patients who are scanned on a regular basis can have their scans analyzed using iTero TimeLa...

Page 167: ...t displayed for iTero Element 5D Plus Lite systems 3 Tap the Compare Selected button to compare and analyze the scans The iTero TimeLapse window is displayed highlighting the areas with changes betwee...

Page 168: ...ew like the iRecord default view 4 Drag the loupe onto the model to view areas of interest and potential treatment areas in the animation window An animation is displayed comparing the state of the te...

Page 169: ...You can zoom in to the image in the animation window or tap the pause button to pause the animation If required you can change the scale of the changes displayed iTero Element 5D and iTero Element 5D...

Page 170: ...ign Go system Invisalign Go is a low stage aligner product that helps you assess and treat patients in just a few taps with guidance every step of the way For more information regarding the Invisalign...

Page 171: ...The Progress Assessment tool includes a report that is a color coded tooth movement table to assist the user in making treatment decisions to track the patient s progress in their ClinCheck treatment...

Page 172: ...ing anatomy l Disable A I Cleanup tool described in Disabling A I cleanup The editing tools are accessed by pressing on the screen Figure 148 Editing tools 10 5 1 Deleting a segment The Delete Segment...

Page 173: ...ete Segment tool A confirmation message is displayed 3 Tap OK to confirm the deletion The entire scanned segment is deleted iTero Element 5D and iTero Element 5D Plus imaging systems User manual 2022...

Page 174: ...e scan so that it can be rescanned To delete a selection 1 Press the screen to display the editing tools 2 Tap the Delete Selection tool Figure 150 Delete Selection tool iTero Element 5D and iTero Ele...

Page 175: ...151 Expanded Delete Selection tool 3 Touch the area of the anatomy you want to delete The selection is removed Figure 152 Selected area of the anatomy is deleted iTero Element 5D and iTero Element 5D...

Page 176: ...be caused by the interference of anatomy lips cheeks and tongue or moisture in the scanning segment The Fill tool highlights these areas and then scans only the highlighted areas in order to prevent o...

Page 177: ...ved from around the edges of the 3D model during scanning If required you can turn off this functionality for the current case Notes l This tool is not supported for edentulous gums l Disabling the A...

Page 178: ...ss material showing Figure 156 Scan displayed with excess material showing 3 To return the excess tissue press the screen to display the editing options and then tap Enable A I Cleanup iTero Element 5...

Page 179: ...d on the Occlusal Clearance legend you can reduce the prepped tooth erase the area on the model and then rescan it as described below To erase part of the scan 1 In the View window ensure you are on t...

Page 180: ...e modified As soon as you lift your finger the selected area is removed and the scan tool is enabled Figure 160 Selected area removed and scan tool enabled iTero Element 5D and iTero Element 5D Plus i...

Page 181: ...Clearance tool The Occlusal Clearance tool enables you to view the contact and distance between the opposing teeth for example to ensure that the prepped tooth has sufficient reduction for the materia...

Page 182: ...Figure 162 Occlusal clearance between the opposing teeth 2 If necessary reduce the prepped tooth and rescan the area as described in Working with the Eraser tool above 3 If required you can change the...

Page 183: ...4 If required tap to take a screenshot of the occlusal clearance For more information on capturing screenshots and adding annotations see Working with the Snapshot tool To display the occlusal clearan...

Page 184: ...ol and legend displayed in the Viewer 3 If required tap to take a screenshot of the occlusal clearance For more information on capturing screenshots and adding annotations see Working with the Snapsho...

Page 185: ...for all case types except Restorative case types To trim the excess material 1 In the View window tap the Edge Trimming tool Figure 165 Edge Trimming tool The Edge Trimming tool expands to show the f...

Page 186: ...trimmed away The area to be trimmed away is highlighted and the confirmation icon is enabled Figure 168 Selected area is highlighted and the confirmation icon is enabled iTero Element 5D and iTero El...

Page 187: ...sition of the green hint point which must be located on the center of the prepped tooth after scanning If required the die separation area can be edited or created manually To display the die separati...

Page 188: ...View mode 3 In the View window tap the Die Separation tool The die separation is displayed in high resolution Figure 171 Die separation is displayed in high resolution iTero Element 5D and iTero Elem...

Page 189: ...following options Figure 172 Die Separation tool options 2 Tap and mark the whole segment with your finger The scan is displayed in low resolution Figure 173 Scan is displayed in low resolution iTero...

Page 190: ...tooth in high resolution The model is displayed as follows Figure 174 Before selecting the die separation iTero Element 5D and iTero Element 5D Plus imaging systems User manual 162 2022 Align Technolo...

Page 191: ...ine The Margin Line tool automatically detects and marks the margin line on restorative case types crowns only Note The margin line may not be created automatically if l The prepped tooth was not scan...

Page 192: ...d zooms in on the prepped tooth Figure 176 Model display moves to the occlusal view and zooms in on the prepped tooth 2 Tap the Margin Line tool The Margin Line tool expands to show the following opti...

Page 193: ...4 If required click to undo the last action You can click the button to undo the last 50 actions 5 If required click to delete the margin line 6 If required click to redisplay the deleted margin line...

Page 194: ...at enables you to view the NIRI and colored intraoral images captured during the scan for every area of interest These images are displayed one below the other in the image pane on the right of the Vi...

Page 195: ...ool with the Snapshot tool on the toolbar and the loupe in the right pane The area within the loupe is displayed in the image pane on the right The display in the image pane changes according to the p...

Page 196: ...contrast and brightness of each image You can zoom in to or out of the selected area of the images displayed in the image pane using the following methods l Using a spreading or pinching gesture on o...

Page 197: ...image pane The image in the image pane is enlarged and only the specific image is displayed Figure 183 Only the zoomed in image is displayed in the enlarged image pane window 2 Tap on the enlarged 2D...

Page 198: ...ault the brightness and contrast toolbar is collapsed Note The color and brightness controls are displayed only when images are displayed in the image pane and not when the loupe is in its default pos...

Page 199: ...he patient s export package and can later be downloaded from MyiTero For more information see Working with the Snapshot tool 10 12 Working with the Review tool iTero Element 5D Plus Lite The View mode...

Page 200: ...ate the Review tool l In the View window tap and then drag the loupe from the right pane over an area of interest Figure 186 Review tool with the Snapshot tool on the toolbar and the loupe in the righ...

Page 201: ...ou can zoom in to and out of the image as well as adjust the contrast and brightness of the image You can zoom in to or out of the selected area of the image displayed in the image pane using the foll...

Page 202: ...erest Figure 188 Zoom in button on the image in the image pane The image pane is enlarged to display the zoomed in image Figure 189 Zoomed in image displayed in the enlarged image pane iTero Element 5...

Page 203: ...as darker and vice versa By default the brightness and contrast toolbar is collapsed Note The color and brightness controls are displayed only when an image is displayed in the image pane and not when...

Page 204: ...p You can tap anywhere in the slider area and drag up or down to adjust the settings 3 Tap to collapse the toolbar 10 12 3Capturing the Review tool images If required you can capture the images displa...

Page 205: ...ile using the Review tool the following screenshots are included l Entire Review tool window including 3D image and 2D NIRI and color viewfinder images Note The 2D NIRI image is not displayed for iTer...

Page 206: ...hes indicating that the screenshot was captured A thumbnail of the screenshot is displayed on the bottom left of the window and remains for 7 seconds Figure 193 Screen capture thumbnail is displayed a...

Page 207: ...notations toolbar contains the following buttons Tap to undo previous annotations Tap to draw on the screenshot Tap to enter text on the screenshot Tap the color for the drawing and text By default th...

Page 208: ...rent color for the next annotation Figure 196 Adding text to the screenshot 4 To save the screenshot with the annotations tap Keep Annotations Figure 197 Screenshot with annotations iTero Element 5D a...

Page 209: ...98 Notification that the screenshots and annotations will be uploaded to MyiTero 5 To save only the screenshots without the annotations tap Discard A confirmation message is displayed Figure 199 Confi...

Page 210: ...to MyiTero The screenshots can now be downloaded from MyiTero from the Orders page or the Viewer Figure 201 Option to download screenshots from the Orders page in MyiTero Note The NIRI column is not...

Page 211: ...kept in its cradle with the blue protective sleeve attached If you have a laptop or mobile configuration scanner the wand should be stored in the supplied carrying case with the protective sleeve atta...

Page 212: ...structions 4 Prepare the following o Required cleaning and disinfecting materials l CaviWipes1 or for a list of alternative materials and the required contact time see Approved cleaning and disinfecti...

Page 213: ...s1 2 Using the soft bristle brush remove any remaining marks and stains on the wand body and wand tip paying special attention to the grooves indents joints vents etc Brush until visibly clean CAUTION...

Page 214: ...g a dry lint free wipe 11 2 3 Drying wand body Air dry the disinfected wand at room temperature 11 2 4 Storage and maintenance 1 Visually inspect the wand for any noticeable damage for example deterio...

Page 215: ...discoloration pitting or cracks CAUTION Do not clean disinfect or use the cradle if any damage is detected Please contact iTero Customer Support for further instructions 2 Prepare the following o Req...

Page 216: ...please refer to Approved cleaning and disinfecting materials for the required contact time Figure 206 iTero Element 5D Remove gross contaminants on the cradle using CaviWipes1 Figure 207 iTero Element...

Page 217: ...ve any remaining marks and stains on the cradle paying special attention to the grooves indents joints etc Figure 209 iTero Element 5D Remove remaining marks and stains on the cradle using the soft br...

Page 218: ...he cradle in a well lit area to ensure all surfaces are visibly clean Disinfection l Using CaviWipes1 thoroughly dampen all external surfaces of the cradle and ensure they remain wet for a minimum of...

Page 219: ...disinfectant wipes or approved disinfectant liquid with a clean lint free wipe and follow the manufacturer s instructions For a list of approved materials see Approved cleaning and disinfecting materi...

Page 220: ...alcohol 1 CaviWipes CaviCide Quats alcohol 3 Clorox HP Wipes 1 4 Hydrogen Peroxide 5 Oxivir 1 Wipes AHP Hydrogen Peroxide 1 Clinell Universal Range Wipes 50 Peracetic Acid 2 Note If the recommended a...

Page 221: ...al staff will be available when the scanner installation is planned to take place l Make sure that the Wi Fi SSID credentials are available Login password l The minimum Wi Fi strength signal for the s...

Page 222: ...To achieve the best reception place all the devices so that the Wi Fi signal travels straight through a wall or partition instead of at an angle l Construction materials make a difference A solid meta...

Page 223: ...dent com 443 Matstore invisalign com 443 Matstore2 invisalign com 443 Matstore3 invisalign com 443 Matstore4 invisalign com 443 Matstoresg invisalign com 443 Matstorechn invisalign com cn 443 AWS IP r...

Page 224: ...he iTero Element 5D touch screen as part of the caries detection solution l Stored scan data is accessible and can be displayed Note Due to electromagnetic disturbance in some cases the image may disa...

Page 225: ...Electrical Fast transient EFT IEC 61000 4 4 2 0 kV on 230 VAC 50 Hz 220 VAC mains 60 Hz Tr Th 5 50 ns 100 kHz Complies Immunity from Surge IEC 61000 4 5 2 0 CM 1 0 kV DM on 230 VAC mains 50 Hz 220 VA...

Page 226: ...relevant for wheel stand configurations only Immunity from Electrostatic discharge ESD EN 61000 4 2 4 kV contact discharge 8 kV air discharge Complies Immunity from radiated electromagnetic fields EN...

Page 227: ...ed Note Due to electromagnetic disturbance in some cases the image may disappear and a non communication message will appear on the touch screen The scanner will return to operation mode after user in...

Page 228: ...M on AC mains 230 V 50 Hz 220 V 60 Hz Tr Th 1 2 50 8 20 s Complies Immunity from conducted disturbances induced by radio frequency fields IEC 61000 4 6 EN 61000 4 6 6 0 VRMS on AC mains 230 V 50 Hz 22...

Page 229: ...ies Immunity from radiated electromagnetic fields EN 61000 4 3 3 0 V m 80 MHz 6 0 GHz 80 AM 1 kHz Complies Immunity from Electrical Fast transient EFT EN 61000 4 4 AC mains 1 0 kV Tr Th 5 50 ns 5 kHz...

Page 230: ...t security legal privacy information technology and quality We identify security risks using robust risk management processes Align Technology is committed to addressing and minimizing security and pr...

Page 231: ...Plus iTero Element 5D Plus iTero Element 5D Plus Lite l Remote maintenance is not possible without permission The devices use TeamViewer for establishing a remote session The TeamViewer software requi...

Page 232: ...et strong passwords with to access scanners and Align systems The more characters it has with special characters the stronger it is Using a passphrase without personal information is one of the simple...

Page 233: ...iTero Element 5D wheel stand configuration system specifications l iTero Element 5D laptop configuration system specifications l iTero Element 5D Plus system specifications iTero Element 5D and iTero...

Page 234: ...C 23 F to 122 F Operating Pressure and Altitude Pressure 520 mmHg to 771 mmHg 69 kPa to 103 kPa Altitude 400 feet to 10 000 feet Storage Transportation Pressure and Altitude Pressure 430 mmHg to 760 m...

Page 235: ...temperature 5 to 50 C 23 to 122 F Operating altitude Altitude 0 feet to 10 000 feet Storage Transportation altitude Altitude 0 feet to 15 000 feet Relative humidity Operating 40 to 70 Storage 30 to 90...

Page 236: ...figuration Mobile configuration 100 240 VAC 50 60 Hz 300 VA max 100 240 VAC 50 60 Hz 250 VA max Operating environmental conditions Operating Temperature 18 C to 26 C 64 4 F to 78 8 F Relative Humidity...

Page 237: ...5 in l Depth 41 5mm 1 6 in Cable length Cart configuration Mobile configuration Wand cable 1 8 m typical Power cable 3000 mm Power cable 1600 mm or 3000 mm Net Weight Cart configuration Computing uni...

Page 238: ...C Scanning technology Parallel Confocal technology Scanning properties l No hovering required scanning can be done at a distance of 0 mm l No field calibration needed l Flexible scanning protocol star...

Page 239: ...ata 94 Color and NIRI mode toggle 113 Color toggle 110 Comparing scans 138 Compliance ii viii Computer settings 64 Confirming new sleeve 105 106 Contraindications ii viii D Delete Segment tool 144 Del...

Page 240: ...4 Router 194 WiFi tips 194 Language settings 76 Laptop configuration 5 Assembly 18 Licenses 79 Logging in 45 First time 33 Logging out 52 Login settings 76 M Maintenance 183 Make It Mine 33 Margin Lin...

Page 241: ...ew 95 View Rx 128 Rx details 128 Rx settings 71 S Safety instructions v xi Scan Sending 116 Starting 82 Timing 116 Viewing 114 Scan color toggle 110 Scan editing 113 Scan options 108 Scan settings 68...

Page 242: ...ons 205 Laptop configuration 207 Wheel stand configuration 206 208 T Time zone settings 67 TimeLapse technology 138 Toolbar 60 Tools Delete Segment 144 Delete Selection 146 Die Separation 159 Disable...

Page 243: ...tion 4 Whitepaper 202 Wi Fi settings 65 Wi Fi tips 194 Z Zooming in and out of images 168 Zooming in and out of images 173 iTero Element 5D and iTero Element 5D Plus imaging systems User manual 2022 A...

Page 244: ...iTero Element 5D and iTero Element 5D Plus imaging systems User manual 216 2022Align Technology Inc All rights reserved...

Page 245: ......

Page 246: ...1 USA 2022 Align Technology Inc All rights reserved Align Invisalign iTero Element among others are trademarks and or service marks of Align Technology Inc or one of its subsidiaries or affiliated com...

Reviews: