Agilent Technologies auroraSonata User Manual Download Page 145

Issue 2 - 07/00

       4-35

Testing in Simulation Mode - Section 2

instructions). For a self call, the CPN is the
number of the line to which aurora

Sonata

 is

connected. With the ETSI protocol, you can
also select 

SUB

 and enter a sub-address if

required.

Note

If you set a new CPN here, it is used for all components of all
one-button tests.

 Tip

You can use the 

Recall 

and 

Save 

function keys to access

numbers in aurora

Sonata

’s speed-dial directory (see Chapter 6

section 1).

-7-

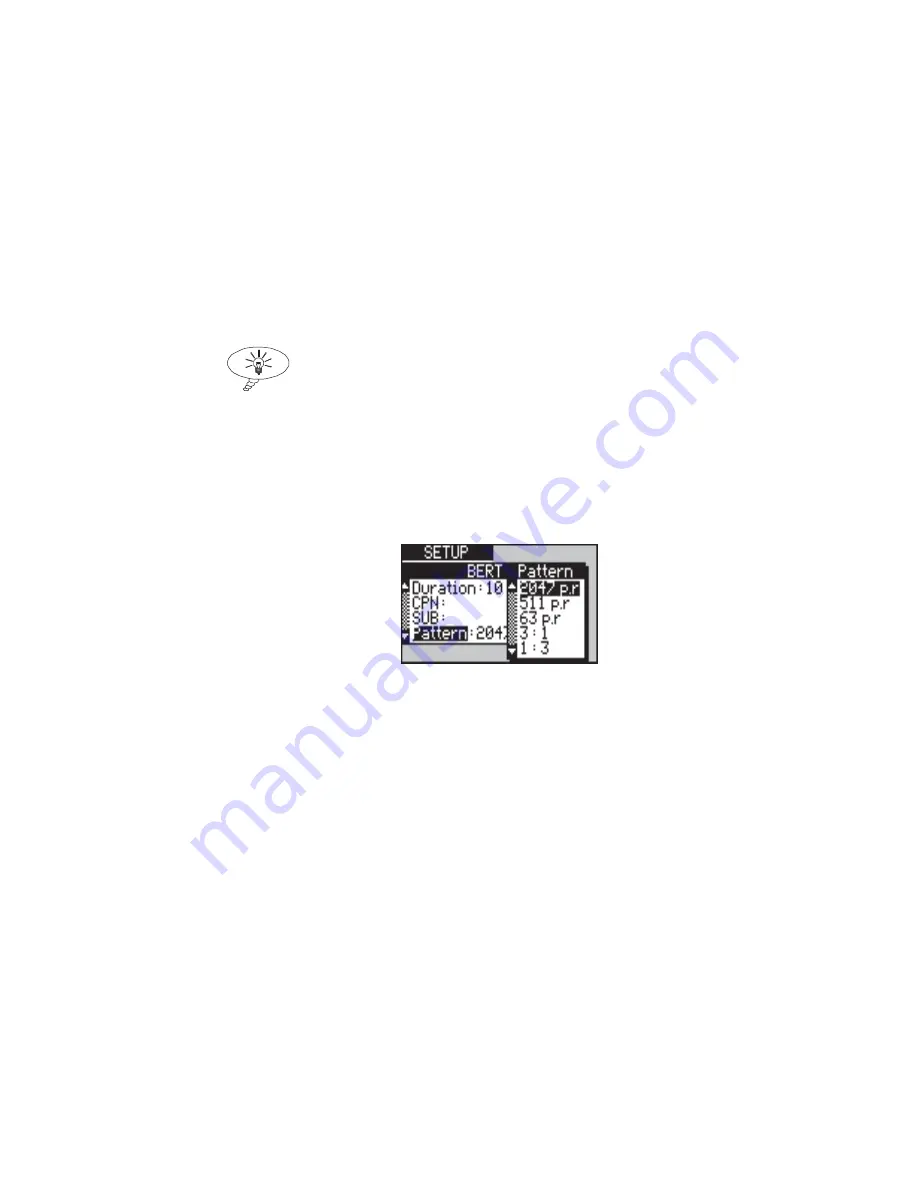
To select the BERT pattern for the test:

Select 

Pattern

.

Highlight the pattern you require and press

ENTER 

to close the option window.

-8-

When you have set up the test details, press

ESC 

to return to the 

Line quality 

component

display and 

ESC 

again to return to the main

ISDN Test Suite.

-9-

With 

Line quality

 still highlighted, press the

Go 

function key.

Note

During the test any incoming calls are answered automatically
and a loop applied to the relevant B channel, irrespective of
call type and answer mode settings.

Summary of Contents for auroraSonata

Page 1: ...427869 Issue 2 07 00 auroraSonata Hand Held ISDN Tester User Guide aurora Sonata Cover P65 25 07 00 09 55 1 Advanced Test Equipment Rentals www atecorp com 800 404 ATEC 2832 Established 1981...

Page 2: ...auroraSonata Hand Held ISDN Tester User Guide 427869...

Page 3: ...t and all restrictions on reproduction and use apply to all media in which this information may be placed Trend Communications Ltd pursues a policy of continual product improvement and reserves the ri...

Page 4: ...auroraSonata Hand Held ISDN Tester User Guide ii 427869...

Page 5: ...d held or hands free operation 2 9 Section 2 Using the menus and windows 2 12 The top level menu 2 12 Moving through the items in a menu 2 13 Selecting a menu item 2 14 Using the function keys 2 14 Ex...

Page 6: ...ecks 4 15 Checking the line voltage 4 15 Checking Layer 1 4 16 Checking the status of Layers 2 and 3 4 21 Checking the protocol activity 4 22 Detecting NEBE FEBE 2B1Q 4 22 Bit Error Rate Testing BERT...

Page 7: ...ling automatic call back 6 15 Understanding the channel activity display 6 16 Displaying call information for a channel 6 16 Clearing a connection 6 16 Going back to normal operation 6 16 Section 3 Sy...

Page 8: ...ations 9 5 Regulations and approvals 9 7 BERT 9 8 Product safety 9 8 Quality and reliability 9 8 Section 2 Notes for Purchasers 9 9 Customising your auroraSonata 9 9 Optional accessories 9 11 auroraEx...

Page 9: ...Issue 2 07 00 1 1 Welcome to auroraSonata Section 1 Chapter 1 Welcome to auroraSonata Contents Section 1 About the User Guide 1 2 Section 2 Introducing auroraSonata 1 7...

Page 10: ...options or accessories for your auroraSonata you may want to put Chapters 1 and 2 and Appendices 3 and 4 in a separate binder You can obtain a new binder free of charge from Agilent Technologies Abou...

Page 11: ...auroraSonata and the User Guide Chapt 2 Basic instructions to get you started Chapt 3 How to set up auroraSonata and connect and clear a basic call Chapt 4 How to test an ISDN link by using auroraSona...

Page 12: ...peface for example Press ENTER Menu options are shown in a different typeface for example Choose Setup Tips notes and warnings Tip Indicates useful information for example a short cut for the task you...

Page 13: ...which only applies to Basic Rate BRI or Primary Rate PRI testing is marked as follows All example screens in the Guide relate to BRI testing Where the feature being described operates differently for...

Page 14: ...col analysis package which is mentioned occasionally in the Guide For a brief outline of this product see Chapter 9 section 2 or for more details consult your Agilent Technologies representative If yo...

Page 15: ...network via ISDN switches the operation of the call control protocols ISDN fixed links which do not use protocol support the integrity of a call and the quality of service the availability and operati...

Page 16: ...ult it whenever you need to How auroraSonata fits together The tester consists of a main unit onto which are fitted one or more optional interface modules Each module is used to test a particular tele...

Page 17: ...e while auroraSonata is switched on or connected to the network You must also observe all safety warnings related to the power supply These are set out in Chapter 8 Looking after auroraSonata Although...

Page 18: ...e plastics A look at auroraSonata The main features of auroraSonata are identified below Summary of the main features External power supply The connector used to supply power from an Battery charger e...

Page 19: ...eypad Alphanumeric keypad including digits 0 9 and keys function keys and Shift functions Interfaceconnectors Connectors for the interfaces fitted on your auroraSonata Microphone Used for making speec...

Page 20: ...handsets Used for DTMF tones and with the Keypad facility Arrowkeys You use these keys to move the cursor To move one step press and release an arrow To move several steps in the same direction hold...

Page 21: ...orm specific operations For each number key with a shifted function the additional task is denoted by a yellow symbol For example The different combinations you can use are Adjusts the screen contrast...

Page 22: ...3 section 2 Allows you to change channels without going into the channel selection screen Moves up one page on a menu Highlights the first item on a menu Moves down one page on a menu Highlights the...

Page 23: ...ation has been achieved Off Flashing red Steady green Red Off Flashing green Steady green Yellow Red Red Green Sonata Sonata l aurora has received an Alarm Indication Signal AIS on a PRI link Sonata L...

Page 24: ...nnector Line Connector Blanking Plate U Interface S Interface Each interface has an LED which shows green Monitor mode or red Simulate mode when the interface is selected Where two interfaces are in u...

Page 25: ...ort 9 pin to 25 pin D type converter optional mains battery charger eliminator appropriate to the country of use For Basic Rate S interface testing 2m RJ45 to RJ45 100R cable supplied as standard moni...

Page 26: ...auroraSonata Hand Held ISDN Tester User Guide 1 18 427869...

Page 27: ...Issue 2 07 00 2 1 Getting Started Section 1 Chapter 2 Getting Started Contents Section 1 Preparing to Use auroraSonata 2 3 Section 2 Using the Menus Windows 2 12 Section 3 Basic Operations 2 16...

Page 28: ...in Chapter 1 Chapter summary To allow you to find information more easily the chapter is divided into the following sections Section 1 Preparing to Use auroraSonata Section 2 Using the Menus and Windo...

Page 29: ...ta to an external power source if you require one this is usually the mains supply Then you need to connect to the interfaces on which you intend to test Tip You will find more information about the p...

Page 30: ...e unit You will find a diagram of the connectors and details of their corresponding cables in Chapter 1 section 2 To connect auroraSonata to an interface 1 Plug the interface cable into the appropriat...

Page 31: ...etting Started Section 1 Connections for simulation on the ISDN The following diagrams show all the points on the ISDN where you can connect and test using auroraSonata in Simulation mode See Chapter...

Page 32: ...ld ISDN Tester User Guide 2 6 427869 Connections for line monitoring The following diagrams show all the points on the ISDN where you can connect and test using auroraSonata in Monitor mode See Chapte...

Page 33: ...in the same way For details on how to change the configuration of auroraSonata s serial port see Chapter 3 section 1 1 Use the RS232 cable to connect auroraSonata s serial port to the serial port on t...

Page 34: ...changing the contrast or switching the backlight on and off Changing the contrast 1 Press and hold 1 The screen shifts through a range of contrasts When the contrast is the way you want it release th...

Page 35: ...er You can then set it down or hang it up and continue to hear activity on the line Note When you switch on auroraSonata it is always in hand held mode even if you set it to hands free when you last u...

Page 36: ...ands free operation Removing the belt hook 1 Remove the battery pack cover To do this Loosen the screw by turning it anticlockwiseusing a coin or screwdriver When the screw is released it pops up Slid...

Page 37: ...e to tighten Warning Tightening the screw Make sure the screw is tight enough to avoid the cover coming off when you try to hang up auroraSonata from its belt hook Replacing the belt hook 1 Remove the...

Page 38: ...splays an option window This is a pop up box listing the settings or values you can choose for the item you have selected For example The top level menu The top level menu leads to all auroraSonata s...

Page 39: ...t from each option list and sub menu in turn See Exiting from a menu or option window later in this section Moving through the items in a menu Use the arrow keys to move the cursor up and down through...

Page 40: ...em displays an option window for you to choose a setting or value for the item you have selected Using the function keys auroraSonata has four function keys labelled F1 to F4 You use them to carry out...

Page 41: ...when you press ENTER to select a value or setting auroraSonata automatically closes the window To close the window without changing the setting press ESC Switching between windows For some menus and f...

Page 42: ...ng choose the operating mode enter alphanumeric information e g names to identify stored test results Getting on screen Help You can get on screen Help at any time while you are using auroraSonata The...

Page 43: ...ncoming call you can change the ringer volume To adjust the volume 1 Press 3 auroraSonata displays a bar graph indicating the current volume and showing whether you are changing the volume of the ring...

Page 44: ...rfaces window lists the interfaces that are fitted on your auroraSonata Where you have two interfaces which can be combined to perform a specific task e g two 4B3T U interfaces you have the option to...

Page 45: ...ou require 2 Press ENTER to select the operating mode and display its main menu or selection screen Entering alphanumeric information When performing certain tasks you need to enter a string of alphan...

Page 46: ...y point in the string by switching to the edit window and moving the cursor In the edit window to move quickly from the last character to the first press Home To move from the first to the last charac...

Page 47: ...Issue 2 07 00 3 1 First Steps in Testing Section 1 Chapter 3 First Steps in Testing Contents Section 1 Setting up auroraSonata 3 3 Section 2 Connecting a Basic Call 3 43...

Page 48: ...tions as follows Section 1 Setting Up auroraSonata Section 2 Connecting a Basic Call The information is useful for beginners who will learn about the different settings and can use the step by step in...

Page 49: ...e In this Guide settings for specific tests are covered in the same chapters as the tests themselves For Bit Error Rate Test BERT settings see Chapter 4 and for Monitor settings e g Idle Codes see Cha...

Page 50: ...ates charging information S bus term n On the S interface this allows you to connect and disconnect an 100 resistor on the S bus PRI term n Allows you to terminate the PRI link with 75 or 120 CRC4 Swi...

Page 51: ...urchased Forexample 2 Highlight the protocol you require and press ENTER Note There may be national variations of a protocol related to features such as Advice of Charge If you need details related to...

Page 52: ...ttings which you define to suit the test you intend to perform The following pages describe each setting in turn explaining what it is for and how to set it up Following this is a set of examples indi...

Page 53: ...ies the ISDN protocol link on which you intend to test as either point to point or point to multipoint The values you can choose for these settings depend on the protocol and interface you have select...

Page 54: ...t a n o S e h t s a s t c a 1 r e y a L t a r o t a r e n e g k c o l c k r o w t e n Note When you chooseTE auroraSonata sets L2 protocol see Identifying the protocol master and slave below to Slave...

Page 55: ...ng the Layer 3 master slave When TN1R6 T or TN1R6 N is selected the Emulation menu has an additional setting L3 Protocol This setting determines whether it is auroraSonata or the connected device that...

Page 56: ...t i e it is not a fixed link you need to specify whether you intend to test an ISDN point to point PP link or a point to multipoint PMP link CorNet N and TN1R6 N only operate on point to point links T...

Page 57: ...s r e y a L t a e v a l s l o c o t o r p e h t d n a 1 r e y a L t a r o t a r e n e g 3 2 T L e v a l S I R B a r o r u a e c a f r e t n i U e h t t A a t a n o S t a T L n a s e t a l u m e e h t...

Page 58: ...creen shows which interface is currently selected for example S Hot Keys Tip To see details of the settings assigned to a Hot Key highlight its number and press ENTER How the Hot Keys work Each of the...

Page 59: ...to it For Basic Rate operation the protocol master slave setting is indicated as follows TE Emulate a TE acting as protocol slave NT Emulate an NT acting as protocol master LT Emulate an LT acting as...

Page 60: ...s by pressing the number on the keypad Tip To display the settings assigned to a Hot Key highlight its number and pressENTER 4 Press the OK function key auroraSonata reconfigures its settings in the w...

Page 61: ...d return to the list of settings To change the settings assigned to a Hot Key 1 Highlight each setting and press ENTER to display an option window For example 2 Change the setting as required For deta...

Page 62: ...the Layer 2 link for calls B TEI Determines the way in which Terminal Endpoint Identifiers TEIs are used A TEI is a unique identity for each terminal on the ISDN link Before you can make calls from a...

Page 63: ...e h c t i w s e r u t u f r o f k n i l e h t p u s p e e k t i s d e e c c u s t i f I e d a m s l l a c Note This setting also determines the point at which Layer 1 activates for a call for details...

Page 64: ...TE on the link You can assign one fixed TEI value 1 Select B TEI 1 or B TEI 2 to display an entry window 2 Type a number between 0 and 63 you cannot enter a higher number You can overwrite any digitsa...

Page 65: ...u are emulating a TE auroraSonata allows you to request charging information from the NT When CorNet T is selected you cannot configure auroraSonata as a NT therefore you cannot set up charging inform...

Page 66: ...able charge generation and choose whether auroraSonata generates the information automatically at 10 second intervals or whether you generate it manually 1 Choose Mode to display an option list 2 High...

Page 67: ...This depends on the network and the country of operation for example in Germany the AOC is always sent in an Information message If you are unsure about the setting you require contact the service pr...

Page 68: ...g the S bus On a Basic Rate link it is necessary to have the S bus terminated with 100 at either end This is normally done by the NT and the most distant socket on the bus When using auroraSonata for...

Page 69: ...select CRC4 to display an option window 2 Highlight Off or Onand pressENTER When CRC4 checking is switched on the CRC LED lights up red when auroraSonata detects a CRC4 error For full details of the p...

Page 70: ...play the possible encoding types 2 Highlight the type of encoding you wish to use and pressENTER The options are Note auroraSonata cannot have a connected call with a device using a different type of...

Page 71: ...nnection UUI Allows you to test the User to User Signalling UUS supplementary service CUG Allows you to test the Closed User Groups CUG supplementary service Note The instructions for testing CLIP R C...

Page 72: ...m r o f r e b m u N n o i t c e n n o c l a n o i t a n r e t n i s e i r t n u o c e h t o t g n i d r o c c a y r a v l l i w s n o i t c e n n o c e h t g n i v i e c e r d n a g n i t a i t i n i...

Page 73: ...x e l e T T N t e N r o C I S T E o t r e f e R n a l p g n i r e b m u n x e l e T s l i a t e d r e h t r u f r o f 9 6 F n o i t a d n e m m o c e R l a n o i t a N T N t e N r o C I S T E c i l b...

Page 74: ...lock Once you have defined these settings the way you want them you will probably not need to change them often 1 From the main Setup menu select General to display a sub menu of general settings Time...

Page 75: ...internal clock auroraSonata has an internal clock calendar Real Time Clock which is used to time stamp protocol decodes and test results To change the time 1 From the General Setup menu select Time to...

Page 76: ...essed after a certain length of time To choose the time delay before auroraSonata switches off 1 From the General Setupmenu selectAuto power off to display the options 2 Highlight the time delay you r...

Page 77: ...your auroraSonata can operate 2 Highlight the language you wish to use and press ENTER to select it The option window closes Changing the country of operation auroraSonata can cater for regional vari...

Page 78: ...e The Tracer setting in this menu is used both to determine what is output at the serial port and to select the format and destination of the protocol decode For more information on protocol analysis...

Page 79: ...r o p l a i r e s e h t o t n o i t a r e p o a r o r u a d n e r T h t i w e l b i t a p m o c t r e p x E s w o d n i W r o f T R E B e h t o t t s e t R E B a m o r f d e t a r e n e g t u p t u o...

Page 80: ...f a t a d t s e i l r a e e h t g n i t i r w r e v o s n i g e b n o i s s e s t n e r r u c Note This setting does not affect auroraSonata s real time buffer the section of memory which holds the l...

Page 81: ...ata Note This setting must be the same on both auroraSonata and the connected device 1 Select Data Bits 2 Choose either 7 or 8 and press ENTER Setting the parity configuration You need to set the pari...

Page 82: ...d the connected device 1 Select Stop Bits to display an option window 2 Choose either 1 or 2and press ENTER Using Xon Xoff flow control Xon Xoff is a protocol which controls asynchronous flow between...

Page 83: ...i n e e r c S r o F d e s u g n i e b g n i n e e r c s l l a c f o e p y t e h T e l p m a x e n e e r c S I L C g n i d o c n E r o F d e s u g n i e b g n i d o c n e e c i o v f o e p y t e h T e...

Page 84: ...Setup menu select General This displays theGeneral Setup menu 2 Select Set Defaults to display a sub menu for setting and selecting default values Get Defaults Return auroraSonata to your custom sett...

Page 85: ...tory defaults Note This cancels any custom defaults you have set up see Saving the current settings as custom defaults later in this section for details on this feature 2 To confirm press the OK funct...

Page 86: ...c a F y a l p s i D e g r a h C I S T E s t i n U e p y T C O A D C O A g n i d o c n E e c i o V w a L A n o i t a n i m r e T S I R B f f O n o i t a n i m r e T I R P I R P m h o 0 2 1 4 C R C I R...

Page 87: ...H 5 1 h t g n e L t s e T m o t s u C e t u n i M 1 s g n i t t e S l a r e n e G f f O r e w o P o t u A s e t u n i M 0 1 s g n i t t e S e m u l o V e u l a v 0 5 t a l l A t s a r t n o C n e e r...

Page 88: ...that you wish to save the current settings as custom defaults 2 To confirm press the OK function key To cancel pressESC Note auroraSonata stores these settings until the next time you return to the f...

Page 89: ...and check whether you can make a call between it and one of the following another piece of ISDN equipment a Terminal Adaptor TA connected to non ISDN equipment another ISDN tester another B channel on...

Page 90: ...up auroraSonata to use any available B channel Bx You cannot connect a call on the D channel unless you have X 25 installed on your unit see the X 25 Operation Annex for details but on a Basic Rate f...

Page 91: ...g the selection screen When you want to see the channel activity display or when you prefer not to switch through the channels one by one e g on a PRI link you can display a graphical representation o...

Page 92: ...Making an outgoing call summary The steps involved in making an outgoing call are set out below For a detailed description of each step see Making an outgoing call details later in this section Note W...

Page 93: ...earer services and teleservices in Chapter 4 Section 4 Layer 1 activation may take up to 35 seconds when connecting to a CorNet T switch This is a feature of the ISPBX which mayvaryaccordingtoload The...

Page 94: ...oraSonata lets you access the Dial Options menu see Setting up dialling information in section 1 from the Outgoing ISDN Call screen as well as from the main Setup menus You can use the Dial Options me...

Page 95: ...e options 2 Highlight the dialling mode you require and press ENTER to select it The options are e d o M g n i l l a i D c o l B n E l o r t n o C l l a C e n o n i d e l b m e s s a l l a e r a s t i...

Page 96: ...mply leave it as it is and proceed with the call For details on how to identify a CPN numbering plan and type see section 1 To change the CPN 1 From the Outgoing ISDN Call menu select CPN to open an e...

Page 97: ...entry window opens Tip To dial a new sub address instead of changing digits on the existing one simply move the cursor to SUB and start typing digits The entry window opens automatically showing the d...

Page 98: ...u begin the call depends on the dialling mode En Bloc dialling With en bloc dialling all the digits are sent when you have entered the whole number 1 Press the Off Hook function key auroraSonata dials...

Page 99: ...roraSonata receives an incomingspeechcall youalwaysansweritmanually For incomingdata calls you choose in advance whether auroraSonata connects automatically or waits for you to connect manually You wo...

Page 100: ...y shows the number the caller dialled This may not be the same as the connected number for example when the call has been forwarded You can test the Call Deflection supplementary service at this point...

Page 101: ...annel activity screen see Displaying current call activity on the channels later in this section You can then switch to this channel to accept the call Call Waiting notification for incoming calls Whe...

Page 102: ...on how to use test calls in Chapter 4 Note When auroraSonata is emulating an NT and Advice of Charge is enabled and set up for manual generation the Connected window has an AOC function key which you...

Page 103: ...the link to release all B channels returning them to the Idle state 1 From the main Simulate menu selectRestart Note auroraSonata displays a screen prompting you to confirm your instruction OK or canc...

Page 104: ...ent timeslots On a Primary Rate link you can also set up an unframed loop where the data is sent as a full 2 megabit stream See Unframed Layer 1 tests in Chapter 4 section 2 There are two types of loo...

Page 105: ...Codec between speech calls Although you can have speech calls in progress on all B channels simultaneously the Codec audio coder decoder can only be connected to one B channel at a time When you have...

Page 106: ...a h t n o i t a m r o f n i r e s U o t r e s U y n A d e v i e c e r r o e g r a h C l l a c e h t r o f e c i v d a g n i g r a h C e s u a C N D S I e r e h t n e h W e d o c e s u a c N D S I d e...

Page 107: ...n Hook function key auroraSonata displays a window showing the Clearing Cause Code see About the Cause Codes later in this section 2 Press ESC to close the Cause Code display auroraSonata returns to t...

Page 108: ...ease Complete message is displayed see About the Cause Codes later in this section for details 3 Press ESC to leave the Cause Code display If you do not press On Hook or test MCID within a certain tim...

Page 109: ...auroraSonata receives a Clearing Cause Code in the Release message When a remote user or the network initiates call clearing auroraSonata receives a Disconnect Cause Code in the Disconnect message Whe...

Page 110: ...auroraSonata Hand Held ISDN Tester User Guide 3 64 427869...

Page 111: ...Section 1 Chapter 4 Testing in Simulation Mode Contents Section 1 Introduction 4 4 Section 2 Physical Line Quality Checks 4 15 Section 3 Channel Testing 4 38 Section 4 Testing Service Availability 4 4...

Page 112: ...DN equipment or the network It is divided into sections as follows Section 1 Introduction Section 2 Physical Line Quality Checks Section 3 ChannelTesting Section 4 TestingServiceAvailability Section 5...

Page 113: ...4 3 Testing in Simulation Mode Section 1 Connecting to the ISDN The following diagrams show the points on the ISDN where you can connect auroraSonata for simulation when the appropriate interface modu...

Page 114: ...a TE or a Network Termination NT Using the termination resistor The S bus must be terminated with 100 at each end This is normally done by the NT and the most distant socket on the bus For simulation...

Page 115: ...an NT on the S interface When you emulate an NT at the S interface you are using auroraSonata to replace the NT and the ISDN You can use this when installing a TE you can make test calls to auroraSon...

Page 116: ...U interface side of the NT auroraSonata can emulate a TE on the U interface using 2B1Q 4B3T or Up0 line coding when the appropriate module is fitted Emulating an LT on the U interface You would use a...

Page 117: ...te a TE on a PRI link to determine whether a TE is faulty to check the line reliability e g using BERT during line provisioning or maintenance to test the line configuration line quality and the avail...

Page 118: ...es of ISDN link links which use ISDN protocol transactions for call control For Basic Rate such links may be either point to point or point to multipoint while for Primary Rate they are always point t...

Page 119: ...Notes Because there is no D channel protocol there is no way to tell when auroraSonata receives a fixed link call Both ends of the link must be set up for fixed link operation When auroraSonata is set...

Page 120: ...g line provisioning run the four preconfigured one button tests in sequence with all components selected s t s e T n o t t u B e n O d e r u g i f n o c e r P e n i L t a r u g i f n o C n o i t n i o...

Page 121: ...ne ID Presentation Restriction COLP R Sub addressing and Advice of Charge AOC supplementaryservices For TN1R6 N and TN1R6 T the Outgoing Channel Test component is only available whenL3 Protocol in the...

Page 122: ...R to list the available components for the highlighted test For example A tick indicates that the component is currently included in the test To add or remove a component 2 Highlight the component and...

Page 123: ...component on screen as they occur You can stop the test at any time by pressing the Abort function key Viewing and printing stored results auroraSonata stores the most recent set of results for each c...

Page 124: ...2 Select a test The screen below shows typical results for the Outgoing Channel component If you aborted the test part way through the results screen displaysAbortedfor each value from that point onw...

Page 125: ...BERT Checking the line voltage For all Basic Rate interfaces you can check the voltage of the line to which you are connected auroraSonata can display the voltage to an accuracy of 1V between 250V an...

Page 126: ...ormation about the OSI 7 layer model in the Glossary and the Introduction to ISDN In Simulation mode you can tell whether Layer 1 is active by checking the Line A LED Off means that Layer 1 is not act...

Page 127: ...being divided into timeslots framed the data is transmitted as a full 2 megabit stream You can therefore test line quality over the entire link rather than over a specific channel Tip For details of h...

Page 128: ...nframed Loop auroraSonata provides a loop so that all data it receives from the remote device is sent back out as a full two megabit transmission You would use this when performing an unframed BERT Wh...

Page 129: ...must turn off this test before you can exit the menu CRC4 error checking When CRC error checking is enabled in the ISDN Setup menu see Chapter 3 section 1 the CRC LED lights up red when a CRC4 error i...

Page 130: ...r f i t l u m e h t n i d r o w 4 0 7 G C R C 4 C R C 4 k c e h C y c n a d n u d e R c i l c y C E s a s r o r r e C R C h t i w s e m a r f i t l u m f o r e b m u n e h T n o i t c e n n o c e h t...

Page 131: ...odel in the Glossary and the Introduction to ISDN In Simulation mode the status of Layers 2 and 3 is indicated by vertical arrows on the Status bar For example Notes Layer 1 must be active before Laye...

Page 132: ...col information to auroraSonata s serial port or save it to memory See Chapter 7 section 1 for instructions Notes There can be no protocol activity unless Layer 1 is active i e the Line A LED must be...

Page 133: ...fixed link you can also perform D channel BERT Tip You can perform BERT over voice or data type calls However to test audio quality it may be simpler to make a speech call to another engineer or a re...

Page 134: ...other B channel Setting up BERT operation 1 From the ISDN Setup window select BERT to display a menu of BERT settings Tip You can change the BERT settings during the call to test with different settin...

Page 135: ...stom test length auroraSonata displays aUser Defsetting To set a custom User Defined test length 1 Select User Def 2 Type the length in hours minutes and seconds two digits for each and press ENTER Se...

Page 136: ...ors or as an HRX percentage HRX Hypothetical Reference Connection is a model used to study the performance of ISDN where the percentages represent the allocation of degraded minutes and errored second...

Page 137: ...o connect incoming data calls You can choose whether auroraSonata connects incoming data calls automatically or whether you connect them manually Tip When you intend to make data type self calls i e t...

Page 138: ...the Comms Tracer setupmenu to BERT SeeConfiguring the serial port protocol output in Chapter 3 section 1 Performing BERT using a connected call You can use BERT for quality checking across the B chan...

Page 139: ...it is transmitting so that they can be compared To check that this is the case look at the BERT Sync LED Steady green means that the patterns are synchronised If they are out of step check that the r...

Page 140: ...you can scroll up and down through the on screen results The table below explains the display Stopping the test manually You can stop a BER test manually at any time You might do this when Duration i...

Page 141: ...the test call See Changing the BERT settings while connected below To start a new test 1 Press the Start function key To return to the Connected window for the test call 1 PressESC Changing the BERT s...

Page 142: ...select Review Results auroraSonata displays a sub menu from which you can choose the type of test results you wish to view Note If you press the Clear function key while BERT is highlighted auroraSon...

Page 143: ...able You can use auroraSonata s ISDN Test Suite to perform BERT quickly and easily either on its own or as part of a series of checks for example during line provisioning For a full introduction to th...

Page 144: ...close the option window 5 To change the test length SelectDurationto display an option window Highlight the duration you require or User Defined if you wish to set a custom duration Press ENTER to clo...

Page 145: ...numbers in auroraSonata s speed dial directory see Chapter 6 section 1 7 To select the BERT pattern for the test SelectPattern Highlight the pattern you require and press ENTER to close the option wi...

Page 146: ...you have the option to perform BERT on the D channel as well as the standard B channel test Notes Do not attempt to perform D channel BERT on a live signalling line as this could damage the operation...

Page 147: ...Issue 2 07 00 4 37 Testing in Simulation Mode Section 2 3 Select the test option you require...

Page 148: ...est Suite in section 1 The Test Suite allows you to test channel availability and or configuration against a range of ISDN bearer services You might perform these checks as part of a series of tests f...

Page 149: ...Emulation menu See Identifying the Layer 3 master slave in Section 1 of Chapter 3 1 Display the ISDN Test Suite For instructions on how to do this and general information about the Test Suite see Int...

Page 150: ...hoose the bearer service for the test calls SelectService Highlight the service you require and press ENTER to close the option window 3 You can perform a local test to the exchange or a distant test...

Page 151: ...structions see Identifying the CPN for the call in Chapter 3 section 2 Select SUB if required and repeat the process Tip You can use the Recall and Save function keys to access numbers in auroraSonata...

Page 152: ...ess theGo function key Understanding the test results During the Channel one button test auroraSonata displays the results for each component in real time The Status bar shows the channel currently be...

Page 153: ...he example screen below shows a typical set of results for the Outgoing Channel component performed on a Basic Rate link auroraSonata stores the most recent set of results for each component and you c...

Page 154: ...ISDN calls and TEI availability for X 25 operation Bearer services and teleservices A bearer service e g Data 64K provides the basiccapability for transmission of signals between user network interfa...

Page 155: ...4 p u o r G x a F 9 9 9 8 9 9 9 o e d i V 9 9 9 8 9 9 9 t x e t e l e T 9 9 9 8 9 9 9 K 6 5 a t a D 9 8 9 8 8 8 9 t x e t o e d i V w e N 9 9 9 8 9 9 8 t x e t o e d i V K 4 6 9 9 9 8 9 9 8 9 1 C U 1...

Page 156: ...ntify that a teleservice is available on a link it cannot identify which channel the teleservice is availableon Tip For an introduction to the ISDN Test Suite and its applications see Introducing the...

Page 157: ...omponent tests that can be included in the Available services one button test Press ENTER if necessary to place a tick in the box next to Teleservice Note When auroraSonata is emulating a TE the list...

Page 158: ...perform either a local test to the local exchange or a distant test to a remote user To do this Select Destination to display an option window Highlight either Local or Distant and pressENTER The opti...

Page 159: ...etails on speed dialling see Chapter 6 section 1 4 You need to select the services to be checked during the test For example you may want to check only those services that are available on the network...

Page 160: ...st call for the service was successfully established and cleared normally Fail means that the call could not be established or was cleared with an abnormal cause The Status bar shows the service curre...

Page 161: ...ested When you start the test auroraSonata transmits a series of Layer 2 SABMEs one at a time each containing SAPI 16 and one of the TEIs in the range you have set up If auroraSonata receives a respon...

Page 162: ...to place a tick in the box next to X 25 TEI 3 Set the range of TEIs to test To do this Press the Setup function key auroraSonata displays a screen for you to set the first and last TEIs in the range t...

Page 163: ...ng the test 1 With Line Config highlighted press theGo function key Understanding the test results During the test auroraSonata displays the result Pass or Fail for each TEI in the range being tested...

Page 164: ...ork and operating as specified for the protocol Your auroraSonata must be configured to test supplementary services andmust be emulating a TE Terminal Equipment Services supported by auroraSonata auro...

Page 165: ...pending on the protocol being used Note Call Forwarding is set up in advance for future incoming calls It is not the same as Call Deflection which deflects a single call when it is presented For detai...

Page 166: ...l incoming calls f Forward all incoming calls OR orward calls that are not answered within a certain time the time is defined by the network The type of call forwarding depends on the service subscrib...

Page 167: ...n auroraSonata is set up to test a Basic Rate point to multipoint link the Call Forwarding setup screen has a CLI options selection which displays theCLI COL menu You must set up a CLI to test Call Fo...

Page 168: ...bscriber receiving an incoming call to send it to another number Notes This service deflects a single call at the time when it is presented unlike Call Forwarding which you set up in advance for futur...

Page 169: ...allows you to test a number of supplementary services that operate during call setup Calling Line ID Presentation Calling Line ID Restriction Connected Line ID Presentation Connected Line ID Restrict...

Page 170: ...receiving a call to display the caller s ISDN number The service operates even when the subscriber s line is busy Calling Line ID Restriction CLIR allows a subscriber making a call to choose whether...

Page 171: ...ith all outgoing calls 3 Enter the number to be sent Choose CLI to display an entry window Type the number up to 20 characters and press ENTER to save it The entry window closes To use a sub address C...

Page 172: ...options are 5 Finally set the CLI Numbering Type and Plan Choose CLI Type or CLI Planto display the options Highlight the option you require and press ENTER Tip The CLI Type and Plan work in the same...

Page 173: ...displayed in the Incoming Callscreen or theISDN call information screen 6 but is followed by an R Note When the test call is to be routed through two non compliant networks you can setPresent to Inte...

Page 174: ...e number should be displayed in the ISDN call information screen 6 for the channel of the incoming call Tip If you are making a call to a remote unit rather than a self call the remote unit must have...

Page 175: ...lect UUI auroraSonata displays an entry window 2 Enter a string of characters up to 20 Tip For instructions see Entering alphanumeric informationin Chapter 2 section 3 3 Press the OK function key to s...

Page 176: ...o users outside their group but they cannot normally receive calls from the outside To check the operation of CUGs on a link you can assign a CUG number to your auroraSonata then try to make calls to...

Page 177: ...G number for auroraSonata 1 Select CUG Index to display an entry window 2 Type a CUG number this should be supplied by the network provider and press ENTER The number must be between 0 and 99 0 and 32...

Page 178: ...trieve ThreePartyCall Explicit Call Transfer Malicious Call Identification Call Suspend Resume Terminal Portability With a connected call you can also use the Keypad facility to test supplementary ser...

Page 179: ...g is available the following screen appears Note This screen is always displayed on channel B1 If you are displaying another channel in the foreground when the incoming call is received auroraSonata d...

Page 180: ...when auroraSonata is emulating a TE 1 For an existing connected Speech call display the Supp Servicesmenu Placing the call on hold 1 From the Supp Services menu selectHold Making a new call on the B c...

Page 181: ...Held screen for the original call Retrieving the original call 1 From the Call Held screen select Retrieve Three Party Calls This service allows the subscriber to participate in and control a three w...

Page 182: ...ed to each other Note The way in which the ECT link is set up is determined by the ECT setting in the ISDN Setup menu For details see Selecting the linkage type for ECT in Chapter 3 section 1 You can...

Page 183: ...or an existing connected call display the Supp Services menu 2 SelectMCID auroraSonata displays a pop up message to show that the MCID request has been accepted Note You can also test MCID after the c...

Page 184: ...call 1 From the Supp Services menu for the connected call chooseSuspend 2 You need to assign an ID to the call to allow the network to identify it To do this Select Call ID to display an entry window...

Page 185: ...connection has initiated call clearing but the call is not fully cleared you can test the Malicious Call Identification MCID supplementary service This allows the subscriber to request that the sourc...

Page 186: ...AOC E You can use auroraSonata to check the availability and operation of call charging for example when addressing a dispute between a service provider and an equipment manufacturer CorNet T When Cor...

Page 187: ...ust be long enough for charging units to be received the actual length required depends on the network 2 Press 6 to display the ISDN call informationscreen and check that the Chargevalue is displayed...

Page 188: ...call 1 Press the AOC function key auroraSonata sends a single charge unit to the caller ISDN sub addressing This service allows the subscriber to connect to terminals on a PMP link which have the same...

Page 189: ...its applications see Introducing the ISDN Test Suite in section 1 You can use auroraSonata s ISDN Test Suite to check Calling Line ID Presentation Restriction Connected Line ID Presentation Restrictio...

Page 190: ...TER to tick or clear the appropriate boxes Note The Teleservice component checks ISDN teleservices For details see section 4 of this chapter 4 Set up the test details for each service to be checked as...

Page 191: ...w CPN here it is used for all components of all one button tests For the CLIP R test you need to enter a CLI which mayalsohaveasub address TheISDN sub address test requires a sub address If you do not...

Page 192: ...ection 1 The example screen below shows a typical set of results Testing services using the Keypad The Keypad facility is an alternative way to test supplementary services You use it to send coded req...

Page 193: ...5 Connected window i e during a call 2 Select String to display an entry window 3 Enter the code you wish to use up to 20 characters This can include and symbols 4 Press ENTER to save the string and...

Page 194: ...auroraSonata Hand Held ISDN Tester User Guide 4 84 427869...

Page 195: ...a 5 2 Setting up auroraSonata for monitoring 5 3 Choosing the monitor output destination 5 5 Setting the Idle Code 5 6 Setting up a monitor session 5 7 During protocol monitoring 5 11 Ending a monitor...

Page 196: ...receive information not to transmit When the appropriate interface modules are fitted auroraSonata can monitor on the following types of link PrimaryRate Basic Rate links at the S interface Basic Rat...

Page 197: ...ry Rate link you may need a T piece depending on the cable and switch you are using Setting up auroraSonata for monitoring Before you begin monitoring you need to determine whether you want auroraSona...

Page 198: ...ode later in this chapter Choosing an automatic or manual start You can set up auroraSonata in advance to begin monitoring at a specific time or choose to begin the session manually Tip The automatic...

Page 199: ...to set the start time 1 From the General Setup menu select Start Time to display an entry window 2 Enter the start time in 24 hour format and press ENTER Choosing the monitor output destination Befor...

Page 200: ...1 From the ISDN Setup menu select Idle Codes to show a list of the available fixed and editable codes Up to eight Idle Codes are available The first four on the list are pre set to the most commonly...

Page 201: ...ing an Interface in Chapter 2 section 3 Note The LED on an interface module shows green in Monitor mode when the interface is selected 3 From the top level menu select Monitor as the operating mode au...

Page 202: ...ot of the screen allows you to change the direction 1 In the Monitor channel display press the function key which shows Aud A Aud B A B both directions or Off to indicate the next availableoption Choo...

Page 203: ...nformation over the channel 2 To monitor protocol activity on a channel press ENTER Understanding the channel activity display The channel display for monitoring shows activity on all channels in the...

Page 204: ...ppens when the memory is full in Chapter 3 section 1 once the memory is full you cannot save a new session until you delete an existing one If you do not assign a name auroraSonata automatically names...

Page 205: ...section of decode then return to the real time display For full instructions and detailed information on the simple decode see Chapter 7 section 1 Checking the status of Layer 1 Throughout the monitor...

Page 206: ...configuration of the serial port the general setup of auroraSonata e g the real time clock setting language of operation etc the automatic start time for monitoring 1 In the main Monitor channel disp...

Page 207: ...nitor session You can view the simple decode of a session which is stored in auroraSonata s memory To display a list of stored sessions 1 In the Monitor display screen press the Review function key au...

Page 208: ...auroraSonata Hand Held ISDN Tester User Guide 5 14 427869...

Page 209: ...Advanced Features System Maintenance Section 1 Chapter 6 Advanced Features System Maintenance Contents Section 1 Advanced Testing Features 6 2 Section 2 Testing in Unattended Mode 6 14 Section 3 Syste...

Page 210: ...ttended Mode Section 3 SystemMaintenance Advanced Testing Features This section describes several ways in which you can set up auroraSonata to make testing quicker and easier It is aimed at users who...

Page 211: ...there are already numbers in the directory the screen displays the last number that was stored Otherwise an empty slot is displayed Calling a speed dial number 1 Display the items in the speed dial di...

Page 212: ...b address highlight SUB and repeat the process up to 19 digits Highlight Name and enter a name up to 8 characters to identify the number Press the OK function key to save the name 3 To call the number...

Page 213: ...the number you wish to erase or replace 2 Select CPN to display the CPN entry window 3 Press the Clear function key to erase the CPN Enter a new one if required Press ENTER to save the changes and re...

Page 214: ...t is also known as the EAZ Using call screening Examples The following examples illustrate occasions when you might use the two main types of screening Example 1 Screening for Called Party Numbers Whe...

Page 215: ...e calls are coming from How to set up call screening To begin setting up screening 1 From the top level menu choose Setup 2 SelectScreening auroraSonata displays a window from which you select the typ...

Page 216: ...of the subscriber number which identifies the terminal from Screening Mode Options ETSI CorNet T TN1R6 T TN1R6 T TN1R6 N TN1R6 N CorNet N 1TR6 1TR6 auroraSonata displays a window in which you set up t...

Page 217: ...protocol 1 Select one of the following depending on the screening type and protocol you are using CLI for CLI screening CPN1 2 or3 for MSN screening CorNet N CorNet T and ETSI CPN for CPN screening TN...

Page 218: ...us sign at the start or end of the number to denote any digit any series of digits or no digits A question mark anywhere in the number denotes any single digit For example 123 The number must be an ex...

Page 219: ...utton test Tip For an introduction to the ISDN Test Suite and its applications see Chapter 4 section 1 Choosing the component tests To select the set of components for your custom test 1 From the ISDN...

Page 220: ...st results During the User Definedone button test auroraSonata displays results for the component currently in progress In the results screen for the test you can use the Next and Prev function keys t...

Page 221: ...sing a Speech call remember that the Codec audio coder decoder is only connected to the currently displayed B channel Although you are calling the line to which your auroraSonata is connected you are...

Page 222: ...orm BERT or check audio quality For an incoming speech call auroraSonata sends DTMF tones down the line before applying the loop Notes To allow auroraSonata to run in unattended mode its automatic pow...

Page 223: ...annot select a channel while the unit is unattended Enabling disabling automatic call back You can set up an unattended auroraSonata so that when it receives an incoming call which is then disconnecte...

Page 224: ...mation about the current or most recent call on a channel 1 Highlight the channel and pressENTER For details of this display see Chapter 3 section 2 Clearing a connection To clear a connection between...

Page 225: ...you through the installation process Warning System maintenance Only perform the operations described in this section if you have been specifically authorised by Agilent Technologies to do so Otherwis...

Page 226: ...Sonata on 2 Connect the external power supply 3 Start up the Trendsend application on the PC Performing the download 1 Go to the Send menu and choose Sonata to displayaSonataDownloaddialoguebox 2 Sele...

Page 227: ...Copying system settings between units You can load all settings defined using the Setup menus from an auroraSonata to a PC and then from the PC to other units This allows you to upgrade the software i...

Page 228: ...a pop up window asks you to confirm that you wish to overwrite this information When you confirm the transfer begins and the PC displays a progressbar 5 When the transfer is complete exit Trendsend Do...

Page 229: ...enance Section 3 4 Click theSetup Parameter checkbox and chooseOK During the download the PC displays a bar graph to indicate progress 5 Exit Trendsend Tip You can check the configuration of an aurora...

Page 230: ...auroraSonata Hand Held ISDN Tester User Guide 6 22 427869...

Page 231: ...turing Analysing Protocol Information Section 1 Chapter 7 Capturing Analysing Protocol Information Contents Section 1 Decoding in Real Time 7 3 Section 2 Capturing to Memory 7 7 Section 3 Analysing th...

Page 232: ...divided into the following sections Section 1 Decoding in Real Time Section 2 CapturingtoMemory Section 3 Analysing the Decode Display About the protocol decode Protocol information is transmitted in...

Page 233: ...line monitoring sessions by sending the protocol information via the serial port to a PC or printer where auroraSonata can produce a more detailed decode Viewing the simple real time decode During ca...

Page 234: ...When you think you see the information on the real time decode you can pause the display and make sure it really is the relevant information without having to stop recording and risk missing the even...

Page 235: ...est call in Simulate mode you can save the contents of the real time buffer in auroraSonata s memory for future reference For instructions see Saving the contents of the real time buffer in section 2...

Page 236: ...S e h t t a t u p t u O l o c o t o r P e d o c e D 3 r e y a L d n a 2 r e y a L 1 r e y a L f o e d o c e d l a i t r a p A D e h t f o p m u d l a m i c e d a x e h l l u f h t i w g n i l l a n g...

Page 237: ...a stored session to the serial port when the equipment you require is available For example you can wait until you have access to a PC and then send the saved protocol information to a file for analys...

Page 238: ...on 2 Enter a name up to eight characters You cannot use the name of an existing stored session Tip If you need instructions on how to use this screen see Entering alphanumeric information in Chapter 2...

Page 239: ...emory Mode setting in theComms Tracer menu seeChoosingwhat happens when the memory is full in Chapter 3 section 1 Ending the capture session You can stop capturing at any time after the call has clear...

Page 240: ...the same call Note You can view the decode in more detail using the extended decode display for information see Section 3 of this chapter Sending the capture to a printer or PC You can send a stored...

Page 241: ...m l e n n a h c D e h t f o p m u d l a m i c e d a x e h l l u f e m a r f d n a p m a t s e m i t r o t a c i d n i e v i e c e R t i m s n a r T h t i w e c n e r e f e r t r e p x E l a m i c e d...

Page 242: ...contents of the real time buffer auroraSonata holds the most recent 8 kilobytes of protocol information in a part of its memory called the real time buffer When you are capturing information for a tes...

Page 243: ...ssign a name to identify the saved information 3 Enter a name up to eight characters Tip If you need instructions on how to use this screen see Entering alphanumeric information in Chapter 2 section 3...

Page 244: ...simulation test calls and line monitoring sessions You can also display a simple on screen decode for information which has been saved to memory or for the real time buffer contents The example screen...

Page 245: ...essages For a Primary Rate link instead of Layer 1 Info states the display shows Layer 1 alarms as they occur Extended Decode The extended decode display allows you to look at a message that is displa...

Page 246: ...pe Information Supervisory or Unnumbered N S N R value Number Sender Receiver Polled Final P F bit Command Response C R bit Layer 3 Protocol Discriminator and Call Reference values Layer 3 Codeset Shi...

Page 247: ...Elements partially decoded Bearer Capability Cause Connected Number Connected Subaddress Channel ID Progress Indicator Network Specific Facility Signal Service Profile ID End Point ID Calling Number...

Page 248: ...ture Activation Feature Indication Information Rate End to End Transit Delay Transit Delay Selection Packet Binary Parameters Packet Window Size Packet Size Throughput Class No information from other...

Page 249: ...are viewing a frozen decode window to return the Decode window to real time 1 Press the RTime function key The detailed decode auroraSonata can send a more detailed decode of the protocol information...

Page 250: ...de of the Layer 3 part of the message if there is one Finally there is a hexadecimal print of the entire message For a Basic Rate link Layer 1 Info State information is provided by the S interface for...

Page 251: ...luding source of trace TE or NT and protocol in use Decode Output Explanation TREND aurora Sonata ISDN Software V2 3 09 41 35 Nov 6 1998 Interfaces S DATE 14 01 99 TIME 09 42 09 ISDN SETUP PARAMETERS...

Page 252: ...of 0 Polling Bit was 1 Frame contained hex 00 01 7F Received reply SABME UA Decode Output Explanation T N 09 42 31 811 L1 Info 2 T N 09 42 31 812 L1 Info 3 T N 09 42 31 813 L1 Info 4 TX 09 42 32 016...

Page 253: ...Reference Originating 1 SETUP Decode Output Explanation TX 09 42 37 588 Frame 2 L2 Info Sapi 0 Tei 0 Pf 0 Nr 0 Ns 0 L3 SETUP Pd 8 Cr O 1 I04 Bearer cap Bcap Speech A Law I18 Channel ident Channel B1 I...

Page 254: ...CEEDING ALERTING ith an RR Replied w Decode Output Explanation RX 09 42 37 788 Frame 2 L2 Info Sapi 0 Tei 0 Pf 0 Nr 1 Ns 0 L3 CALL PROC Pd 8 Cr D 1 I18 Channel ident Channel B1 02 01 00 02 08 01 81 02...

Page 255: ...tion TX 09 42 37 898 Frame 4 L2 RR Sapi 0 Tei 0 Pf 0 Nr 2 02 01 01 04 RX 09 42 44 773 Frame 4 L2 Info Sapi 0 Tei 0 Pf 0 Nr 1 Ns 2 L3 CONNECT Pd 8 Cr D 1 I4C Connected numb Numb 123452 02 01 04 02 08 0...

Page 256: ...SCONNECT Sent in reply RR Decode Output Explanation RX 09 42 45 177 Frame 5 L2 RR Sapi 0 Tei 0 Pf 0 Nr 2 00 01 01 04 RX 09 42 50 325 Frame 6 L2 Info Sapi 0 Tei 0 Pf 0 Nr 2 Ns 3 L3 DISCONNECT Pd 8 Cr D...

Page 257: ...t Explanation TX 09 42 50 593 Frame 8 L2 Info Sapi 0 Tei 0 Pf 0 Nr 4 Ns 2 L3 RELEASE Pd 8 Cr O 1 I08 Cause Cause Code 16 00 01 04 08 08 01 01 4D 08 02 80 90 RX 09 42 50 695 Frame 7 L2 Info Sapi 0 Tei...

Page 258: ...layers are labelled as follows MMI User interface CC Call control CCP X 25 call control L3 Layer3 P3 Packetlayer L2 Layer2 L2D HDLC controller L1 Layer1 ME Managemententity The example below shows th...

Page 259: ...on 3 MMI The rest of the line is a breakdown of the contents of the information fields sent with data requests or indication primitives A timestamp shows the time the message was sent received to the...

Page 260: ...auroraSonata Hand Held ISDN Tester User Guide 7 30 427869...

Page 261: ...Issue 2 07 00 8 1 Power Sources Chapter 8 Power Sources Contents Using external mains power 8 2 Using battery power 8 3...

Page 262: ...ied with the unit When you connect the adaptor charger this automatically starts up a battery charging cycle see Recharging the battery pack later in this chapter 1 Plug auroraSonata s power supply un...

Page 263: ...the interfaces you are using the age of the battery surrounding temperature and the task you areperforming Under normal conditions with one BRI S interface in use the medium capacity battery pack las...

Page 264: ...teries auroraSonata can be set to switch itself off automatically when powered from batteries if no calls are in progress and no keys have been pressed after a certain length of time You can choose th...

Page 265: ...patibility The battery is initially charged at a high current fast charging This means it will be almost fully charged in 1 1 hours medium capacity pack or 2 3 hours higher capacity pack During fast c...

Page 266: ...k It may be useful to carry spare battery packs with you in case the battery runs out at a site where no mains power is available Keep them in the carrying case until needed While you are replacing th...

Page 267: ...ck slightly out of its casing with the connector still attached Unplug the connector by pulling the connector itself Do not pull on the wires To fit a new battery 1 Place the new battery pack in the u...

Page 268: ...packs If your auroraSonata is to be left unused for more than three months you should remove the battery and store it separately to avoid chemical changes caused by the discharge of the internal circu...

Page 269: ...Issue 2 07 00 9 1 Technical Purchasing Notes Section 1 Chapter 9 Technical Purchasing Notes Contents Section 1 Technical Information 9 2 Section 2 Notes for Purchasers 9 9...

Page 270: ...al information related to auroraSonata If you require more details contact your local Agilent Technologies representative auroraSonata specifications Protocols Currently supports the ETSI 1TR6 CorNet...

Page 271: ...2 characters Keypad 27 keys plus shifted functions Indicators 6 LEDs on front panel 3 dual colour 2 red only 1 green only 1 dual colour LED adjacent to each interface connector Audio Integral telephon...

Page 272: ...r supplies Batteries NiMH rechargeable pack two possible sizes Mediumcapacity 1 85AHorgreater Highercapacity 3 5AHorgreater Low voltage is indicated at nominally 16 cell capacity External power supply...

Page 273: ...Connectors S interface 8 pin RJ45 Pinout pin 1 optional battery status pin 2 optional battery status pin 3 Tx TE mode pin 4 Rx TE mode pin 5 Rx TE mode pin 6 Tx TE mode pin 7 optional power pin 8 opti...

Page 274: ...rimary Rate ISDN 8 pin RJ45 Pinout pin 1 Rx TE mode pin 2 Rx TE mode pin 3 no connection pin 4 Tx TE mode pin 5 Tx TE mode pin 6 no connection pin 7 no connection pin 8 no connection The BRI S interfa...

Page 275: ...d with 9 pin D type socket for direct communication with a PC serial port NT mode clock Accurate to 3 ppm over operating temperature range Regulations and approvals EC Directives auroraSonata complies...

Page 276: ...047p r default 511 bit pattern conforms to CCITT Rec V52 2047 bit pattern conforms to CCITT Rec 0151 152 Error performance is gauged according to G 821 objectives Product safety auroraSonata complies...

Page 277: ...wer because you only need to purchase the interfaces that you actually need if your requirements change you can arrange for additional interfaces to be fitted the tester can easily accommodate future...

Page 278: ...tasks are as follows s n o i t a r u g i f n o C e l u d o M k s a T d e r i u q e R s e l u d o M S e h t n o n o i t a l u m i S e c a f r e t n i e l u d o m S e n O U e h t n o n o i t a l u m i S...

Page 279: ...adapter charger additional User Guide vehicle cigar lighter charger power lead additional cables as requested 9 25 pin connector adaptor for RS232 cable For details contact your Agilent Technologies r...

Page 280: ...auroraSonata Hand Held ISDN Tester User Guide 9 12 427869...

Page 281: ...Issue 2 07 00 A1 1 Appendix 1 Menus Appendix 1 auroraSonata Menus...

Page 282: ...ined Teleservice User Defined Outgoing ISDN Call Call Forwarding Channel Outgoing Channel Save Real Time Available Services Supp services Supp Services Restart ISDN Test Suite Supp Services ISDN Test...

Page 283: ...e Encoding Idle Codes Dial Options Stop Bits BERT ECT X ON X OFF Setup ISDN Comms Tracer Layer 2 Screening Mode CLI COL Pattern Message CPN Type UUI Threshold Answer AOC SPC Call Duration Type CPN Pla...

Page 284: ...auroraSonata Hand Held ISDN Tester User Guide A1 4 427869 Setup General...

Page 285: ...Issue 2 07 00 A2 1 Appendix 2 Disconnection Clearing Error Codes Appendix 2 Disconnection Clearing Error Codes...

Page 286: ...gned allocated 2 No route to specified transit network The equipment has received a request to route the call through a network which it does not recognise either the network does not exist or it does...

Page 287: ...he called number is no longer assigned 26 Non selected user clearing The called user has not been awarded the incoming call 27 Destination out of order The requested destination cannot be reached beca...

Page 288: ...b address etc to the remote user as requested 44 Requested circuit channel not available The requested circuit or channel cannot be provided by the other side of the interface 47 Resources unavailable...

Page 289: ...sed to report that a service or option has not been implemented only when no other cause in the service or option not implemented class applies 81 Invalid call reference value The equipment has receiv...

Page 290: ...g and therefore cannot process the message 97 Message type non existent or not implemented The equipment has received a message of a type it does not recognise either because the message is undefined...

Page 291: ...in the protocol error class applies 127 Interworking unspecified There has been interworking with a network which does not provide cause codes for its actions Therefore the precise cause for clearing...

Page 292: ...as ETSI except the codes listed below 19 Service element not registered 24 Number not assigned 49 SUU not transmitted 59 Call rejected 60 Rejected terminal diversion 62 No right to service 92 Erroneo...

Page 293: ...external codes 2 Message not implemented 4 Connection type not implemented 5 Channel type not implemented 6 Identified channel does not exist 9 Overlap sending not allowed 19 Invalid facility paramete...

Page 294: ...be achieved 88 Network failure 104 Faulty state 105 Busy 2 Internal codes The following codes are generated by auroraSonata itself and are used for diagnostic purposes 128 Call Control received an inv...

Page 295: ...atory missing Information Element 147 Layer 3 timer T318 has expired 148 Layer 3 timer T319 has expired 149 Normalcallclearing 150 Incoming message had invalid Information Element contents 151 Request...

Page 296: ...auroraSonata Hand Held ISDN Tester User Guide A2 12 427869...

Page 297: ...Issue 2 07 00 A3 1 Appendix 3 Introduction to ISDN Appendix 3 Introduction to ISDN...

Page 298: ...mmon set of interface standards and allows all users to send and receive information over the network ISDN offers end to end caller to receiver digital connectivity between Terminal Equipment TEs via...

Page 299: ...SDN Equipment on the ISDN Each piece of equipment functional group on the ISDN has a label related to the function it performs The labels are ISDN interfaces An interface reference point is said to ex...

Page 300: ...n analogue waveform is sampled at regular intervals and a measurement is taken of the sample point at various levels The number obtained is digital The sampling rate is 8kHz and the sample value is tr...

Page 301: ...ages which can then be transmitted down the telephone lines Basic Rate and Primary Rate ISDN Equipment on an ISDN network may be connected either through a Basic Rate interface or a Primary Rate inter...

Page 302: ...he S bus is terminated at the NT1 and the distant end on both the transmit and receive pairs Connection to the bus is usually made via 8 pin plugs which conform to ISO Specification 8877 Over this bus...

Page 303: ...ly as 30B D In the U S the primary rate standard comprises of 23 B channels and one D channel known collectively as 23B D B Channels The B channels contain user data at rates of up to 64kbps D Channel...

Page 304: ...sfer of bits Layer 2 Data link layer provides link level control Error detection and correction are handled by assembling the bits into frames All Layer 2 formats derive from a standard known as High...

Page 305: ...s attempt to make a call simultaneously a procedure known as D Channel Contention prevents a collision Activation and deactivation TEs and NTs can be deactivated to reduce power consumption then react...

Page 306: ...3 call control information by organising the Layer 3 bits into error checked frames Layer 2 procedures based on HDLC are known as Link Access Procedure for a D Channel LAPD A Layer 2 frame is structu...

Page 307: ...cribes the intention of the message CONNECT SETUP etc InformationElements A number of these may be included Their number and content depend upon the message type Protocols A protocol is an agreed set...

Page 308: ...re are two implementations CorNet N operates between adjacent PBX links CorNet T operates between a PBX and a piece of ISDN Terminal Equipment TE CorNet N and CorNet T are based on the ETSI protocol W...

Page 309: ...Issue 2 07 00 A4 1 Appendix 4 Glossary Abbreviations Appendix 4 Glossary Abbreviations...

Page 310: ...hannel capable of transmitting data but not timing AT T A custom ISDN protocol used by AT T auroraExpert A protocol analysis package that can be used in conjunction with the aurora family of ISDN test...

Page 311: ...ssociated with it Circuit A link connecting two or more nodes Circuit A type of network where a circuit is established and switching maintained between the communicating parties for the duration of th...

Page 312: ...y Number The number dialled by the calling party Crosstalk Interference occurring when data is transmitted on different mediums which are adjacent to each other CUG Closed User Group D Bit Delivery co...

Page 313: ...ng The process of coding information into a form suitable for transmission EndtoEnd Signalling method in which signals pass right through from end to end without processing within intermediate nodes E...

Page 314: ...bly of electronic elements in a single structure ISO TheInternationalStandardisationOrganisation A voluntary activity of the national standardisation organisations of each member country The ISO works...

Page 315: ...g A mode of operation where an aurora tester is set to receive information about current activity from ISDN equipment i e an NT TE or another aurora tester The tester is only used to receive informati...

Page 316: ...of a telephone circuit OSI 7 layer A model defined by the ISO in which ISDN functions Model are separated into 7 clearly defined layers Overlap A type of dialling where the digits are sent one at a ti...

Page 317: ...The lowest layer of the OSI model which is responsible for the electrical mechanical and interface aspects of transmitted data Also known as Layer 1 PMP Point to Multipoint Pointto In Point to Multipo...

Page 318: ...h through a network is selected RTC Real Time Clock A calendar clock that is powered from its own battery and which continues to run even when the tester is switched off or the power is removed Rx Rec...

Page 319: ...t between non ISDN and ISDN references TE Terminal Equipment Equipment providing the functions which allow the user to operate the access protocols TE1 Terminal Equipment Type 1 A terminal with an ISD...

Page 320: ...le in which a pair of wires are twisted around each other to minimise noise from other circuits Tx Transmit U Interface An ISDN reference point between NT1 and the network The first reference point at...

Page 321: ...Issue 2 07 00 Index 1 Index Index...

Page 322: ...maintenance 8 3 8 8 Baud Rate setting 3 34 Bearer services 4 44 BERT 4 23 4 36 changing settings while connected 4 31 choosing how to connect incoming data calls 4 27 choosing the test pattern 4 24 D...

Page 323: ...service 3 47 CPN CLI numbering plan type 3 26 dialling mode 3 49 entering the CPN 3 50 summary of setup process 3 46 3 47 using an SPC 3 25 Call Waiting 4 69 Called Party Number See CPN Calling Line...

Page 324: ...etting the numbering plan type 3 26 CLIP CLIR 4 60 4 63 Closed User Groups CUG 4 66 4 68 Codec audio coder decoder 3 48 switching between speech calls 3 59 COLP COLR 4 63 4 64 Connecting to the ISDN f...

Page 325: ...E ECT See Explicit Call Transfer Emulation mode examples 3 11 identifying the protocol master slave 3 8 LT emulation 4 6 NT emulation 4 5 setting the device to emulate 3 7 setting the ISDN link type...

Page 326: ...isplaying 2 16 for a function key 2 14 Hot Keys changing settings for a Hot Key 3 14 configuring auroraSonata using 3 12 3 15 displaying current list 3 12 preconfigured 3 13 selecting 3 14 I Idle Code...

Page 327: ...function keys 1 11 6 18 key descriptions 1 11 location 1 11 number keys 1 12 On Off 1 11 Shift key 1 12 Keypad facility 4 82 4 83 L Language setting 3 31 Layer 1 A3 10 activation 3 17 4 16 activation...

Page 328: ...est BERT 4 33 Line Termination See LT Line Type setting 3 10 Loops introduction 3 58 looping back a test call 3 58 unframed loops PRI links 4 18 4 23 LT emulation 4 6 M Malicious Call ID 4 73 4 75 Mas...

Page 329: ...5 11 choosing the receive direction for audio 5 8 choosng the receive direction for channel activity 5 8 Idle Codes 5 6 5 7 on screen protocol decode 7 3 reviewing a stored monitor session 5 13 saving...

Page 330: ...l checks 4 15 Point to multipoint links 3 10 Point to point links 3 10 Power supply batteries about 8 3 8 8 battery power indicator 1 14 checking battery voltage 8 3 discharging 8 4 fitting a battery...

Page 331: ...tional variants 3 5 3 31 selecting 3 5 3 6 Purchasers notes 9 9 9 11 R RAI Remote Alarm Indication returning RAI signals on a PRI link 3 23 Real time buffer saving the current contents 7 12 7 13 viewi...

Page 332: ...to a PC printer 2 7 connector 1 11 outputting BERT results 4 28 parity configuration 3 35 selecting the output 3 32 5 5 sending stop bits 3 36 using Xon Xoff flow control 3 36 Services bearer services...

Page 333: ...8 4 79 Supplementary Services 4 82 Supplementary services 4 54 4 83 Advice of Charge 4 76 4 78 Call Deflection 4 58 4 59 Call Forwarding 4 55 4 58 Call Hold Retrieve 4 70 4 71 Call Waiting 4 69 CLIP C...

Page 334: ...n the S bus 4 4 Termination setting emulation 3 7 Test methods introduction 1 7 Simulation 4 2 Three party calls 4 71 4 72 Threshold setting BERT 4 25 Time changing 3 29 TN1R6 N and TN1R6 T A3 12 Top...

Page 335: ...oice encoding 3 24 Voltage checking voltage on the line 4 15 4 16 Volume adjusting 2 17 W Welcome screen 2 8 Windows option windows 2 12 switching between 1 13 2 15 X X 25 checking TEI availability 4...

Page 336: ...auroraSonata Hand Held ISDN Tester User Guide Index 16 427869...

Reviews: